[Cloud Build private pools](https://docs.cloud.google.com/build/docs/private-pools/private-pools-overview.md.txt)
let you deploy your applications to
[private Google Kubernetes Engine (GKE) clusters](https://docs.cloud.google.com/kubernetes-engine/docs/how-to/private-clusters#private_cp)
with Cloud Build. In this tutorial, you connect a private pool to a
private GKE cluster's IP address through a Cloud VPN
connection to route traffic across peered [Virtual Private Cloud
(VPC)](https://docs.cloud.google.com/vpc/docs) networks. Alternatively, to access a private
GKE cluster without configuring Cloud VPN, you can use a
[DNS-based endpoint](https://docs.cloud.google.com/deploy/docs/gke-targets.md.txt#dns-based-endpoint).
Designed for network administrators, this approach applies whenever private pool
workers must communicate with services in a different peered
VPC network, such as Cloud SQL databases, Memorystore
instances, or Compute Engine instances. To complete these steps, you should be
familiar with Google Kubernetes Engine, Cloud Build, the `gcloud` command,
VPC Network Peering, and Cloud VPN.
## Architecture overview
When you create a private GKE cluster with no client
access to the public endpoint, clients can only access the
[GKE cluster control plane](https://docs.cloud.google.com/kubernetes-engine/docs/concepts/cluster-architecture.md.txt#control_plane)
using its
[private IP address](https://docs.cloud.google.com/kubernetes-engine/docs/concepts/private-cluster-concept#endpoints_in_private_clusters).
Clients like `kubectl` can communicate with the control plane only
if they run on an instance that has access to the VPC network
and is in an
[authorized network](https://docs.cloud.google.com/kubernetes-engine/docs/how-to/authorized-networks#benefits_with_private_clusters).
If you want to use
[Cloud Build to deploy](https://docs.cloud.google.com/build/docs/deploying-builds/deploy-gke.md.txt)
your application on this private GKE cluster, then you
need to use Cloud Build private pools to access the
GKE clusters. Private pools are a set of worker instances
that run in a Google Cloud project owned by Google, and are peered to your
VPC network using a VPC Network Peering connection. In this
setup, the worker instances are allowed to communicate with the private IP
address of the GKE cluster control plane.
However, the GKE cluster control plane also runs in a
Google-owned project and connects to your VPC network using
[Private Service Connect](https://docs.cloud.google.com/vpc/docs/private-service-connect.md.txt) (PSC).
[VPC Network Peering doesn't support transitive peering](https://docs.cloud.google.com/vpc/docs/vpc-peering.md.txt#restrictions),
so packets can't be routed directly between the Cloud Build
private pool and the GKE cluster control plane.
To enable Cloud Build worker instances to access the
GKE cluster control plane, you can peer the private pool
and use PSC to connect the GKE cluster control plane with two
VPC networks that you own and then connect these two
VPC networks using Cloud VPN. This peering and connection
allows each side of the VPC tunnel to advertise the
private pool and GKE cluster
control plane networks, thus completing the route.
The following architectural diagram shows the resources that are used in
this tutorial:
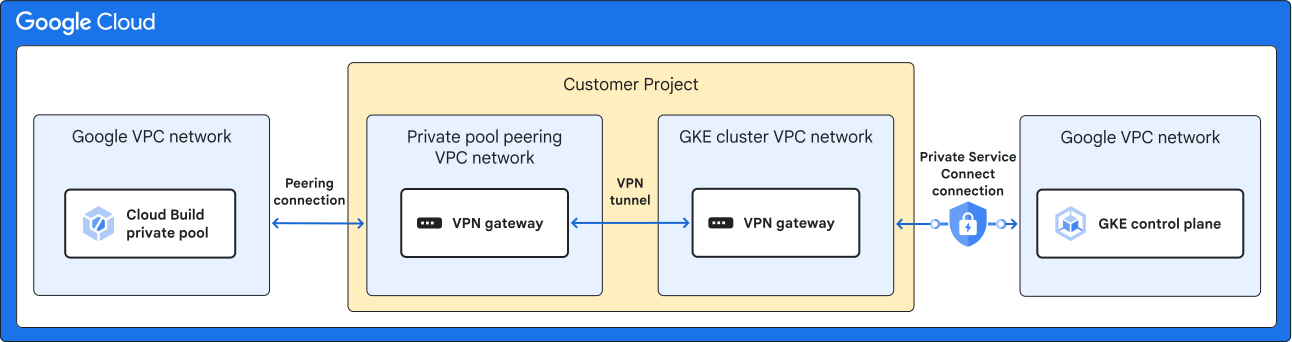
We recommend creating all resources used in this tutorial in the same
[Google Cloud region](https://docs.cloud.google.com/build/docs/locations.md.txt) for low latency. The VPN tunnel can traverse two different
regions if this inter-region communication is needed for your own
implementation. The two VPC networks that you own can
also belong to different projects.
## Objectives
- Create a private GKE cluster.
- Set up a Cloud Build private pool.
- Create a [HA VPN](https://docs.cloud.google.com/network-connectivity/docs/vpn/concepts/overview.md.txt#ha-vpn) connection between two VPC networks.
- Enable routing of packets across two VPC Network Peerings and a VPC connection.
## Costs
In this document, you use the following billable components of Google Cloud:
- [Google Kubernetes Engine](https://cloud.google.com/kubernetes-engine/pricing)
- [Cloud Build](https://cloud.google.com/build/pricing)
- [Cloud VPN](https://docs.cloud.google.com/network-connectivity/docs/vpn/pricing)
To generate a cost estimate based on your projected usage,
use the [pricing calculator](https://docs.cloud.google.com/products/calculator).
New Google Cloud users might be eligible for a [free trial](https://docs.cloud.google.com/free).
When you finish the tasks that are described in this document, you can avoid
continued billing by deleting the resources that you created. For more information, see
[Clean up](https://docs.cloud.google.com/build/docs/private-pools/accessing-private-gke-clusters-with-cloud-build-private-pools.md.txt#clean-up).
## Before you begin
1. In the Google Cloud console, on the project selector page,
select or create a Google Cloud project.
**Roles required to select or create a project**
- **Select a project**: Selecting a project doesn't require a specific IAM role---you can select any project that you've been granted a role on.
- **Create a project** : To create a project, you need the Project Creator role (`roles/resourcemanager.projectCreator`), which contains the `resourcemanager.projects.create` permission. [Learn how to grant
roles](https://docs.cloud.google.com/iam/docs/granting-changing-revoking-access).
> [!NOTE]
> **Note**: If you don't plan to keep the resources that you create in this procedure, create a project instead of selecting an existing project. After you finish these steps, you can delete the project, removing all resources associated with the project.
[Go to project selector](https://console.cloud.google.com/projectselector2/home/dashboard)
2.
[Verify that billing is enabled for your Google Cloud project](https://docs.cloud.google.com/billing/docs/how-to/verify-billing-enabled.md.txt#confirm_billing_is_enabled_on_a_project).
3.
Enable the Cloud Build, Google Kubernetes Engine, and Service Networking APIs, if any are not already enabled.
**Roles required to enable APIs**
To enable APIs, you need the `serviceusage.services.enable` permission. If you
created the project, then you likely already have this permission through the
Owner role (`roles/owner`). Otherwise, you can get this permission through the
Service Usage Admin role (`roles/serviceusage.serviceUsageAdmin`).
[Learn how to grant roles](https://docs.cloud.google.com/iam/docs/granting-changing-revoking-access.md.txt).
[Enable the APIs](https://console.cloud.google.com/apis/enableflow?apiid=cloudbuild.googleapis.com,container.googleapis.com,servicenetworking.googleapis.com&redirect=https://console.cloud.google.com)
4. In the Google Cloud console, activate Cloud Shell.
[Activate Cloud Shell](https://console.cloud.google.com/?cloudshell=true)
At the bottom of the Google Cloud console, a
[Cloud Shell](https://docs.cloud.google.com/shell/docs/how-cloud-shell-works.md.txt)
session starts and displays a command-line prompt. Cloud Shell is a shell environment
with the Google Cloud CLI
already installed and with values already set for
your current project. It can take a few seconds for the session to initialize.
## Creating two VPC networks in your own project
In this section, you create two VPC networks and a subnet for
the GKE cluster nodes.
1. In Cloud Shell, create the first VPC network
(called "Private pool peering VPC network" in the
preceding diagram). You don't need to create subnets in this network.
gcloud compute networks create PRIVATE_POOL_PEERING_VPC_NAME \
--subnet-mode=CUSTOM
Replace PRIVATE_POOL_PEERING_VPC_NAME with the name
of your VPC network to be peered with the
Cloud Build private pool network.
2. Create the second VPC network (called
"GKE cluster VPC network" in the
preceding diagram):
gcloud compute networks create GKE_CLUSTER_VPC_NAME \
--subnet-mode=CUSTOM
Replace GKE_CLUSTER_VPC_NAME with the name of your
VPC network to peer with the
GKE cluster control plane.
3. Create a subnet for the GKE cluster nodes:
gcloud compute networks subnets create GKE_SUBNET_NAME \
--network=GKE_CLUSTER_VPC_NAME \
--range=GKE_SUBNET_RANGE \
--region=REGION
Replace the following:
- GKE_SUBNET_NAME: the name of the subnetwork that is intended to host the GKE cluster nodes.
- GKE_CLUSTER_VPC_NAME: the name of your VPC network to connect with the GKE cluster control plane.
- GKE_SUBNET_RANGE: the IP address range of GKE_SUBNET_NAME. For this tutorial, you can use `10.244.252.0/22`.
- REGION: the Google Cloud region hosting the GKE cluster. For this tutorial, you can use `us-central1`.
You've now set up two VPC networks in your own project, and
they're ready to peer with other services.
## Creating a private GKE cluster
In this section, you create the private GKE cluster.
1. In Cloud Shell, create a GKE cluster with
no client access to the public endpoint of the control plane.
gcloud container clusters create PRIVATE_CLUSTER_NAME \
--region=REGION \
--enable-master-authorized-networks \
--network=GKE_CLUSTER_VPC_NAME \
--subnetwork=GKE_SUBNET_NAME \
--enable-private-nodes \
--enable-private-endpoint \
--enable-ip-alias \
--master-ipv4-cidr=CLUSTER_CONTROL_PLANE_CIDR
Replace the following:
- PRIVATE_CLUSTER_NAME: the name of the private GKE cluster.
- REGION: the region for the GKE cluster. In this tutorial, use `us-central1` for the region, the same region as the one you used for the VPC networks.
- GKE_CLUSTER_VPC_NAME: the name of your VPC network to connect to the GKE cluster control plane.
- GKE_SUBNET_RANGE: the IP address range of GKE_SUBNET_NAME. For this tutorial, you can use `10.244.252.0/22`.
- CLUSTER_CONTROL_PLANE_CIDR: the IP address
range of the GKE cluster control plane. It
must have a `/28` prefix. For this tutorial, use `172.16.0.32/28`.
> [!NOTE]
> **Note:** The flag "--enabled-private-endpoint" enables Cloud Build to connect internally to the GKE cluster. If you are creating the GKE cluster in Cloud Console, make sure to untick **Access control plane using its external IP address**.
You have now created a private GKE cluster.
### Configure VPC Network Peering for GKE 1.28 and below
If you are using this tutorial to configure an existing cluster running GKE
version 1.28 or earlier, your private VPC network uses
VPC Network Peering to connect to the GKE cluster. Complete the following
steps:
1. Retrieve the name of the GKE cluster's
VPC Network Peering. This VPC Network Peering was automatically
created when you created the GKE cluster.
export GKE_PEERING_NAME=$(gcloud container clusters describe PRIVATE_CLUSTER_NAME \
--region=REGION \
--format='value(privateClusterConfig.peeringName)')
Replace the following:
- PRIVATE_CLUSTER_NAME: the name of the private GKE cluster.
- REGION: the region for the GKE cluster. In this tutorial, use `us-central1` for the region, the same region as the one you used for the VPC networks.
2. Enable the export of custom routes in order to advertise the private pool
network to the GKE cluster control plane:
gcloud compute networks peerings update $GKE_PEERING_NAME \
--network=GKE_CLUSTER_VPC_NAME \
--export-custom-routes \
--no-export-subnet-routes-with-public-ip
Replace GKE_CLUSTER_VPC_NAME with the name of your
VPC network to connect with the GKE cluster
control plane.
For more information about custom routes, you can read
[Importing and exporting custom routes](https://docs.cloud.google.com/vpc/docs/vpc-peering.md.txt#importing-exporting-routes).
## Creating a Cloud Build private pool
In this section, you create the Cloud Build private pool.
1. In Cloud Shell, allocate a named IP address range in the
PRIVATE_POOL_PEERING_VPC_NAME VPC network for
the Cloud Build private pool:
gcloud compute addresses create RESERVED_RANGE_NAME \
--global \
--purpose=VPC_PEERING \
--addresses=PRIVATE_POOL_NETWORK \
--prefix-length=PRIVATE_POOL_PREFIX \
--network=PRIVATE_POOL_PEERING_VPC_NAME
Replace the following:
- RESERVED_RANGE_NAME: the name of the private IP address range that hosts the Cloud Build private pool.
- PRIVATE_POOL_NETWORK: the first IP address of RESERVED_RANGE_NAME. For this tutorial, you can use `192.168.0.0`.
- PRIVATE_POOL_PREFIX: the prefix of RESERVED_RANGE_NAME. Each private pool created will use `/24` from this range. For this tutorial, you can use `20`; this allows you to create up to sixteen pools.
- PRIVATE_POOL_PEERING_VPC_NAME: the name of your VPC network to be peered with the Cloud Build private pool network.
- IP range is `global` because when `--purpose` is `VPC_PEERING` the named IP address range must be `global`.
2. Create a private connection between the VPC network that
contains the Cloud Build private pool and
PRIVATE_POOL_PEERING_VPC_NAME:
gcloud services vpc-peerings connect \
--service=servicenetworking.googleapis.com \
--ranges=RESERVED_RANGE_NAME \
--network=PRIVATE_POOL_PEERING_VPC_NAME
Replace the following:
- RESERVED_RANGE_NAME: the name of the private IP address range that hosts the Cloud Build private pool.
- PRIVATE_POOL_PEERING_VPC_NAME: the name of your VPC network to be peered with the Cloud Build private pool network.
3. Enable the export of custom routes in order to advertise the
GKE cluster control plane network to the private pool:
gcloud compute networks peerings update servicenetworking-googleapis-com \
--network=PRIVATE_POOL_PEERING_VPC_NAME \
--export-custom-routes \
--no-export-subnet-routes-with-public-ip
Replace PRIVATE_POOL_PEERING_VPC_NAME with the name of
your VPC network to be peered with the Cloud Build
private pool network.
4. Create a Cloud Build private pool that is peered with
PRIVATE_POOL_PEERING_VPC_NAME:
gcloud builds worker-pools create PRIVATE_POOL_NAME \
--region=REGION \
--peered-network=projects/$GOOGLE_CLOUD_PROJECT/global/networks/PRIVATE_POOL_PEERING_VPC_NAME
Replace the following:
- PRIVATE_POOL_NAME: the name of the Cloud Build private pool.
- REGION: the region for the GKE cluster. In this tutorial, use `us-central1` for the region, the same region as the one you used for the VPC networks.
You have now created a Cloud Build private pool and peered it
with the VPC network in your own project.
## Creating a Cloud VPN connection between your two VPC networks
In your own project, you now have a VPC network peered with
the Cloud Build private pool and a second VPC
network peered with the private GKE cluster.
In this section, you create a Cloud VPN connection between the
two VPC networks in your project. This connection completes
the route and allows the Cloud Build private pools to
access the GKE cluster.
1. In Cloud Shell, create two HA VPN gateways that connect to each
other. To create these gateways, follow the instructions in
[Creating two fully configured HA VPN gateways that connect to each other](https://docs.cloud.google.com/network-connectivity/docs/vpn/how-to/creating-ha-vpn2.md.txt#creating-ha-gw-2-gw-and-tunnel).
The setup is complete after you have created the BGP sessions. While
following these instructions, use the following values:
- PRIVATE_POOL_PEERING_VPC_NAME for `NETWORK_1`
- GKE_CLUSTER_VPC_NAME for `NETWORK_2`
- REGION for `REGION_1` and `REGION_2`
2. Configure each of the four BGP sessions you created to advertise the
routes to the private pool VPC network and the
GKE cluster control plane VPC network:
gcloud compute routers update-bgp-peer ROUTER_NAME_1 \
--peer-name=PEER_NAME_GW1_IF0 \
--region=REGION \
--advertisement-mode=CUSTOM \
--set-advertisement-ranges=PRIVATE_POOL_NETWORK/PRIVATE_POOL_PREFIX
gcloud compute routers update-bgp-peer ROUTER_NAME_1 \
--peer-name=PEER_NAME_GW1_IF1 \
--region=REGION \
--advertisement-mode=CUSTOM \
--set-advertisement-ranges=PRIVATE_POOL_NETWORK/PRIVATE_POOL_PREFIX
gcloud compute routers update-bgp-peer ROUTER_NAME_2 \
--peer-name=PEER_NAME_GW2_IF0 \
--region=REGION \
--advertisement-mode=CUSTOM \
--set-advertisement-ranges=CLUSTER_CONTROL_PLANE_CIDR
gcloud compute routers update-bgp-peer ROUTER_NAME_2 \
--peer-name=PEER_NAME_GW2_IF1 \
--region=REGION \
--advertisement-mode=CUSTOM \
--set-advertisement-ranges=CLUSTER_CONTROL_PLANE_CIDR
Where the following values are the same names that you used when you
created the two HA VPN gateways:
- ROUTER_NAME_1
- PEER_NAME_GW1_IF0
- PEER_NAME_GW1_IF1
- ROUTER_NAME_2
- PEER_NAME_GW2_IF0
- PEER_NAME_GW2_IF1
## Enabling Cloud Build access to the GKE cluster control plane
Now that you have a VPN connection between the two VPC
networks in your project, enable Cloud Build access to the
GKE cluster control plane.
1. In Cloud Shell, add the private pool network range to the control plane authorized
networks in GKE:
gcloud container clusters update PRIVATE_CLUSTER_NAME \
--enable-master-authorized-networks \
--region=REGION \
--master-authorized-networks=PRIVATE_POOL_NETWORK/PRIVATE_POOL_PREFIX
Replace the following:
- PRIVATE_CLUSTER_NAME: the name of the private GKE cluster.
- REGION: the region for the GKE cluster. In this tutorial, use `us-central1` for the region, the same region as the one you used for the VPC networks.
- PRIVATE_POOL_NETWORK: the first IP address of RESERVED_RANGE_NAME. For this tutorial, you can use `192.168.0.0`.
- PRIVATE_POOL_PREFIX: the prefix of RESERVED_RANGE_NAME. Each private pool created will use `/24` from this range. For this tutorial, you can use `20`; this allows you to create up to sixteen pools.
2. Allow the service account you are using for the build to access the
GKE cluster control plane:
export PROJECT_NUMBER=$(gcloud projects describe $GOOGLE_CLOUD_PROJECT --format 'value(projectNumber)')
gcloud projects add-iam-policy-binding $GOOGLE_CLOUD_PROJECT \
--member=serviceAccount:SERVICE_ACCOUNT \
--role=roles/container.developer
The Cloud Build private pools now can access the
GKE cluster control plane.
## Verifying the solution
In this section, you verify that the solution is working by running the
command `kubectl get nodes` in a build step which is running in the private
pool.
1. In Cloud Shell, create a temporary folder with a
Cloud Build configuration file that runs the command
`kubectl get nodes`:
mkdir private-pool-test && cd private-pool-test
cat > cloudbuild.yaml <REGION: the region for the GKE cluster. In this tutorial, use `us-central1` for the region, the same region as the one you used for the VPC networks.
- PRIVATE_CLUSTER_NAME: the name of the private GKE cluster.
- PRIVATE_POOL_NAME: the name of the Cloud Build private pool.
2. Start the build job:
gcloud builds submit --config=cloudbuild.yaml
3. Verify that the output is the list of nodes in the GKE
cluster. The build log shown in the console includes a table similar to this:
```
NAME STATUS ROLES AGE VERSION
gke-private-default-pool-3ec34262-7lq9 Ready 9d v1.19.9-gke.1900
gke-private-default-pool-4c517758-zfqt Ready 9d v1.19.9-gke.1900
gke-private-default-pool-d1a885ae-4s9c Ready 9d v1.19.9-gke.1900
```
You have now verified that the workers from the private pool can access the
GKE cluster. This access lets you use
[Cloud Build to deploy](https://docs.cloud.google.com/build/docs/deploying-builds/deploy-gke.md.txt)
your application on this private GKE cluster.
## Troubleshooting
If you encounter problems with this tutorial, see the following documents:
- [Cloud VPN troubleshooting](https://docs.cloud.google.com/network-connectivity/docs/vpn/support/troubleshooting.md.txt)
- [VPC Network Peering troubleshooting](https://docs.cloud.google.com/vpc/docs/using-vpc-peering.md.txt#troubleshooting)
- [Private GKE cluster troubleshooting](https://cloud.google.com/kubernetes-engine/docs/how-to/private-clusters#troubleshooting)
## Clean up
To avoid incurring charges to your Google Cloud account for the resources used in this
tutorial, either delete the project that contains the resources, or keep the project and
delete the individual resources.
### Delete the project
> [!CAUTION]
> **Caution** : Deleting a project has the following effects:
>
> - **Everything in the project is deleted.** If you used an existing project for the tasks in this document, when you delete it, you also delete any other work you've done in the project.
> - **Custom project IDs are lost.** When you created this project, you might have created a custom project ID that you want to use in the future. To preserve the URLs that use the project ID, such as an `appspot.com` URL, delete selected resources inside the project instead of deleting the whole project.
>
>
> If you plan to explore multiple architectures, tutorials, or quickstarts, reusing projects
> can help you avoid exceeding project quota limits.
1. In the Google Cloud console, go to the **Manage resources** page.
[Go to Manage resources](https://console.cloud.google.com/iam-admin/projects)
2. In the project list, select the project that you want to delete, and then click **Delete**.
3. In the dialog, type the project ID, and then click **Shut down** to delete the project.
### Delete the individual resources
1. In Cloud Shell, delete the GKE cluster:
gcloud container clusters delete PRIVATE_CLUSTER_NAME \
--region=REGION \
--async
When you run this command, the VPC Network Peering is
automatically deleted.
2. Delete the Cloud Build private pool:
gcloud builds worker-pools delete PRIVATE_POOL_NAME \
--region=REGION
3. Delete the private connection between the service producer
VPC network and PRIVATE_POOL_PEERING_VPC_NAME:
gcloud services vpc-peerings delete \
--network=PRIVATE_POOL_PEERING_VPC_NAME \
--async
4. Delete the named IP address range used for the private pool:
gcloud compute addresses delete RESERVED_RANGE_NAME \
--global
5. Delete the four VPN tunnels. Use the same names that you specified
at [Create VPN tunnels](https://docs.cloud.google.com/network-connectivity/docs/vpn/how-to/creating-ha-vpn2.md.txt#create_vpn_tunnels).
gcloud compute vpn-tunnels delete \
TUNNEL_NAME_GW1_IF0 \
TUNNEL_NAME_GW1_IF1 \
TUNNEL_NAME_GW2_IF0 \
TUNNEL_NAME_GW2_IF1 \
--region=REGION
6. Delete the two Cloud Routers. Use the same names that you specified
at [Create Cloud Routers](https://docs.cloud.google.com/network-connectivity/docs/vpn/how-to/creating-ha-vpn2.md.txt#creates).
gcloud compute routers delete \
ROUTER_NAME_1 \
ROUTER_NAME_2 \
--region=REGION
7. Delete the two VPN Gateways. Use the same names that you specified at
[Create the HA VPN gateways](https://docs.cloud.google.com/network-connectivity/docs/vpn/how-to/creating-ha-vpn2.md.txt#create-ha-gateways).
gcloud compute vpn-gateways delete \
GW_NAME_1 \
GW_NAME_2 \
--region=REGION
8. Delete GKE_SUBNET_NAME, which is the subnetwork
that hosts the GKE cluster nodes:
gcloud compute networks subnets delete GKE_SUBNET_NAME \
--region=REGION
9. Delete the two VPC networks
PRIVATE_POOL_PEERING_VPC_NAME and GKE_CLUSTER_VPC_NAME:
gcloud compute networks delete \
PRIVATE_POOL_PEERING_VPC_NAME \
GKE_CLUSTER_VPC_NAME
## What's next
- Learn how to [run builds in a private pool](https://docs.cloud.google.com/build/docs/private-pools/run-builds-in-private-pool.md.txt).
- Learn how to [deploy to GKE from Cloud Build](https://docs.cloud.google.com/build/docs/deploying-builds/deploy-gke.md.txt).
- Try out other Google Cloud features for yourself. Have a look at our [tutorials](https://docs.cloud.google.com/architecture).