This guide explains how to perform zero-downtime blue/green deployments on
Compute Engine Managed Instance Groups (MIGs) using Cloud Build and
Terraform.
Cloud Build enables you to automate a variety of developer processes,
including building and deploying applications to various Google Cloud runtimes
such as Compute Engine,
[Google Kubernetes Engine](https://docs.cloud.google.com/build/docs/deploying-builds/deploy-gke),
[GKE Enterprise](https://docs.cloud.google.com/anthos/multicluster-management/gateway/tutorials/cloud-build-integration),
and [Cloud Run functions](https://docs.cloud.google.com/build/docs/deploying-builds/deploy-functions).
[Compute Engine MIGs](https://docs.cloud.google.com/compute/docs/instance-groups) enable you to operate
applications on multiple identical Virtual Machines (VMs). You can make your
workloads scalable and highly available by taking advantage of automated MIG
services, including: autoscaling, autohealing, regional (multiple zone)
deployment, and automatic updating. Using the blue/green continuous deployment
model, you will learn how to gradually transfer user traffic from one MIG (blue)
to another MIG (green), both of which are running in production.
## Before you begin
-
Enable the Cloud Build, Cloud Run, Artifact Registry, and Resource Manager APIs, if any are not already enabled.
**Roles required to enable APIs**
To enable APIs, you need the `serviceusage.services.enable` permission. If you
created the project, then you likely already have this permission through the
Owner role (`roles/owner`). Otherwise, you can get this permission through the
Service Usage Admin role (`roles/serviceusage.serviceUsageAdmin`).
[Learn how to grant roles](https://docs.cloud.google.com/iam/docs/granting-changing-revoking-access).
[Enable the APIs](https://console.cloud.google.com/apis/enableflow?apiid=cloudbuild.googleapis.com,run.googleapis.com,artifactregistry.googleapis.com,cloudresourcemanager.googleapis.com&redirect=https://cloud.google.com/build/docs/deploying-builds/deploy-cloud-run)
- Have your application source code ready. Your source code needs to be stored
in a repository such as GitHub or Bitbucket.
- To run the `gcloud` commands in this page, install
the [Google Cloud CLI](https://docs.cloud.google.com/sdk).
## Required Identity and Access Management permissions
1. In the Google Cloud console, go to the
Cloud Build **Permissions** page:
[Go to **Permissions**](https://console.cloud.google.com/cloud-build/settings)
2. For your [specified Cloud Build service account](https://docs.cloud.google.com/build/docs/securing-builds/configure-user-specified-service-accounts)
or [default Cloud Build service account](https://docs.cloud.google.com/build/docs/cloud-build-service-account), set the status of the following roles to **Enabled**:
- Compute Instance Admin v1 (`roles/compute.instanceAdmin`) \| Lets Cloud Build deploy new instances to Compute Engine.
- In the Assign Service Account User Role panel, [choose a service account to impersonate](https://docs.cloud.google.com/build/docs/deploying-builds/cb-sa-imp) and then click **Grant Permission**.
- Storage Admin (`roles/storage.admin`) \| Enables reading and writing from Cloud Storage.
- Artifact Registry Writer (`roles/artifactregistry.writer`) \| Allows pulling images from and writing to Artifact Registry.
- Logs Writer (`roles/logging.logWriter`) \| Allows log entries to be written to Cloud Logging.
- Cloud Build Editor (`roles/cloudbuild.builds.editor`) \| Allows your service account to run builds.
## Design overview
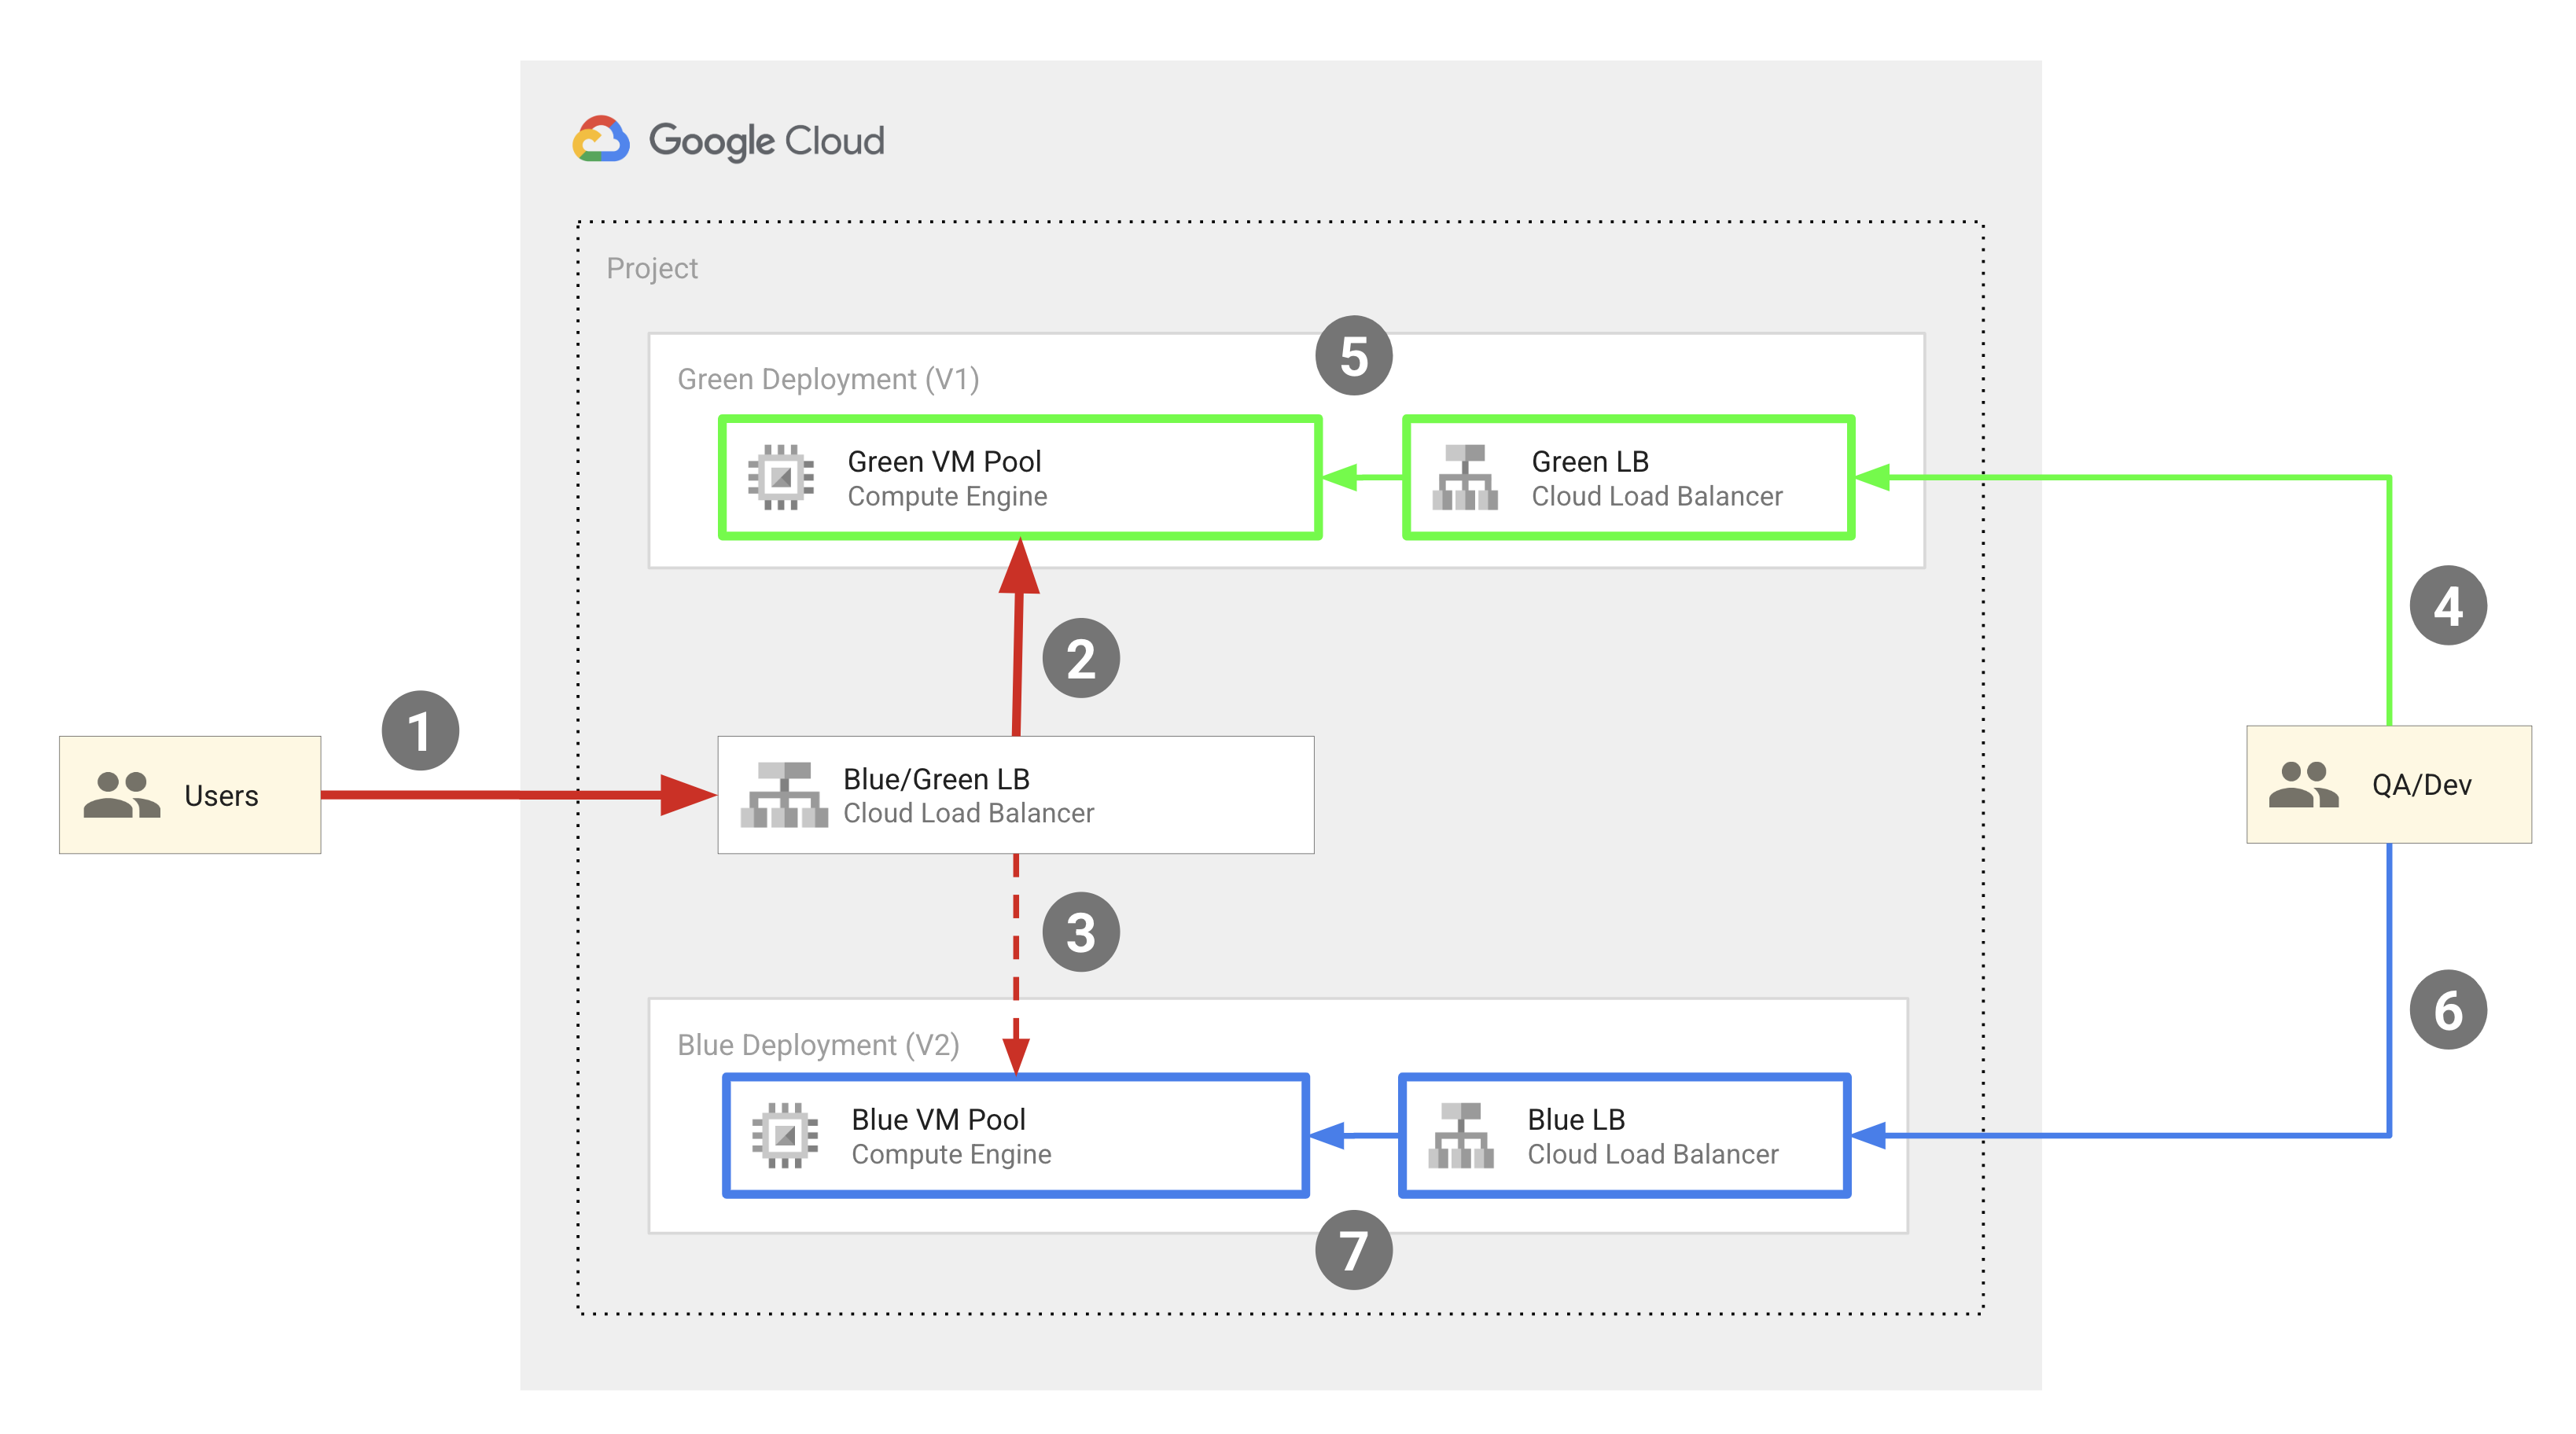
The following diagram shows the blue-green deployment model used by the code
sample described in this document:
At a high level, this model includes the following components:
- Two Compute Engine VM pools: Blue and Green.
- Three external HTTP(S) load balancers:
- A Blue-Green load balancer, that routes traffic from end users to either the Blue or the Green pool of VM instances.
- A Blue load balancer that routes traffic from QA engineers and developers to the Blue VM instance pool.
- A Green load balancer that routes traffic from QA engineers and developers to the Green instance pool.
- Two sets of users:
- End users who have access to the Blue-Green load balancer, which points them to either the Blue or the Green instance pool.
- QA engineers and developers who require access to both sets of pools for development and testing purposes. They can access both the Blue and the Green load balancers, which routes them to the Blue Instance pool and the Green instance pool respectively.
The Blue and the Green VMs pools are implemented as Compute Engine MIGs, and
external IP addresses are routed into the VMs in the MIG using external HTTP(s)
load balancers. The code sample described in this document uses Terraform to
configure this infrastructure.
The following diagram illustrates the developer operations that happens in the
deployment:

In the previous diagram, the red arrows represent the bootstrapping flow that
occurs when you set up the deployment infrastructure for the first time, and the
blue arrows represent the GitOps flow that occurs during every deployment.
To set up this infrastructure, you run a setup script that starts the bootstrap
process and sets up the components for the GitOps flow.
The setup script executes a Cloud Build pipeline that performs the
following operations:
- Creates a repository in [Cloud Source Repositories](https://docs.cloud.google.com/source-repositories/docs) named `copy-of-gcp-mig-simple` and copies the source code from the GitHub sample repository to the repository in Cloud Source Repositories.
- Creates two [Cloud Build triggers](https://docs.cloud.google.com/build/docs/triggers) named `apply` and `destroy`.
> [!NOTE]
> **Note:** Cloud Build supports built-in integration with GitHub, GitLab, and Bitbucket. Cloud Source Repositories is used in this sample for demonstration purposes.
> [!CAUTION]
> **Caution:** Effective June 17, 2024, Cloud Source Repositories isn't available
> to new customers. If your organization hasn't
> previously used Cloud Source Repositories, you can't enable the API or use
> Cloud Source Repositories. New projects not connected to an organization can't enable the
> Cloud Source Repositories API. Organizations that have used Cloud Source Repositories prior to
> June 17, 2024 are not affected by this change.
The `apply` trigger is attached to a Terraform file named `main.tfvars` in the
Cloud Source Repositories. This file contains the Terraform variables representing
the blue and the green load balancers.
To set up the deployment, you update the variables in the `main.tfvars` file.
The `apply` trigger runs a Cloud Build pipeline that executes
`tf_apply` and performs the following operations:
- Creates two Compute Engine MIGs (one for green and one for blue), four Compute Engine VM instances (two for the green MIG and two for the blue MIG), the three load balancers (blue, green, and the splitter), and three public IP addresses.
- Prints out the IP addresses that you can use to see the deployed applications in the blue and the green instances.
The destroy trigger is triggered manually to delete all the resources created by
the apply trigger.
## Objectives
- Use Cloud Build and Terraform to set up external HTTP(S) load
balancers with Compute Engine VM instance group backends.
- Perform blue/green deployments on the VM instances.
## Costs
In this document, you use the following billable components of Google Cloud:
- [Compute Engine](https://cloud.google.com/compute/all-pricing)
- [Cloud Build](https://docs.cloud.google.com/build/pricing)
- [Cloud Source Repositories](https://docs.cloud.google.com/source-repositories/pricing)
- [Cloud Load Balancing](https://docs.cloud.google.com/load-balancing/pricing)
To generate a cost estimate based on your projected usage,
use the [pricing calculator](https://docs.cloud.google.com/products/calculator).
New Google Cloud users might be eligible for a [free trial](https://docs.cloud.google.com/free).
When you finish the tasks that are described in this document, you can avoid
continued billing by deleting the resources that you created. For more information, see
[Clean up](https://docs.cloud.google.com/build/docs/deploying-builds/deploy-compute-engine#clean-up).
## Before you begin
## Trying it out
1. Run the setup script from the Google code sample repository:
bash <(curl https://raw.githubusercontent.com/GoogleCloudPlatform/cloud-build-samples/main/mig-blue-green/setup.sh)
2. When the setup script asks for user consent, enter **yes**.
The script finishes running in a few seconds.
3. In the Google Cloud console, open the Cloud Build **Build history**
page:
[Open the Build history page](https://console.cloud.google.com/cloud-build)
4. Click the latest build.
You see the **Build details** page, which shows a Cloud Build
pipeline with three build steps: the first build step creates a repository in
Cloud Source Repositories, the second step clones the contents of the sample
repository in GitHub to Cloud Source Repositories, and the third step adds two
build triggers.
5. Open Cloud Source Repositories:
[Open Cloud Source Repositories](https://source.cloud.google.com/repos)
6. From the repositories list, click `copy-of-gcp-mig-simple`.
In the **History** tab at the bottom of the page, you'll see one commit with
the description
`A copy of https://github.com/GoogleCloudPlatform/cloud-build-samples.git`
made by Cloud Build to create a repository named
`copy-of-gcp-mig-simple`.
7. Open the Cloud Build **Triggers** page:
[Open Triggers page](https://console.cloud.google.com/cloud-build/triggers)
8. You'll see two build triggers named `apply` and `destroy`. The `apply` trigger is attached to the `infra/main.tfvars` file in the `main` branch. This trigger is executed anytime the file is updated. The `destroy` trigger is a manual trigger.
9. To start the deploy process, update the `infra/main.tfvars` file:
1. In your terminal window, create and navigate into a folder named
`deploy-compute-engine`:
mkdir ~/deploy-compute-engine
cd ~/deploy-compute-engine
2. Clone the `copy-of-gcp-mig-simple` repo:
gcloud source repos clone copy-of-mig-blue-green
3. Navigate into the cloned directory:
cd ./copy-of-mig-blue-green
4. Update `infra/main.tfvars` to replace blue with green:
sed -i'' -e 's/blue/green/g' infra/main.tfvars
5. Add the updated file:
git add .
6. Commit the file:
git commit -m "Promote green"
7. Push the file:
git push
Making changes to `infra/main.tfvars` triggers the execution of the `apply`
trigger, which starts the deployment.
10. Open Cloud Source Repositories:
[Open Cloud Source Repositories](https://source.cloud.google.com/repos)
11. From the repositories list, click `copy-of-gcp-mig-simple`.
You'll see the commit with the description `Promote green` in the
**History** tab at the bottom of the page.
12. To view the execution of the `apply` trigger, open the **Build history** page
in the Google Cloud console:
[Open the Build history page](https://console.cloud.google.com/cloud-build)
13. Open the **Build details** page by clicking on the first build.
You will see the `apply` trigger pipeline with two build steps. The first
build step executes Terraform apply to create the Compute Engine and load
balancing resources for the deployment. The second build step prints out
the IP address where you can see the application running.
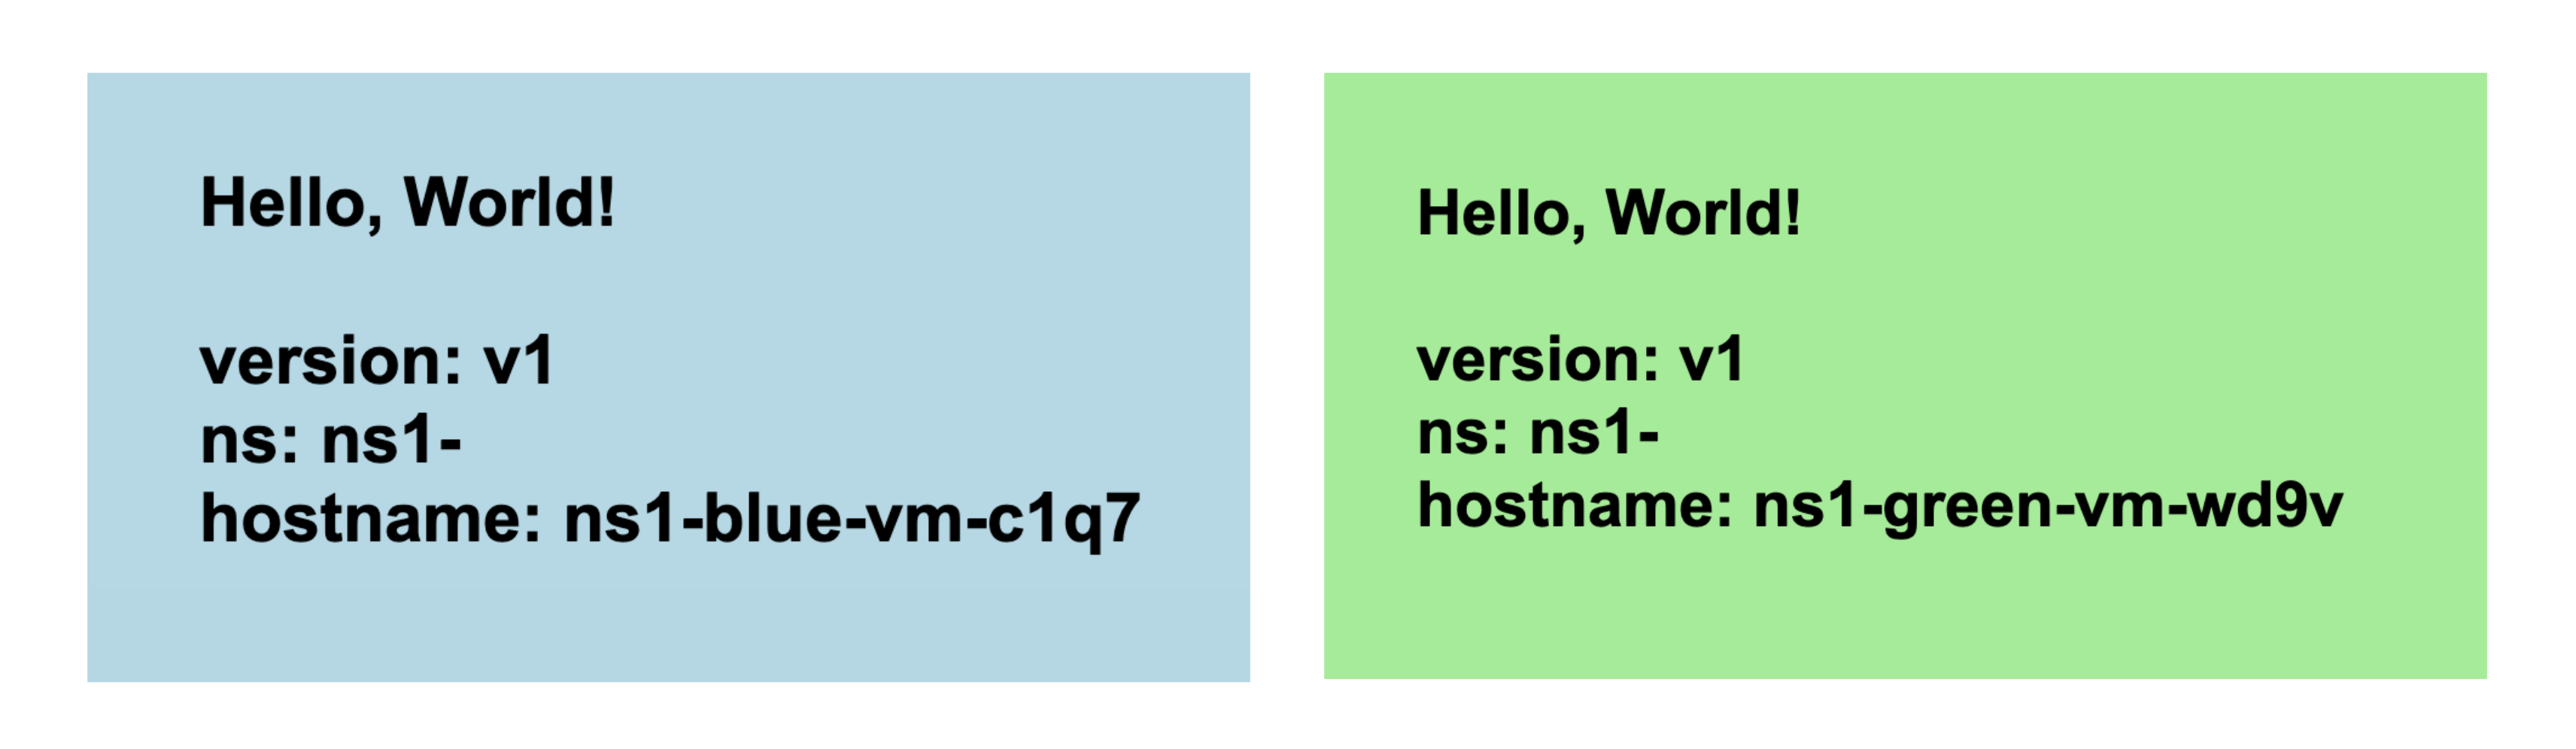
14. Open the IP address corresponding to the green MIG in a browser. You'll see
a screenshot similar to the following showing the deployment:
15. Go to the Compute Engine **Instance group** page to see the Blue and the
Green instance groups:
[Open the Instance group page](https://console.cloud.google.com/compute/instanceGroups/list)
16. Open the **VM instances** page to see the four VM instances:
[Open the VM Instance page](https://console.cloud.google.com/compute/instances)
17. Open the **External IP addresses** page to see the three load balancers:
[Open the External IP addresses page](https://console.cloud.google.com/networking/addresses/list)
## Understanding the code
Source code for this code sample includes:
- Source code related to the setup script.
- Source code related to the Cloud Build pipelines.
- Source code related to the Terraform templates.
### Setup script
`setup.sh` is the setup script that runs the bootstrap process and creates the
components for the blue-green deployment. The script performs the following
operations:
- Enables the Cloud Build, Resource Manager, Compute Engine, and Cloud Source Repositories APIs.
- Grants the `roles/editor` IAM role to the Cloud Build service account in your project. This role is required for Cloud Build to create and set up the necessary GitOps components for the deployment.
- Grants the `roles/source.admin` IAM role to the Cloud Build service account in your project. This role is required for the Cloud Build service account to create the Cloud Source Repositories in your project and clone the contents of the sample GitHub repository to your Cloud Source Repositories.
- Generates a Cloud Build pipeline named
`bootstrap.cloudbuild.yaml` inline, that:
- Creates a new repository in Cloud Source Repositories.
- Copies the source code from the sample GitHub repository to the new repository in Cloud Source Repositories.
- Creates the apply and destroy build triggers.
set -e
BLUE='\033[1;34m'
RED='\033[1;31m'
GREEN='\033[1;32m'
NC='\033[0m'
echo -e "\n${GREEN}######################################################"
echo -e "# #"
echo -e "# Zero-Downtime Blue/Green VM Deployments Using #"
echo -e "# Managed Instance Groups, Cloud Build & Terraform #"
echo -e "# #"
echo -e "######################################################${NC}\n"
echo -e "\nSTARTED ${GREEN}setup.sh:${NC}"
echo -e "\nIt's ${RED}safe to re-run${NC} this script to ${RED}recreate${NC} all resources.\n"
echo "> Checking GCP CLI tool is installed"
gcloud --version > /dev/null 2>&1
readonly EXPLICIT_PROJECT_ID="$1"
readonly EXPLICIT_CONSENT="$2"
if [ -z "$EXPLICIT_PROJECT_ID" ]; then
echo "> No explicit project id provided, trying to infer"
PROJECT_ID="$(gcloud config get-value project)"
else
PROJECT_ID="$EXPLICIT_PROJECT_ID"
fi
if [ -z "$PROJECT_ID" ]; then
echo "ERROR: GCP project id was not provided as parameter and could not be inferred"
exit 1
else
readonly PROJECT_NUM="$(gcloud projects describe $PROJECT_ID --format='value(projectNumber)')"
if [ -z "$PROJECT_NUM" ]; then
echo "ERROR: GCP project number could not be determined"
exit 1
fi
echo -e "\nYou are about to:"
echo -e " * modify project ${RED}${PROJECT_ID}/${PROJECT_NUM}${NC}"
echo -e " * ${RED}enable${NC} various GCP APIs"
echo -e " * make Cloud Build ${RED}editor${NC} of your project"
echo -e " * ${RED}execute${NC} Cloud Builds and Terraform plans to create"
echo -e " * ${RED}4 VMs${NC}, ${RED}3 load balancers${NC}, ${RED}3 public IP addresses${NC}"
echo -e " * incur ${RED}charges${NC} in your billing account as a result\n"
fi
if [ "$EXPLICIT_CONSENT" == "yes" ]; then
echo "Proceeding under explicit consent"
readonly CONSENT="$EXPLICIT_CONSENT"
else
echo -e "Enter ${BLUE}'yes'${NC} if you want to proceed:"
read CONSENT
fi
if [ "$CONSENT" != "yes" ]; then
echo -e "\nERROR: Aborted by user"
exit 1
else
echo -e "\n......................................................"
echo -e "\n> Received user consent"
fi
#
# Executes action with one randomly delayed retry.
#
function do_with_retry {
COMMAND="$@"
echo "Trying $COMMAND"
(eval $COMMAND && echo "Success on first try") || ( \
echo "Waiting few seconds to retry" &&
sleep 10 && \
echo "Retrying $COMMAND" && \
eval $COMMAND \
)
}
echo "> Enabling required APIs"
# Some of these can be enabled later with Terraform, but I personally
# prefer to do all API enablement in one place with gcloud.
gcloud services enable \
--project=$PROJECT_ID \
cloudbuild.googleapis.com \
cloudresourcemanager.googleapis.com \
compute.googleapis.com \
sourcerepo.googleapis.com \
--no-user-output-enabled \
--quiet
echo "> Adding Cloud Build to roles/editor"
gcloud projects add-iam-policy-binding \
"$PROJECT_ID" \
--member="serviceAccount:$PROJECT_NUM@cloudbuild.gserviceaccount.com" \
--role='roles/editor' \
--condition=None \
--no-user-output-enabled \
--quiet
echo "> Adding Cloud Build to roles/source.admin"
gcloud projects add-iam-policy-binding \
"$PROJECT_ID" \
--member="serviceAccount:$PROJECT_NUM@cloudbuild.gserviceaccount.com" \
--condition=None \
--role='roles/source.admin' \
--no-user-output-enabled \
--quiet
echo "> Configuring bootstrap job"
rm -rf "./bootstrap.cloudbuild.yaml"
cat <<'EOT_BOOT' > "./bootstrap.cloudbuild.yaml"
tags:
- "mig-blue-green-bootstrapping"
steps:
- id: create_new_cloud_source_repo
name: "gcr.io/cloud-builders/gcloud"
script: |
#!/bin/bash
set -e
echo "(Re)Creating source code repository"
gcloud source repos delete \
"copy-of-mig-blue-green" \
--quiet || true
gcloud source repos create \
"copy-of-mig-blue-green" \
--quiet
- id: copy_demo_source_into_new_cloud_source_repo
name: "gcr.io/cloud-builders/gcloud"
env:
- "PROJECT_ID=$PROJECT_ID"
- "PROJECT_NUMBER=$PROJECT_NUMBER"
script: |
#!/bin/bash
set -e
readonly GIT_REPO="https://github.com/GoogleCloudPlatform/cloud-build-samples.git"
echo "Cloning demo source repo"
mkdir /workspace/from/
cd /workspace/from/
git clone $GIT_REPO ./original
cd ./original
echo "Cloning new empty repo"
mkdir /workspace/to/
cd /workspace/to/
gcloud source repos clone \
"copy-of-mig-blue-green"
cd ./copy-of-mig-blue-green
echo "Making a copy"
cp -r /workspace/from/original/mig-blue-green/* ./
echo "Setting git identity"
git config user.email \
"$PROJECT_NUMBER@cloudbuild.gserviceaccount.com"
git config user.name \
"Cloud Build"
echo "Commit & push"
git add .
git commit \
-m "A copy of $GIT_REPO"
git push
- id: add_pipeline_triggers
name: "gcr.io/cloud-builders/gcloud"
env:
- "PROJECT_ID=$PROJECT_ID"
script: |
#!/bin/bash
set -e
echo "(Re)Creating destroy trigger"
gcloud builds triggers delete "destroy" --quiet || true
gcloud builds triggers create manual \
--name="destroy" \
--repo="https://source.developers.google.com/p/$PROJECT_ID/r/copy-of-mig-blue-green" \
--branch="master" \
--build-config="pipelines/destroy.cloudbuild.yaml" \
--repo-type=CLOUD_SOURCE_REPOSITORIES \
--quiet
echo "(Re)Creating apply trigger"
gcloud builds triggers delete "apply" --quiet || true
gcloud builds triggers create cloud-source-repositories \
--name="apply" \
--repo="copy-of-mig-blue-green" \
--branch-pattern="master" \
--build-config="pipelines/apply.cloudbuild.yaml" \
--included-files="infra/main.tfvars" \
--quiet
EOT_BOOT
echo "> Waiting API enablement propagation"
do_with_retry "(gcloud builds list --project "$PROJECT_ID" --quiet && gcloud compute instances list --project "$PROJECT_ID" --quiet && gcloud source repos list --project "$PROJECT_ID" --quiet) > /dev/null 2>&1" > /dev/null 2>&1
echo "> Executing bootstrap job"
gcloud beta builds submit \
--project "$PROJECT_ID" \
--config ./bootstrap.cloudbuild.yaml \
--no-source \
--no-user-output-enabled \
--quiet
rm ./bootstrap.cloudbuild.yaml
echo -e "\n${GREEN}All done. Now you can:${NC}"
echo -e " * manually run 'apply' and 'destroy' triggers to manage deployment lifecycle"
echo -e " * commit change to 'infra/main.tfvars' and see 'apply' pipeline trigger automatically"
echo -e "\n${GREEN}Few key links:${NC}"
echo -e " * Dashboard: https://console.cloud.google.com/home/dashboard?project=$PROJECT_ID"
echo -e " * Repo: https://source.cloud.google.com/$PROJECT_ID/copy-of-mig-blue-green"
echo -e " * Cloud Build Triggers: https://console.cloud.google.com/cloud-build/triggers;region=global?project=$PROJECT_ID"
echo -e " * Cloud Build History: https://console.cloud.google.com/cloud-build/builds?project=$PROJECT_ID"
echo -e "\n............................."
echo -e "\n${GREEN}COMPLETED!${NC}"
### Cloud Build pipelines
`apply.cloudbuild.yaml` and `destroy.cloudbuild.yaml` are the
Cloud Build config files that the setup script uses to set up the
resources for the GitOps flow. `apply.cloudbuild.yaml` contains two build steps:
- `tf_apply build` build step that calls the function `tf_install_in_cloud_build_step`, which installs Terraform. `tf_apply` that creates the resources used in the GitOps flow. The functions `tf_install_in_cloud_build_step` and `tf_apply` are defined in `bash_utils.sh` and the build step uses the `source` command to call them.
- `describe_deployment` build step that calls the function `describe_deployment` that prints out the IP addresses of the load balancers.
`destroy.cloudbuild.yaml` calls `tf_destroy` that deletes all the resources
created by `tf_apply`.
The functions `tf_install_in_cloud_build_step`, `tf_apply`,
`describe_deployment`, and `tf_destroy` are defined in the file `bash_utils.sh`.
The build config files use the `source` command to call the functions.
steps:
- id: run-terraform-apply
name: "gcr.io/cloud-builders/gcloud"
env:
- "PROJECT_ID=$PROJECT_ID"
script: |
#!/bin/bash
set -e
source /workspace/lib/bash_utils.sh
tf_install_in_cloud_build_step
tf_apply
- id: describe-deployment
name: "gcr.io/cloud-builders/gcloud"
env:
- "PROJECT_ID=$PROJECT_ID"
script: |
#!/bin/bash
set -e
source /workspace/lib/bash_utils.sh
describe_deployment
tags:
- "mig-blue-green-apply"
steps:
- id: run-terraform-destroy
name: "gcr.io/cloud-builders/gcloud"
env:
- "PROJECT_ID=$PROJECT_ID"
script: |
#!/bin/bash
set -e
source /workspace/lib/bash_utils.sh
tf_install_in_cloud_build_step
tf_destroy
tags:
- "mig-blue-green-destroy"
The following code shows the function `tf_install_in_cloud_build_step` that's
defined in `bash_utils.sh`. The build config files call this function to
install Terraform on the fly. It creates a Cloud Storage bucket to
record the Terraform status.
function tf_install_in_cloud_build_step {
echo "Installing deps"
apt update
apt install \
unzip \
wget \
-y
echo "Manually installing Terraform"
wget https://releases.hashicorp.com/terraform/1.3.4/terraform_1.3.4_linux_386.zip
unzip -q terraform_1.3.4_linux_386.zip
mv ./terraform /usr/bin/
rm -rf terraform_1.3.4_linux_386.zip
echo "Verifying installation"
terraform -v
echo "Creating Terraform state storage bucket $BUCKET_NAME"
gcloud storage buckets create \
"gs://$BUCKET_NAME" || echo "Already exists..."
echo "Configure Terraform provider and state bucket"
cat < "/workspace/infra/provider.tf"
terraform {
required_version = ">= 0.13"
backend "gcs" {
bucket = "$BUCKET_NAME"
}
required_providers {
google = {
source = "hashicorp/google"
version = ">= 3.77, < 5.0"
}
}
}
EOT_PROVIDER_TF
echo "$(cat /workspace/infra/provider.tf)"
}
The following code snippet shows the function `tf_apply` that's defined in
`bash_utils.sh`. It first calls `terraform init` that loads all modules and
custom libraries and then runs `terraform apply` to load the variables from
the `main.tfvars` file.
function tf_apply {
echo "Running Terraform init"
terraform \
-chdir="$TF_CHDIR" \
init
echo "Running Terraform apply"
terraform \
-chdir="$TF_CHDIR" \
apply \
-auto-approve \
-var project="$PROJECT_ID" \
-var-file="main.tfvars"
}
The following code snippet shows the function `describe_deployment` that's
defined in `bash_utils.sh`. It uses `gcloud compute addresses describe` to fetch
the IP addresses of the load balancers using the name and prints them out.
function describe_deployment {
NS="ns1-"
echo -e "Deployment configuration:\n$(cat infra/main.tfvars)"
echo -e \
"Here is how to connect to:" \
"\n\t* active color MIG: http://$(gcloud compute addresses describe ${NS}splitter-address-name --region=us-west1 --format='value(address)')/" \
"\n\t* blue color MIG: http://$(gcloud compute addresses describe ${NS}blue-address-name --region=us-west1 --format='value(address)')/" \
"\n\t* green color MIG: http://$(gcloud compute addresses describe ${NS}green-address-name --region=us-west1 --format='value(address)')/"
echo "Good luck!"
}
The following code snippet shows the function `tf_destroy` that's defined in
`bash_utils.sh`. It calls `terraform init` that loads all modules and custom
libraries and then runs `terraform destroy` that unloads the Terraform variables.
function tf_destroy {
echo "Running Terraform init"
terraform \
-chdir="$TF_CHDIR" \
init
echo "Running Terraform destroy"
terraform \
-chdir="$TF_CHDIR" \
destroy \
-auto-approve \
-var project="$PROJECT_ID" \
-var-file="main.tfvars"
}
### Terraform templates
You'll find all the Terraform configuration files and variables in the
`copy-of-gcp-mig-simple/infra/` folder.
- `main.tf`: this is the Terraform configuration file
- `main.tfvars`: this file defines the Terraform variables.
- `mig/` and `splitter/`: these folders contain the modules that define the load balancers. The `mig/` folder contains the Terraform configuration file that defines the MIG for the Blue and the Green load balancers. The Blue and the Green MIGs are identical, therefore they are defined once and instantiated for the blue and the green objects. The Terraform configuration file for the splitter load balancer is in the `splitter/` folder .
The following code snippet shows the contents of `infra/main.tfvars`. It
contains three variables: two that determine what application version to deploy
to the Blue and the Green pools and a variable for the active color: Blue or
Green. Changes to this file triggers the deployment.
MIG_VER_BLUE = "v1"
MIG_VER_GREEN = "v1"
MIG_ACTIVE_COLOR = "blue"
The following is a code snippet from `infra/main.tf`. In this snippet:
- A variable is defined for the Google Cloud project.
- Google is set as the Terraform provider.
- A variable is defined for namespace. All objects created by Terraform are prefixed with this variable so that multiple versions of the application can be deployed in the same project and the object names don't collide with each other.
- Variables `MIG_VER_BLUE`, `MIG_VER_BLUE`, and `MIG_ACTIVE_COLOR` are the bindings for the variables in the `infra/main.tfvars` file.
variable "project" {
type = string
description = "GCP project we are working in."
}
provider "google" {
project = var.project
region = "us-west1"
zone = "us-west1-a"
}
variable "ns" {
type = string
default = "ns1-"
description = "The namespace used for all resources in this plan."
}
variable "MIG_VER_BLUE" {
type = string
description = "Version tag for 'blue' deployment."
}
variable "MIG_VER_GREEN" {
type = string
description = "Version tag for 'green' deployment."
}
variable "MIG_ACTIVE_COLOR" {
type = string
description = "Active color (blue | green)."
}
The following code snippet from `infra/main.tf` shows the instantiation of the
splitter module. This module takes in the active color so that the splitter load
balancer knows which MIG to deploy the application.
module "splitter-lb" {
source = "./splitter"
project = var.project
ns = "${var.ns}splitter-"
active_color = var.MIG_ACTIVE_COLOR
instance_group_blue = module.blue.google_compute_instance_group_manager_default.instance_group
instance_group_green = module.green.google_compute_instance_group_manager_default.instance_group
}
The following code snippet from `infra/main.tf` defines two identical modules
for Blue and Green MIGs. It takes in the color, the network, and the subnetwork
which are defined in the splitter module.
module "blue" {
source = "./mig"
project = var.project
app_version = var.MIG_VER_BLUE
ns = var.ns
color = "blue"
google_compute_network = module.splitter-lb.google_compute_network
google_compute_subnetwork = module.splitter-lb.google_compute_subnetwork_default
google_compute_subnetwork_proxy_only = module.splitter-lb.google_compute_subnetwork_proxy_only
}
module "green" {
source = "./mig"
project = var.project
app_version = var.MIG_VER_GREEN
ns = var.ns
color = "green"
google_compute_network = module.splitter-lb.google_compute_network
google_compute_subnetwork = module.splitter-lb.google_compute_subnetwork_default
google_compute_subnetwork_proxy_only = module.splitter-lb.google_compute_subnetwork_proxy_only
}
The file `splitter/main.tf` defines the objects that are created for the
splitter MIG. The following is a code snippet from `splitter/main.tf` that
contains the logic to switch between the Green and the Blue MIG. It's backed by
the service `google_compute_region_backend_service`, which can route traffic to
two backend regions: `var.instance_group_blue` or `var.instance_group_green`.
`capacity_scaler` defines how much of the traffic to route.
The following code routes 100% of the traffic to the specified color, but you
can update this code for canary deployment to route the traffic to a subset of
the users.
resource "google_compute_region_backend_service" "default" {
name = local.l7-xlb-backend-service
region = "us-west1"
load_balancing_scheme = "EXTERNAL_MANAGED"
health_checks = [google_compute_region_health_check.default.id]
protocol = "HTTP"
session_affinity = "NONE"
timeout_sec = 30
backend {
group = var.instance_group_blue
balancing_mode = "UTILIZATION"
capacity_scaler = var.active_color == "blue" ? 1 : 0
}
backend {
group = var.instance_group_green
balancing_mode = "UTILIZATION"
capacity_scaler = var.active_color == "green" ? 1 : 0
}
}
The file `mig/main.tf` defines the objects pertaining to the Blue and the Green
MIGs. The following code snippet from this file defines the Compute Engine
instance template that's used to create the VM pools. Note that this instance
template has the Terraform lifecycle property set to `create_before_destroy`.
This is because, when updating the version of the pool, you cannot use the
template to create the new version of the pools when it is still being used by
the previous version of the pool. But if the older version of the pool is
destroyed before creating the new template, there'll be a period of time when
the pools are down. To avoid this scenario, we set the Terraform lifecycle to
`create_before_destroy` so that the newer version of a VM pool is created first
before the older version is destroyed.
resource "google_compute_instance_template" "default" {
name = local.l7-xlb-backend-template
disk {
auto_delete = true
boot = true
device_name = "persistent-disk-0"
mode = "READ_WRITE"
source_image = "projects/debian-cloud/global/images/family/debian-10"
type = "PERSISTENT"
}
labels = {
managed-by-cnrm = "true"
}
machine_type = "n1-standard-1"
metadata = {
startup-script = <Hello, World!
version: ${var.app_version}
ns: ${var.ns}
hostname: $vm_hostname