# Use custom holidays in an ARIMA_PLUS time-series forecasting model
This tutorial shows you how to do the following tasks:
- Create an [`ARIMA_PLUS` time-series forecasting model](https://docs.cloud.google.com/bigquery/docs/reference/standard-sql/bigqueryml-syntax-create-time-series) that uses only built-in holidays.
- Create an `ARIMA_PLUS` time-series forecasting model that uses custom holidays in addition to built-in holidays.
- Visualize the forecasted results from these models.
- Inspect a model to see which holidays it models.
- Evaluate the effects of the custom holidays on the forecasted results.
- Compare the performance of the model that uses only built-in holidays to the performance of the model that uses custom holidays in addition to built-in holidays.
This tutorial uses the `bigquery-public-data.wikipedia.pageviews_*`
public tables.
## Required permissions
- To create the dataset, you need the `bigquery.datasets.create`
IAM permission.
- To create the model, you need the following permissions:
- `bigquery.jobs.create`
- `bigquery.models.create`
- `bigquery.models.getData`
- `bigquery.models.updateData`
- To run inference, you need the following permissions:
- `bigquery.models.getData`
- `bigquery.jobs.create`
For more information about IAM roles and permissions in
BigQuery, see
[Introduction to IAM](https://docs.cloud.google.com/bigquery/docs/access-control).
## Costs
In this document, you use the following billable components of Google Cloud:
- **BigQuery:** You incur costs for the data you process in BigQuery.
To generate a cost estimate based on your projected usage,
use the [pricing calculator](https://docs.cloud.google.com/products/calculator).
New Google Cloud users might be eligible for a [free trial](https://docs.cloud.google.com/free).
For more information, see [BigQuery pricing](https://cloud.google.com/bigquery/pricing).
## Before you begin
## Create a dataset
To create a BigQuery dataset, select one of the following
options:
### Console
1. In the Google Cloud console, go to the **BigQuery** page.
[Go to BigQuery](https://console.cloud.google.com/bigquery)
2. In the left pane, click
**Explorer**:

If you don't see the left pane, click
**Expand left pane** to open the pane.
3. In **Explorer** , expand your project, and then click **Datasets**.
4. On the **Datasets** page, click
**Create dataset**.
5. In the **Create dataset** pane, do the following:
- For **Dataset ID** , enter `bqml_tutorial`.
- For **Data location** , select **US**.
Leave the remaining default settings as they are.
6. Click **Create dataset**.
### bq
To create a new dataset, use the
[`bq mk --dataset` command](https://docs.cloud.google.com/bigquery/docs/reference/bq-cli-reference#mk-dataset).
1. Create a dataset named `bqml_tutorial` with the data location set to `US`:
```
bq mk --dataset \
--location=US \
--description "BigQuery ML tutorial dataset." \
bqml_tutorial
```
2. Confirm that the dataset was created:
```bash
bq ls
```
### API
Call the [`datasets.insert`](https://docs.cloud.google.com/bigquery/docs/reference/rest/v2/datasets/insert)
method with a defined [dataset resource](https://docs.cloud.google.com/bigquery/docs/reference/rest/v2/datasets):
```json
{
"datasetReference": {
"datasetId": "bqml_tutorial"
}
}
```
## Prepare the time-series data
Aggregate the Wikipedia page view data for the
[Google I/O](https://en.wikipedia.org/wiki/Google_I/O) page into a single
table, grouped by day:
1. Go to the **BigQuery** page.
[Go to BigQuery](https://console.cloud.google.com/bigquery)
2. In the SQL editor pane, run the following SQL statement:
```googlesql
CREATE OR REPLACE TABLE `bqml_tutorial.googleio_page_views`
AS
SELECT
DATETIME_TRUNC(datehour, DAY) AS date,
SUM(views) AS views
FROM
`bigquery-public-data.wikipedia.pageviews_*`
WHERE
datehour >= '2017-01-01'
AND datehour < '2023-01-01'
AND title = 'Google_I/O'
GROUP BY
DATETIME_TRUNC(datehour, DAY)
```
## Create a time-series forecasting model that uses built-in holidays
Create a model that forecasts daily page views for the Wikipedia
"Google I/O" page, based on page
view data before 2022 and taking built-in holidays into account:
1. Go to the **BigQuery** page.
[Go to BigQuery](https://console.cloud.google.com/bigquery)
2. In the SQL editor pane, run the following SQL statement:
```googlesql
CREATE OR REPLACE MODEL `bqml_tutorial.forecast_googleio`
OPTIONS (
model_type = 'ARIMA_PLUS',
holiday_region = 'US',
time_series_timestamp_col = 'date',
time_series_data_col = 'views',
data_frequency = 'DAILY',
horizon = 365)
AS
SELECT
*
FROM
`bqml_tutorial.googleio_page_views`
WHERE
date < '2022-01-01';
```
## Visualize the forecasted results
After you create the model using built-in holidays, join the original data from
the `bqml_tutorial.googleio_page_views` table with the forecasted value from the
[`ML.EXPLAIN_FORECAST` function](https://docs.cloud.google.com/bigquery/docs/reference/standard-sql/bigqueryml-syntax-explain-forecast),
and then visualize it by
[using Data Studio](https://docs.cloud.google.com/bigquery/docs/visualize-looker-studio):
1. Go to the **BigQuery** page.
[Go to BigQuery](https://console.cloud.google.com/bigquery)
2. In the SQL editor pane, run the following SQL statement:
```googlesql
SELECT
original.date,
original.views AS original_views,
explain_forecast.time_series_adjusted_data
AS adjusted_views_without_custom_holiday,
FROM
`bqml_tutorial.googleio_page_views` original
INNER JOIN
(
SELECT
*
FROM
ML.EXPLAIN_FORECAST(
MODEL `bqml_tutorial.forecast_googleio`,
STRUCT(365 AS horizon))
) explain_forecast
ON
TIMESTAMP(original.date)
= explain_forecast.time_series_timestamp
ORDER BY
original.date;
```
3. In the **Query results** pane, click **Open in** \>
**Data Studio**. Data Studio
opens in a new tab.
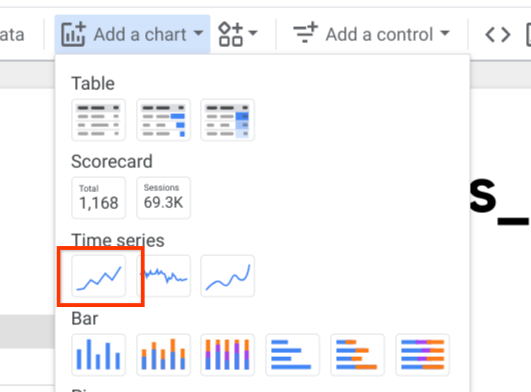
4. In the Data Studio tab, click **Add a chart**, and then
click the time series chart:
Place the chart on the report.
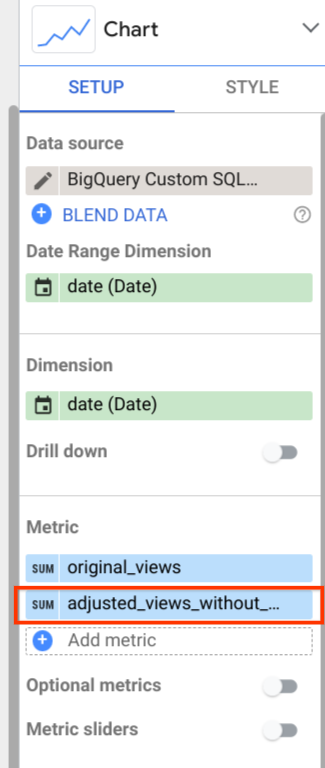
5. On the **Setup** tab of the **Chart** pane, click **Add metric** and select
**adjusted_views_without_custom_holiday**:
The chart looks similar to the following:
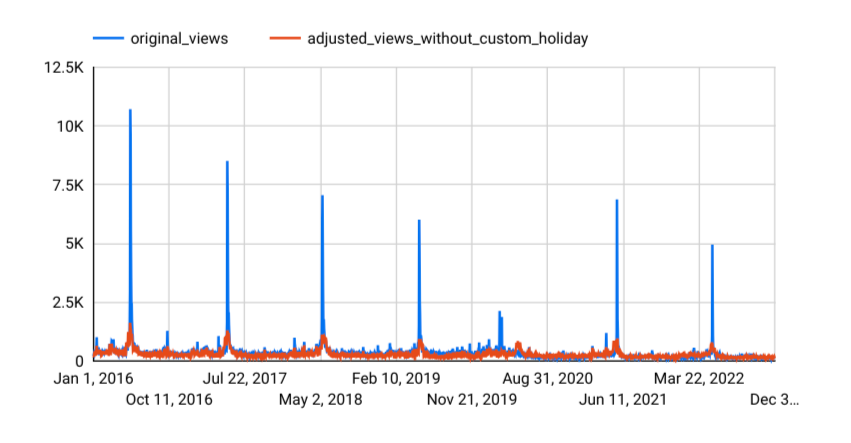
You can see that the forecasting model captures the general trend pretty
well. However, it isn't capturing the increased traffic related to previous
Google I/O events, and it isn't able to generate an accurate forecast for
1. The next sections show you how to deal with some of these limitations.
## Create a time-series forecasting model that uses built-in holidays and custom holidays
As you can see in
[Google I/O history](https://en.wikipedia.org/wiki/Google_I/O#History),
the Google I/O event occurred on different dates between 2017 and 2022. To take
this variation into account, create a model that forecasts page views for the
Wikipedia "Google_I/O" page through 2022, based on page view data from before
2022, and using custom holidays to represent the Google I/O event each year.
In this model, you also adjust the holiday effect window to cover three days
around the event date, to better capture some potential page traffic before
and after the event.
1. Go to the **BigQuery** page.
[Go to BigQuery](https://console.cloud.google.com/bigquery)
2. In the SQL editor pane, run the following SQL statement:
```googlesql
CREATE OR REPLACE MODEL `bqml_tutorial.forecast_googleio_with_custom_holiday`
OPTIONS (
model_type = 'ARIMA_PLUS',
holiday_region = 'US',
time_series_timestamp_col = 'date',
time_series_data_col = 'views',
data_frequency = 'DAILY',
horizon = 365)
AS (
training_data AS (
SELECT
*
FROM
`bqml_tutorial.googleio_page_views`
WHERE
date < '2022-01-01'
),
custom_holiday AS (
SELECT
'US' AS region,
'GoogleIO' AS holiday_name,
primary_date,
1 AS preholiday_days,
2 AS postholiday_days
FROM
UNNEST(
[
DATE('2017-05-17'),
DATE('2018-05-08'),
DATE('2019-05-07'),
-- cancelled in 2020 due to pandemic
DATE('2021-05-18'),
DATE('2022-05-11')])
AS primary_date
)
);
```
## Visualize the forecasted results
After you create the model using custom holidays, join the original data from
the `bqml_tutorial.googleio_page_views` table with the forecasted value from the
[`ML.EXPLAIN_FORECAST` function](https://docs.cloud.google.com/bigquery/docs/reference/standard-sql/bigqueryml-syntax-explain-forecast),
and then visualize it by
[using Data Studio](https://docs.cloud.google.com/bigquery/docs/visualize-looker-studio):
1. Go to the **BigQuery** page.
[Go to BigQuery](https://console.cloud.google.com/bigquery)
2. In the SQL editor pane, run the following SQL statement:
```googlesql
SELECT
original.date,
original.views AS original_views,
explain_forecast.time_series_adjusted_data
AS adjusted_views_with_custom_holiday,
FROM
`bqml_tutorial.googleio_page_views` original
INNER JOIN
(
SELECT
*
FROM
ML.EXPLAIN_FORECAST(
MODEL
`bqml_tutorial.forecast_googleio_with_custom_holiday`,
STRUCT(365 AS horizon))
) explain_forecast
ON
TIMESTAMP(original.date)
= explain_forecast.time_series_timestamp
ORDER BY
original.date;
```
3. In the **Query results** pane, click **Explore data** ,
and then click **Explore with Data Studio**. Data Studio
opens in a new tab.
4. In the Data Studio tab, click **Add a chart**, click the
time series chart, and place the chart on the report.
5. On the **Setup** tab of the **Chart** pane, click **Add metric** and select
**adjusted_views_with_custom_holiday**.
The chart looks similar to the following:
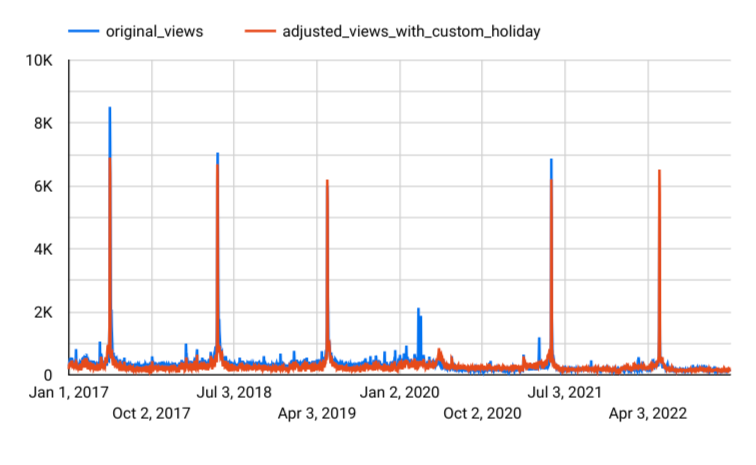
As you can see, the custom holidays boosted the performance
of the forecasting model. It now effectively captures the increase of page
views caused by Google I/O.
## Inspect holiday information
Inspect the list of holidays that were taken into account during modeling
by using the
[`ML.HOLIDAY_INFO` function](https://docs.cloud.google.com/bigquery/docs/reference/standard-sql/bigqueryml-syntax-holiday-info):
1. Go to the **BigQuery** page.
[Go to BigQuery](https://console.cloud.google.com/bigquery)
2. In the SQL editor pane, run the following SQL statement:
```googlesql
SELECT *
FROM
ML.HOLIDAY_INFO(
MODEL `bqml_tutorial.forecast_googleio_with_custom_holiday`);
```
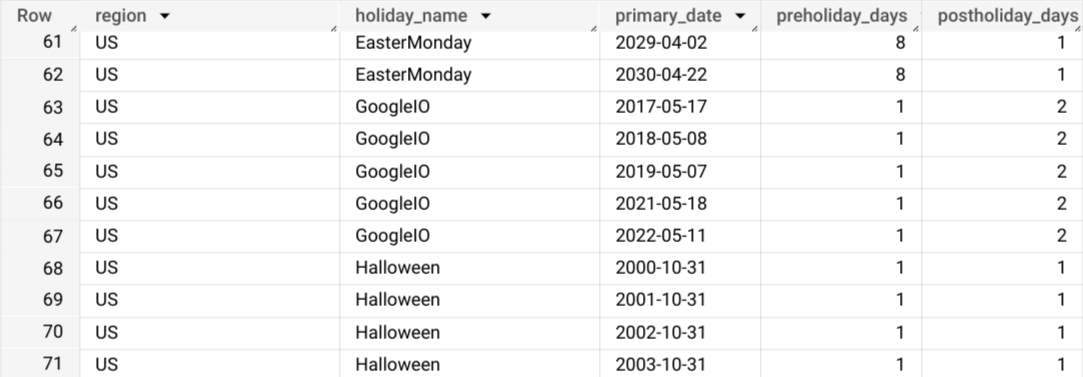
The results show both Google I/O and the built-in holidays in the list
of holidays:
## Evaluate the effects of the custom holidays
Evaluate the effects of the custom holidays on the forecasted results by
using the
[`ML.EXPLAIN_FORECAST` function](https://docs.cloud.google.com/bigquery/docs/reference/standard-sql/bigqueryml-syntax-explain-forecast):
1. Go to the **BigQuery** page.
[Go to BigQuery](https://console.cloud.google.com/bigquery)
2. In the SQL editor pane, run the following SQL statement:
```googlesql
SELECT
time_series_timestamp,
holiday_effect_GoogleIO,
holiday_effect_US_Juneteenth,
holiday_effect_Christmas,
holiday_effect_NewYear
FROM
ML.EXPLAIN_FORECAST(
model
`bqml_tutorial.forecast_googleio_with_custom_holiday`,
STRUCT(365 AS horizon))
WHERE holiday_effect != 0;
```
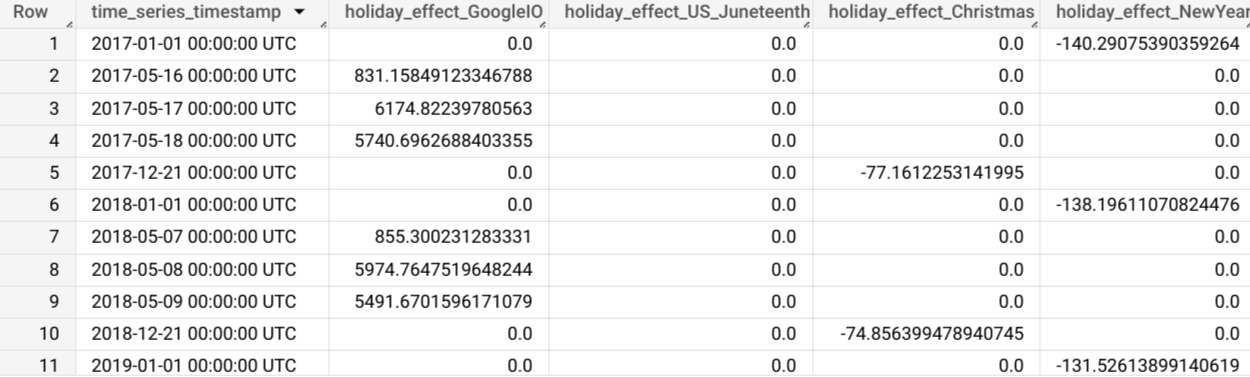
The results show that Google I/O contributes a large amount of holiday
effect to the forecasted results:
## Compare model performance
Use the
[`ML.EVALUATE` function](https://docs.cloud.google.com/bigquery/docs/reference/standard-sql/bigqueryml-syntax-evaluate)
to compare the performance of the first model created without custom holidays
and the second model created with custom holidays. To see how the second
model performs when it comes to forecasting a future custom holiday, set the
time range to the week of Google I/O in 2022:
1. Go to the **BigQuery** page.
[Go to BigQuery](https://console.cloud.google.com/bigquery)
2. In the SQL editor pane, run the following SQL statement:
```googlesql
SELECT
"original" AS model_type,
*
FROM
ml.evaluate(
MODEL `bqml_tutorial.forecast_googleio`,
(
SELECT
*
FROM
`bqml_tutorial.googleio_page_views`
WHERE
date >= '2022-05-08'
AND date < '2022-05-12'
),
STRUCT(
365 AS horizon,
TRUE AS perform_aggregation))
UNION ALL
SELECT
"with_custom_holiday" AS model_type,
*
FROM
ml.evaluate(
MODEL
`bqml_tutorial.forecast_googleio_with_custom_holiday`,
(
SELECT
*
FROM
`bqml_tutorial.googleio_page_views`
WHERE
date >= '2022-05-08'
AND date < '2022-05-12'
),
STRUCT(
365 AS horizon,
TRUE AS perform_aggregation));
```
The results show that the second model offers a significant performance
improvement:

## Clean up
> [!CAUTION]
> **Caution** : Deleting a project has the following effects:
>
> - **Everything in the project is deleted.** If you used an existing project for the tasks in this document, when you delete it, you also delete any other work you've done in the project.
> - **Custom project IDs are lost.** When you created this project, you might have created a custom project ID that you want to use in the future. To preserve the URLs that use the project ID, such as an `appspot.com` URL, delete selected resources inside the project instead of deleting the whole project.
>
>
> If you plan to explore multiple architectures, tutorials, or quickstarts, reusing projects
> can help you avoid exceeding project quota limits.
1. In the Google Cloud console, go to the **Manage resources** page.
[Go to Manage resources](https://console.cloud.google.com/iam-admin/projects)
2. In the project list, select the project that you want to delete, and then click **Delete**.
3. In the dialog, type the project ID, and then click **Shut down** to delete the project.