# Control access with tags
Attaching tags to BigQuery resources lets you conditionally manage
permissions across your tables, views, and datasets. With
[Identity and Access Management (IAM)](https://docs.cloud.google.com/iam/docs/tags-access-control), you can use tags,
which are key-value pairs, to grant roles or [deny access](https://docs.cloud.google.com/iam/docs/deny-access)
([Preview](https://cloud.google.com/products#product-launch-stages)) through
[deny policies](https://docs.cloud.google.com/iam/docs/deny-overview). You can also attach [data governance
tags](https://docs.cloud.google.com/bigquery/docs/tags#data-governance-tags) ([Preview](https://cloud.google.com/products#product-launch-stages)) to
table columns and use data policies to restrict column data access.
Tags can be attached directly to a resource or inherited from parent resources
in the Google Cloud hierarchy. For organization-level tag
management, see the [Tags overview](https://docs.cloud.google.com/resource-manager/docs/tags/tags-overview).
To grant permissions across multiple related resources simultaneously---including
future assets---consider using
[IAM Conditions](https://docs.cloud.google.com/bigquery/docs/conditions).
## Limitations
- Table tags aren't supported on BigQuery Omni tables, tables
in hidden datasets, or temporary tables. Dataset tags aren't supported on
BigQuery Omni datasets. Additionally, cross-region
queries in BigQuery Omni don't use tags during access
control checks of tables in other regions.
- You can attach a maximum of 50 tags to a table or dataset.
- All tables referenced in a wildcard query must have exactly the same set
of tag keys and values.
- Users with conditional access to a dataset or table cannot modify
permissions for that resource through the Google Cloud console.
Permission modifications are only supported through the bq tool
and the BigQuery API.
- Some services outside of BigQuery
cannot properly verify IAM tag conditions. If the tag
condition is positive, meaning that a user is granted a role on a resource
only if that resource has a particular tag, then access is denied to the
resource regardless of what tags are attached to it. If the tag condition
is negative, meaning that a user is granted a role on a resource only if
that resource *doesn't* have a particular tag, then the tag condition is
not checked.
> [!TIP]
> **Best practice:** Use positive IAM tag conditions rather than negative ones to prevent granting roles unintentionally.
## Required roles
You need to grant IAM roles that give users the necessary
[permissions](https://docs.cloud.google.com/bigquery/docs/access-control) to perform each task in this
document.
Both of the following predefined IAM roles include all of
the necessary BigQuery permissions:
- BigQuery Data Owner (`roles/bigquery.dataOwner`)
- BigQuery Admin (`roles/bigquery.admin`)
The Resource Manager permissions for adding and removing tags are included in the
[Tag User role](https://docs.cloud.google.com/resource-manager/docs/tags/tags-creating-and-managing#required-permissions-attach)
(`roles/resourcemanager.tagUser`).
### Required permissions
To use tags in BigQuery, you need the following permissions:
| Operation | BigQuery interfaces (API, CLI, console) and Terraform | Cloud Resource Manager API or gcloud |
|---|---|---|
| Attach a tag to a table or view | - `bigquery.tables.createTagBinding` permission on the table or view - `resourcemanager.tagValueBindings.create` permission on the tag value - `bigquery.tables.create` permission to attach a tag when creating a table or view - `bigquery.tables.update` permission to attach a tag when updating a table or view | - `bigquery.tables.createTagBinding` permission on the table or view - `resourcemanager.tagValueBindings.create` permission on the tag value |
| Remove a tag from a table or view | - `bigquery.tables.deleteTagBinding` permission on the table or view - `resourcemanager.tagValueBindings.delete` permission on the tag value - `bigquery.tables.update` permission to remove a tag when updating a table or view | - `bigquery.tables.deleteTagBinding` permission on the table or view - `resourcemanager.tagValueBindings.delete` permission on the tag value |
| Attach a tag to a dataset | - `bigquery.datasets.createTagBinding` permission on the dataset - `resourcemanager.tagValueBindings.create` permission on the tag value - `bigquery.datasets.create` permission to attach a tag when creating a dataset - `bigquery.datasets.update` permission to attach a tag when updating a dataset | - `bigquery.datasets.createTagBinding` permission on the dataset - `resourcemanager.tagValueBindings.create` permission on the tag value |
| Remove a tag from a dataset | - `bigquery.datasets.deleteTagBinding` permission on the dataset - `resourcemanager.tagValueBindings.delete` permission on the tag value - `bigquery.datasets.update` permission to remove a tag when updating a dataset | - `bigquery.datasets.deleteTagBinding` permission on the dataset - `resourcemanager.tagValueBindings.delete` permission on the tag value |
To list tag keys and key values in the Google Cloud console, you need the following
permissions:
- To list the tag keys that are associated with a parent organization or
project, you need the `resourcemanager.tagKeys.list` permission at the tag
key's parent level and the `resourcemanager.tagKeys.get` permission for each
tag key. To view the list of tag keys in the BigQuery console,
click the dataset name and then click
**Edit details** , or click the table or
view name and then click **Edit \> Edit details**.
- To list the tag values of keys that are associated with a parent organization
or project, you need the `resourcemanager.tagValues.list` permission at the
tag value parent level and the `resourcemanager.tagValues.get` permission for
each tag value. To view the list of tag key values in the
BigQuery console, click the dataset name and then click
**Edit details** , or click the table or view name and then click
**Edit \> Edit details**.
To use tags in Cloud Resource Manager API or gcloud, you need the following
permissions:
- To list the tags attached to a table or view with the Cloud Resource Manager API or the gcloud CLI, you need the `bigquery.tables.listTagBindings` IAM permission.
- To list the effective tags for a table or view, you need the `bigquery.tables.listEffectiveTags` IAM permission.
- To list the tags attached to a dataset with the Cloud Resource Manager API or the gcloud CLI, you need the `bigquery.datasets.listTagBindings` IAM permission.
- To list the effective tags for a dataset, you need the `bigquery.datasets.listEffectiveTags` IAM permission.
## Create tag keys and values
You can create a tag before you attach it to a BigQuery resource,
or you can create a tag manually when you create the resource using the
Google Cloud console.
For information about creating tag keys and tag values, see
[Creating a tag](https://docs.cloud.google.com/resource-manager/docs/tags/tags-creating-and-managing#creating_tag)
and
[Adding tag values](https://docs.cloud.google.com/resource-manager/docs/tags/tags-creating-and-managing#adding_tag_values)
in the Resource Manager documentation.
## Tag datasets
The following sections describe how to attach tags to new and existing datasets,
list tags attached to a dataset, and detach tags from a dataset.
### Attach tags when you create a new dataset
After you create a tag, you can attach it to a new BigQuery
dataset. You can attach only one tag value to a dataset for any given tag key.
You can attach a maximum of 50 tags to a dataset.
### Console
1. In the Google Cloud console, go to the **BigQuery** page.
[Go to BigQuery](https://console.cloud.google.com/bigquery)
2. In the left pane, click **Explorer**:

If you don't see the left pane, click **Expand left pane** to open the pane.
3. In the **Explorer** pane, select the project where you want to create
your dataset.
4. Click
**View actions** \> **Create dataset**.
5. Enter the information for your new dataset. For more details, see
[Create datasets](https://docs.cloud.google.com/bigquery/docs/datasets).
6. Expand the **Tags** section.
1. To apply an existing tag, do the following:
1. Click the drop-down arrow beside **Select scope** and choose
**Current scope** ---**Select current organization** or **Select
current project**.
Alternatively, click **Select scope** to search for a resource
or to see a list of current resources.
2. For **Key 1** and **Value 1**, choose the appropriate values
from the lists.
2. To manually enter a new tag, do the following:
1. Click the drop-down arrow beside **Select a scope** and choose
**Manually enter IDs** \> **Organization** ,
**Project** , or **Tags**.
2. If you're creating a tag for your project or organization, in
the dialog, enter the `PROJECT_ID` or the `ORGANIZATION_ID`, and
then click **Save**.
3. For **Key 1** and **Value 1**, choose the appropriate values
from the lists.
3. Optional: To add additional tags to the table, click **Add tag** and
follow the previous steps.
7. Click **Create dataset**.
### SQL
Use the
[`CREATE SCHEMA` statement](https://docs.cloud.google.com/bigquery/docs/reference/standard-sql/data-definition-language#create_schema_statement).
1. In the Google Cloud console, go to the **BigQuery** page.
[Go to BigQuery](https://console.cloud.google.com/bigquery)
2. In the query editor, enter the following statement:
```googlesql
CREATE SCHEMA PROJECT_ID.DATASET_ID
OPTIONS (
tags = [('TAG_KEY_1', 'TAG_VALUE_1'), ('TAG_KEY_2', 'TAG_VALUE_2')];)
```
Replace the following:
- `PROJECT_ID`: your project ID.
- `DATASET_ID`: the ID of the dataset that you're creating.
- `TAG_KEY_1`: the [namespaced key name](https://docs.cloud.google.com/iam/docs/tags-access-control#definitions) that you want to set as the first tag on the dataset, for example, `'my-project/env'` or `'556741164180/department'`.
- `TAG_VALUE_1`: the [short name](https://docs.cloud.google.com/iam/docs/tags-access-control#definitions) for the tag's value, for example, `'prod'` or `'sales'`.
- `TAG_KEY_2`: the namespaced key name for the second tag.
- `TAG_VALUE_2`: the short name for the second tag's value.
3. Click **Run**.
For more information about how to run queries, see [Run an interactive query](https://docs.cloud.google.com/bigquery/docs/running-queries#queries).
### bq
Use the
[`bq mk --dataset` command](https://docs.cloud.google.com/bigquery/docs/reference/bq-cli-reference#mk-dataset)
with the `--add_tags` flag:
```bash
bq mk --dataset \
--add_tags=TAG \
PROJECT_ID:DATASET_ID
```
Replace the following:
- `TAG`: the tag that you are attaching to the new dataset. Multiple tags are separated by commas. For example, `556741164180/env:prod,myProject/department:sales`. Each tag must have the [namespaced key name and value short name](https://docs.cloud.google.com/iam/docs/tags-access-control#definitions).
- `PROJECT_ID`: the ID of the project where you are creating a dataset.
- `DATASET_ID`: the ID of the new dataset.
### Terraform
Use the
[`google_bigquery_dataset`](https://registry.terraform.io/providers/hashicorp/google/latest/docs/resources/bigquery_dataset) resource.
> [!NOTE]
> **Note:** To create BigQuery objects using Terraform, you must enable the [Cloud Resource Manager API](https://docs.cloud.google.com/resource-manager/reference/rest).
To authenticate to BigQuery, set up Application Default
Credentials. For more information, see
[Set up authentication for client libraries](https://docs.cloud.google.com/bigquery/docs/authentication#client-libs).
The following example creates a dataset named `my_dataset`, then attaches
tags to it by populating the `resource_tags` field:
# Create tag keys and values
data "google_project" "default" {}
resource "google_tags_tag_key" "env_tag_key" {
parent = "projects/${data.google_project.default.project_id}"
short_name = "env2"
}
resource "google_tags_tag_key" "department_tag_key" {
parent = "projects/${data.google_project.default.project_id}"
short_name = "department2"
}
resource "google_tags_tag_value" "env_tag_value" {
parent = "tagKeys/${google_tags_tag_key.env_tag_key.name}"
short_name = "prod"
}
resource "google_tags_tag_value" "department_tag_value" {
parent = "tagKeys/${google_tags_tag_key.department_tag_key.name}"
short_name = "sales"
}
# Create a dataset
resource "google_bigquery_dataset" "default" {
dataset_id = "my_dataset"
default_partition_expiration_ms = 2592000000 # 30 days
default_table_expiration_ms = 31536000000 # 365 days
description = "dataset description"
location = "US"
max_time_travel_hours = 96 # 4 days
# Attach tags to the dataset
resource_tags = {
(google_tags_tag_key.env_tag_key.namespaced_name) : google_tags_tag_value.env_tag_value.short_name,
(google_tags_tag_key.department_tag_key.namespaced_name) : google_tags_tag_value.department_tag_value.short_name
}
}
To apply your Terraform configuration in a Google Cloud project, complete the steps in the
following sections.
## Prepare Cloud Shell
1. Launch [Cloud Shell](https://shell.cloud.google.com/).
2. Set the default Google Cloud project
where you want to apply your Terraform configurations.
You only need to run this command once per project, and you can run it in any directory.
```
export GOOGLE_CLOUD_PROJECT=PROJECT_ID
```
Environment variables are overridden if you set explicit values in the Terraform
configuration file.
## Prepare the directory
Each Terraform configuration file must have its own directory (also
called a *root module*).
1. In [Cloud Shell](https://shell.cloud.google.com/), create a directory and a new file within that directory. The filename must have the `.tf` extension---for example `main.tf`. In this tutorial, the file is referred to as `main.tf`.
```
mkdir DIRECTORY && cd DIRECTORY && touch main.tf
```
2. If you are following a tutorial, you can copy the sample code in each section or step.
Copy the sample code into the newly created `main.tf`.
Optionally, copy the code from GitHub. This is recommended
when the Terraform snippet is part of an end-to-end solution.
3. Review and modify the sample parameters to apply to your environment.
4. Save your changes.
5. Initialize Terraform. You only need to do this once per directory.
```
terraform init
```
Optionally, to use the latest Google provider version, include the `-upgrade`
option:
```
terraform init -upgrade
```
## Apply the changes
1. Review the configuration and verify that the resources that Terraform is going to create or update match your expectations:
```
terraform plan
```
Make corrections to the configuration as necessary.
2. Apply the Terraform configuration by running the following command and entering `yes` at the prompt:
```
terraform apply
```
Wait until Terraform displays the "Apply complete!" message.
3. [Open your Google Cloud project](https://console.cloud.google.com/) to view the results. In the Google Cloud console, navigate to your resources in the UI to make sure that Terraform has created or updated them.
> [!NOTE]
> **Note:** Terraform samples typically assume that the required APIs are enabled in your Google Cloud project.
### API
Call the
[`datasets.insert` method](https://docs.cloud.google.com/bigquery/docs/reference/rest/v2/datasets/insert)
and add your tags to the `resource_tags` field.
### Attach tags to an existing dataset
After you create a tag, you can attach it to an existing dataset. You can attach
only one tag value to a dataset for any given tag key.
### Console
1. In the Google Cloud console, go to the **BigQuery** page.
[Go to BigQuery](https://console.cloud.google.com/bigquery)
2. In the left pane, click **Explorer**:

3. In the **Explorer** pane, expand your project, click **Datasets**, and then select a dataset.
4. In the **Dataset info** section, click
**Edit details**.
5. Expand the **Tags** section.
1. To apply an existing tag, do the following:
1. Click the drop-down arrow beside **Select scope** and choose
**Current scope** ---**Select current organization** or **Select
current project**.
Alternatively, click **Select scope** to search for a resource
or to see a list of current resources.
2. For **Key 1** and **Value 1**, choose the appropriate values
from the lists.
2. To manually enter a new tag, do the following:
1. Click the drop-down arrow beside **Select a scope** and choose
**Manually enter IDs** \> **Organization** ,
**Project** , or **Tags**.
2. If you're creating a tag for your project or organization, in
the dialog, enter the `PROJECT_ID` or the `ORGANIZATION_ID`, and
then click **Save**.
3. For **Key 1** and **Value 1**, choose the appropriate values
from the lists.
3. Optional: To add additional tags to the table, click **Add tag** and
follow the previous steps.
6. Click **Save**.
### SQL
Use the
[`ALTER SCHEMA SET OPTIONS` statement](https://docs.cloud.google.com/bigquery/docs/reference/standard-sql/data-definition-language#alter_schema_set_options_statement).
The following example overwrites all tags for an existing dataset.
1. In the Google Cloud console, go to the **BigQuery** page.
[Go to BigQuery](https://console.cloud.google.com/bigquery)
2. In the query editor, enter the following statement:
```googlesql
ALTER SCHEMA PROJECT_ID.DATASET_ID
SET OPTIONS (
tags = [('TAG_KEY_1', 'TAG_VALUE_1'), ('TAG_KEY_2', 'TAG_VALUE_2')];)
```
Replace the following:
- `PROJECT_ID`: your project ID.
- `DATASET_ID`: the ID of the dataset that contains the table.
- `TABLE_ID`: the name of the table you're tagging.
- `TAG_KEY_1`: the [namespaced key name](https://docs.cloud.google.com/iam/docs/tags-access-control#definitions) that you want to set as the first tag on the table, for example, `'my-project/env'` or `'556741164180/department'`.
- `TAG_VALUE_1`: the [short name](https://docs.cloud.google.com/iam/docs/tags-access-control#definitions) for the tag's value, for example, `'prod'` or `'sales'`.
- `TAG_KEY_2`: the namespaced key name for the second tag.
- `TAG_VALUE_2`: the short name for the second tag's value.
3. Click **Run**.
For more information about how to run queries, see [Run an interactive query](https://docs.cloud.google.com/bigquery/docs/running-queries#queries).
The following example uses the `+=` operator to attach tags to a dataset
without overwriting existing tags. If an existing tag has the same key, that
tag is overwritten.
1. In the Google Cloud console, go to the **BigQuery** page.
[Go to BigQuery](https://console.cloud.google.com/bigquery)
2. In the query editor, enter the following statement:
```googlesql
ALTER SCHEMA PROJECT_ID.DATASET_ID
SET OPTIONS (
tags += [('TAG_KEY_1', 'TAG_VALUE_1'), ('TAG_KEY_2', 'TAG_VALUE_2')];)
```
Replace the following:
- `PROJECT_ID`: your project ID.
- `DATASET_ID`: the ID of the dataset that contains the table.
- `TABLE_ID`: the name of the table you're tagging.
- `TAG_KEY_1`: the [namespaced key name](https://docs.cloud.google.com/iam/docs/tags-access-control#definitions) that you want to set as the first tag on the table, for example, `'my-project/env'` or `'556741164180/department'`.
- `TAG_VALUE_1`: the [short name](https://docs.cloud.google.com/iam/docs/tags-access-control#definitions) for the tag's value, for example, `'prod'` or `'sales'`.
- `TAG_KEY_2`: the namespaced key name for the second tag.
- `TAG_VALUE_2`: the short name for the second tag's value.
3. Click **Run**.
For more information about how to run queries, see [Run an interactive query](https://docs.cloud.google.com/bigquery/docs/running-queries#queries).
### bq
Use the
[`bq update` command](https://docs.cloud.google.com/bigquery/docs/reference/bq-cli-reference#mk-dataset)
with the `--add_tags` flag:
```bash
bq update \
--add_tags=TAG \
PROJECT_ID:DATASET_ID
```
Replace the following:
- `TAG`: the tag that you are attaching to the dataset. Multiple tags are separated by commas. For example, `556741164180/env:prod,myProject/department:sales`. Each tag must have the [namespaced key name and value short name](https://docs.cloud.google.com/iam/docs/tags-access-control#definitions).
- `PROJECT_ID`: the ID of the project where the existing dataset is located.
- `DATASET_ID`: the ID of the existing dataset.
### gcloud
To attach a tag to a dataset using the command line, create a
tag binding resource by using the
[`gcloud resource-manager tags bindings create` command](https://docs.cloud.google.com/sdk/gcloud/reference/resource-manager/tags/bindings/create):
```
gcloud resource-manager tags bindings create \
--tag-value=TAG_VALUE_NAME \
--parent=RESOURCE_ID \
--location=LOCATION
```
Replace the following:
- `TAG_VALUE_NAME`: the permanent ID or namespaced name of the tag value to be attached, such as `tagValues/4567890123` or `1234567/my_tag_key/my_tag_value`.
- `RESOURCE_ID`: the full ID of the dataset, including the API domain name (`//bigquery.googleapis.com/`) to identify the type of resource. For example, `//bigquery.googleapis.com/projects/my_project/datasets/my_dataset`.
- `LOCATION`: the [location](https://docs.cloud.google.com/bigquery/docs/locations) of your dataset.
### Terraform
Add tags to the dataset's `resource_tags` field, and then apply the
updated configuration using the `google_bigquery_dataset` resource. For
more information, see the Terraform example in
[Attach tags when you create a new dataset](https://docs.cloud.google.com/bigquery/docs/tags#attach_tags_when_you_create_a_new_dataset).
### API
Call the
[`datasets.get` method](https://docs.cloud.google.com/bigquery/docs/reference/rest/v2/datasets/get)
to get the dataset resource, including the `resource_tags` field. Add your
tags to the `resource_tags` field and pass the updated dataset resource
back using the
[`datasets.update` method](https://docs.cloud.google.com/bigquery/docs/reference/rest/v2/datasets/update).
### List tags attached to a dataset
The following steps provide a list of tag bindings attached directly to a
dataset. These methods don't return tags that are inherited from parent
resources.
### Console
1. In the Google Cloud console, go to the **BigQuery** page.
[Go to BigQuery](https://console.cloud.google.com/bigquery)
2. In the left pane, click **Explorer**:

3. In the **Explorer** pane, expand your project, click **Datasets**, and then select a dataset.
The tags appear in the **Dataset info** section.
### bq
To list tags attached to a dataset, use the
[`bq show` command](https://docs.cloud.google.com/bigquery/docs/reference/bq-cli-reference#bq_show).
```
bq show PROJECT_ID:DATASET_ID
```
Replace the following:
- `PROJECT_ID`: the ID of the project containing your dataset.
- `DATASET_ID`: the ID of the dataset for which you want to list the tags.
### gcloud
To get a list of tag bindings attached to a resource, use the [`gcloud resource-manager tags bindings list` command](https://docs.cloud.google.com/sdk/gcloud/reference/resource-manager/tags/bindings/list):
```
gcloud resource-manager tags bindings list \
--parent=RESOURCE_ID \
--location=LOCATION
```
Replace the following:
- `RESOURCE_ID`: the full ID of the dataset,
including the API domain name (`//bigquery.googleapis.com/`) to identify
the type of resource. For example,
`//bigquery.googleapis.com/projects/my_project/datasets/my_dataset`.
- `LOCATION`: the [location](https://docs.cloud.google.com/bigquery/docs/locations)
of your dataset.
The output is similar to the following:
```none
name: tagBindings/%2F%2Fbigquery.googleapis.com%2Fprojects%2Fmy_project%2Fdatasets%2Fmy_dataset/tagValues/4567890123
parent: //bigquery.googleapis.com/projects/my_project/datasets/my_dataset
tagValue: tagValues/4567890123
```
You can list the inherited tags by BigQuery datasets using
the `gcloud resource-manager tags bindings list`. You can also use the [`--filter`](https://docs.cloud.google.com/sdk/gcloud/reference/topic/filters)
option on the `namespacedTagValue` attribute to filter tags according to
project ID, tag value, or tag key.
```
gcloud resource-manager tags bindings list \
--parent=//bigquery.googleapis.com/projects/PROJECT_ID/datasets/DATASET_ID \
--effective \
--filter=namespacedTagValue:TAG_FILTER
```
Replace the following :
- `PROJECT_ID`: the ID of the project containing
your dataset.
- `DATASET_ID`: the ID of the dataset.
- `TAG_FILTER`: specify a value to filter for
inherited tags based on one of the following:
- Filter for tags by project ID. For example, `myproject`.
- Filter for tag values by specifying the permanent ID or namespaced
name of the tag value. For example, `tagValues/4567890123` or `1234567/my_tag_key/my_tag_value`.
- Filter for tag keys by specifying the display name for the tag key.
For example `tagkey`.
### Terraform
Use the `terraform state show` command to list the attributes of the
dataset, including the `resource_tags` field. Run this command
in the directory where the dataset's Terraform configuration file has been
run.
```none
terraform state show google_bigquery_dataset.default
```
### API
Call the
[`datasets.get` method](https://docs.cloud.google.com/bigquery/docs/reference/rest/v2/datasets/get)
to get the dataset resource. The dataset resource includes tags attached to
the dataset in the `resource_tags` field.
### Views
Use the
[`INFORMATION_SCHEMA.SCHEMATA_OPTIONS` view](https://docs.cloud.google.com/bigquery/docs/information-schema-datasets-schemata-options).
For example, the following query shows all tags attached to all datasets
in a region. This query returns a table with columns including `schema_name`
(the dataset names), `option_name` (always `'tags'`),
`object_type` (always `ARRAY>`), and `option_value`,
which contains arrays of `STRUCT` objects representing tags associated with
each dataset. For datasets without assigned tags, the `option_value` column
returns an empty array.
```googlesql
SELECT * from region-REGION.INFORMATION_SCHEMA.SCHEMATA_OPTIONS
WHERE option_name='tags'
```
Replace the following:
- `REGION`: the [region](https://docs.cloud.google.com/bigquery/docs/locations) where your datasets are located.
> [!NOTE]
> **Note:** You can list the inherited tags by BigQuery dataset and tables using the [`gcloud resource-manager tags bindings list`](https://docs.cloud.google.com/bigquery/docs/tags#gcloud_1) command.
### Detach tags from a dataset
You can detach a tag from a resource by deleting the tag binding resource. If
you're deleting a tag, you must detach it from the dataset before you delete
it. For more information, see [Deleting tags](https://docs.cloud.google.com/resource-manager/docs/tags/tags-creating-and-managing#deleting).
### Console
1. In the Google Cloud console, go to the **BigQuery** page.
[Go to BigQuery](https://console.cloud.google.com/bigquery)
2. In the left pane, click **Explorer**:

3. In the **Explorer** pane, expand your project, click **Datasets**, and then select a dataset.
4. In the **Dataset info** section, click
**Edit details**.
5. In the **Tags** section, click
**Delete item** next to the
tag you want to delete.
6. Click **Save**.
### SQL
Use the
[`ALTER SCHEMA SET OPTIONS` statement](https://docs.cloud.google.com/bigquery/docs/reference/standard-sql/data-definition-language#alter_schema_set_options_statement).
The following example detaches tags from a dataset using the `-=` operator. To
detach all tags from a dataset, you can specify `tags=NULL` or `tags=[]`.
1. In the Google Cloud console, go to the **BigQuery** page.
[Go to BigQuery](https://console.cloud.google.com/bigquery)
2. In the query editor, enter the following statement:
```googlesql
ALTER TABLE PROJECT_ID.DATASET_ID.TABLE_ID
SET OPTIONS (
tags -= [('TAG_KEY_1', 'TAG_VALUE_1'), ('TAG_KEY_2', 'TAG_VALUE_2')];)
```
Replace the following:
- `PROJECT_ID`: your project ID.
- `DATASET_ID`: the ID of the dataset that contains the table.
- `TABLE_ID`: the name of the table that you're detaching the tags from.
- `TAG_KEY_1`: the [namespaced key name](https://docs.cloud.google.com/iam/docs/tags-access-control#definitions) of the first tag you want to detach, for example, `'my-project/env'` or `'556741164180/department'`.
- `TAG_VALUE_1`: the [short name](https://docs.cloud.google.com/iam/docs/tags-access-control#definitions) of the value for the tag you want to detach, for example, `'prod'` or `'sales'`.
- `TAG_KEY_2`: the namespaced key name for the second tag you're detaching.
- `TAG_VALUE_2`: the short name for the value of the second tag you're detaching.
3. Click **Run**.
For more information about how to run queries, see [Run an interactive query](https://docs.cloud.google.com/bigquery/docs/running-queries#queries).
### bq
Use the
[`bq update` command](https://docs.cloud.google.com/bigquery/docs/reference/bq-cli-reference#mk-dataset)
with the `--remove_tags` flag:
```bash
bq update \
--remove_tags=REMOVED_TAG \
PROJECT_ID:DATASET_ID
```
Replace the following:
- `REMOVED_TAG`: the tag that you are removing from the dataset. Multiple tags are separated by commas. Only accepts keys without value pairs. For example, `556741164180/env,myProject/department`. Each tag must have the [namespaced key name](https://docs.cloud.google.com/iam/docs/tags-access-control#definitions).
- `PROJECT_ID`: the ID of the project that contains your dataset.
- `DATASET_ID`: the ID of the dataset to detach tags from.
Alternatively, if you want to remove *all* tags from a dataset, use the
[`bq update` command](https://docs.cloud.google.com/bigquery/docs/reference/bq-cli-reference#bq_update)
with the `--clear_all_tags` flag:
```bash
bq update \
--clear_all_tags
PROJECT_ID:DATASET_ID
```
### gcloud
To detach a tag from a dataset using the command line, delete the tag
binding by using the
[`gcloud resource-manager tags bindings delete` command](https://docs.cloud.google.com/sdk/gcloud/reference/resource-manager/tags/bindings/delete):
```
gcloud resource-manager tags bindings delete \
--tag-value=TAG_VALUE_NAME \
--parent=RESOURCE_ID \
--location=LOCATION
```
Replace the following:
- `TAG_VALUE_NAME`: the permanent ID or namespaced name of the tag value to be detached, such as `tagValues/4567890123` or `1234567/my_tag_key/my_tag_value`.
- `RESOURCE_ID`: the full ID of the dataset, including the API domain name (`//bigquery.googleapis.com/`) to identify the type of resource. For example, `//bigquery.googleapis.com/projects/my_project/datasets/my_dataset`.
- `LOCATION`: the [location](https://docs.cloud.google.com/bigquery/docs/locations) of your dataset.
### Terraform
Remove your tags from the dataset's `resource_tags` field, and then apply
the updated configuration using the `google_bigquery_dataset` resource.
### API
Call the
[`datasets.get` method](https://docs.cloud.google.com/bigquery/docs/reference/rest/v2/datasets/get)
to get the dataset resource, including the `resource_tags` field. Remove
your tags from the `resource_tags` field and pass the updated dataset
resource back using the
[`datasets.update` method](https://docs.cloud.google.com/bigquery/docs/reference/rest/v2/datasets/update).
## Tag tables
The following sections describe how to attach tags to new and existing tables,
list tags attached to a table, and detach tags from a table.
### Attach tags when you create a new table
After you create a tag, you can attach it to a new table. You can attach
only one tag value to a table for any given tag key. You can attach a maximum of
50 tags to a table.
### Console
1. In the Google Cloud console, go to the **BigQuery** page.
[Go to BigQuery](https://console.cloud.google.com/bigquery)
2. In the left pane, click **Explorer**:

3. In the **Explorer** pane, expand your project, click **Datasets**, and
then select a dataset.
4. In the **Dataset info** section, click
**Create table**.
5. Enter the information for your new table. For more details, see
[Create and use tables](https://docs.cloud.google.com/bigquery/docs/tables).
6. Expand the **Tags** section.
1. To apply an existing tag, do the following:
1. Click the drop-down arrow beside **Select scope** and choose
**Current scope** ---**Select current organization** or **Select
current project**.
Alternatively, click **Select scope** to search for a resource
or to see a list of current resources.
2. For **Key 1** and **Value 1**, choose the appropriate values
from the lists.
2. To manually enter a new tag, do the following:
1. Click the drop-down arrow beside **Select a scope** and choose
**Manually enter IDs** \> **Organization** ,
**Project** , or **Tags**.
2. If you're creating a tag for your project or organization, in
the dialog, enter the `PROJECT_ID` or the `ORGANIZATION_ID`, and
then click **Save**.
3. For **Key 1** and **Value 1**, choose the appropriate values
from the lists.
3. Optional: To add additional tags to the table, click **Add tag** and
follow the previous steps.
7. Click **Create table**.
### SQL
Use the
[`CREATE TABLE` statement](https://docs.cloud.google.com/bigquery/docs/reference/standard-sql/data-definition-language#create_table_statement).
1. In the Google Cloud console, go to the **BigQuery** page.
[Go to BigQuery](https://console.cloud.google.com/bigquery)
2. In the query editor, enter the following statement:
```googlesql
CREATE TABLE PROJECT_ID.DATASET_ID.TABLE_ID
OPTIONS (
tags = [('TAG_KEY_1', 'TAG_VALUE_1'), ('TAG_KEY_2', 'TAG_VALUE_2')];)
```
Replace the following:
- `PROJECT_ID`: your project ID.
- `DATASET_ID`: the ID of the dataset where you're creating the table.
- `TABLE_ID`: the name of the new table.
- `TAG_KEY_1`: the [namespaced key name](https://docs.cloud.google.com/iam/docs/tags-access-control#definitions) that you want to set as the first tag on the table, for example, `'my-project/env'` or `'556741164180/department'`.
- `TAG_VALUE_1`: the [short name](https://docs.cloud.google.com/iam/docs/tags-access-control#definitions) for the tag's value, for example, `'prod'` or `'sales'`.
- `TAG_KEY_2`: the namespaced key name for the second tag.
- `TAG_VALUE_2`: the short name for the second tag's value.
3. Click **Run**.
For more information about how to run queries, see [Run an interactive query](https://docs.cloud.google.com/bigquery/docs/running-queries#queries).
### bq
Use the
[`bq mk --table` command](https://docs.cloud.google.com/bigquery/docs/reference/bq-cli-reference#mk-table)
with the `--add_tags` flag:
```bash
bq mk --table \
--schema=SCHEMA \
--add_tags=TAG \
PROJECT_ID:DATASET_ID.TABLE_ID
```
Replace the following:
- `SCHEMA`: the [inline schema definition](https://docs.cloud.google.com/bigquery/docs/tables#create_an_empty_table_with_a_schema_definition).
- `TAG`: the tag that you are attaching to the new table. Multiple tags are separated by commas. For example, `556741164180/env:prod,myProject/department:sales`. Each tag must have the [namespaced key name and value short name](https://docs.cloud.google.com/iam/docs/tags-access-control#definitions).
- `PROJECT_ID`: the ID of the project where you are creating a table.
- `DATASET_ID`: the ID of the dataset where you are creating a table.
- `TABLE_ID`: the ID of the new table.
### Terraform
Use the
[`google_bigquery_table`](https://registry.terraform.io/providers/hashicorp/google/latest/docs/resources/bigquery_table)
resource.
> [!NOTE]
> **Note:** To create BigQuery objects using Terraform, you must enable the [Cloud Resource Manager API](https://docs.cloud.google.com/resource-manager/reference/rest).
To authenticate to BigQuery, set up Application Default
Credentials. For more information, see
[Set up authentication for client libraries](https://docs.cloud.google.com/bigquery/docs/authentication#client-libs).
The following example creates a table named `mytable`, then attaches
tags to it by populating the `resource_tags` field:
# Create tag keys and values
data "google_project" "default" {}
resource "google_tags_tag_key" "env_tag_key" {
parent = "projects/${data.google_project.default.project_id}"
short_name = "env3"
}
resource "google_tags_tag_key" "department_tag_key" {
parent = "projects/${data.google_project.default.project_id}"
short_name = "department3"
}
resource "google_tags_tag_value" "env_tag_value" {
parent = "tagKeys/${google_tags_tag_key.env_tag_key.name}"
short_name = "prod"
}
resource "google_tags_tag_value" "department_tag_value" {
parent = "tagKeys/${google_tags_tag_key.department_tag_key.name}"
short_name = "sales"
}
# Create a dataset
resource "google_bigquery_dataset" "default" {
dataset_id = "MyDataset"
default_partition_expiration_ms = 2592000000 # 30 days
default_table_expiration_ms = 31536000000 # 365 days
description = "dataset description"
location = "US"
max_time_travel_hours = 96 # 4 days
}
# Create a table
resource "google_bigquery_table" "default" {
dataset_id = google_bigquery_dataset.default.dataset_id
table_id = "mytable"
description = "table description"
# Attach tags to the table
resource_tags = {
(google_tags_tag_key.env_tag_key.namespaced_name) : google_tags_tag_value.env_tag_value.short_name,
(google_tags_tag_key.department_tag_key.namespaced_name) : google_tags_tag_value.department_tag_value.short_name
}
}
To apply your Terraform configuration in a Google Cloud project, complete the steps in the
following sections.
## Prepare Cloud Shell
1. Launch [Cloud Shell](https://shell.cloud.google.com/).
2. Set the default Google Cloud project
where you want to apply your Terraform configurations.
You only need to run this command once per project, and you can run it in any directory.
```
export GOOGLE_CLOUD_PROJECT=PROJECT_ID
```
Environment variables are overridden if you set explicit values in the Terraform
configuration file.
## Prepare the directory
Each Terraform configuration file must have its own directory (also
called a *root module*).
1. In [Cloud Shell](https://shell.cloud.google.com/), create a directory and a new file within that directory. The filename must have the `.tf` extension---for example `main.tf`. In this tutorial, the file is referred to as `main.tf`.
```
mkdir DIRECTORY && cd DIRECTORY && touch main.tf
```
2. If you are following a tutorial, you can copy the sample code in each section or step.
Copy the sample code into the newly created `main.tf`.
Optionally, copy the code from GitHub. This is recommended
when the Terraform snippet is part of an end-to-end solution.
3. Review and modify the sample parameters to apply to your environment.
4. Save your changes.
5. Initialize Terraform. You only need to do this once per directory.
```
terraform init
```
Optionally, to use the latest Google provider version, include the `-upgrade`
option:
```
terraform init -upgrade
```
## Apply the changes
1. Review the configuration and verify that the resources that Terraform is going to create or update match your expectations:
```
terraform plan
```
Make corrections to the configuration as necessary.
2. Apply the Terraform configuration by running the following command and entering `yes` at the prompt:
```
terraform apply
```
Wait until Terraform displays the "Apply complete!" message.
3. [Open your Google Cloud project](https://console.cloud.google.com/) to view the results. In the Google Cloud console, navigate to your resources in the UI to make sure that Terraform has created or updated them.
> [!NOTE]
> **Note:** Terraform samples typically assume that the required APIs are enabled in your Google Cloud project.
### API
Call the
[`tables.insert` method](https://docs.cloud.google.com/bigquery/docs/reference/rest/v2/tables/insert)
with a defined [table resource](https://docs.cloud.google.com/bigquery/docs/reference/rest/v2/tables).
Include the tags in the `resource_tags` field.
### Attach tags to an existing table
After you create a tag, you can attach it to an existing table. You can attach
only one tag value to a table for any given tag key.
### Console
1. In the Google Cloud console, go to the **BigQuery** page.
[Go to BigQuery](https://console.cloud.google.com/bigquery)
2. In the left pane, click **Explorer**:

3. In the **Explorer** pane, expand your project, and then click **Datasets**.
4. Click **Overview \> Tables**, and then select a table.
5. In the details pane, click **Edit \> Edit details**.
6. Expand the **Tags** section.
1. To apply an existing tag, do the following:
1. Click the drop-down arrow beside **Select scope** and choose
**Current scope** ---**Select current organization** or **Select
current project**.
Alternatively, click **Select scope** to search for a resource
or to see a list of current resources.
2. For **Key 1** and **Value 1**, choose the appropriate values
from the lists.
2. To manually enter a new tag, do the following:
1. Click the drop-down arrow beside **Select a scope** and choose
**Manually enter IDs** \> **Organization** ,
**Project** , or **Tags**.
2. If you're creating a tag for your project or organization, in
the dialog, enter the `PROJECT_ID` or the `ORGANIZATION_ID`, and
then click **Save**.
3. For **Key 1** and **Value 1**, choose the appropriate values
from the lists.
3. Optional: To add additional tags to the table, click **Add tag** and
follow the previous steps.
7. Click **Save**.
### SQL
Use the
[`ALTER TABLE SET OPTIONS` statement](https://docs.cloud.google.com/bigquery/docs/reference/standard-sql/data-definition-language#alter_table_set_options_statement).
The following example overwrites all tags for an existing table.
1. In the Google Cloud console, go to the **BigQuery** page.
[Go to BigQuery](https://console.cloud.google.com/bigquery)
2. In the query editor, enter the following statement:
```googlesql
ALTER TABLE PROJECT_ID.DATASET_ID.TABLE_ID
SET OPTIONS (
tags = [('TAG_KEY_1', 'TAG_VALUE_1'), ('TAG_KEY_2', 'TAG_VALUE_2')];)
```
Replace the following:
- `PROJECT_ID`: your project ID.
- `DATASET_ID`: the ID of the dataset that contains the table.
- `TABLE_ID`: the name of the table you're tagging.
- `TAG_KEY_1`: the [namespaced key name](https://docs.cloud.google.com/iam/docs/tags-access-control#definitions) that you want to set as the first tag on the table, for example, `'my-project/env'` or `'556741164180/department'`.
- `TAG_VALUE_1`: the [short name](https://docs.cloud.google.com/iam/docs/tags-access-control#definitions) for the tag's value, for example, `'prod'` or `'sales'`.
- `TAG_KEY_2`: the namespaced key name for the second tag.
- `TAG_VALUE_2`: the short name for the second tag's value.
3. Click **Run**.
For more information about how to run queries, see [Run an interactive query](https://docs.cloud.google.com/bigquery/docs/running-queries#queries).
The following example uses the `+=` operator to attach a tag to a table
without overwriting existing tags. If an existing tag has the same key, that
tag is overwritten.
1. In the Google Cloud console, go to the **BigQuery** page.
[Go to BigQuery](https://console.cloud.google.com/bigquery)
2. In the query editor, enter the following statement:
```googlesql
ALTER TABLE PROJECT_ID.DATASET_ID.TABLE_ID
SET OPTIONS (
tags += [('TAG_KEY_1', 'TAG_VALUE_1'), ('TAG_KEY_2', 'TAG_VALUE_2')];)
```
Replace the following:
- `PROJECT_ID`: your project ID.
- `DATASET_ID`: the ID of the dataset that contains the table.
- `TABLE_ID`: the name of the table you're tagging.
- `TAG_KEY_1`: the [namespaced key name](https://docs.cloud.google.com/iam/docs/tags-access-control#definitions) that you want to set as the first tag on the table, for example, `'my-project/env'` or `'556741164180/department'`.
- `TAG_VALUE_1`: the [short name](https://docs.cloud.google.com/iam/docs/tags-access-control#definitions) for the tag's value, for example, `'prod'` or `'sales'`.
- `TAG_KEY_2`: the namespaced key name for the second tag.
- `TAG_VALUE_2`: the short name for the second tag's value.
3. Click **Run**.
For more information about how to run queries, see [Run an interactive query](https://docs.cloud.google.com/bigquery/docs/running-queries#queries).
### bq
Use the
[`bq update` command](https://docs.cloud.google.com/bigquery/docs/reference/bq-cli-reference#bq_update)
with the `--add_tags` flag:
```bash
bq update \
--add_tags=TAG \
PROJECT_ID:DATASET_ID.TABLE_ID
```
Replace the following:
- `TAG`: the tag that you are attaching to the table. Multiple tags are separated by commas. For example, `556741164180/env:prod,myProject/department:sales`. Each tag must have the [namespaced key name and value short name](https://docs.cloud.google.com/iam/docs/tags-access-control#definitions).
- `PROJECT_ID`: the ID of the project that contains your table.
- `DATASET_ID`: the ID of the dataset that contains your table.
- `TABLE_ID`: the ID of the table that you are updating.
### gcloud
To attach a tag to a table using the command line, create a
tag binding resource by using the
[`gcloud resource-manager tags bindings create` command](https://docs.cloud.google.com/sdk/gcloud/reference/resource-manager/tags/bindings/create):
```
gcloud resource-manager tags bindings create \
--tag-value=TAG_VALUE_NAME \
--parent=RESOURCE_ID \
--location=LOCATION
```
Replace the following:
- `TAG_VALUE_NAME`: the permanent ID or namespaced name of the tag value to be attached, such as `tagValues/4567890123` or `1234567/my_tag_key/my_tag_value`.
- `RESOURCE_ID`: the full ID of the table, including the API domain name (`//bigquery.googleapis.com/`) to identify the type of resource. For example, `//bigquery.googleapis.com/projects/my_project/datasets/my_dataset/tables/my_table`
- `LOCATION`: the [location](https://docs.cloud.google.com/bigquery/docs/locations) of your table.
### Terraform
Add tags to the table's `resource_tags` field, and then apply the
updated configuration using the `google_bigquery_table` resource. For
more information, see the Terraform example in
[Attach tags when you create a new table](https://docs.cloud.google.com/bigquery/docs/tags#attach_tags_when_you_create_a_new_table).
### API
Call the
[`tables.update` method](https://docs.cloud.google.com/bigquery/docs/reference/rest/v2/tables/update)
with a defined [table resource](https://docs.cloud.google.com/bigquery/docs/reference/rest/v2/tables).
Include the tags in the `resource_tags` field.
### List tags attached to a table
You can list tags that are attached directly to a table. This process
doesn't list tags that are inherited from parent resources.
### Console
1. In the Google Cloud console, go to the **BigQuery** page.
[Go to BigQuery](https://console.cloud.google.com/bigquery)
2. In the left pane, click **Explorer**:

3. In the **Explorer** pane, expand your project, and then click **Datasets**.
4. Click **Overview \> Tables**, and then select a table.
The tags are visible in the **Details** tab.
### bq
Use the
[`bq show` command](https://docs.cloud.google.com/bigquery/docs/reference/bq-cli-reference#bq_show)
and look for the `tags` column. If there are no tags on the table, the
`tags` column isn't displayed.
```bash
bq show \
PROJECT_ID:DATASET_ID.TABLE_ID
```
Replace the following:
- `PROJECT_ID`: the ID of the project that contains your table.
- `DATASET_ID`: the ID of the dataset that contains your table.
- `TABLE_ID`: the ID of your table.
### gcloud
To get a list of tag bindings attached to a resource, use the
[`gcloud resource-manager tags bindings list` command](https://docs.cloud.google.com/sdk/gcloud/reference/resource-manager/tags/bindings/list):
```sh
gcloud resource-manager tags bindings list \
--parent=RESOURCE_ID \
--location=LOCATION
```
Replace the following:
- `RESOURCE_ID`: the full ID of the table,
including the API domain name (`//bigquery.googleapis.com/`) to identify
the type of resource. For example,
`//bigquery.googleapis.com/projects/my_project/datasets/my_dataset/tables/my_table`.
- `LOCATION`: the [location](https://docs.cloud.google.com/bigquery/docs/locations)
of your dataset.
The output is similar to the following:
```none
name: tagBindings/%2F%2Fbigquery.googleapis.com%2Fprojects%2Fmy_project%2Fdatasets%2Fmy_dataset/tagValues/4567890123
parent: //bigquery.googleapis.com/projects/my_project/datasets/my_dataset
tagValue: tagValues/4567890123
```
You can list the inherited tags by BigQuery tables using
the `gcloud resource-manager tags bindings list`. You can also use the [`--filter`](https://docs.cloud.google.com/sdk/gcloud/reference/topic/filters)
option on the `namespacedTagValue` attribute to filter tags according to
project ID, tag value, or tag key.
```
gcloud resource-manager tags bindings list \
--parent=//bigquery.googleapis.com/projects/PROJECT_ID/datasets/DATASET_ID/tables/TABLE_ID \
--effective \
--filter=namespacedTagValue:TAG_FILTER
```
Replace the following :
- `PROJECT_ID`: the ID of the project containing
your dataset.
- `DATASET_ID`: the ID of the dataset.
- `TAG_FILTER`: specify a value to filter for
inherited tags based on one of the following:
- Filter for tags by project ID. For example, `myproject`.
- Filter for tag values by specifying the permanent ID or namespaced
name of the tag value. For example, `tagValues/4567890123` or `1234567/my_tag_key/my_tag_value`.
- Filter for tag keys by specifying the display name for the tag key.
For example `tagkey`.
### Terraform
Use the `terraform state show` command to list the attributes of the
table, including the `resource_tags` field. Run this command
in the directory where the table's Terraform configuration file has been
run.
```none
terraform state show google_bigquery_table.default
```
### API
Call the
[`tables.get` method](https://docs.cloud.google.com/bigquery/docs/reference/rest/v2/tables/get)
with a defined [table resource](https://docs.cloud.google.com/bigquery/docs/reference/rest/v2/tables),
and look for the `resource_tags` field.
### Views
Use the
[`INFORMATION_SCHEMA.TABLE_OPTIONS` view](https://docs.cloud.google.com/bigquery/docs/information-schema-table-options).
For example, the following query shows all tags attached to all tables in a
dataset. This query returns a table with columns including `schema_name`
(the dataset name), `option_name` (always `'tags'`),
`object_type` (always `ARRAY>`), and `option_value`,
which contains arrays of `STRUCT` objects representing tags associated with
each dataset. For tables without assigned tags, the `option_value` column
returns an empty array.
```googlesql
SELECT * from DATASET_ID.INFORMATION_SCHEMA.TABLE_OPTIONS
WHERE option_name='tags'
```
Replace `DATASET_ID` with the ID of the dataset
that contains your table.
> [!NOTE]
> **Note:** You can list the inherited tags by BigQuery dataset and tables using the [`gcloud resource-manager tags bindings list`](https://docs.cloud.google.com/bigquery/docs/tags#gcloud_4) command.
### Detach tags from a table
You can remove a tag association from a table by deleting the tag binding.
If you're deleting a tag, you must detach it from the table before you delete
it. For more information, see [Deleting tags](https://docs.cloud.google.com/resource-manager/docs/tags/tags-creating-and-managing#deleting).
### Console
1. In the Google Cloud console, go to the **BigQuery** page.
[Go to BigQuery](https://console.cloud.google.com/bigquery)
2. In the left pane, click **Explorer**:

3. In the **Explorer** pane, expand your project, and then click **Datasets**.
4. Click **Overview \> Tables**, and then select a table.
5. In the details pane, click **Edit \> Edit details**.
6. In the **Tags** section, click
**Delete item** next to the
tag you want to delete.
7. Click **Save**.
### SQL
Use the
[`ALTER TABLE SET OPTIONS` statement](https://docs.cloud.google.com/bigquery/docs/reference/standard-sql/data-definition-language#alter_table_set_options_statement).
The following example detaches tags from a table using the `-=` operator. To
detach all tags from a table, you can specify `tags=NULL` or `tags=[]`.
1. In the Google Cloud console, go to the **BigQuery** page.
[Go to BigQuery](https://console.cloud.google.com/bigquery)
2. In the query editor, enter the following statement:
```googlesql
ALTER TABLE PROJECT_ID.DATASET_ID.TABLE_ID
SET OPTIONS (
tags -= [('TAG_KEY_1', 'TAG_VALUE_1'), ('TAG_KEY_2', 'TAG_VALUE_2')];)
```
Replace the following:
- `PROJECT_ID`: your project ID.
- `DATASET_ID`: the ID of the dataset that contains the table.
- `TABLE_ID`: the name of the table that you're detaching the tags from.
- `TAG_KEY_1`: the [namespaced key name](https://docs.cloud.google.com/iam/docs/tags-access-control#definitions) of the first tag you want to detach, for example, `'my-project/env'` or `'556741164180/department'`.
- `TAG_VALUE_1`: the [short name](https://docs.cloud.google.com/iam/docs/tags-access-control#definitions) of the value for the tag you want to detach, for example, `'prod'` or `'sales'`.
- `TAG_KEY_2`: the namespaced key name for the second tag you're detaching.
- `TAG_VALUE_2`: the short name for the value of the second tag you're detaching.
3. Click **Run**.
For more information about how to run queries, see [Run an interactive query](https://docs.cloud.google.com/bigquery/docs/running-queries#queries).
### bq
To remove some tags from a table, use the
[`bq update` command](https://docs.cloud.google.com/bigquery/docs/reference/bq-cli-reference#bq_update)
with the `--remove_tags` flag:
```bash
bq update \
--remove_tags=TAG_KEYS \
PROJECT_ID:DATASET_ID.TABLE_ID
```
Replace the following:
- `TAG_KEYS`: the tag keys that you are detaching from the table, separated by commas. For example, `556741164180/env,myProject/department`. Each tag key must have the [namespaced key name](https://docs.cloud.google.com/iam/docs/tags-access-control#definitions).
- `PROJECT_ID`: the ID of the project that contains your table.
- `DATASET_ID`: the ID of the dataset that contains your table.
- `TABLE_ID`: the ID of the table that you are updating.
To remove all tags from a table, use the
[`bq update` command](https://docs.cloud.google.com/bigquery/docs/reference/bq-cli-reference#bq_update)
with the `--clear_all_tags` flag:
```bash
bq update \
--clear_all_tags \
PROJECT_ID:DATASET_ID.TABLE_ID
```
### gcloud
To remove a tag association from a table using the command line, delete the
tag binding by using the
[`gcloud resource-manager tags bindings delete` command](https://docs.cloud.google.com/sdk/gcloud/reference/resource-manager/tags/bindings/delete):
```
gcloud resource-manager tags bindings delete \
--tag-value=TAG_VALUE_NAME \
--parent=RESOURCE_ID \
--location=LOCATION
```
Replace the following:
- `TAG_VALUE_NAME`: the permanent ID or namespaced name of the tag value to be deleted, such as `tagValues/4567890123` or `1234567/my_tag_key/my_tag_value`.
- `RESOURCE_ID`: the full ID of the table, including the API domain name (`//bigquery.googleapis.com/`) to identify the type of resource. For example, `//bigquery.googleapis.com/projects/my_project/datasets/my_dataset/tables/my_table`.
- `LOCATION`: the [location](https://docs.cloud.google.com/bigquery/docs/locations) of your dataset.
### Terraform
Remove your tags from the table's `resource_tags` field, and then apply
the updated configuration using the `google_bigquery_table` resource.
### API
Call the
[`tables.update` method](https://docs.cloud.google.com/bigquery/docs/reference/rest/v2/tables/update)
with a defined [table resource](https://docs.cloud.google.com/bigquery/docs/reference/rest/v2/tables),
and remove the tags in the `resource_tags` field. To remove all tags, remove
the `resource_tags` field.
## Tag other table-like resources
You can similarly tag BigQuery views, materialized views, clones, and
snapshots.
## Tag columns
You can tag table columns with [data governance tags](https://docs.cloud.google.com/bigquery/docs/tags#data-governance-tags) for
column-level access control and data masking.
## Delete tags
You can't delete a tag if it's referenced by a table, view, or dataset. You
should detach all existing tag binding resources before deleting the tag key
or value itself. To delete tag keys and tag values, see
[Deleting tags](https://docs.cloud.google.com/resource-manager/docs/tags/tags-creating-and-managing#deleting).
## Example
Suppose you are an administrator of an organization. Your
data analysts are all members of the group analysts@example.com, which has the
BigQuery Data Viewer IAM role on the project `userData`. A data
analyst intern is hired, and according to the company policy they should only
have permission to view the `anonymousData` dataset in the `userData` project.
You can control their access using tags.
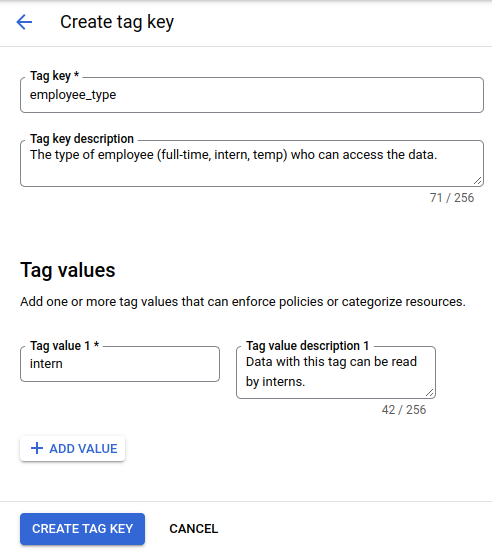
1. [Create a tag](https://docs.cloud.google.com/resource-manager/docs/tags/tags-creating-and-managing#creating_tag)
with the key `employee_type` and the value `intern`:
2. In the Google Cloud console, go to the **IAM** page.
[Go to IAM](https://console.cloud.google.com/iam-admin/iam)
3. Locate the row that contains the intern whose dataset access you want to
restrict, and click
**Edit principal** in that row.
4. From the **Role** menu, select **BigQuery Data Viewer**.
5. Click **Add condition**.
6. In the **Title** and **Description** fields, enter values that describe the
IAM tag condition that you want to create.
7. On the **Condition builder** tab, click **Add**.
8. In the **Condition type** menu, select **Resource** , then select **Tag**.
9. In the **Operator** menu, select **has value**.
10. In the **Value path** field, enter the tag value path in the form
`ORGANIZATION/TAG_KEY/TAG_VALUE`.
For example, `example.org/employee_type/intern`.
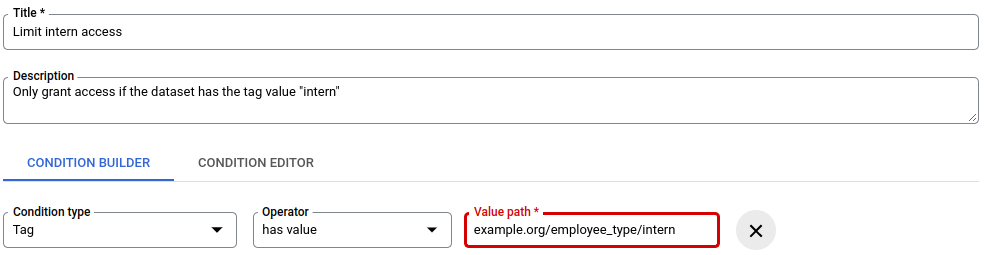
This IAM tag condition restricts the intern's access to
datasets that have the `intern` tag.
11. To save the tag condition, click **Save**.
12. To save any changes that you made in the **Edit permissions** pane, click
**Save**.
13. To attach the `intern` tag value to the `anonymousData` dataset, use the
command line to run the `gcloud resource-manager tags bindings create`
command. For example:
```
gcloud resource-manager tags bindings create \
--tag-value=tagValues/4567890123 \
--parent=//bigquery.googleapis.com/projects/userData/datasets/anonymousData \
--location=US
```
## Control access to columns with data governance tags
> [!WARNING]
>
> **Preview**
>
>
> This feature is
>
> subject to the "Pre-GA Offerings Terms" in the General Service Terms section of the
> [Service Specific
> Terms](https://docs.cloud.google.com/terms/service-terms#1).
>
> Pre-GA features are available "as is" and might have limited support.
>
> For more information, see the
> [launch stage descriptions](https://cloud.google.com/products/#product-launch-stages).
> [!NOTE]
> **Note:** To provide feedback or request support for this feature, send an email to [bigquery-security-feedback@google.com](mailto:bigquery-security-feedback@google.com).
You can enforce column-level security and data masking in
BigQuery using data governance tags. Data governance tags are a type of
Resource Manager tag that you can attach to sensitive columns and use in
BigQuery data policies to grant conditional access to your users.
Configure column-level security by creating data governance tags and attaching
them to BigQuery columns. Then, create BigQuery Data Policy
data policies that reference these tags. These policies apply data masking rules
or grant raw data access to specific users, ensuring only authorized principals
view sensitive data.
For more information, see [Introduction to column-level access control](https://docs.cloud.google.com/bigquery/docs/column-level-security-intro) and [Introduction to data masking](https://docs.cloud.google.com/bigquery/docs/column-data-masking-intro).
To create and manage data governance tags in the Google Cloud console,
you can use the
[BigQuery Security center](https://docs.cloud.google.com/bigquery/docs/security-center-overview#manage-tags-taxonomies).
### Before you begin with governance tags
1.
[Install](https://docs.cloud.google.com/sdk/docs/install) the Google Cloud CLI.
> [!NOTE]
> **Note:** If you installed the gcloud CLI previously, make sure you have the latest version by running `gcloud components update`.
2. If you're using an external identity provider (IdP), you must first
[sign in to the gcloud CLI with your federated identity](https://docs.cloud.google.com/iam/docs/workforce-log-in-gcloud).
3.
To [initialize](https://docs.cloud.google.com/sdk/docs/initializing) the gcloud CLI, run the following command:
```bash
gcloud init
```
4. To create and manage data governance tags, you must use [on-demand pricing](https://cloud.google.com/bigquery/pricing#on_demand_pricing), or the [BigQuery Enterprise or Enterprise Plus edition](https://docs.cloud.google.com/bigquery/docs/editions-intro).
#### Required roles for data governance tags
To get the permissions that
you need to control column access with data governance tags,
ask your administrator to grant you the
following IAM roles:
- Create data governance tags:
- [Tag Administrator](https://docs.cloud.google.com/iam/docs/roles-permissions/resourcemanager#resourcemanager.tagAdmin) (`roles/resourcemanager.tagAdmin`) on the project or organization
- [Organization Viewer](https://docs.cloud.google.com/iam/docs/roles-permissions/resourcemanager#resourcemanager.organizationViewer) (`roles/resourcemanager.organizationViewer`) on the organization
- Attach tags to or remove tags from columns:
- [BigQuery Data Owner](https://docs.cloud.google.com/iam/docs/roles-permissions/bigquery#bigquery.dataOwner) (`roles/bigquery.dataOwner`) on the table
- [Tag User](https://docs.cloud.google.com/iam/docs/roles-permissions/resourcemanager#resourcemanager.tagUser) (`roles/resourcemanager.tagUser`) on the organization, project, or tag value
- Create and manage data policies: [BigQuery Data Policy Admin](https://docs.cloud.google.com/iam/docs/roles-permissions/bigquerydatapolicy#bigquerydatapolicy.admin) (`roles/bigquerydatapolicy.admin`) on the project
For more information about granting roles, see [Manage access to projects, folders, and organizations](https://docs.cloud.google.com/iam/docs/granting-changing-revoking-access).
You might also be able to get
the required permissions through [custom
roles](https://docs.cloud.google.com/iam/docs/creating-custom-roles) or other [predefined
roles](https://docs.cloud.google.com/iam/docs/roles-overview#predefined).
### Create data governance tags
Create the data governance tag key and its values.
#### Create a tag key
To create a key for a data governance tag, set the `purpose` field to
`DATA_GOVERNANCE` when you create the tag key. Setting this purpose categorizes
the tag for column-level security or data masking and distinguishes it from general resource tags in BigQuery.
### Console
1. In the Google Cloud console, go to the **BigQuery** page.
[Go to BigQuery](https://console.cloud.google.com/bigquery)
2. In the BigQuery navigation menu, click **Governance** ,
and then click **Security center**.
3. Click the **Data governance tags** tab.
4. Click **Create**.
5. In the **Create tag key** pane, specify the tag key details:
- In the **Data governance tags name** field, enter a name for the tag key.
- Optional: In the **Description** field, enter a description for the tag key.
6. Click **Create**.
> [!NOTE]
> **Note:** Data governance tags created in the BigQuery Security center are scoped to the active project. To create organization-scoped tag keys, use the gcloud CLI or the Resource Manager console.
### gcloud
1. Run the [`gcloud resource-manager tags keys create`](https://docs.cloud.google.com/sdk/gcloud/reference/resource-manager/tags/keys/create)
command:
gcloud resource-manager tags keys create TAG_KEY \
--parent=projects/PROJECT_ID \
--purpose=DATA_GOVERNANCE
Replace the following:
- `TAG_KEY`: the short name for the tag key.
- `PROJECT_ID`: the ID of your Google Cloud project. To supply an organization instead of a project, use `organizations/ORGANIZATION_ID` instead of `projects/PROJECT_ID`.
### Terraform
To create a tag key for data governance, use the
[`google_tags_tag_key`](https://registry.terraform.io/providers/hashicorp/google-beta/latest/docs/resources/tags_tag_key)
resource in the `google-beta` provider and set the `purpose` argument to
`DATA_GOVERNANCE`:
resource "google_tags_tag_key" "dg_key" {
provider = google-beta
parent = "projects/PROJECT_ID"
short_name = "TAG_KEY"
purpose = "DATA_GOVERNANCE"
}
Replace the following:
- `TAG_KEY`: the short name for the tag key.
- `PROJECT_ID`: the ID of your Google Cloud project. To supply an organization instead of a project, use `organizations/ORGANIZATION_ID` instead of `projects/PROJECT_ID`.
To apply your Terraform configuration in a Google Cloud project, complete the steps in the
following sections.
## Prepare Cloud Shell
1. Launch [Cloud Shell](https://shell.cloud.google.com/).
2. Set the default Google Cloud project
where you want to apply your Terraform configurations.
You only need to run this command once per project, and you can run it in any directory.
```
export GOOGLE_CLOUD_PROJECT=PROJECT_ID
```
Environment variables are overridden if you set explicit values in the Terraform
configuration file.
## Prepare the directory
Each Terraform configuration file must have its own directory (also
called a *root module*).
1. In [Cloud Shell](https://shell.cloud.google.com/), create a directory and a new file within that directory. The filename must have the `.tf` extension---for example `main.tf`. In this tutorial, the file is referred to as `main.tf`.
```
mkdir DIRECTORY && cd DIRECTORY && touch main.tf
```
2. If you are following a tutorial, you can copy the sample code in each section or step.
Copy the sample code into the newly created `main.tf`.
Optionally, copy the code from GitHub. This is recommended
when the Terraform snippet is part of an end-to-end solution.
3. Review and modify the sample parameters to apply to your environment.
4. Save your changes.
5. Initialize Terraform. You only need to do this once per directory.
```
terraform init
```
Optionally, to use the latest Google provider version, include the `-upgrade`
option:
```
terraform init -upgrade
```
## Apply the changes
1. Review the configuration and verify that the resources that Terraform is going to create or update match your expectations:
```
terraform plan
```
Make corrections to the configuration as necessary.
2. Apply the Terraform configuration by running the following command and entering `yes` at the prompt:
```
terraform apply
```
Wait until Terraform displays the "Apply complete!" message.
3. [Open your Google Cloud project](https://console.cloud.google.com/) to view the results. In the Google Cloud console, navigate to your resources in the UI to make sure that Terraform has created or updated them.
> [!NOTE]
> **Note:** Terraform samples typically assume that the required APIs are enabled in your Google Cloud project.
### API
1. Send a `POST` request to the `tagKeys` endpoint:
curl --request POST \
"https://cloudresourcemanager.googleapis.com/v3/tagKeys" \
--header "Authorization: Bearer $(gcloud auth print-access-token)" \
--header 'Accept: application/json' \
--header 'Content-Type: application/json' \
--data '{"shortName":"TAG_KEY","parent":"projects/PROJECT_ID","purpose":"DATA_GOVERNANCE"}' \
--compressed
Replace the following:
- `TAG_KEY`: the short name for the tag key.
- `PROJECT_ID`: the ID of your Google Cloud project. To supply an organization instead of a project, use `organizations/ORGANIZATION_ID` instead of `projects/PROJECT_ID`.
#### Create a tag value
To add one or more values to a tag key, follow these steps.
### Console
1. In the Google Cloud console, go to the **BigQuery** page.
[Go to BigQuery](https://console.cloud.google.com/bigquery)
2. In the BigQuery navigation menu, click **Governance** ,
and then click **Security center**.
3. Click the **Data governance tags** tab.
4. In the list of tag keys, locate the tag key that you want to add a
value to, click
more_vert
**Actions** , and then click **Add tag values**.
5. In the **Add tag values** pane, enter a short name for the tag value.
6. Optional: In the **Description** field, enter a description.
7. Click **Save**.
### gcloud
1. Get the namespaced name for the tag key by running the
[`gcloud resource-manager tags keys list`](https://docs.cloud.google.com/sdk/gcloud/reference/resource-manager/tags/keys/list)
command:
gcloud resource-manager tags keys list --parent=projects/PROJECT_ID
2. Create a new value by running the [`gcloud resource-manager tags values create`](https://docs.cloud.google.com/sdk/gcloud/reference/resource-manager/tags/values/create)
command:
gcloud resource-manager tags values create TAG_VALUE \
--parent=PROJECT_ID/TAG_KEY
Replace the following:
- `TAG_VALUE`: a user-specified short name of the tag value.
- `PROJECT_ID`: the ID of your Google Cloud project. To supply an organization instead of a project, use your `ORGANIZATION_ID` instead.
### Terraform
To create a tag value, use the
[`google_tags_tag_value`](https://registry.terraform.io/providers/hashicorp/google-beta/latest/docs/resources/tags_tag_value)
resource in the `google-beta` provider:
resource "google_tags_tag_value" "dg_value" {
provider = google-beta
parent = "tagKeys/${google_tags_tag_key.dg_key.name}"
short_name = "TAG_VALUE"
}
Replace the following:
- `TAG_VALUE`: a user-specified short name of the tag value.
To apply your Terraform configuration in a Google Cloud project, complete the steps in the
following sections.
## Prepare Cloud Shell
1. Launch [Cloud Shell](https://shell.cloud.google.com/).
2. Set the default Google Cloud project
where you want to apply your Terraform configurations.
You only need to run this command once per project, and you can run it in any directory.
```
export GOOGLE_CLOUD_PROJECT=PROJECT_ID
```
Environment variables are overridden if you set explicit values in the Terraform
configuration file.
## Prepare the directory
Each Terraform configuration file must have its own directory (also
called a *root module*).
1. In [Cloud Shell](https://shell.cloud.google.com/), create a directory and a new file within that directory. The filename must have the `.tf` extension---for example `main.tf`. In this tutorial, the file is referred to as `main.tf`.
```
mkdir DIRECTORY && cd DIRECTORY && touch main.tf
```
2. If you are following a tutorial, you can copy the sample code in each section or step.
Copy the sample code into the newly created `main.tf`.
Optionally, copy the code from GitHub. This is recommended
when the Terraform snippet is part of an end-to-end solution.
3. Review and modify the sample parameters to apply to your environment.
4. Save your changes.
5. Initialize Terraform. You only need to do this once per directory.
```
terraform init
```
Optionally, to use the latest Google provider version, include the `-upgrade`
option:
```
terraform init -upgrade
```
## Apply the changes
1. Review the configuration and verify that the resources that Terraform is going to create or update match your expectations:
```
terraform plan
```
Make corrections to the configuration as necessary.
2. Apply the Terraform configuration by running the following command and entering `yes` at the prompt:
```
terraform apply
```
Wait until Terraform displays the "Apply complete!" message.
3. [Open your Google Cloud project](https://console.cloud.google.com/) to view the results. In the Google Cloud console, navigate to your resources in the UI to make sure that Terraform has created or updated them.
> [!NOTE]
> **Note:** Terraform samples typically assume that the required APIs are enabled in your Google Cloud project.
### API
1. Get the namespaced name for the tag key:
curl --request GET \
"https://cloudresourcemanager.googleapis.com/v3/tagKeys/namespaced?name=PROJECT_ID/TAG_KEY" \
--header "Authorization: Bearer $(gcloud auth print-access-token)" \
--header 'Accept: application/json'
The response contains the `name` field, for example `tagKeys/4567890123`.
2. Send a `POST` request to the `tagValues` endpoint with the tag key name:
curl --request POST \
"https://cloudresourcemanager.googleapis.com/v3/tagValues" \
--header "Authorization: Bearer $(gcloud auth print-access-token)" \
--header 'Accept: application/json' \
--header 'Content-Type: application/json' \
--data '{"shortName":"TAG_VALUE","parent":"tagKeys/TAG_KEY_ID"}' \
--compressed
Replace the following:
- `TAG_VALUE`: a user-specified short name of the tag value.
- `PROJECT_ID`: the ID of your Google Cloud project. To supply an organization instead of a project, use your `ORGANIZATION_ID` instead.
- `TAG_KEY_ID`: the namespaced name for the tag key from step 1---for example, if tag key name is `tagKeys/4567890123`, then the tag key ID is `4567890123`.
#### Create hierarchical tag values
Optionally, you can create a child tag value that is parented by a tag value
and build a hierarchical tree of data governance tag values. The hierarchy can
be 5-levels deep, as shown in the following diagram:
### gcloud
To create a child tag value, run the
[`gcloud resource-manager tags values create`](https://docs.cloud.google.com/sdk/gcloud/reference/resource-manager/tags/values/create)
command and specify a parent tag value in the `--parent` flag:
gcloud resource-manager tags values create CHILD_TAG_VALUE \
--parent=PROJECT_ID/TAG_KEY/PARENT_TAG_VALUE
Replace the following:
- `CHILD_TAG_VALUE`: the short name for the child tag value you are creating.
- `PROJECT_ID`: the ID of your Google Cloud project. To supply an organization instead of a project, use your `ORGANIZATION_ID` instead.
- `TAG_KEY`: the short name of the tag key that is the parent of the tag value.
- `PARENT_TAG_VALUE`: the short name of the parent tag value.
### API
To create a child tag value, use the tag value resource name of the
parent (for example, `tagValues/123456789012`) in the `parent` field:
curl --request POST \
"https://cloudresourcemanager.googleapis.com/v3/tagValues" \
--header "Authorization: Bearer $(gcloud auth print-access-token)" \
--header 'Accept: application/json' \
--header 'Content-Type: application/json' \
--data '{"shortName":"CHILD_TAG_VALUE","parent":"tagValues/PARENT_TAG_VALUE_ID"}' \
--compressed
Replace the following:
- `CHILD_TAG_VALUE`: the short name for the child tag value you are creating.
- `PARENT_TAG_VALUE_ID`: the numeric ID of the parent tag value.
### Attach data governance tags to BigQuery columns
Attach the data governance tags that you created to the BigQuery
columns that you want to protect.
### SQL
#### Create a new table with a tagged column
To attach data governance tags when creating a table, use the
[`CREATE TABLE`](https://docs.cloud.google.com/bigquery/docs/reference/standard-sql/data-definition-language#create_table_statement)
statement. Specify the tag by setting the `data_governance_tags` option on
the column.
CREATE TABLE PROJECT_ID.DATASET_ID.TABLE_ID (
COLUMN_NAME INT64 OPTIONS (data_governance_tags=[("PROJECT_ID/TAG_KEY", "TAG_VALUE")])
);
Replace the following:
- `PROJECT_ID`: the ID of your Google Cloud project. To supply an organization instead of a project as the parent of your tag, use your `ORGANIZATION_ID` instead for the tag key format (`ORGANIZATION_ID/TAG_KEY`).
- `DATASET_ID`: the ID of the dataset where the table resides.
- `TABLE_ID`: the ID of the table you are creating.
- `COLUMN_NAME`: the name of the column you want to tag.
- `TAG_KEY`: the tag key that you want to apply.
- `TAG_VALUE`: the tag value that you want to apply.
#### Add a tag to an existing table
To attach data governance tags to a column in an existing table, use the
[`ALTER TABLE`](https://docs.cloud.google.com/bigquery/docs/reference/standard-sql/data-definition-language#alter_table_set_options_statement)
statement to set the `data_governance_tags` option on the column.
ALTER TABLE PROJECT_ID.DATASET_ID.TABLE_ID
ALTER COLUMN COLUMN_NAME SET OPTIONS (data_governance_tags=[("PROJECT_ID/TAG_KEY", "TAG_VALUE")]);
### bq CLI
#### Create a new table with a tagged column
1. To create a local JSON schema file that defines the tag, run the `bq mk`
command:
bq mk \
--table \
--project_id=PROJECT_ID \
--description="description of my table" \
--schema=SCHEMA_FILE.json \
DATASET_ID.TABLE_ID
Replace the following:
- `PROJECT_ID`: the ID of your Google Cloud project. To supply an organization instead of a project as the parent of your tag, use your `ORGANIZATION_ID` instead for the tag key format (`ORGANIZATION_ID/TAG_KEY`).
- `DATASET_ID`: the ID of the dataset where the table resides.
- `TABLE_ID`: the ID of the table you are creating.
#### Add a tag to an existing table
1. To add a tag to an existing table, first export its schema to a local
file:
bq show \
--project_id=PROJECT_ID \
--schema \
--format=prettyjson \
DATASET_ID.TABLE_ID > SCHEMA_FILE.json
2. Edit the schema file to add the `dataGovernanceTagsInfo` object to the
column. For example:
[
{
"description": "my sensitive column",
"mode": "NULLABLE",
"name": "Column_X",
"type": "INT64",
"dataGovernanceTagsInfo": {
"dataGovernanceTags": {
"PROJECT_ID/TAG_KEY": "TAG_VALUE"
}
}
},
{
"mode": "REQUIRED",
"name": "column2",
"type": "FLOAT"
}
]
3. Update the table to attach tags to the sensitive column with the `bq
update` command:
bq update \
--project_id=PROJECT_ID \
--schema=SCHEMA_FILE.json \
DATASET_ID.TABLE_ID
You can also use the `bq update` command to remove existing tags and
attach new tags.
### Terraform
#### Create a new table with a tagged column
To attach data governance tags to a column when creating a table, use the
[`google_bigquery_table`](https://registry.terraform.io/providers/hashicorp/google-beta/latest/docs/resources/bigquery_table)
resource in the `google-beta` provider. Set the `dataGovernanceTagsInfo`
object inside the column's schema definition.
The following example creates a table and attaches a data governance tag to
a column:
resource "google_bigquery_table" "table" {
provider = google-beta
dataset_id = "DATASET_ID"
table_id = "TABLE_ID"
schema = < [!NOTE]
> **Note:** Adding, modifying, or clearing `dataGovernanceTagsInfo` on a table column schema is performed in-place and doesn't recreate the table.
To apply your Terraform configuration in a Google Cloud project, complete the steps in the
following sections.
## Prepare Cloud Shell
1. Launch [Cloud Shell](https://shell.cloud.google.com/).
2. Set the default Google Cloud project
where you want to apply your Terraform configurations.
You only need to run this command once per project, and you can run it in any directory.
```
export GOOGLE_CLOUD_PROJECT=PROJECT_ID
```
Environment variables are overridden if you set explicit values in the Terraform
configuration file.
## Prepare the directory
Each Terraform configuration file must have its own directory (also
called a *root module*).
1. In [Cloud Shell](https://shell.cloud.google.com/), create a directory and a new file within that directory. The filename must have the `.tf` extension---for example `main.tf`. In this tutorial, the file is referred to as `main.tf`.
```
mkdir DIRECTORY && cd DIRECTORY && touch main.tf
```
2. If you are following a tutorial, you can copy the sample code in each section or step.
Copy the sample code into the newly created `main.tf`.
Optionally, copy the code from GitHub. This is recommended
when the Terraform snippet is part of an end-to-end solution.
3. Review and modify the sample parameters to apply to your environment.
4. Save your changes.
5. Initialize Terraform. You only need to do this once per directory.
```
terraform init
```
Optionally, to use the latest Google provider version, include the `-upgrade`
option:
```
terraform init -upgrade
```
## Apply the changes
1. Review the configuration and verify that the resources that Terraform is going to create or update match your expectations:
```
terraform plan
```
Make corrections to the configuration as necessary.
2. Apply the Terraform configuration by running the following command and entering `yes` at the prompt:
```
terraform apply
```
Wait until Terraform displays the "Apply complete!" message.
3. [Open your Google Cloud project](https://console.cloud.google.com/) to view the results. In the Google Cloud console, navigate to your resources in the UI to make sure that Terraform has created or updated them.
> [!NOTE]
> **Note:** Terraform samples typically assume that the required APIs are enabled in your Google Cloud project.
### API
#### Create a new table with a tagged column
Use the [`tables.insert`](https://docs.cloud.google.com/bigquery/docs/reference/rest/v2/tables/insert)
method. Include the `dataGovernanceTagsInfo` field in the request body.
```json
{
"schema": {
"fields": [
{
"name": "Column_X",
"type": "INT64",
"description": "sensitive column",
"dataGovernanceTagsInfo": {
"dataGovernanceTags": {
"PROJECT_ID/TAG_KEY": "TAG_VALUE"
}
}
}
]
}
}
```
#### Add a tag to an existing table
1. Retrieve the current table resource with the
[`tables.get`](https://docs.cloud.google.com/bigquery/docs/reference/rest/v2/tables/get) method.
2. Modify the table resource to include the `dataGovernanceTagsInfo` field
for the target column.
3. Call the [`tables.update`](https://docs.cloud.google.com/bigquery/docs/reference/rest/v2/tables/update)
or [`tables.patch`](https://docs.cloud.google.com/bigquery/docs/reference/rest/v2/tables/patch)
method with the updated table resource.
### Create and manage data policies
Create and manage BigQuery data policies that reference data
governance tags to apply masking rules or raw data access policies.
After a data policy is created for a tagged column, only users specified in that
policy can access the column, provided they also have access to the table. All
other users are denied access.
#### Create data policies
### Terraform
To create a data policy that references a data governance tag, use the
[`google_bigquery_datapolicyv2_data_policy`](https://registry.terraform.io/providers/hashicorp/google-beta/latest/docs/resources/bigquery_datapolicyv2_data_policy)
resource in the `google-beta` provider. Specify the `data_governance_tag`
block to bind the policy to a data governance tag key and value.
> [!CAUTION]
> **Caution:** The `data_governance_tag` block and its nested fields are immutable. Updating or removing this block causes Terraform to recreate the data policy resource.
##### Create a data policy with a predefined `SHA256` masking rule
The following example creates a data masking policy that uses a predefined
`SHA256` masking routine:
resource "google_bigquery_datapolicyv2_data_policy" "mask_policy" {
provider = google-beta
location = "LOCATION"
data_policy_type = "DATA_MASKING_POLICY"
data_policy_id = "POLICY_ID"
data_masking_policy {
predefined_expression = "SHA256"
}
data_governance_tag {
key = "PROJECT_ID/TAG_KEY"
value = "TAG_VALUE"
}
grantees = [
"principal://goog/subject/EMAIL_ADDRESS"
]
}
Replace the following:
- `LOCATION`: the region where you are creating the data policy. For more information, see [Locations](https://docs.cloud.google.com/bigquery/docs/locations).
- `POLICY_ID`: the ID for the data policy.
- `PROJECT_ID`: the ID of your Google Cloud project. To supply an organization instead of a project as the parent of your tag, use your `ORGANIZATION_ID` instead for the `key` format (`ORGANIZATION_ID/TAG_KEY`).
- `TAG_KEY`: the short name for the tag key.
- `TAG_VALUE`: the short name of the tag value.
- `EMAIL_ADDRESS`: the email address of the user or service account to grant access to.
##### Create a raw data access policy
To create a raw data access policy, set `data_policy_type` to
`RAW_DATA_ACCESS_POLICY`:
resource "google_bigquery_datapolicyv2_data_policy" "raw_policy" {
provider = google-beta
location = "LOCATION"
data_policy_type = "RAW_DATA_ACCESS_POLICY"
data_policy_id = "POLICY_ID"
data_governance_tag {
key = "PROJECT_ID/TAG_KEY"
value = "TAG_VALUE"
}
grantees = [
"principal://goog/subject/EMAIL_ADDRESS"
]
}
To apply your Terraform configuration in a Google Cloud project, complete the steps in the
following sections.
## Prepare Cloud Shell
1. Launch [Cloud Shell](https://shell.cloud.google.com/).
2. Set the default Google Cloud project
where you want to apply your Terraform configurations.
You only need to run this command once per project, and you can run it in any directory.
```
export GOOGLE_CLOUD_PROJECT=PROJECT_ID
```
Environment variables are overridden if you set explicit values in the Terraform
configuration file.
## Prepare the directory
Each Terraform configuration file must have its own directory (also
called a *root module*).
1. In [Cloud Shell](https://shell.cloud.google.com/), create a directory and a new file within that directory. The filename must have the `.tf` extension---for example `main.tf`. In this tutorial, the file is referred to as `main.tf`.
```
mkdir DIRECTORY && cd DIRECTORY && touch main.tf
```
2. If you are following a tutorial, you can copy the sample code in each section or step.
Copy the sample code into the newly created `main.tf`.
Optionally, copy the code from GitHub. This is recommended
when the Terraform snippet is part of an end-to-end solution.
3. Review and modify the sample parameters to apply to your environment.
4. Save your changes.
5. Initialize Terraform. You only need to do this once per directory.
```
terraform init
```
Optionally, to use the latest Google provider version, include the `-upgrade`
option:
```
terraform init -upgrade
```
## Apply the changes
1. Review the configuration and verify that the resources that Terraform is going to create or update match your expectations:
```
terraform plan
```
Make corrections to the configuration as necessary.
2. Apply the Terraform configuration by running the following command and entering `yes` at the prompt:
```
terraform apply
```
Wait until Terraform displays the "Apply complete!" message.
3. [Open your Google Cloud project](https://console.cloud.google.com/) to view the results. In the Google Cloud console, navigate to your resources in the UI to make sure that Terraform has created or updated them.
> [!NOTE]
> **Note:** Terraform samples typically assume that the required APIs are enabled in your Google Cloud project.
### API
Create a data policy that uses a predefined `SHA256` masking rule, or create
a raw data access policy.
##### Create a data policy with a predefined `SHA256` masking rule
To create a data policy with a predefined `SHA256` masking rule, send a
`POST` request to the `dataPolicies` endpoint:
curl --request POST \
"https://bigquerydatapolicy.googleapis.com/v2/projects/PROJECT_ID/locations/LOCATION/dataPolicies" \
--header "Authorization: Bearer $(gcloud auth print-access-token)" \
--header 'Accept: application/json' \
--header 'Content-Type: application/json' \
--data '{"dataPolicy":{"dataPolicyType":"DATA_MASKING_POLICY","dataMaskingPolicy":{"predefinedExpression":"SHA256"},"grantees": ["principal://goog/subject/EMAIL_ADDRESS"],"dataGovernanceTag":{"key":"PROJECT_ID/TAG_KEY","value":"TAG_VALUE"}},"dataPolicyId":"POLICY_ID"}' \
--compressed
Replace the following:
- `PROJECT_ID`: the ID of your Google Cloud project. To supply an organization instead of a project as the parent of your tag, use your `ORGANIZATION_ID` instead for the `dataGovernanceTag.key` format (`ORGANIZATION_ID/TAG_KEY`).
- `LOCATION`: the region where you are creating data policy. For more information, see [locations](https://docs.cloud.google.com/bigquery/docs/locations).
- `EMAIL_ADDRESS`: the email address of user to grant access.
- `TAG_KEY`: the short name for the tag key.
- `TAG_VALUE`: a user-specified short name of the tag value.
- `POLICY_ID`: the ID for data policy.
##### Create a raw data access policy
To create a raw data access policy, set the `dataPolicyType` to
`RAW_DATA_ACCESS_POLICY`:
curl --request POST \
"https://bigquerydatapolicy.googleapis.com/v2/projects/PROJECT_ID/locations/LOCATION/dataPolicies" \
--header "Authorization: Bearer $(gcloud auth print-access-token)" \
--header 'Accept: application/json' \
--header 'Content-Type: application/json' \
--data '{"dataPolicy":{"dataPolicyType":"RAW_DATA_ACCESS_POLICY","grantees": ["principal://goog/subject/EMAIL_ADDRESS"],"dataGovernanceTag":{"key":"PROJECT_ID/TAG_KEY","value":"TAG_VALUE"}},"dataPolicyId":"POLICY_ID"}' \
--compressed
#### Update data policies
Update an existing data policy to grant access to additional users.
### API
1. To add users by directly updating a policy, first get the current policy
and its `etag`:
curl --request GET \
"https://bigquerydatapolicy.googleapis.com/v2/projects/PROJECT_ID/locations/LOCATION/dataPolicies/POLICY_ID" \
--header "Authorization: Bearer $(gcloud auth print-access-token)" \
--header 'Accept: application/json' \
--header 'Content-Type: application/json' \
--compressed
2. Send a `PATCH` request with the updated list of grantees and the `etag`
from the previous step:
curl -X PATCH \
-H "Authorization: Bearer $(gcloud auth print-access-token)" \
-H "Content-Type: application/json" \
-d '{
"grantees": ["principal://goog/subject/user1@example.com","principal://iam.googleapis.com/projects/-/serviceAccounts/SA_EMAIL_ADDRESS"],
"etag": "ETAG"
}' \
"https://bigquerydatapolicy.googleapis.com/v2/projects/PROJECT_ID/locations/LOCATION/dataPolicies/POLICY_ID?updateMask=grantees"
Replace `ETAG` with the `etag` value returned by
the `GET` request in the previous step.
Alternatively, use the `addGrantees` method to add users to a policy:
curl -X POST \
-H "Authorization: Bearer $(gcloud auth print-access-token)" \
-H "Content-Type: application/json" \
-d '{
"grantees": ["principal://goog/subject/user1@example.com","principal://iam.googleapis.com/projects/-/serviceAccounts/SA_EMAIL_ADDRESS"]
}' \
"https://bigquerydatapolicy.googleapis.com/v2/projects/PROJECT_ID/locations/LOCATION/dataPolicies/POLICY_ID:addGrantees"
3. To remove users from a policy, use the `removeGrantees` method:
curl -X POST \
-H "Authorization: Bearer $(gcloud auth print-access-token)" \
-H "Content-Type: application/json" \
-d '{
"grantees": ["principal://goog/subject/user1@example.com","principal://iam.googleapis.com/projects/-/serviceAccounts/SA_EMAIL_ADDRESS"]
}' \
"https://bigquerydatapolicy.googleapis.com/v2/projects/PROJECT_ID/locations/LOCATION/dataPolicies/POLICY_ID:removeGrantees"
#### Delete data policies
### API
To delete a data policy, send a `DELETE` request to the `dataPolicies`
endpoint:
curl --request DELETE \
"https://bigquerydatapolicy.googleapis.com/v2/projects/PROJECT_ID/locations/LOCATION/dataPolicies/POLICY_ID" \
--header "Authorization: Bearer $(gcloud auth print-access-token)" \
--header 'Accept: application/json' \
--header 'Content-Type: application/json' \
--compressed
#### List data policies
### API
To list data policies that reference a tag key, send a `GET` request to the
`dataPolicies` endpoint with a `filter` parameter:
curl --request GET \
"https://bigquerydatapolicy.googleapis.com/v2/projects/PROJECT_ID/locations/LOCATION/dataPolicies?filter=dataGovernanceTag:PROJECT_ID/TAG_KEY" \
--header "Authorization: Bearer $(gcloud auth print-access-token)" \
--header 'Accept: application/json' \
--header 'Content-Type: application/json' \
--compressed
### Interactions with other features
This section describes how data governance tags interact with other
BigQuery features.
| Feature | Interaction |
|---|---|
| Information Schema | Data governance tags attached to columns are included in the `INFORMATION_SCHEMA.COLUMNS` and `INFORMATION_SCHEMA.COLUMN_FIELD_PATHS` views. |
| Table copy | Cross-region table copies are disabled for tables that have column-level security features, including tables with data governance tags. |
| Time travel | Access to historical table data is governed by the access policies and tags that are attached to the table. |
### Configure a default data policy project
When you access columns protected by data governance tags, BigQuery by default evaluates only the data policies in the project where the table is located. Data policies defined in other projects don't apply, unless an administrator configures a default data policy project at the organization level.
If a default data policy project is configured for your organization, BigQuery evaluates both the data policies of the table's project and those of the default data policy project when determining column access.
If a user is subject to conflicting data policies in both the table's project and the default data policy project, the data policies in the table's project take precedence.
To set or view the `default_data_policy_projects` option at the organization level using DDL or `INFORMATION_SCHEMA` views, see [Data management settings](https://docs.cloud.google.com/bigquery/docs/default-configuration#data-management-settings) in the default configuration documentation.
### Limitations of data governance tags
- BigQuery Omni tables don't support data governance tags on columns.
- You can use the Google Cloud console to view data governance tags on columns, but not to bind or unbind them.
- You can bind one tag per column and up to 1000 unique tags per table.
- If you query a tagged column using the BigQuery Storage Read API, `tabledata.list` calls, or wildcard tables, you receive an access denied error unless a data policy grants you access.
- For `STRUCT` fields, you can apply data governance tags only to the leaf fields.
- You can delete tag values that are attached to columns. If you delete a tag value, the tag binding persists on the column, but because the tag value no longer exists, access to the column might be lost.
For more information about troubleshooting common issues with data governance
tags, see [Troubleshoot data governance tags](https://docs.cloud.google.com/bigquery/docs/troubleshoot-access-control#troubleshoot-gov-tags).
## What's next
- For an overview of tags in Google Cloud, see [Tags overview](https://docs.cloud.google.com/resource-manager/docs/tags/tags-overview).
- For more information about how to use tags, see [Creating and managing
tags](https://docs.cloud.google.com/resource-manager/docs/tags/tags-creating-and-managing).
- Learn more about [applying policies on columns](https://docs.cloud.google.com/bigquery/docs/column-level-security).
- For information about how to control access to BigQuery resources with IAM Conditions, see [Control access with IAM Conditions](https://docs.cloud.google.com/bigquery/docs/conditions).