# Migrate schema and data from Teradata
The combination of the BigQuery Data Transfer Service and a special migration agent lets you
copy your data from a Teradata on-premises data warehouse instance to
BigQuery. This document describes the step-by-step process of
migrating data from Teradata using the BigQuery Data Transfer Service.
## Before you begin
> [!NOTE]
> Service account keys are a security risk if not managed correctly. You are responsible for the security of the private key and for other operations described by [Best practices for managing service account keys](https://docs.cloud.google.com/iam/docs/best-practices-for-managing-service-account-keys). If you are prevented from creating a service account key, service account key creation might be disabled for your organization. For more information, see [Managing secure-by-default organization resources](https://docs.cloud.google.com/resource-manager/docs/secure-by-default-organizations).
>
>
> If you acquired the service account key from an external source, you must validate it before use.
> For more information, see [Security requirements for externally sourced credentials](https://docs.cloud.google.com/docs/authentication/external/externally-sourced-credentials).
### Set required permissions
Ensure that the principal creating the transfer has the following
roles in the project containing the transfer job:
- Logs Viewer (`roles/logging.viewer`)
- Storage Admin (`roles/storage.admin`), or a [custom role](https://docs.cloud.google.com/iam/docs/creating-custom-roles) that grants the following permissions:
- `storage.objects.create`
- `storage.objects.get`
- `storage.objects.list`
- BigQuery Admin (`roles/bigquery.admin`), or a custom role that grants the following permissions:
- `bigquery.datasets.create`
- `bigquery.jobs.create`
- `bigquery.jobs.get`
- `bigquery.jobs.listAll`
- `bigquery.tables.get`
- `bigquery.transfers.get`
- `bigquery.transfers.update`
### Create a dataset
[Create a BigQuery dataset](https://docs.cloud.google.com/bigquery/docs/datasets)
to store your data. You don't need to create any tables.
### Create a Cloud Storage bucket
[Create a Cloud Storage bucket](https://docs.cloud.google.com/storage/docs/creating-buckets) for staging
the data during the transfer job.
### Prepare the local environment
Complete the tasks in this section to prepare your local environment for the
transfer job.
#### Local machine requirements
- The migration agent uses a JDBC connection with the Teradata instance and Google Cloud APIs. Ensure that network access is not blocked by a firewall.
- To use the migration agent version 1.18.0 or later, you must install Java Runtime Environment (JRE) 21 or later. Earlier versions of the migration agent require JRE 8 or later.
- Ensure that you have enough storage space for the extraction method you have chosen, as described in [Extraction method](https://docs.cloud.google.com/bigquery/docs/migration/teradata-overview#extraction_method).
- If you have decided to use Teradata Parallel Transporter (TPT) extraction, ensure that the [`tbuild`](https://docs.teradata.com/r/Teradata-Parallel-Transporter-Reference/July-2017/Teradata-PT-Utility-Commands/Command-Syntax/tbuild) utility is installed. For more information on choosing an extraction method, see [Extraction method](https://docs.cloud.google.com/bigquery/docs/migration/teradata-overview#extraction_method).
#### Teradata connection details
- Make sure you have the username and password of a Teradata user with read
access to the system tables and the tables that are being migrated.
> [!NOTE]
> The username and password are captured through a prompt and are only stored in RAM. Optionally, you can create a credentials file for the username or password in a later step. When using a credentials file, take appropriate steps to control access to the folder where you store it on the local file system, because it is not encrypted.
- Make sure you know the hostname and port number to connect to the
Teradata instance.
> [!NOTE]
> Authentication modes, such as LDAP, are not supported.
#### Download the JDBC driver
[Download](https://downloads.teradata.com/download/connectivity/jdbc-driver)
the `terajdbc4.jar` JDBC driver file from Teradata to a machine that
can connect to the data warehouse.
#### Set the `GOOGLE_APPLICATION_CREDENTIALS` variable
[Set the environment variable `GOOGLE_APPLICATION_CREDENTIALS`](https://docs.cloud.google.com/docs/authentication/set-up-adc-local-dev-environment#local-key)
to the service account key you downloaded in the
[Before you begin](https://docs.cloud.google.com/bigquery/docs/migration/teradata#before_you_begin) section.
### Update the VPC Service Controls egress rule
Add the BigQuery Data Transfer Service managed Google Cloud project corresponding to your region
to the
[egress rule](https://docs.cloud.google.com/vpc-service-controls/docs/ingress-egress-rules#egress_rules_reference)
in the VPC Service Controls perimeter.
The following table is a list of project numbers for the regional locations used
for data transfers. Add the project numbers that correspond
to your dataset's location.
#### Multi-regional locations
| Multi-region description | Multi-region name | Project numbers |
|---|---|---|
| Data centers within member states of the European Union | `eu` | 17253722542 272853474138 420718595790 929473878322 990232121269 |
| Data centers in the United States | `us` | 1005756709729 140222280645 247872939591 312976397333 521896999118 525821192359 892499355189 949134172629 990232121269 |
#### Regional locations
| Region description | Region name | Project numbers |
|---|---|---|
| **Americas** |||
| Montréal | `northamerica-northeast1` | 603911341430 644379120249 665941355665 743643531530 990232121269 |
| Toronto | `northamerica-northeast2` | 181203883014 569023246094 814935732186 833015518790 990232121269 |
| Mexico | `northamerica-south1` | 439376105624 737643102222 746316165749 863053761002 990232121269 |
| São Paolo | `southamerica-east1` | 133435938206 376122552368 485381725001 796391836836 990232121269 |
| Santiago | `southamerica-west1` | 1087357303029 348543783783 659924941015 862900136725 990232121269 |
| Iowa | `us-central1` | 298453567688 788415223852 850878823175 986263347210 990232121269 |
| South Carolina | `us-east1` | 1055108947046 1084124504460 335013112247 724101498857 990232121269 |
| Northern Virginia | `us-east4` | 1029854080039 517474920593 970314007431 98298633330 990232121269 |
| Columbus, Ohio | `us-east5` | 1018267783826 386306739011 420397636038 778968775575 990232121269 |
| Dallas | `us-south1` | 1000457898916 1047122215716 241710172671 955278753983 990232121269 |
| Oregon | `us-west1` | 232019391832 341405773774 376906440760 477215631937 990232121269 |
| Los Angeles | `us-west2` | 1082081077124 593499865061 796558996990 812061960238 990232121269 |
| Salt Lake City | `us-west3` | 34769458069 488393466740 870087576864 878441810105 990232121269 |
| Las Vegas | `us-west4` | 219770299440 421529192039 516260452158 653925368482 990232121269 |
| **Europe** |||
| Warsaw | `europe-central2` | 408105394529 556626738827 613447812609 875068591969 990232121269 |
| Finland | `europe-north1` | 1049140453480 148002628360 610856287987 657186468367 990232121269 |
| Stockholm | `europe-north2` | 264708615094 275871864623 353052212156 915614473443 990232121269 |
| Madrid | `europe-southwest1` | 1035291313153 1048466610864 16585749286 684773867031 990232121269 |
| Belgium | `europe-west1` | 311010690362 337985836396 348525528820 874692481832 990232121269 |
| Berlin | `europe-west10` | 1014021387408 1021109191575 1076988971454 965306537493 990232121269 |
| Turin | `europe-west12` | 624998300135 664251133452 672417986210 702529954322 990232121269 |
| London | `europe-west2` | 1013046052024 424062913611 625972158490 707263280432 990232121269 |
| Frankfurt | `europe-west3` | 1087781646048 143240061766 312688138599 715827071311 990232121269 |
| Netherlands | `europe-west4` | 110044889848 398757511504 557234723212 769143166592 990232121269 |
| Zürich | `europe-west6` | 163551586425 378713015688 416925392034 669890417706 990232121269 |
| Milan | `europe-west8` | 103481800693 1082157965924 23655501621 555661886352 990232121269 |
| Paris | `europe-west9` | 1085882338778 176207547936 221990904254 670920836007 990232121269 |
| **Asia Pacific** |||
| Taiwan | `asia-east1` | 21873972082 271898158674 389278959284 922460772707 990232121269 |
| Hong Kong | `asia-east2` | 263483805684 773980783174 865347783058 90665746791 990232121269 |
| Tokyo | `asia-northeast1` | 415417931028 53965067050 953665196151 983967577764 990232121269 |
| Osaka | `asia-northeast2` | 205726704771 478186599828 57312416489 861476638029 990232121269 |
| Seoul | `asia-northeast3` | 320159292295 548035635347 791473645597 935702892639 990232121269 |
| Mumbai | `asia-south1` | 13592990997 229940966341 68960523189 901420668689 990232121269 |
| Delhi | `asia-south2` | 496191507005 54806403576 741779061357 809478923584 990232121269 |
| Singapore | `asia-southeast1` | 541653567103 60558171982 753901882843 944188302893 990232121269 |
| Jakarta | `asia-southeast2` | 1074047252998 17464964742 271871433529 427023413305 990232121269 |
| Bangkok | `asia-southeast3` | 1020436856624 355273974477 603543103680 777922772431 990232121269 |
| Sydney | `australia-southeast1` | 163046745040 591848239128 623326425100 814418810594 990232121269 |
| Melbourne | `australia-southeast2` | 1062391852597 441829466914 714897033691 748594785463 990232121269 |
| **Middle East** |||
| Doha | `me-central1` | 260539430499 380691191456 707684919235 799708208022 990232121269 |
| Dammam | `me-central2` | 1067269861014 364585730608 702115426609 932431265647 990232121269 |
| Tel Aviv | `me-west1` | 356023739839 748664533815 869899828196 940471234508 990232121269 |
| **Africa** |||
| Johannesburg | `africa-south1` | 366497204741 900693348777 930834390708 990232121269 995904484959 |
| **Other** |||
| AWS ap-northeast-2 | `aws-ap-northeast-2` | 118757274428 227045504542 31525566793 415505940944 990232121269 |
| AWS ap-southeast-2 | `aws-ap-southeast-2` | 179772227799 236687515237 779037664799 925378406445 990232121269 |
| AWS eu-central-1 | `aws-eu-central-1` | 469423327197 5211207427 905007897524 989902812500 990232121269 |
| AWS eu-west-1 | `aws-eu-west-1` | 477582827438 653238211450 795832028199 961178626984 990232121269 |
| AWS us-east-1 | `aws-us-east-1` | 1005783963369 293187121246 622189180485 78860240845 990232121269 |
| AWS us-west-2 | `aws-us-west-2` | 206681800614 264089603202 419256100048 79353630998 990232121269 |
| Azure eastus2 | `azure-eastus2` | 1021739993926 1054000274357 495696597482 590387575526 990232121269 |
| Azure westus2 | `azure-westus2` | 118244543872 242088193076 278777007439 662989519829 990232121269 |
| Internal-only location (europe-west15) | `europe-west15` | 1075380375245 635354739083 663432613496 904125362271 990232121269 |
| Internal-only location (us-central2) | `us-central2` | 1085843140251 269725830808 498892726043 68311303080 990232121269 |
| Internal-only location (us-east7) | `us-east7` | 173063949542 661852837608 704905947583 956740768291 990232121269 |
| Synthetic location (us-synthetic1) | `us-synthetic1` | 131957618958 250975404179 740244847288 787843086952 990232121269 |
| Internal-only location (us-west8) | `us-west8` | 13105749132 248649202605 477355088721 653053504449 990232121269 |
The communication channel between the agent running on premises and BigQuery Data Transfer Service
is by publishing Pub/Sub messages to a per transfer topic. BigQuery Data Transfer Service
needs to send commands to the agent to extract data, and the agent needs to
publish messages back to BigQuery Data Transfer Service to update the status and return data
extraction responses.
### Create a custom schema file
To use a
[custom schema file](https://docs.cloud.google.com/bigquery/docs/migration/teradata-overview#custom_schema_file)
instead of automatic schema detection, create one manually, or
have the migration agent create one for you when you
[initialize the agent](https://docs.cloud.google.com/bigquery/docs/migration/teradata#initialize_the_migration_agent).
If you create a schema file
manually and you intend to use the Google Cloud console to create a transfer,
upload the schema file to a Cloud Storage bucket in the same project
you plan to use for the transfer.
### Download the migration agent
[Download the migration agent](https://storage.googleapis.com/data_transfer_agent/latest/mirroring-agent.jar)
to a machine which can connect to the data warehouse. Move the migration agent
JAR file to the same directory as the Teradata JDBC driver JAR file.
> [!NOTE]
> **Note:** For migration agent versions 1.18.0 and later, you must upgrade your Java Runtime Environment (JRE) to version 21 or later.
### Setup credential file for access module
A credential file is required if you are using the [access module for Cloud Storage with the Teradata Parallel Transporter (TPT) utility](https://docs.cloud.google.com/bigquery/docs/migration/teradata-overview#extraction_method) for extraction.
Before you create a credential file, you must have [created a service account key](https://docs.cloud.google.com/iam/docs/keys-create-delete#creating). From your downloaded service account key file, obtain the following information:
- `client_email`
- `private_key` : Copy all characters within `---BEGIN PRIVATE KEY---` and `---END PRIVATE KEY---`, including all `/n` characters and without the enclosing double quotes.
Once you have the required information, create a credential file. The following is an example credential file with a default
location of `$HOME/.gcs/credentials`:
```bash
[default]
gcs_access_key_id = ACCESS_ID
gcs_secret_access_key = ACCESS_KEY
```
Replace the following:
- `ACCESS_ID`: the access key ID, or the `client_email` value in your service account key file.
- `ACCESS_KEY`: the secret access key, or the `private_key` value in your service account key file.
> [!NOTE]
> **Note:** you can modify the location of the credential file with the `gcs-module-config-dir` parameter when you [set up the transfer](https://docs.cloud.google.com/bigquery/docs/migration/teradata#set_up_a_transfer)
## Set up a transfer
Create a transfer with the BigQuery Data Transfer Service.
If you want a custom schema file created automatically, use the migration
agent to set up the transfer.
You can't create an on-demand transfer by using the bq command-line tool;
you must use the Google Cloud console or the BigQuery Data Transfer Service API instead.
If you are creating a recurring transfer, we strongly recommend that you
specify a schema file so that data from subsequent transfers can be properly
partitioned when it is loaded into BigQuery. Without a schema
file, the BigQuery Data Transfer Service infers the table schema from the source data
being transferred, and all information about partitioning, clustering,
primary keys, and change tracking is lost. In addition, subsequent transfers
skip previously migrated tables after the initial transfer. For more
information on how to create a schema file, see
[Custom schema file](https://docs.cloud.google.com/bigquery/docs/migration/teradata-overview#custom_schema_file).
### Console
1. In the Google Cloud console, go to the BigQuery page.
[Go to the BigQuery page](https://console.cloud.google.com/bigquery)
2. Click **Data transfers**.
3. Click **Create Transfer**.
4. In the **Source type** section, do the following:
- Choose **Migration: Teradata**.
- For **Transfer config name** , enter a display name for the transfer such as `My Migration`. The display name can be any value that lets you identify the transfer if you need to modify it later.
- Optional: For **Schedule options** , you can leave the default value of **Daily** (based on creation time) or choose another time if you want a recurring, incremental transfer. Otherwise, choose **On-demand** for a one-time transfer.
- For **Destination settings**, choose the appropriate dataset.

5. In the **Data source details** section, continue with specific details for your
Teradata transfer.
- For **Database type** , choose **Teradata**.
- For **Cloud Storage bucket** , browse for the name of the Cloud Storage bucket for staging the migration data. Don't type in the prefix `gs://` -- enter only the bucket name.
- For **Database name**, enter the name of the source database in Teradata.
- For **Table name patterns**, enter a pattern for matching the table
names in the source database. You can use regular expressions to
specify the pattern. For example:
- `sales|expenses` matches tables that are named `sales` and `expenses`.
- `.*` matches all tables.
> [!NOTE]
> **Note:** For information about regular expression syntax for Teradata transfers, see the [re2 library](https://github.com/google/re2/wiki/Syntax).
- For **Service account email**, enter the email address associated with
the service account's credentials used by a migration agent.
- Optional: For **Schema file path** , enter the path and filename of a
custom schema file. For more information about creating a custom schema
file, see [Custom schema file](https://docs.cloud.google.com/bigquery/docs/migration/teradata-overview#custom_schema_file).
You can leave this field blank to have BigQuery
[automatically detect your source table schema](https://docs.cloud.google.com/bigquery/docs/migration/teradata-overview#default_schema_detection) for you.
- Optional: For **Translation output root directory** , enter the path and
filename of the schema mapping file provided by the BigQuery
translation engine. For more information about generating a schema
mapping file, see [Using translation engine output for schema](https://docs.cloud.google.com/bigquery/docs/migration/teradata-overview#using_translation_engine_output_for_schema)
([Preview](https://cloud.google.com/products/#product-launch-stages)). You can leave this field
blank to have BigQuery [automatically detect your source
table schema](https://docs.cloud.google.com/bigquery/docs/migration/teradata-overview#default_schema_detection) for you.
- Optional: For **Enable direct unload to GCS** , select the checkbox to enable the
[access module for Cloud Storage](https://docs.cloud.google.com/bigquery/docs/migration/teradata-overview#extraction_method).
6. In the **Service Account** menu, select a [service account](https://docs.cloud.google.com/iam/docs/service-account-overview)
from the service accounts associated with your
Google Cloud project. You can associate a service account with
your transfer instead of using your user credentials. For more
information about using service accounts with data transfers, see
[Use service accounts](https://docs.cloud.google.com/bigquery/docs/use-service-accounts).
- If you signed in with a [federated identity](https://docs.cloud.google.com/iam/docs/workforce-identity-federation), then a service account is required to create a transfer. If you signed in with a [Google Account](https://docs.cloud.google.com/iam/docs/principals-overview#google-account), then a service account for the transfer is optional.
- The service account must have the [required permissions](https://docs.cloud.google.com/bigquery/docs/migration/teradata#set_required_permissions).
7. Optional: In the **Notification options** section, do the following:
- Click the **Email notifications** toggle if you want the transfer administrator to receive an email notification when a transfer run fails.
- Click the **Pub/Sub notifications** toggle to configure Pub/Sub run [notifications](https://docs.cloud.google.com/bigquery/docs/transfer-run-notifications) for your transfer. For **Select a Pub/Sub topic** , choose your [topic](https://docs.cloud.google.com/pubsub/docs/overview#types) name or click **Create a topic**.
8. Click **Save**.
9. On the **Transfer details** page, click the **Configuration** tab.
10. Note the resource name for this transfer because you need it to run
the migration agent.
### bq
When you create a Cloud Storage transfer using the bq tool,
the transfer configuration is set to recur every 24 hours. For on-demand
transfers, use the Google Cloud console or the BigQuery Data Transfer Service API.
You cannot configure notifications using the bq tool.
Enter the
[`bq mk`](https://docs.cloud.google.com/bigquery/docs/reference/bq-cli-reference#mk-transfer-config)
command and supply the transfer creation flag
`--transfer_config`. The following flags are also required:
- `--data_source`
- `--display_name`
- `--target_dataset`
- `--params`
```bash
bq mk \
--transfer_config \
--project_id=project ID \
--target_dataset=dataset \
--display_name=name \
--service_account_name=service_account \
--params='parameters' \
--data_source=data source
```
Where:
- project ID is your project ID. If `--project_id` isn't supplied to specify a particular project, the default project is used.
- dataset is the dataset you want to target (`--target_dataset`) for the transfer configuration.
- name is the display name (`--display_name`) for the transfer configuration. The transfer's display name can be any value that lets you identify the transfer if you need to modify it later.
- service_account is the service account name used to authenticate your transfer. The service account should be owned by the same `project_id` used to create the transfer and it should have all the listed [required permissions](https://docs.cloud.google.com/bigquery/docs/migration/teradata#set_required_permissions).
- parameters contains the parameters (`--params`) for the created transfer configuration in JSON format. For example: `--params='{"param":"param_value"}'`.
- For Teradata migrations, use the following parameters:
- `bucket` is the Cloud Storage bucket that will act as a staging area during the migration.
- `database_type` is Teradata.
- `agent_service_account` is the email address associated with the service account that you created.
- `database_name` is the name of the source database in Teradata.
- `table_name_patterns` is a pattern(s) for matching the table names in the source database. You can use regular expressions to specify the pattern. The pattern should follow Java regular expression syntax. For example:
- `sales|expenses` matches tables that are named `sales` and `expenses`.
- `.*` matches all tables.
- `is_direct_gcs_unload_enabled` is a boolean flag to enable direct unload to Cloud Storage.
- data_source is the data source (`--data_source`): `on_premises`.
For example, the following command creates a Teradata transfer
named `My Transfer` using Cloud Storage bucket `mybucket` and target dataset
`mydataset`. The transfer will migrate all tables from the Teradata
data warehouse `mydatabase` and the optional schema file is `myschemafile.json`.
```bash
bq mk \
--transfer_config \
--project_id=123456789876 \
--target_dataset=MyDataset \
--display_name='My Migration' \
--params='{"bucket": "mybucket", "database_type": "Teradata",
"database_name":"mydatabase", "table_name_patterns": ".*",
"agent_service_account":"myemail@mydomain.com", "schema_file_path":
"gs://mybucket/myschemafile.json", "is_direct_gcs_unload_enabled": true}' \
--data_source=on_premises
```
After running the command, you receive a message like the following:
`[URL omitted] Please copy and paste the above URL into your web browser and
follow the instructions to retrieve an authentication code.`
Follow the instructions and paste the authentication code on the command
line.
### API
Use the [`projects.locations.transferConfigs.create`](https://docs.cloud.google.com/bigquery/docs/reference/datatransfer/rest/v1/projects.locations.transferConfigs/create)
method and supply an instance of the [`TransferConfig`](https://docs.cloud.google.com/bigquery/docs/reference/datatransfer/rest/v1/projects.locations.transferConfigs#TransferConfig)
resource.
### Java
Before trying this sample, follow the Java setup instructions in the
[BigQuery quickstart using
client libraries](https://docs.cloud.google.com/bigquery/docs/quickstarts/quickstart-client-libraries).
For more information, see the
[BigQuery Java API
reference documentation](https://docs.cloud.google.com/java/docs/reference/google-cloud-bigquery/latest/overview).
To authenticate to BigQuery, set up Application Default Credentials.
For more information, see
[Set up authentication for client libraries](https://docs.cloud.google.com/bigquery/docs/authentication#client-libs).
import com.google.api.gax.rpc.https://docs.cloud.google.com/java/docs/reference/gax/latest/com.google.api.gax.rpc.ApiException.html;
import com.google.cloud.bigquery.datatransfer.v1.https://docs.cloud.google.com/java/docs/reference/google-cloud-bigquerydatatransfer/latest/com.google.cloud.bigquery.datatransfer.v1.CreateTransferConfigRequest.html;
import com.google.cloud.bigquery.datatransfer.v1.https://docs.cloud.google.com/java/docs/reference/google-cloud-bigquerydatatransfer/latest/com.google.cloud.bigquery.datatransfer.v1.DataTransferServiceClient.html;
import com.google.cloud.bigquery.datatransfer.v1.https://docs.cloud.google.com/java/docs/reference/google-cloud-bigquerydatatransfer/latest/com.google.cloud.bigquery.datatransfer.v1.ProjectName.html;
import com.google.cloud.bigquery.datatransfer.v1.https://docs.cloud.google.com/java/docs/reference/google-cloud-bigquerydatatransfer/latest/com.google.cloud.bigquery.datatransfer.v1.TransferConfig.html;
import com.google.protobuf.https://docs.cloud.google.com/java/docs/reference/protobuf/latest/com.google.protobuf.Struct.html;
import com.google.protobuf.https://docs.cloud.google.com/java/docs/reference/protobuf/latest/com.google.protobuf.Value.html;
import java.io.IOException;
import java.util.HashMap;
import java.util.Map;
// Sample to create a teradata transfer config.
public class CreateTeradataTransfer {
public static void main(String[] args) throws IOException {
// TODO(developer): Replace these variables before running the sample.
final String projectId = "MY_PROJECT_ID";
String datasetId = "MY_DATASET_ID";
String databaseType = "Teradata";
String bucket = "cloud-sample-data";
String databaseName = "MY_DATABASE_NAME";
String tableNamePatterns = "*";
String serviceAccount = "MY_SERVICE_ACCOUNT";
String schemaFilePath = "/your-schema-path";
Map params = new HashMap<>();
params.put("database_type", https://docs.cloud.google.com/java/docs/reference/protobuf/latest/com.google.protobuf.Value.html.newBuilder().setStringValue(databaseType).build());
params.put("bucket", https://docs.cloud.google.com/java/docs/reference/protobuf/latest/com.google.protobuf.Value.html.newBuilder().setStringValue(bucket).build());
params.put("database_name", https://docs.cloud.google.com/java/docs/reference/protobuf/latest/com.google.protobuf.Value.html.newBuilder().setStringValue(databaseName).build());
params.put("table_name_patterns", https://docs.cloud.google.com/java/docs/reference/protobuf/latest/com.google.protobuf.Value.html.newBuilder().setStringValue(tableNamePatterns).build());
params.put("agent_service_account", https://docs.cloud.google.com/java/docs/reference/protobuf/latest/com.google.protobuf.Value.html.newBuilder().setStringValue(serviceAccount).build());
params.put("schema_file_path", https://docs.cloud.google.com/java/docs/reference/protobuf/latest/com.google.protobuf.Value.html.newBuilder().setStringValue(schemaFilePath).build());
https://docs.cloud.google.com/java/docs/reference/google-cloud-bigquerydatatransfer/latest/com.google.cloud.bigquery.datatransfer.v1.TransferConfig.html transferConfig =
https://docs.cloud.google.com/java/docs/reference/google-cloud-bigquerydatatransfer/latest/com.google.cloud.bigquery.datatransfer.v1.TransferConfig.html.newBuilder()
.setDestinationDatasetId(datasetId)
.setDisplayName("Your Teradata Config Name")
.setDataSourceId("on_premises")
.setParams(https://docs.cloud.google.com/java/docs/reference/protobuf/latest/com.google.protobuf.Struct.html.newBuilder().https://docs.cloud.google.com/java/docs/reference/protobuf/latest/com.google.protobuf.Struct.Builder.html#com_google_protobuf_Struct_Builder_putAllFields_java_util_Map_java_lang_String_com_google_protobuf_Value__(params).build())
.setSchedule("every 24 hours")
.build();
createTeradataTransfer(projectId, transferConfig);
}
public static void createTeradataTransfer(String projectId, https://docs.cloud.google.com/java/docs/reference/google-cloud-bigquerydatatransfer/latest/com.google.cloud.bigquery.datatransfer.v1.TransferConfig.html transferConfig)
throws IOException {
try (https://docs.cloud.google.com/java/docs/reference/google-cloud-bigquerydatatransfer/latest/com.google.cloud.bigquery.datatransfer.v1.DataTransferServiceClient.html client = https://docs.cloud.google.com/java/docs/reference/google-cloud-bigquerydatatransfer/latest/com.google.cloud.bigquery.datatransfer.v1.DataTransferServiceClient.html.create()) {
https://docs.cloud.google.com/java/docs/reference/google-cloud-bigquerydatatransfer/latest/com.google.cloud.bigquery.datatransfer.v1.ProjectName.html parent = https://docs.cloud.google.com/java/docs/reference/google-cloud-bigquerydatatransfer/latest/com.google.cloud.bigquery.datatransfer.v1.ProjectName.html.of(projectId);
https://docs.cloud.google.com/java/docs/reference/google-cloud-bigquerydatatransfer/latest/com.google.cloud.bigquery.datatransfer.v1.CreateTransferConfigRequest.html request =
https://docs.cloud.google.com/java/docs/reference/google-cloud-bigquerydatatransfer/latest/com.google.cloud.bigquery.datatransfer.v1.CreateTransferConfigRequest.html.newBuilder()
.setParent(parent.https://docs.cloud.google.com/java/docs/reference/google-cloud-bigquerydatatransfer/latest/com.google.cloud.bigquery.datatransfer.v1.ProjectName.html#com_google_cloud_bigquery_datatransfer_v1_ProjectName_toString__())
.setTransferConfig(transferConfig)
.build();
https://docs.cloud.google.com/java/docs/reference/google-cloud-bigquerydatatransfer/latest/com.google.cloud.bigquery.datatransfer.v1.TransferConfig.html config = client.createTransferConfig(request);
System.out.println("Cloud teradata transfer created successfully :" + config.https://docs.cloud.google.com/java/docs/reference/google-cloud-bigquerydatatransfer/latest/com.google.cloud.bigquery.datatransfer.v1.TransferConfig.html#com_google_cloud_bigquery_datatransfer_v1_TransferConfig_getName__());
} catch (https://docs.cloud.google.com/java/docs/reference/gax/latest/com.google.api.gax.rpc.ApiException.html ex) {
System.out.print("Cloud teradata transfer was not created." + ex.toString());
}
}
}
### Migration agent
You can optionally set up the transfer directly from the migration agent.
For more information, see
[Initialize the migration agent](https://docs.cloud.google.com/bigquery/docs/migration/teradata#initialize_the_migration_agent).
## Initialize the migration agent
You must initialize the migration agent for a new transfer. Initialization is
required only once for a transfer, whether or not it is recurring.
Initialization only configures the migration agent, it doesn't start
the transfer.
If you are going to use the migration agent to create a custom schema file,
ensure that you have a writable directory under your
working directory with the same name as the project you want to use for the
transfer. This is where the migration agent creates the schema file.
For example, if you are working in `/home` and you are setting up
the transfer in project `myProject`, create directory `/home/myProject`
and make sure it is writable by users.
1. Open a new session. On the command line, issue the initialization command,
which follows this form:
```bash
java -cp \
OS-specific-separated-paths-to-jars (JDBC and agent) \
com.google.cloud.bigquery.dms.Agent \
--initialize
```
The following example shows the initialization command when the JDBC driver
and migration agent JAR files are in a local `migration` directory:
### Unix, Linux, Mac OS
```bash
java -cp \
/usr/local/migration/terajdbc4.jar:/usr/local/migration/mirroring-agent.jar \
com.google.cloud.bigquery.dms.Agent \
--initialize
```
### Windows
Copy all the files into the `C:\migration` folder (or adjust the paths in
the command), then run:
```bash
java -cp C:\migration\terajdbc4.jar;C:\migration\mirroring-agent.jar com.google.cloud.bigquery.dms.Agent --initialize
```
2. When prompted, configure the following options:
1. Choose whether to save the Teradata Parallel Transporter (TPT) template to disk. If you are planning to use the TPT extraction method, you can modify the saved template with parameters that suit your Teradata instance.
2. Type the path to a local directory that the transfer job can use for file extraction. Ensure you have the minimum recommended storage space as described in [Extraction method](https://docs.cloud.google.com/bigquery/docs/migration/teradata-overview#extraction_method).
3. Type the database hostname.
4. Type the database port.
5. Choose whether to use Teradata Parallel Transporter (TPT) as the extraction method.
6. Optional: Type the path to a database credential file.
7. Choose whether to specify a BigQuery Data Transfer Service config name.
If you are initializing the migration agent for a transfer you
have already [set up](https://docs.cloud.google.com/bigquery/docs/migration/teradata#set_up_a_transfer), then do the following:
1. Type the **Resource name** of the transfer. You can find this in the **Configuration** tab of the **Transfer details** page for the transfer.
2. When prompted, type a path and filename for the migration agent configuration file that will be created. You refer to this file when you [run the migration agent](https://docs.cloud.google.com/bigquery/docs/migration/teradata#run_the_migration_agent) to start the transfer.
3. Skip the remaining steps.
If you are using the migration agent to set up a transfer, press
**Enter** to skip to the next prompt.
8. Type the Google Cloud Project ID.
9. Type the name of the source database in Teradata.
10. Type a pattern for matching the table names in the source database.
You can use regular expressions to specify the pattern. For example:
- `sales|expenses` matches tables that are named `sales` and `expenses`.
- `.*` matches all tables.
> [!NOTE]
> **Note:** For information about regular expression syntax for Teradata transfers, see the [re2 library](https://github.com/google/re2/wiki/Syntax).
11. Optional: Type the path to a local JSON schema file. This is strongly
recommended for recurring transfers.
If you aren't using a schema file, or if you want the migration agent
to create one for you, press Enter to skip to the next prompt.
12. Choose whether to create a new schema file.
If you do want to create a schema file:
1. Type `yes`.
2. Type the username of a Teradata user who has read access to the system tables and the tables you want to migrate.
3. Type the password for that user.
The migration agent creates the schema file and
outputs its location.
4. Modify the schema file to mark partitioning, clustering, primary
keys and change tracking columns, and verify that you want
to use this schema for the transfer configuration. See
[Custom schema file](https://docs.cloud.google.com/bigquery/docs/migration/teradata-overview#custom_schema_file)
for tips.
5. Press `Enter` to skip to the next prompt.
If you don't want to create a schema file, type `no`.
13. Type the name of the target Cloud Storage bucket for staging migration
data before loading to BigQuery. If you had the
migration agent create a custom schema file, it is also uploaded to
this bucket.
14. Type the name of the destination dataset in BigQuery.
15. Type a display name for the transfer configuration.
16. Type a path and filename for the migration
agent configuration file that will be created.
3. After entering all the requested parameters, the migration agent creates a
configuration file and outputs it to the local path that you specified. See
the next section for a closer look at the configuration file.
### Configuration file for the migration agent
The configuration file created in the initialization step looks similar to this
example:
{
"agent-id": "81f452cd-c931-426c-a0de-c62f726f6a6f",
"transfer-configuration": {
"project-id": "123456789876",
"location": "us",
"id": "61d7ab69-0000-2f6c-9b6c-14c14ef21038"
},
"source-type": "teradata",
"console-log": false,
"silent": false,
"teradata-config": {
"connection": {
"host": "localhost"
},
"local-processing-space": "extracted",
"database-credentials-file-path": "",
"max-local-storage": "50GB",
"gcs-upload-chunk-size": "32MB",
"use-tpt": true,
"transfer-views": false,
"max-sessions": 0,
"spool-mode": "NoSpool",
"max-parallel-upload": 4,
"max-parallel-extract-threads": 1,
"session-charset": "UTF8",
"max-unload-file-size": "2GB"
}
}
#### Transfer job options in the migration agent configuration file
- `transfer-configuration`: Information about this transfer configuration in BigQuery.
- `teradata-config`: Information specific for this Teradata extraction:
- `connection`: Information about the hostname and port
- `local-processing-space`: The extraction folder where the agent will extract table data to, before uploading it to Cloud Storage.
- `database-credentials-file-path`: **(Optional)** The path to a file that contains credentials for connecting to the Teradata database automatically. The file should contain two lines for the credentials. You can use a username/password, as shown in the following example:
```json
username=abc
password=123
```
You can also use a secret from [SecretManager](https://cloud.google.com/secret-manager) instead:
```json
username=abc
secret_resource_id=projects/my-project/secrets/my-secret-name/versions/1
```
When using a credentials file, take care to control access to the folder where you store it on the local file system, because it isn't encrypted. If no path is provided, you will be prompted for a username and password when you start an agent.
> [!NOTE]
> Authentication modes, such as LDAP, are not supported.
- `max-local-storage`: The maximum amount of local storage to use for
the extraction in the specified staging directory. The default value is
`50GB`. The supported format is: `numberKB|MB|GB|TB`.
In all extraction modes, files are deleted from your local staging
directory after they are uploaded to Cloud Storage.
> [!NOTE]
> Note: the \`max-local-storage\` limit has additional effects when Teradata Parallel Transporter (TPT) is used. If the table has multiple partitions smaller than the \`max-local-storage\` value, then table extraction is split into multiple TPT jobs, each not exceeding the \`max-local-storage\` value. If the table is not partitioned, or if any of the partitions is bigger than \`max-local-storage\`, then extraction proceeds but the actual space required for extraction exceeds the limit.
- `use-tpt`: Directs the migration agent to use Teradata Parallel
Transporter (TPT) as an extraction method.
For each table, the migration agent generates a TPT script, starts a
`tbuild` process and waits for completion. Once the `tbuild` process
completes, the agent lists and uploads the extracted files to
Cloud Storage, and then deletes the TPT script. For more information, see
[Extraction method](https://docs.cloud.google.com/bigquery/docs/migration/teradata-overview#extraction_method).
> [!WARNING]
> Warning: An agent generates and saves a TPT script into a file in the local extraction folder. The script contains a Teradata username and password. Take appropriate steps to restrict access to files in the local extraction folder, because the username and password aren't encrypted.
- `transfer-views`: Directs the migration agent to also transfer data from views.
Use this only when you require data customization during migration.
In other cases, migrate views to [BigQuery Views](https://docs.cloud.google.com/bigquery/docs/views-intro).
This option has the following prerequisites:
- You can only use this option with Teradata versions 16.10 and higher.
- A view should have an integer column "partition" defined, pointing to an ID of partition for the given row in the underlying table.
- `max-sessions`: Specifies the maximum number of sessions used by the extract
job (either FastExport or TPT). If set to 0, then the Teradata database
will determine the maximum number of sessions for each extract job.
- `gcs-upload-chunk-size`: A large file is uploaded to Cloud Storage in chunks.
This parameter along with `max-parallel-upload` are used to control how
much data gets uploaded to Cloud Storage at the same time. For example, if the
`gcs-upload-chunk-size` is 64 MB and `max-parallel-upload` is 10 MB, then
theoretically a migration agent can upload 640 MB (64 MB \* 10) of data at
the same time. If the chunk fails to upload, then the entire chunk has to
be retried. The chunk size must be small.
- `max-parallel-upload`: This value determines the maximum number of threads
used by the migration agent to upload files to Cloud Storage. If not
specified, defaults to the number of processors available to the Java virtual
machine. The general rule of thumb is to choose the value based on the number
of cores that you have in the machine which runs the agent. So if you have `n` cores,
then the optimal number of threads should be `n`. If the cores are hyper-threaded,
then the optimal number should be `(2 * n)`. There are also other
settings like network bandwidth that you must consider while adjusting
`max-parallel-upload`. Adjusting this parameter can improve the
performance of uploading to Cloud Storage.
- `spool-mode`: In most cases, the NoSpool mode is the best option.
`NoSpool` is the default value in agent configuration. You can change this
parameter if any of the [disadvantages of NoSpool](https://docs.teradata.com/r/tRbhWsU75TDpkqzyEZReyA/2gbczYmS%7EPRXRVKD0Dngtg)
apply to your case.
- `max-unload-file-size`: Determines the maximum extracted file size. This
parameter is not enforced for TPT extractions.
- `max-parallel-extract-threads`: This configuration is used only in
FastExport mode. It determines the number of parallel threads used for
extracting the data from Teradata. Adjusting this parameter could improve
the performance of extraction.
- `tpt-template-path`: Use this configuration to provide a custom TPT
extraction script as input. You can use this parameter to apply
transformations to your migration data.
- `tpt-export-count`: The export operator is responsible for extracting data
from the Teradata database. This parameter overrides the default export count in the TPT script.
It should be less than or equal to the value of the `max-sessions` parameter to ensure that each instance has enough pipes to the database.
- `tpt-file-writer-count`: The file writer operator is responsible for taking the data received
from the export operator and writing it to a physical file on your storage system. This
parameter overrides the default file writer count in the TPT script. Ideally, the file writer
count must match the export count; otherwise, the transfer becomes a bottleneck at either the extraction or the writer end.
- `schema-mapping-rule-path`: **(Optional)** The path to a configuration
file that contains a schema mapping to override the default mapping rules.
Some mapping types work only with Teradata Parallel Transporter (TPT) mode.
Example: Mapping from Teradata type `TIMESTAMP` to BigQuery
type `DATETIME`:
```json
{
"rules": [
{
"database": {
"name": "database.*",
"tables": [
{
"name": "table.*"
}
]
},
"match": {
"type": "COLUMN_TYPE",
"value": "TIMESTAMP"
},
"action": {
"type": "MAPPING",
"value": "DATETIME"
}
}
]
}
```
Attributes:
- `database`: **(Optional)** `name` is a regular expression for databases to include. All the databases are included by default.
- `tables`: **(Optional)** contains an array of tables. `name` is a regular expression for tables to include. All the tables are included by default.
- `match`: **(Required)**
- `type` supported values: `COLUMN_TYPE`.
- `value` supported values: `TIMESTAMP`, `DATETIME`.
- `action`: **(Required)**
- `type` supported values: `MAPPING`.
- `value` supported values: `TIMESTAMP`, `DATETIME`.
> [!NOTE]
> **Note:** BigQuery stores [`TIMESTAMP`](https://docs.cloud.google.com/bigquery/docs/reference/standard-sql/data-types#timestamp_type) in UTC by default. Data transfers that include timestamps from other timezones might have discrepancies when transferred into BigQuery.
- `compress-output`: **(Optional)** dictates whether data should be compressed
before storing on Cloud Storage. This is only applied in **tpt-mode** .
By default this value is `false`.
- `gcs-module-config-dir`: **(Optional)** the path to the [credentials file](https://docs.cloud.google.com/bigquery/docs/migration/teradata#setup_credential_file_for_access_module)
to access the Cloud Storage bucket. The default directory is `$HOME/.gcs`, but you can use this parameter to change the directory.
- `gcs-module-connection-count`: **(Optional)** Specifies the number of TCP connections to the Cloud Storage service.
The default value is 10.
- `gcs-module-buffer-size`: **(Optional)** Specifies the size of the buffers to be used for the TCP connections.
The default is 8 MB (8388608 bytes). For ease of use, you can use the following multipliers:
- `k (1000)`
- `K (1024)`
- `m (1000 * 1000)`
- `M (1024*1024)`
- `gcs-module-buffer-count`: **(Optional)** Specifies the number of buffers to be used with
the TCP connections specified by the `gcs-module-connection-count`. We recommend using a
value that is equal to twice the number of TCP connections to the Cloud Storage service.
The default value is 2 \* `gcs-module-connection-count`.
- `gcs-module-max-object-size`: **(Optional)** This parameter controls the sizes of Cloud Storage objects.
Value of this parameter can be an integer or an integer followed by, without a space,
one of the following multipliers:
- `k (1000)`
- `K (1024)`
- `m (1000 * 1000)`
- `M (1024*1024)`
- `gcs-module-writer-instances`: **(Optional)** This parameter specifies number of Cloud Storage writer instances.
By default, the value is 1. You can increase this value to increase
throughput during the writing phase of the TPT export.
> [!NOTE]
> **Note:** All configuration parameters listed earlier can be overridden for a particular agent run by using a startup flag with the full parameter path. For example: `java -cp ... --teradata-config.local-processing-space=`
#### Optimize agent data extraction
By fine tuning the agent parameters, you can optimize the data extraction
process and make the overall transfer process efficient.
The following table provides information about parameters you can use to tune
your migration:
| Parameter | Recommended Value | Description |
|---|---|---|
| **`gcs-module-writer-instances`** | 4 | Increases parallelization for TPT extraction and Cloud Storage write operations. Tune this value to balance transfer optimization and Teradata instance load. |
| **`gcs-module-connection-count`** | 10 | Sets the number of TCP connections to Cloud Storage. Increasing this value improves parallelization during the Cloud Storage upload phase. |
| **`gcs-module-buffer-size`** | 32m | Defines the size of the buffers for TCP connections. Testing indicates that `32m` provides optimal results. |
| **`tpt-export-count`** | Must be less than or equal to the `max-sessions` value. | Overrides the default export operator count in the TPT script. The value should be less than or equal to the `max-sessions` value to ensure that each instance has enough pipes to the database. |
| **`tpt-file-writer-count`** | Should be equal to the `export-count` value. | Overrides the default file writer operator count in the TPT script. Ideally, this value should match the `tpt-export-count` value to avoid bottlenecks. |
Consider the following best practices for configuration:
- **Memory constraint**: Ensure that the result of the following calculation is
less than the total memory of the virtual machine (VM) running the agent.
Use consistent units for all values in your calculation.
$$ \\text{gcs-module-writer-instances} \\times \\text{gcs-module-buffer-size} \\times \\text{gcs-module-buffer-count} \< \\text{Total VM memory} $$
- **Tuning order**:
1. Adjust the `gcs-module-writer-instances` parameter value first to find the best balance of performance and load.
2. If further performance gains are needed, increase the `gcs-module-connection-count` value.
- **Automatic scaling** : By default, the `gcs-module-buffer-size` parameter
value is typically set to twice the connection count, but we recommend
explicitly tuning the value to `32m` for these workloads.
## Run the migration agent
After initializing the migration agent and creating the configuration file, use
the following steps to run the agent and start the migration:
1. Run the agent by specifying the paths to the JDBC driver, the migration
agent, and the configuration file that was created in the previous
initialization step.
> [!WARNING]
> The migration agent must keep running for the entire period of the transfer. If you run the agent remotely, for example by using SSH, make sure it remains active even if the remote connection is closed. You can do this by using \`tmux\` or similar utilities.
```bash
java -cp \
OS-specific-separated-paths-to-jars (JDBC and agent) \
com.google.cloud.bigquery.dms.Agent \
--configuration-file=path to configuration file
```
### Unix, Linux, Mac OS
```bash
java -cp \
/usr/local/migration/Teradata/JDBC/terajdbc4.jar:mirroring-agent.jar \
com.google.cloud.bigquery.dms.Agent \
--configuration-file=config.json
```
### Windows
Copy all the files into the `C:\migration` folder (or adjust the paths in
the command), then run:
```bash
java -cp C:\migration\terajdbc4.jar;C:\migration\mirroring-agent.jar com.google.cloud.bigquery.dms.Agent --configuration-file=config.json
```
If you are ready to proceed with the migration, press `Enter` and the agent
will proceed if the classpath provided during initialization is valid.
2. When prompted, type the username and password for the database connection.
If the username and password are valid, the data migration starts.
**Optional** In the command to start the migration, you can also use a flag
that passes a credentials file to the agent, instead of entering the username
and password each time. See the optional parameter
[`database-credentials-file-path`](https://docs.cloud.google.com/bigquery/docs/migration/teradata#configuration_file_for_the_migration_agent)
in the agent configuration file for more information. When using a
credentials file, take appropriate steps to control access to the folder
where you store it on the local file system, because it isn't encrypted.
3. Leave this session open until the migration is completed. If you created a
recurring migration transfer, keep this session open indefinitely. If this
session is interrupted, current and future transfer runs fail.
4. Periodically monitor if the agent is running. If a transfer run is in
progress and no agent responds within 24 hours, the transfer run fails.
5. If the migration agent stops working while the transfer is in progress or
scheduled, the Google Cloud console shows the error status and prompts you
to restart the agent. To restart the migration agent, return to the start of
this section. You don't need to repeat the initialization
command. The transfer resumes from the point where tables were not completed.
> [!WARNING]
> WARNING: The extracted data from Teradata is not encrypted. Take appropriate steps to restrict access to extracted files in the local machine's extraction folder, and ensure that your Cloud Storage bucket is not publicly available. Read more about controlling access to Cloud Storage buckets with [IAM roles](https://docs.cloud.google.com/storage/docs/access-control/using-iam-permissions).
## Track the progress of the migration
You can view the status of the migration in the Google Cloud console. You
can also set up Pub/Sub or email notifications. See
[BigQuery Data Transfer Service notifications](https://docs.cloud.google.com/bigquery/docs/transfer-run-notifications).
The BigQuery Data Transfer Service schedules and initiates a transfer run on a schedule
specified upon the creation of transfer configuration. It is important that
the migration agent is running when a transfer run is active. If there are no
updates from the agent side within 24 hours, a transfer run fails.
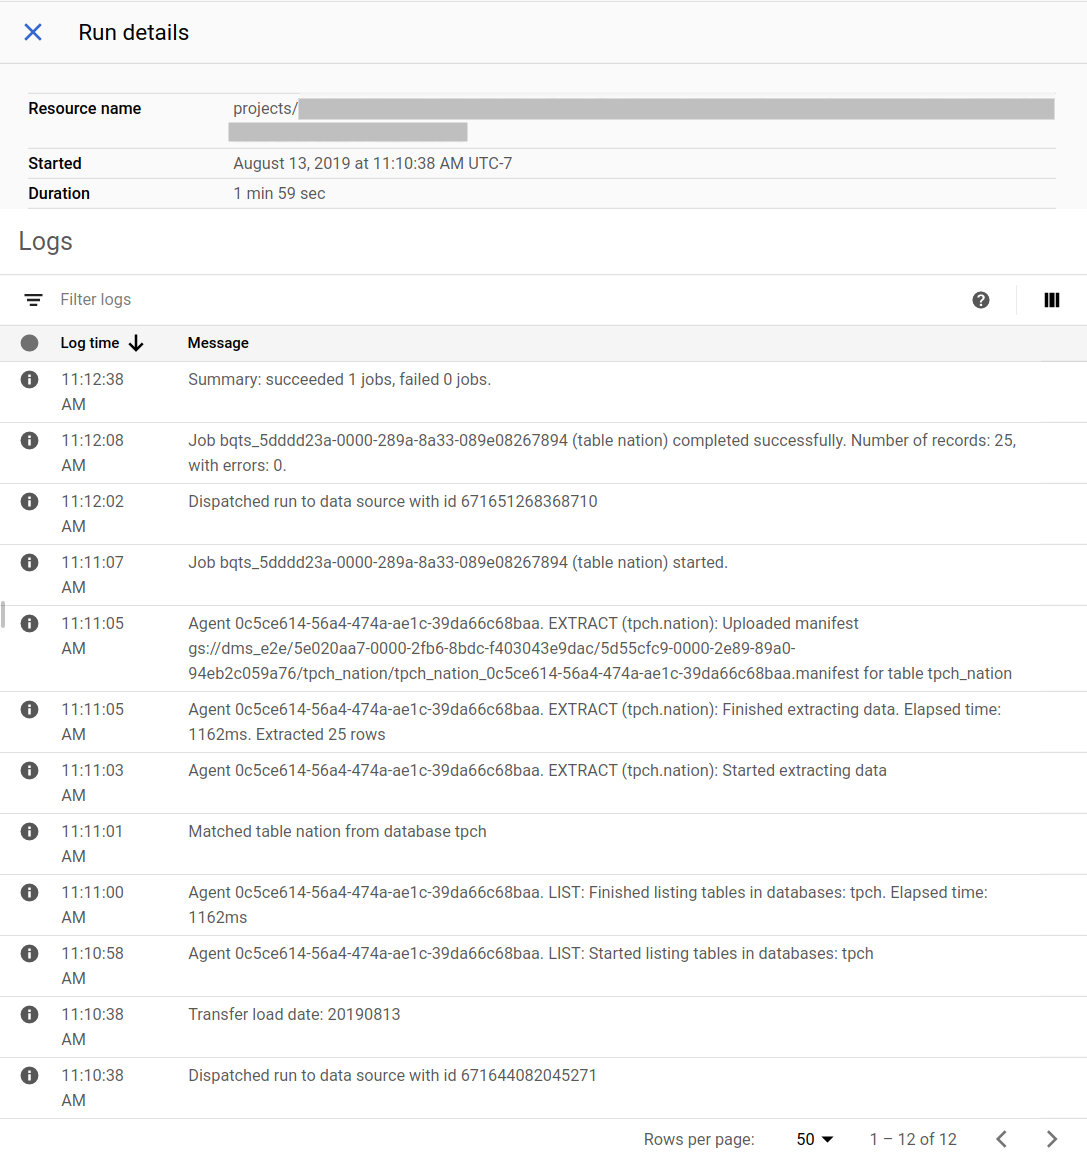
Example of migration status in the Google Cloud console:
## Upgrade the migration agent
If a new version of the migration agent is available,
you must manually update the migration agent. To receive notices about
the BigQuery Data Transfer Service, subscribe to the
[release notes](https://docs.cloud.google.com/bigquery/docs/release-notes).
## What's next
- Try a [test migration](https://docs.cloud.google.com/bigquery/docs/migration/teradata-tutorial) of Teradata to BigQuery.
- Learn more about the [BigQuery Data Transfer Service](https://docs.cloud.google.com/bigquery/docs/dts-introduction).
- Migrate SQL code with the [Batch SQL translation](https://docs.cloud.google.com/bigquery/docs/batch-sql-translator).