# Migration assessment
The BigQuery migration assessment lets you plan and evaluate the migration of your
existing data warehouse to BigQuery. You can run an assessment to
estimate storage costs, identify workload optimizations, and generate a
migration plan that outlines the time and effort required for your migration.
## Before you begin
To prepare and run a BigQuery migration assessment, follow these steps:
1. Ensure that you are familiar with the [Google Cloud console](https://docs.cloud.google.com/bigquery/docs/bigquery-web-ui) and the [batch SQL translator](https://docs.cloud.google.com/bigquery/docs/batch-sql-translator).
2. [Create a Cloud Storage bucket](https://docs.cloud.google.com/storage/docs/creating-buckets).
> [!NOTE]
> **Note:** [Use the `--pap` flag](https://docs.cloud.google.com/sdk/gcloud/reference/storage/buckets/create#FLAGS) to prevent your Cloud Storage bucket data from being publicly accessible.
3. [Extract metadata and query logs](https://docs.cloud.google.com/bigquery/docs/migration-assessment#extract-metadata-logs) from your data warehouse.
4. [Upload your metadata and query logs](https://docs.cloud.google.com/bigquery/docs/migration-assessment#upload) to your Cloud Storage bucket.
5. [Run the migration assessment](https://docs.cloud.google.com/bigquery/docs/migration-assessment#run-migration-assessment).
6. [Review the Data Studio report](https://docs.cloud.google.com/bigquery/docs/migration-assessment#review_the_data_studio_report).
7. Optional: [Query the assessment results](https://docs.cloud.google.com/bigquery/docs/migration-assessment#query_assessment_output) to find detailed or specific
assessment information.
## Extract metadata and query logs from your data warehouse
Both metadata and query logs are needed for preparing the assessment with
recommendations.
To extract the metadata and query logs necessary to run the assessment, select
your data warehouse:
### Databricks
> [!WARNING]
>
> **Preview**
>
>
> This feature is
>
> subject to the "Pre-GA Offerings Terms" in the General Service Terms section of the
> [Service Specific
> Terms](https://docs.cloud.google.com/terms/service-terms#1).
>
> Pre-GA features are available "as is" and might have limited support.
>
> For more information, see the
> [launch stage descriptions](https://cloud.google.com/products/#product-launch-stages).
To request feedback or support for this feature, send an email to
[bq-edw-migration-support@google.com](mailto:bq-edw-migration-support@google.com).
Metadata extraction for the Databricks Assessment starts with downloading and
running the extraction tool in your Databricks environment.
The extraction tool is a notebook that produces a ZIP archive with files that
contain a representation of a number of Databricks views. The views contain
the data necessary for the assessment.
## Download the extraction tool
A download link for the notebook is provided in the Assessment section of the
Google Cloud console. The files are available as a ZIP archive, containing the
following:
- The extraction notebook
- The utility Python scripts that the notebook runs during the extraction process.
## Import and configure the extraction tool
> [!NOTE]
> **Note:** This step requires the entire downloaded archive, as the extraction notebook depends on the additional files to complete the necessary extraction tasks.
1. [Import](https://docs.databricks.com/aws/en/notebooks/notebook-export-import) the ZIP file from the previous step using the Databricks user interface.
2. After import, open the extraction notebook and complete all steps labeled "Configuration".
Authentication for the notebook is a part of the configuration steps. The
notebook supports two Databricks authentication methods:
- [Service principal](https://docs.databricks.com/aws/en/admin/users-groups/service-principals)
- [Personal Access Token (PAT)](https://docs.databricks.com/aws/en/dev-tools/auth/pat)
you will need to use one of these methods to proceed to the next section.
We recommend using a service principal over the PAT if available, since the
PAT option is considered legacy by Databricks.
## Obtain the data for assessment
After you complete all of the configuration steps, your notebook is ready
to run. When the extraction notebook is active, use the "Run all" option to
run the notebook.
Running the notebook could take up to a day for very large systems. For a
typical system with about 50,000 tables, the extraction takes less than an
hour.
## Optional: Monitor the extraction notebook progress
The extraction notebook provides logs that contain progress and error
information for monitoring purposes. The latest log messages for a given
notebook run contain information on what is being extracted.
Because notebook execution doesn't stop at the first error, review errors in
two steps:
1. Check the summary after an extraction for an error count or other error indicators after the extraction completes; for example, less data was found than was expected. If the results look acceptable, you can skip the next step.
2. Copy the log output and save it to a text file.
## Complete the extraction process
After the notebook finishes the extraction process, you can download the
results by clicking the download button in the last section of the notebook.
### Snowflake
### Requirements
You must meet the following requirements in order to extract metadata and
query logs from Snowflake:
- A machine that can connect to your Snowflake instance(s).
- A Google Cloud account with a Cloud Storage bucket to store the data.
- An empty BigQuery dataset to store the results. Alternatively, you can create a BigQuery dataset when you create the assessment job using the Google Cloud console UI.
- Snowflake user with `IMPORTED PRIVILEGES` access on the database `Snowflake`. We recommend creating a [`SERVICE`](https://docs.snowflake.com/en/user-guide/admin-user-management#types-of-users) user with a key-pair based authentication. This provides the secure method for accessing Snowflake data platform without a need to generate MFA tokens.
- To create a new service user follow the [official Snowflake
guide](https://docs.snowflake.com/en/user-guide/key-pair-auth#configuring-key-pair-authentication). You will have to generate the RSA key-pair and assign public key to the Snowflake user.
- Service user should have the `ACCOUNTADMIN` role, or be [granted a role
with the `IMPORTED PRIVILEGES` privileges on the database
`Snowflake`](https://docs.snowflake.com/en/sql-reference/account-usage#enabling-snowflake-database-usage-for-other-roles) by an account administrator.
- Alternatively to key-pair authentication, you can use the password-based authentication. However, starting from August 2025, Snowflake enforces MFA on all password-based users. This requires you to approve the MFA push notification when using our extraction tool.
### Run the `dwh-migration-dumper` tool
Download the [`dwh-migration-dumper` command-line extraction tool](https://github.com/google/dwh-migration-tools/releases/latest).
Download the
[`SHA256SUMS.txt` file](https://github.com/google/dwh-migration-tools/releases/latest/download/SHA256SUMS.txt)
and run the following command to verify zip correctness:
### Bash
```bash
sha256sum --check SHA256SUMS.txt
```
### Windows PowerShell
```bash
(Get-FileHash RELEASE_ZIP_FILENAME).Hash -eq ((Get-Content SHA256SUMS.txt) -Split " ")[0]
```
Replace the `RELEASE_ZIP_FILENAME` with the
downloaded zip filename of the `dwh-migration-dumper` command-line extraction tool release---for
example, `dwh-migration-tools-v1.0.52.zip`
The `True` result confirms successful checksum verification.
The `False` result indicates verification error. Make sure the checksum
and zip files are downloaded from the same release version and placed in
the same directory.
For details about how to use the `dwh-migration-dumper` tool,
see the
[generate metadata](https://docs.cloud.google.com/bigquery/docs/generate-metadata)
page.
Use the `dwh-migration-dumper` tool to extract logs and metadata from your
Snowflake data warehouse as two zip files. Run the following
commands on a machine with access to the source data warehouse to generate
the files.
Generate the metadata zip file:
```bash
dwh-migration-dumper \
--connector snowflake \
--host HOST_NAME \
--user USER_NAME \
--role ROLE_NAME \
--warehouse WAREHOUSE \
--assessment \
--private-key-file PRIVATE_KEY_PATH \
--private-key-password PRIVATE_KEY_PASSWORD
```
Generate the zip file containing query logs:
```bash
dwh-migration-dumper \
--connector snowflake-logs \
--host HOST_NAME \
--user USER_NAME \
--role ROLE_NAME \
--warehouse WAREHOUSE \
--query-log-start STARTING_DATE \
--query-log-end ENDING_DATE \
--assessment \
--private-key-file PRIVATE_KEY_PATH \
--private-key-password PRIVATE_KEY_PASSWORD
```
Replace the following:
- `HOST_NAME`: the hostname of your Snowflake instance.
- `USER_NAME`: the username to use for the database connection, where the user must have the access permissions as detailed in the [requirements section](https://docs.cloud.google.com/bigquery/docs/migration-assessment#requirements-snowflake).
- `PRIVATE_KEY_PATH`: the path to the RSA private key used for authentication.
- `PRIVATE_KEY_PASSWORD`: (Optional) the password that was used when creating the RSA private key. It is required only if private key is encrypted.
- `ROLE_NAME`: (Optional, but highly recommended) the user role when running the `dwh-migration-dumper` tool---for example, `ACCOUNTADMIN`. While technically optional if your default role has sufficient privileges, specifying a role ensures that the session has access to the `SNOWFLAKE.ACCOUNT_USAGE` schema.
- `WAREHOUSE`: the warehouse used to execute the dumping operations. If you have multiple virtual warehouses, you can specify any warehouse to execute this query. Running this query with the access permissions detailed in the [requirements section](https://docs.cloud.google.com/bigquery/docs/migration-assessment#requirements-snowflake) extracts all warehouse artifacts in this account.
- `STARTING_DATE`: (Optional) used to indicate the start date in a date range of query logs, written in the format `YYYY-MM-DD`.
- `ENDING_DATE`: (Optional) used to indicate the end date in a date range of query logs, written in the format `YYYY-MM-DD`.
You can also generate multiple zip files containing query logs covering
non-overlapping periods and provide all of them for assessment.
### Hadoop / Cloudera
> [!WARNING]
>
> **Preview**
>
>
> This feature is
>
> subject to the "Pre-GA Offerings Terms" in the General Service Terms section of the
> [Service Specific
> Terms](https://docs.cloud.google.com/terms/service-terms#1).
>
> Pre-GA features are available "as is" and might have limited support.
>
> For more information, see the
> [launch stage descriptions](https://cloud.google.com/products/#product-launch-stages).
To request feedback or support for this feature, send an email to
[bq-edw-migration-support@google.com](mailto:bq-edw-migration-support@google.com).
> [!NOTE]
> **Note:** Extracting metadata from Cloudera Manager captures cluster-level utilization and Apache Hadoop YARN and Apache Spark workloads, but it doesn't extract Apache Hive table schemas or SQL query logs. If your Cloudera cluster runs Hive workloads, you must also complete the metadata and query log extraction steps. For more information, see [Use Hive in your
> Cloudera cluster](https://docs.cloud.google.com/bigquery/docs/migration-assessment#use-hive-cloudera).
### Requirements
You must have the following to extract metadata from Cloudera:
- A machine that can connect to the Cloudera Manager API.
- A Google Cloud account with a Cloud Storage bucket to store the data.
- An empty BigQuery dataset to store the results. Alternatively, you can create a BigQuery dataset when you create the assessment job.
### Run the `dwh-migration-dumper` tool
1. Download the [`dwh-migration-dumper` command-line extraction tool](https://github.com/google/dwh-migration-tools/releases/latest).
2. Download the
[`SHA256SUMS.txt` file](https://github.com/google/dwh-migration-tools/releases/latest/download/SHA256SUMS.txt).
3. In your command-line environment, verify zip correctness:
```bash
sha256sum --check SHA256SUMS.txt
```
For details about how to use the `dwh-migration-dumper` tool, see
[Generate metadata for translation and assessment](https://docs.cloud.google.com/bigquery/docs/generate-metadata).
4. Use the `dwh-migration-dumper` tool to extract metadata and performance
statistics to the zip file:
```bash
dwh-migration-dumper \
--connector cloudera-manager \
--user USER_NAME \
--password PASSWORD \
--url URL_PATH \
--yarn-application-types "APP_TYPES" \
--spark-history-service-names "SPARK_HISTORY_SERVICE_NAMES" \
--pagination-page-size PAGE_SIZE \
--start-date START_DATE \
--end-date END_DATE \
--assessment
```
Replace the following:
- `USER_NAME`: the name of the user to connect to your Cloudera Manager instance.
- `PASSWORD`: the password for your Cloudera Manager instance.
- `URL_PATH`: the URL path to the Cloudera Manager API, for example, `https://localhost:7183/api/v55/`.
- `APP_TYPES` (optional): the comma-separated YARN application types that are dumped from the cluster. The default value is `MAPREDUCE,SPARK,Oozie Launcher`.
- `SPARK_HISTORY_SERVICE_NAMES` (optional): the comma-separated list of service names for your Spark History Server, used to query Spark event logs through Apache Knox for application metadata extraction. If not provided, the default value is `sparkhistory,spark3history`.
- `PAGE_SIZE` (optional): the number of records per Cloudera response. The default value is `1000`.
- `START_DATE` (optional): the start date for your history dump in ISO 8601 format, for example `2025-05-29`. The default value is 90 days before the current date.
- `END_DATE` (optional): the end date for your history dump in ISO 8601 format, for example `2025-05-30`. The default value is the current date.
#### Extract HDFS storage metadata
You can also analyze storage footprints, directory structures, and file
permissions on the Apache Hadoop Distributed File System (HDFS) by running the `dwh-migration-dumper` tool
with the `hdfs` connector on a node with access to the
HDFS NameNode.
```bash
dwh-migration-dumper \
--connector hdfs \
--host HDFS_NAMENODE_HOST \
--port 8020 \
--kerberos-auth-for-hadoop \
--hadoop-core-site-xml CORE_SITE_XML_PATH \
--hadoop-hdfs-site-xml HDFS_SITE_XML_PATH \
--assessment
```
Replace the following:
- `HDFS_NAMENODE_HOST`: the hostname or IP address of your active HDFS NameNode. The default port is `8020`.
- `CORE_SITE_XML_PATH`: the path to your cluster's `core-site.xml` file. For example, `/etc/hadoop/conf/core-site.xml`.
- `HDFS_SITE_XML_PATH`: the path to your cluster's `hdfs-site.xml` file. For example, `/etc/hadoop/conf/hdfs-site.xml`.
Upload the generated `dwh-migration-hdfs-*.zip` file to the same
Cloud Storage bucket as your Cloudera Manager metadata zip file.
#### Use Oozie in your Cloudera cluster
If you use Oozie in your Cloudera cluster, you can dump Oozie job history
with the Oozie connector. You can use Oozie with Kerberos authentication
or basic authentication.
For Kerberos authentication, run the following:
```bash
kinit
dwh-migration-dumper \
--connector oozie \
--url URL_PATH \
--assessment
```
Replace the following:
- `URL_PATH` (optional): the Oozie server URL path. If you don't specify the URL path, it's taken from the `OOZIE_URL` environment variable.
For basic authentication, run the following:
```bash
dwh-migration-dumper \
--connector oozie \
--user USER_NAME \
--password PASSWORD \
--url URL_PATH \
--assessment
```
Replace the following:
- `USER_NAME`: the name of the Oozie user.
- `PASSWORD`: the user password.
- `URL_PATH` (optional): the Oozie server URL path. If you don't specify the URL path, it's taken from the `OOZIE_URL` environment variable.
#### Use Airflow in your Cloudera cluster
If you use Airflow in your Cloudera cluster, you can dump DAGs history
with the Airflow connector:
```bash
dwh-migration-dumper \
--connector airflow \
--user USER_NAME \
--password PASSWORD \
--url URL \
--driver "DRIVER_PATH" \
--start-date START_DATE \
--end-date END_DATE \
--assessment
```
Replace the following:
- `USER_NAME`: the name of the Airflow user
- `PASSWORD`: the user password
- `URL`: the JDBC string to the Airflow database
- `DRIVER_PATH`: the path to the JDBC driver
- `START_DATE` (optional): the start date for your history dump in ISO 8601 format
- `END_DATE` (optional): the end date for your history dump in ISO 8601 format
#### Use Hive in your Cloudera cluster
If your Cloudera cluster runs Hive workloads, extract
Hive metastore schemas (`--connector hiveql`) and
query logs (`hadoop-migration-assessment` logging hook) by completing the steps in the
Hive tab.
### Teradata
### Requirements
- A machine connected to your source Teradata data warehouse. The migration assessment supports Teradata version 15 or later, and supports only on-premises versions of Teradata VantageCore. Teradata VantageCloud is not supported.
- A Google Cloud account with a Cloud Storage bucket to store the data
- An empty BigQuery dataset to store the results
- Read permissions on the dataset to view the results
- Recommended: Administrator-level access rights to the source database when using the extraction tool to access system tables
#### Requirement: Enable logging
The `dwh-migration-dumper` tool extracts three types of logs: query logs, utility
logs, and resource usage logs. You need to enable logging for the following
types of logs to view more thorough insights:
- **Query logs:** Extracted from the view `dbc.QryLogV` and from the table `dbc.DBQLSqlTbl`. Enable logging by [specifying the `WITH SQL` option](https://docs.teradata.com/r/Enterprise_IntelliFlex_VMware/Database-Administration/Tracking-Query-Behavior-with-Database-Query-Logging-Operational-DBAs/SQL-Statements-to-Control-Logging/WITH-Logging-Options).
- **Utility logs:** Extracted from the table `dbc.DBQLUtilityTbl`. Enable logging by [specifying the `WITH UTILITYINFO` option](https://docs.teradata.com/r/Enterprise_IntelliFlex_VMware/Database-Administration/Tracking-Query-Behavior-with-Database-Query-Logging-Operational-DBAs/SQL-Statements-to-Control-Logging/WITH-Logging-Options).
- **Resource usage logs:** Extracted from the tables `dbc.ResUsageScpu` and `dbc.ResUsageSpma`. [Enable RSS logging](https://docs.teradata.com/r/Enterprise_IntelliFlex_VMware/Resource-Usage-Macros-and-Tables/Resource-Usage-and-Procedures/Enabling-RSS-Logging) for these two tables.
### Run the `dwh-migration-dumper` tool
Download the [`dwh-migration-dumper` tool](https://github.com/google/dwh-migration-tools/releases/latest).
Download the
[`SHA256SUMS.txt` file](https://github.com/google/dwh-migration-tools/releases/latest/download/SHA256SUMS.txt)
and run the following command to verify zip correctness:
### Bash
```bash
sha256sum --check SHA256SUMS.txt
```
### Windows PowerShell
```bash
(Get-FileHash RELEASE_ZIP_FILENAME).Hash -eq ((Get-Content SHA256SUMS.txt) -Split " ")[0]
```
Replace the `RELEASE_ZIP_FILENAME` with the
downloaded zip filename of the `dwh-migration-dumper` command-line extraction tool release---for
example, `dwh-migration-tools-v1.0.52.zip`
The `True` result confirms successful checksum verification.
The `False` result indicates verification error. Make sure the checksum
and zip files are downloaded from the same release version and placed in
the same directory.
For details about how to set up and use the extraction tool, see
[Generate metadata for translation and assessment](https://docs.cloud.google.com/bigquery/docs/generate-metadata).
Use the extraction tool
to extract logs and metadata from your Teradata data warehouse as
two zip files.
Run the following commands on a machine with access to the source
data warehouse to generate the files.
Generate the metadata zip file:
```bash
dwh-migration-dumper \
--connector teradata \
--database DATABASES \
--driver path/terajdbc4.jar \
--host HOST \
--assessment \
--user USER \
--password PASSWORD
```
**Note:** The `--database` flag is optional for the
`teradata` connector. If omitted, then the metadata for all of the databases is extracted. This flag is only valid for the `teradata`
connector and can't be used with `teradata-logs`.
Generate the zip file containing query logs:
```bash
dwh-migration-dumper \
--connector teradata-logs \
--driver path/terajdbc4.jar \
--host HOST \
--assessment \
--user USER \
--password PASSWORD
```
**Note:** The `--database` flag isn't used when extracting
query logs with the `teradata-logs` connector. Query logs are
always extracted for all databases.
Replace the following:
- `PATH`: the absolute or relative path to the driver JAR file to use for this connection
- `VERSION`: the version of your driver
- `HOST`: the host address
- `USER`: the username to use for the database connection
- `DATABASES`: (Optional) the comma-separated list of database names to extract. If not provided, all databases are extracted.
- `PASSWORD`: (Optional) the password to use for the database connection. If left empty, the user is prompted for their password.
By default, the query logs are extracted
from the view `dbc.QryLogV` and from the table `dbc.DBQLSqlTbl`. If you need
to extract the query logs from an alternative location, you can
specify the names of the tables or views by using the
`-Dteradata-logs.query-logs-table` and `-Dteradata-logs.sql-logs-table`
flags.
> [!TIP]
> **Tip:** To improve performance of joining tables that are specified by the `-Dteradata-logs.query-logs-table` and `-Dteradata-logs.sql-logs-table` flags, you can include an additional column of type `DATE` in the `JOIN` condition. This column must be defined in both tables and it must be part of the Partitioned Primary Index. To include this column, use the `-Dteradata-logs.log-date-column` flag.
By default, the utility logs are extracted from the table
`dbc.DBQLUtilityTbl`. If you need to extract the utility logs from an
alternative location, you can specify the name of the table using the
`-Dteradata-logs.utility-logs-table` flag.
By default, the resource usage logs are extracted from the tables
`dbc.ResUsageScpu` and `dbc.ResUsageSpma`. If you need to extract the
resource usage logs from an alternative location, you can specify the names
of the tables using the `-Dteradata-logs.res-usage-scpu-table` and
`-Dteradata-logs.res-usage-spma-table` flags.
For example:
### Bash
```bash
dwh-migration-dumper \
--connector teradata-logs \
--driver path/terajdbc4.jar \
--host HOST \
--assessment \
--user USER \
--password PASSWORD \
-Dteradata-logs.query-logs-table=pdcrdata.QryLogV_hst \
-Dteradata-logs.sql-logs-table=pdcrdata.DBQLSqlTbl_hst \
-Dteradata-logs.log-date-column=LogDate \
-Dteradata-logs.utility-logs-table=pdcrdata.DBQLUtilityTbl_hst \
-Dteradata-logs.res-usage-scpu-table=pdcrdata.ResUsageScpu_hst \
-Dteradata-logs.res-usage-spma-table=pdcrdata.ResUsageSpma_hst
```
### Windows PowerShell
```bash
dwh-migration-dumper `
--connector teradata-logs `
--driver path\terajdbc4.jar `
--host HOST `
--assessment `
--user USER `
--password PASSWORD `
"-Dteradata-logs.query-logs-table=pdcrdata.QryLogV_hst" `
"-Dteradata-logs.sql-logs-table=pdcrdata.DBQLSqlTbl_hst" `
"-Dteradata-logs.log-date-column=LogDate" `
"-Dteradata-logs.utility-logs-table=pdcrdata.DBQLUtilityTbl_hst" `
"-Dteradata-logs.res-usage-scpu-table=pdcrdata.ResUsageScpu_hst" `
"-Dteradata-logs.res-usage-spma-table=pdcrdata.ResUsageSpma_hst"
```
By default, the `dwh-migration-dumper` tool extracts the last seven days of
query logs.
Google recommends that you provide at least two weeks of query logs to be
able to view more thorough insights. You can specify a custom time range by
using the `--query-log-start` and `--query-log-end` flags. For example:
```bash
dwh-migration-dumper \
--connector teradata-logs \
--driver path/terajdbc4.jar \
--host HOST \
--assessment \
--user USER \
--password PASSWORD \
--query-log-start "2023-01-01 00:00:00" \
--query-log-end "2023-01-15 00:00:00"
```
You can also generate multiple zip files containing query logs covering
different periods and provide all of them for assessment.
### Redshift
### Requirements
- A machine connected to your source Amazon Redshift data warehouse
- A Google Cloud account with a Cloud Storage bucket to store the data
- An empty BigQuery dataset to store the results
- Read permissions on the dataset to view the results
- Recommended: Super user access to the database when using the extraction tool to access system tables
### Run the `dwh-migration-dumper` tool
Download the [`dwh-migration-dumper` command-line extraction tool](https://github.com/google/dwh-migration-tools/releases/latest).
Download the
[`SHA256SUMS.txt` file](https://github.com/google/dwh-migration-tools/releases/latest/download/SHA256SUMS.txt)
and run the following command to verify zip correctness:
### Bash
```bash
sha256sum --check SHA256SUMS.txt
```
### Windows PowerShell
```bash
(Get-FileHash RELEASE_ZIP_FILENAME).Hash -eq ((Get-Content SHA256SUMS.txt) -Split " ")[0]
```
Replace the `RELEASE_ZIP_FILENAME` with the
downloaded zip filename of the `dwh-migration-dumper` command-line extraction tool release---for
example, `dwh-migration-tools-v1.0.52.zip`
The `True` result confirms successful checksum verification.
The `False` result indicates verification error. Make sure the checksum
and zip files are downloaded from the same release version and placed in
the same directory.
For details about how to use the `dwh-migration-dumper` tool,
see the
[generate metadata](https://docs.cloud.google.com/bigquery/docs/generate-metadata)
page.
Use the `dwh-migration-dumper` tool to extract logs and metadata from your
Amazon Redshift data warehouse as two zip files.
Run the following commands on a machine with access to the source
data warehouse to generate the files.
Generate the metadata zip file:
```bash
dwh-migration-dumper \
--connector redshift \
--database DATABASE \
--driver PATH/redshift-jdbc42-VERSION.jar \
--host host.region.redshift.amazonaws.com \
--assessment \
--user USER \
--iam-profile IAM_PROFILE_NAME
```
Generate the zip file containing query logs:
```bash
dwh-migration-dumper \
--connector redshift-raw-logs \
--database DATABASE \
--driver PATH/redshift-jdbc42-VERSION.jar \
--host host.region.redshift.amazonaws.com \
--assessment \
--user USER \
--iam-profile IAM_PROFILE_NAME
```
Replace the following:
- `DATABASE`: the name of the database to connect to
- `PATH`: the absolute or relative path to the driver JAR file to use for this connection
- `VERSION`: the version of your driver
- `USER`: the username to use for the database connection
- `IAM_PROFILE_NAME`: the [Amazon Redshift IAM profile name](https://docs.aws.amazon.com/redshift/latest/mgmt/connecting-with-authentication-profiles.html). Required for Amazon Redshift authentication and for AWS API access. To get the description of Amazon Redshift clusters, use the AWS API.
By default, Amazon Redshift stores three to five days of query logs.
By default, the `dwh-migration-dumper` tool extracts the last seven days of query
logs.
Google recommends that you provide at least two weeks of query logs to be
able to view more thorough insights. You might need to run the
extraction tool a few times
over the course of two weeks to get the best results. You can specify a custom
range by using the `--query-log-start` and `--query-log-end` flags.
For example:
```bash
dwh-migration-dumper \
--connector redshift-raw-logs \
--database DATABASE \
--driver PATH/redshift-jdbc42-VERSION.jar \
--host host.region.redshift.amazonaws.com \
--assessment \
--user USER \
--iam-profile IAM_PROFILE_NAME \
--query-log-start "2023-01-01 00:00:00" \
--query-log-end "2023-01-02 00:00:00"
```
You can also generate multiple zip files containing query logs covering
different periods and provide all of them for assessment.
> [!NOTE]
> **Note:** Earlier versions of the `dwh-migration-dumper` tool preferred the `--password` option over `--iam-profile`. This option still works, but it is deprecated, and it might lead to some gaps in the report.
### Redshift Serverless
> [!WARNING]
> **Preview:** BigQuery Migration Assessment for Amazon Redshift Serverless is in [Preview](https://cloud.google.com/products#product-launch-stages). To use this feature, you must be added to the allowlist. To request access, fill out the [application form](https://docs.google.com/forms/d/e/1FAIpQLScr8inhgfdAFg5phMFjs9TQRTDuucmQ3vACzKgtRGmjmqlzdA/viewform) or send an email to [bq-edw-migration-support@google.com](mailto:bq-edw-migration-support@google.com).
### Requirements
- A machine connected to your source Amazon Redshift Serverless data warehouse
- A Google Cloud account with a Cloud Storage bucket to store the data
- An empty BigQuery dataset to store the results
- Read permissions on the dataset to view the results
- Recommended: Super user access to the database when using the extraction tool to access system tables
### Run the `dwh-migration-dumper` tool
Download the [`dwh-migration-dumper` command-line extraction tool](https://github.com/google/dwh-migration-tools/releases/latest).
For details about how to use the `dwh-migration-dumper` tool, see the
[Generate metadata](https://docs.cloud.google.com/bigquery/docs/generate-metadata) page.
Use the `dwh-migration-dumper` tool to extract usage logs and metadata from
your Amazon Redshift Serverless namespace as two zip files. Run the following
commands on a machine with access to the source data warehouse to generate
the files.
Generate the metadata zip file:
```bash
dwh-migration-dumper \
--connector redshift \
--database DATABASE \
--driver PATH/redshift-jdbc42-VERSION.jar \
--host host.region.redshift-serverless.amazonaws.com \
--assessment \
--user USER \
--iam-profile IAM_PROFILE_NAME
```
Generate the zip file containing query logs:
```bash
dwh-migration-dumper \
--connector redshift-serverless-logs \
--database DATABASE \
--driver PATH/redshift-jdbc42-VERSION.jar \
--host host.region.redshift-serverless.amazonaws.com \
--assessment \
--user USER \
--iam-profile IAM_PROFILE_NAME
```
Replace the following:
- `DATABASE`: the name of the database to connect to
- `PATH`: the absolute or relative path to the driver JAR file to use for this connection
- `VERSION`: the version of your driver
- `USER`: the username to use for the database connection
- `IAM_PROFILE_NAME`: the [Amazon Redshift IAM profile name](https://docs.aws.amazon.com/redshift/latest/mgmt/connecting-with-authentication-profiles.html). Required for Amazon Redshift authentication and for AWS API access. To get the description of Amazon Redshift clusters, use the AWS API.
Amazon Redshift Serverless stores usage logs for seven days. If a wider
range is required, Google recommends extracting data multiple times over a
longer period.
### Oracle / Oracle Exadata
> [!WARNING]
>
> **Preview**
>
>
> This feature is
>
> subject to the "Pre-GA Offerings Terms" in the General Service Terms section of the
> [Service Specific
> Terms](https://docs.cloud.google.com/terms/service-terms#1).
>
> Pre-GA features are available "as is" and might have limited support.
>
> For more information, see the
> [launch stage descriptions](https://cloud.google.com/products/#product-launch-stages).
To request feedback or support for this feature, send an email to
[bq-edw-migration-support@google.com](mailto:bq-edw-migration-support@google.com).
### Requirements
You must meet the following requirements in order to extract metadata and
query logs from Oracle and Oracle Exadata:
- Your Oracle database must be version 11g R1 or higher.
- A machine that can connect to your Oracle instance(s).
- Java 8 or higher.
- A Google Cloud account with a Cloud Storage bucket to store the data.
- An empty BigQuery dataset to store the results. Alternatively, you can create a BigQuery dataset when you create the assessment job using the Google Cloud console UI.
- An Oracle common user with SYSDBA privileges.
### Run the `dwh-migration-dumper` tool
Download the [`dwh-migration-dumper` command-line extraction tool](https://github.com/google/dwh-migration-tools/releases/latest).
Download the
[`SHA256SUMS.txt` file](https://github.com/google/dwh-migration-tools/releases/latest/download/SHA256SUMS.txt)
and run the following command to verify zip correctness:
```bash
sha256sum --check SHA256SUMS.txt
```
For details about how to use the `dwh-migration-dumper` tool,
see the
[generate metadata](https://docs.cloud.google.com/bigquery/docs/generate-metadata)
page.
Use the `dwh-migration-dumper` tool to extract metadata and performance
statistics to the zip file. By default, statistics are extracted from the
Oracle AWR that requires the Oracle Tuning and Diagnostics
Pack. If this data is not available, `dwh-migration-dumper` uses STATSPACK
instead. The `oracle-stats` connector also supports Oracle Exadata.
For multitenant databases, the `dwh-migration-dumper` tool must be executed
in the root container. Running it in one of the pluggable databases results
in missing performance statistics and metadata about other pluggable
databases.
Generate the metadata zip file:
```bash
dwh-migration-dumper \
--connector oracle-stats \
--host HOST_NAME \
--port PORT \
--oracle-service SERVICE_NAME \
--assessment \
--driver JDBC_DRIVER_PATH \
--user USER_NAME \
--password
```
Replace the following:
- `HOST_NAME`: the hostname of your Oracle instance.
- `PORT`: the connection port number. The default value is 1521.
- `SERVICE_NAME`: the Oracle service name to use for the connection.
- `JDBC_DRIVER_PATH`: the absolute or relative path to the driver JAR file. You can download this file from the [Oracle JDBC driver downloads](https://www.oracle.com/pl/database/technologies/appdev/jdbc-downloads.html) page. You should select the driver version that is compatible with your database version.
- `USER_NAME`: name of the user used to connect to your Oracle instance. The user must have the access permissions as detailed in the [requirements section](https://docs.cloud.google.com/bigquery/docs/migration-assessment#requirements-oracle).
### Apache Hive
> [!WARNING]
>
> **Preview**
>
>
> This feature is
>
> subject to the "Pre-GA Offerings Terms" in the General Service Terms section of the
> [Service Specific
> Terms](https://docs.cloud.google.com/terms/service-terms#1).
>
> Pre-GA features are available "as is" and might have limited support.
>
> For more information, see the
> [launch stage descriptions](https://cloud.google.com/products/#product-launch-stages).
### Requirements
- A machine connected to your source Apache Hive data warehouse (BigQuery migration assessment supports Hive on Tez and MapReduce, and supports Apache Hive versions between 2.2 and 3.1, inclusively)
- A Google Cloud account with a Cloud Storage bucket to store the data
- An empty BigQuery dataset to store the results
- Read permissions on the dataset to view the results
- Access to your source Apache Hive data warehouse to configure query logs extraction
- Up to date tables, partitions, and columns statistics
The BigQuery migration assessment uses tables, partitions, and columns statistics to
understand your Apache Hive data warehouse better and provide
thorough insights. If the `hive.stats.autogather` configuration
setting is set to `false` in your source Apache Hive data warehouse,
Google recommends enabling it or updating statistics manually before
running the `dwh-migration-dumper` tool.
### Run the `dwh-migration-dumper` tool
Download the [`dwh-migration-dumper` command-line extraction tool](https://github.com/google/dwh-migration-tools/releases/latest).
Download the
[`SHA256SUMS.txt` file](https://github.com/google/dwh-migration-tools/releases/latest/download/SHA256SUMS.txt)
and run the following command to verify zip correctness:
### Bash
```bash
sha256sum --check SHA256SUMS.txt
```
### Windows PowerShell
```bash
(Get-FileHash RELEASE_ZIP_FILENAME).Hash -eq ((Get-Content SHA256SUMS.txt) -Split " ")[0]
```
Replace the `RELEASE_ZIP_FILENAME` with the
downloaded zip filename of the `dwh-migration-dumper` command-line extraction tool release---for
example, `dwh-migration-tools-v1.0.52.zip`
The `True` result confirms successful checksum verification.
The `False` result indicates verification error. Make sure the checksum
and zip files are downloaded from the same release version and placed in
the same directory.
For details about how to use the `dwh-migration-dumper` tool, see
[Generate metadata for translation and assessment](https://docs.cloud.google.com/bigquery/docs/generate-metadata).
Use the `dwh-migration-dumper` tool to generate metadata from your
Hive data warehouse as a zip file.
#### Without Authentication
To generate the metadata zip file, run the following command on a machine
that has access to the source data warehouse:
```bash
dwh-migration-dumper \
--connector hiveql \
--database DATABASE \
--host hive.cluster.host \
--port 9083 \
--assessment
```
#### With Kerberos Authentication
To authenticate to the metastore, sign in as a user that has access to the
Apache Hive metastore and generate a Kerberos ticket. Then,
generate the metadata zip file with the following command:
```bash
JAVA_OPTS="-Djavax.security.auth.useSubjectCredsOnly=false" \
dwh-migration-dumper \
--connector hiveql \
--database DATABASE \
--host hive.cluster.host \
--port 9083 \
--hive-kerberos-url PRINCIPAL/HOST \
-Dhiveql.rpc.protection=hadoop.rpc.protection \
--assessment
```
Replace the following:
- `DATABASE` (optional): the comma-separated list of database names to extract---for example, `--database db1,db2`. You can omit the `--database` flag to extract all databases in the cluster. Extracting the entire cluster catalog ensures that all tables and cross-database dependencies are captured, letting you perform a more comprehensive migration assessment.
- `PRINCIPAL`: the kerberos principal that the ticket is issued to
- `HOST`: the kerberos hostname that the ticket is issued to
- `hadoop.rpc.protection`: the Quality of Protection (QOP) of the Simple Authentication and Security Layer (SASL) configuration level, equal to the value of `hadoop.rpc.protection` parameter inside the `/etc/hadoop/conf/core-site.xml` file, with one of the following values:
- `authentication`
- `integrity`
- `privacy`
### Extract query logs with the `hadoop-migration-assessment` logging hook
The `hadoop-migration-assessment` logging hook (`MigrationAssessmentLoggingHook`)
intercepts and records queries as they run in real time. It doesn't extract
historical queries that ran before you installed the
logging hook.
- For an initial test or report generation, we recommend that you run the logging hook for a few hours to confirm that `.avro` files are generated in the configured base directory, for example, in `hdfs://tmp/logs/` or `/tmp/logs/hive/`.
- For a production migration assessment, we recommend that you run the logging hook for one to two weeks to capture a full business cycle, including weekly or month-end batch jobs, for accurate workload concurrency, query frequency, and compute sizing insights.
To extract query logs, follow these steps:
1. [Upload the `hadoop-migration-assessment` logging hook](https://docs.cloud.google.com/bigquery/docs/migration-assessment#upload-hadoop-hive-hook).
2. [Configure the logging hook properties](https://docs.cloud.google.com/bigquery/docs/migration-assessment#configure-properties).
3. [Verify the logging hook](https://docs.cloud.google.com/bigquery/docs/migration-assessment#verify-hive-hook).
#### Upload the `hadoop-migration-assessment` logging hook
1. Download the [`hadoop-migration-assessment` query logs extraction logging hook](https://github.com/google/hadoop-migration-assessment-tools/releases/latest) that contains the
Hive logging hook JAR file.
2. Extract the JAR file.
If you need to audit the tool to ensure that it meets compliance
requirements, review the source code from the
[`hadoop-migration-assessment` logging hook GitHub repository](https://github.com/google/hadoop-migration-assessment-tools), and compile your own binary.
3. Copy the JAR file into the auxiliary library folder on all clusters where
you plan to enable the query logging. Depending on your vendor, you need
to locate the auxiliary library folder in cluster settings and transfer
the JAR file to the auxiliary library folder on the Hive cluster.
4. Set up configuration properties for `hadoop-migration-assessment` logging hook.
Depending on your Hadoop vendor, you need to use
the UI console to edit cluster settings. Modify the
`/etc/hive/conf/hive-site.xml` file or apply the configuration
with the configuration manager.
#### Configure properties
If you already have other values for the following
configuration keys, append the settings using a comma (`,`).
To set up `hadoop-migration-assessment` logging hook, the following configuration
settings are required:
- `hive.exec.failure.hooks`: `com.google.cloud.bigquery.dwhassessment.hooks.MigrationAssessmentLoggingHook`
- `hive.exec.post.hooks` : `com.google.cloud.bigquery.dwhassessment.hooks.MigrationAssessmentLoggingHook`
- `hive.exec.pre.hooks`: `com.google.cloud.bigquery.dwhassessment.hooks.MigrationAssessmentLoggingHook`
- `hive.aux.jars.path`: include the path to the logging hook JAR file, for example `file:///HiveMigrationAssessmentQueryLogsHooks_deploy.jar`.
- `dwhassessment.hook.base-directory`: path to the query logs output folder. For example, `hdfs://tmp/logs/`.
- You can also set the following optional configurations:
- `dwhassessment.hook.queue.capacity`: the queue capacity for the query events logging threads. The default value is `64`.
- `dwhassessment.hook.rollover-interval`: the frequency at which the file rollover must be performed. For example, `600s`. The default value is 3600 seconds (1 hour).
- `dwhassessment.hook.rollover-eligibility-check-interval`: the frequency at which the file rollover eligibility check is triggered in the background. For example, `600s`. The default value is 600 seconds (10 minutes).
> [!IMPORTANT]
> **Important:** To apply the configuration changes, you must restart Hive services.
#### Verify the logging hook
After you restart the `hive-server2` process, run a test query
and analyze your debug logs. You can see the following message:
```
Logger successfully started, waiting for query events. Log directory is '[dwhassessment.hook.base-directory value]'; rollover interval is '60' minutes;
rollover eligibility check is '10' minutes
```
The logging hook creates a date-partitioned subfolder in
the configured folder. The Avro file with query events appears in that
folder after the `dwhassessment.hook.rollover-interval` interval
or `hive-server2` process termination. You can look for similar
messages in your debug logs to see the status of the rollover operation:
```
Updated rollover time for logger ID 'my_logger_id' to '2023-12-25T10:15:30'
```
```
Performed rollover check for logger ID 'my_logger_id'. Expected rollover time
is '2023-12-25T10:15:30'
```
Rollover happens at the specified intervals or when the day changes. When
the date changes, the logging hook also creates a new
subfolder for that date.
You can also generate folders containing query logs from different
Hive clusters and provide all of them for a single
assessment.
### Informatica
> [!WARNING]
>
> **Preview**
>
>
> This feature is
>
> subject to the "Pre-GA Offerings Terms" in the General Service Terms section of the
> [Service Specific
> Terms](https://docs.cloud.google.com/terms/service-terms#1).
>
> Pre-GA features are available "as is" and might have limited support.
>
> For more information, see the
> [launch stage descriptions](https://cloud.google.com/products/#product-launch-stages).
To request feedback or support for this feature, send an email to
[bq-edw-migration-support@google.com](mailto:bq-edw-migration-support@google.com).
### Requirements
- Access to Informatica PowerCenter Repository Manager client
- A Google Cloud account with a Cloud Storage bucket to store the data.
- An empty BigQuery dataset to store the results. Alternatively, you can create a BigQuery dataset when you create the assessment job using the Google Cloud console.
#### Requirement: Export object files
You can use the Informatica PowerCenter Repository Manager GUI to export your
object files. For information, see [Steps to Export Objects](https://docs.informatica.com/data-integration/powercenter/10-5-8/repository-guide/exporting-and-importing-objects/steps-to-export-objects.html)
Alternatively, you can also run the `pmrep` command to export your object
files with the following steps:
1. Run the [`pmrep connect`](https://docs.informatica.com/data-integration/common-content-for-data-integration/10-5-6/command-reference/pmrep-command-reference/connect.html) command to connect to the repository:
```bash
pmrep connect -r `REPOSITORY_NAME` -d `DOMAIN_NAME` -n `USERNAME` -x `PASSWORD`
```
Replace the following:
- `REPOSITORY_NAME`: name of the repository you want to connect to
- `DOMAIN_NAME`: name of the domain for the repository
- `USERNAME`: username to connect to the repository
- `PASSWORD`: password of the username
1. Once connected to the repository, use the [`pmrep objectexport`](https://docs.informatica.com/data-integration/common-content-for-data-integration/10-5-6/command-reference/pmrep-command-reference/objectexport.html) command to export the required objects:
```bash
pmrep objectexport -n `OBJECT_NAME` -o `OBJECT_TYPE` -f `FOLDER_NAME` -u `OUTPUT_FILE_NAME.xml`
```
Replace the following:
- `OBJECT_NAME`: name of a specific object to export
- `OBJECT_TYPE`: object type of the specified object
- `FOLDER_NAME`: name of the folder containing the object to export
- `OUTPUT_FILE_NAME`: name of the XML file to contain the object information
## Upload metadata and query logs to Cloud Storage
Once you have extracted the metadata and query logs from your data warehouse,
you can upload the files to a Cloud Storage bucket to proceed with the
migration assessment.
### Databricks
> [!WARNING]
>
> **Preview**
>
>
> This feature is
>
> subject to the "Pre-GA Offerings Terms" in the General Service Terms section of the
> [Service Specific
> Terms](https://docs.cloud.google.com/terms/service-terms#1).
>
> Pre-GA features are available "as is" and might have limited support.
>
> For more information, see the
> [launch stage descriptions](https://cloud.google.com/products/#product-launch-stages).
To request feedback or support for this feature, send an email to
[bq-edw-migration-support@google.com](mailto:bq-edw-migration-support@google.com).
Upload the ZIP file to your Cloud Storage bucket. For more
information about creating buckets and uploading files to
Cloud Storage, see [Create buckets](https://docs.cloud.google.com/storage/docs/creating-buckets)
and [Upload objects from a filesystem](https://docs.cloud.google.com/storage/docs/uploading-objects).
### Snowflake
Upload the metadata and the zip file(s) containing query logs and usage
histories to your Cloud Storage
bucket. When uploading these files to Cloud Storage, the following
requirements must be met:
- The total uncompressed size of all the files inside the metadata zip file must be less than 50 GB.
- The metadata zip file and the zip file containing query logs must be uploaded to a Cloud Storage folder. If you have multiple zip files containing non-overlapping query logs, you can upload all of them.
- You must upload all the files to the same Cloud Storage folder.
- You must upload all of the metadata and query logs zip files exactly as they are output by `dwh-migration-dumper` tool. Don't extract, combine, or otherwise modify them.
- The total uncompressed size of all the query history files must be less than 5 TB.
- Verify that the location selected for the migration assessment is located in the [same location of the Cloud Storage
bucket](https://docs.cloud.google.com/storage/docs/locations).
For more information about creating buckets and uploading files to
Cloud Storage, see [Create buckets](https://docs.cloud.google.com/storage/docs/creating-buckets)
and [Upload objects from a filesystem](https://docs.cloud.google.com/storage/docs/uploading-objects).
### Hadoop / Cloudera
> [!WARNING]
>
> **Preview**
>
>
> This feature is
>
> subject to the "Pre-GA Offerings Terms" in the General Service Terms section of the
> [Service Specific
> Terms](https://docs.cloud.google.com/terms/service-terms#1).
>
> Pre-GA features are available "as is" and might have limited support.
>
> For more information, see the
> [launch stage descriptions](https://cloud.google.com/products/#product-launch-stages).
To request feedback or support for this feature, send email to
[bq-edw-migration-support@google.com](mailto:bq-edw-migration-support@google.com).
Upload the zip file containing metadata and performance statistics to a
Cloud Storage bucket. By default, the filename for the zip file is
`dwh-migration-cloudera-manager-RUN_DATE.zip` (for
example `dwh-migration-cloudera-manager-20250312T145808.zip`), but you can
customize it with the `--output` flag.
- The limit for the total uncompressed size of all the files inside the ZIP file is 50 GB.
- For Hadoop and Cloudera, the migration assessment tool accepts only one ZIP file at a time. The specified path to the Cloud Storage bucket must only contain one ZIP file.
- Verify that the location selected for the migration assessment is located in the [same location of the Cloud Storage
bucket](https://docs.cloud.google.com/storage/docs/locations).
For more information about creating buckets and uploading files to
Cloud Storage, see [Create a bucket](https://docs.cloud.google.com/storage/docs/creating-buckets)
and [Upload objects from a file system](https://docs.cloud.google.com/storage/docs/uploading-objects).
### Teradata
Upload the metadata and one or more zip files containing query logs to your
Cloud Storage bucket.
The entries in all the zip files containing query logs are divided into the
following:
- Query history files with the `query_history_` prefix.
- Time series files with the `utility_logs_`, `dbc.ResUsageScpu_`, and `dbc.ResUsageSpma_` prefixes.
When uploading these files to Cloud Storage,
the following requirements must be met:
- The limit for the total uncompressed size of all the query history files is 5 TB. The limit for the total uncompressed size of all the time series files is 1 TB.
- The limit for the total uncompressed size of all the files inside the ZIP file is 50 GB.
- If your query logs are archived in a different database, specify the names of the tables or views by using the `-Dteradata-logs.query-logs-table` and `-Dteradata-logs.sql-logs-table` flags. For more information, see [Extract
metadata and query logs from your data
warehouse](https://docs.cloud.google.com/bigquery/docs/migration-assessment#teradata).
- Verify that the location selected for the migration assessment is located in the [same location of the Cloud Storage
bucket](https://docs.cloud.google.com/storage/docs/locations).
For more information about creating buckets and
uploading files to Cloud Storage, see [Create buckets](https://docs.cloud.google.com/storage/docs/creating-buckets)
and [Upload objects from a filesystem](https://docs.cloud.google.com/storage/docs/uploading-objects).
### Redshift
Upload the metadata and one or more zip files containing query logs to your
Cloud Storage bucket.
The entries in all the zip files containing query logs are divided into the
following:
- Query history files with the `querytext_` and `ddltext_` prefixes.
- Time series files with the `query_queue_info_`, `wlm_query_`, and `querymetrics_` prefixes.
When uploading these files to Cloud Storage,
the following requirements must be met:
- The limit for the total uncompressed size of all the query history files is 5 TB. The limit for the total uncompressed size of all the time series files is 1 TB.
- The limit for the total uncompressed size of all the files inside the ZIP file is 50 GB.
- Verify that the location selected for the migration assessment is located in the [same location of the Cloud Storage
bucket](https://docs.cloud.google.com/storage/docs/locations).
For more information about creating buckets and
uploading files to Cloud Storage, see [Create buckets](https://docs.cloud.google.com/storage/docs/creating-buckets)
and [Upload objects from a filesystem](https://docs.cloud.google.com/storage/docs/uploading-objects).
### Redshift Serverless
> [!WARNING]
> **Preview:** BigQuery Migration Assessment for Amazon Redshift Serverless is in [Preview](https://cloud.google.com/products#product-launch-stages). To use this feature, you must be added to the allowlist. To request access, fill out the [application form](https://docs.google.com/forms/d/e/1FAIpQLScr8inhgfdAFg5phMFjs9TQRTDuucmQ3vACzKgtRGmjmqlzdA/viewform) or send an email to [bq-edw-migration-support@google.com](mailto:bq-edw-migration-support@google.com).
Upload the metadata and one or more zip files containing query logs to your
Cloud Storage bucket. For more information about creating buckets and
uploading files to Cloud Storage, see [Create buckets](https://docs.cloud.google.com/storage/docs/creating-buckets)
and [Upload objects from a filesystem](https://docs.cloud.google.com/storage/docs/uploading-objects).
### Oracle / Oracle Exadata
> [!WARNING]
>
> **Preview**
>
>
> This feature is
>
> subject to the "Pre-GA Offerings Terms" in the General Service Terms section of the
> [Service Specific
> Terms](https://docs.cloud.google.com/terms/service-terms#1).
>
> Pre-GA features are available "as is" and might have limited support.
>
> For more information, see the
> [launch stage descriptions](https://cloud.google.com/products/#product-launch-stages).
To request feedback or support for this feature, send email to [bq-edw-migration-support@google.com](mailto:bq-edw-migration-support@google.com).
Upload the zip file containing metadata and performance statistics to a
Cloud Storage bucket. By default, the filename for the zip file is
`dwh-migration-oracle-stats.zip`, but you can customize this by specifying it
in the `--output` flag. When uploading these files to Cloud Storage,
the following requirements must be met:
- The limit for the total uncompressed size of all the files inside the ZIP file is 50 GB.
- For Oracle and Oracle Exadata, the migration assessment tool only accepts a single ZIP file at a time. The specified path to the Cloud Storage bucket accepts only one ZIP file at a time.
- Verify that the location selected for the migration assessment is located in the [same location of the Cloud Storage
bucket](https://docs.cloud.google.com/storage/docs/locations).
For more information about creating buckets and uploading files to
Cloud Storage, see [Create buckets](https://docs.cloud.google.com/storage/docs/creating-buckets)
and [Upload objects from a filesystem](https://docs.cloud.google.com/storage/docs/uploading-objects).
### Apache Hive
> [!WARNING]
>
> **Preview**
>
>
> This feature is
>
> subject to the "Pre-GA Offerings Terms" in the General Service Terms section of the
> [Service Specific
> Terms](https://docs.cloud.google.com/terms/service-terms#1).
>
> Pre-GA features are available "as is" and might have limited support.
>
> For more information, see the
> [launch stage descriptions](https://cloud.google.com/products/#product-launch-stages).
Upload the metadata and folders containing query logs from one or
multiple Hive clusters to your Cloud Storage
bucket. For more information about creating buckets and uploading files to
Cloud Storage, see [Create buckets](https://docs.cloud.google.com/storage/docs/creating-buckets)
and [Upload objects from a filesystem](https://docs.cloud.google.com/storage/docs/uploading-objects).
The limit for the total uncompressed size of all the files inside the metadata
zip file is 50 GB.
You can use [Cloud Storage connector](https://docs.cloud.google.com/dataproc/docs/concepts/connectors/cloud-storage#non-clusters)
to copy query logs directly to the Cloud Storage folder.
The folders containing subfolders with query logs must be uploaded to the
same Cloud Storage folder, where the metadata zip file is uploaded.
Query logs folders have query history files with the `dwhassessment_`
prefix. The limit for the total uncompressed size of all the query history
files is 5 TB.
### Informatica
> [!WARNING]
>
> **Preview**
>
>
> This feature is
>
> subject to the "Pre-GA Offerings Terms" in the General Service Terms section of the
> [Service Specific
> Terms](https://docs.cloud.google.com/terms/service-terms#1).
>
> Pre-GA features are available "as is" and might have limited support.
>
> For more information, see the
> [launch stage descriptions](https://cloud.google.com/products/#product-launch-stages).
To request feedback or support for this feature, send email to [bq-edw-migration-support@google.com](mailto:bq-edw-migration-support@google.com).
Upload a zip file containing your Informatica XML repository objects to a
Cloud Storage bucket. This zip file must also include a
`compilerworks-metadata.yaml` file that contains the following:
```bash
product:
arguments: "ConnectorArguments{connector=informatica, assessment=true}"
```
The limit for the total uncompressed size of all files inside the zip file
is 50 GB.
For more information about creating buckets and uploading files to
Cloud Storage, see [Create buckets](https://docs.cloud.google.com/storage/docs/creating-buckets)
and [Upload objects from a filesystem](https://docs.cloud.google.com/storage/docs/uploading-objects).
## Run a BigQuery migration assessment
Follow these steps to run the BigQuery migration assessment. These steps assume you have
uploaded the metadata files into a Cloud Storage bucket, as described in the
previous section.
### Required permissions
To enable the BigQuery Migration Service, you need the following
Identity and Access Management (IAM) permissions:
- `resourcemanager.projects.get`
- `resourcemanager.projects.update`
- `serviceusage.services.enable`
- `serviceusage.services.get`
To access and use the BigQuery Migration Service, you need the following
permissions on the project:
- `bigquerymigration.workflows.create`
- `bigquerymigration.workflows.get`
- `bigquerymigration.workflows.list`
- `bigquerymigration.workflows.delete`
- `bigquerymigration.subtasks.get`
- `bigquerymigration.subtasks.list`
> [!NOTE]
> **Note:** You can only set the permissions and roles with the `bigquerymigration.*` prefix using the Google Cloud CLI. For information on how to set up and use the Google Cloud CLI, see the [gcloud CLI tool overview](https://docs.cloud.google.com/sdk/gcloud).
To run the BigQuery Migration Service, you need the following additional
permissions.
- Permission to access the Cloud Storage buckets for input and output files:
- `storage.objects.get` on the source Cloud Storage bucket
- `storage.objects.list` on the source Cloud Storage bucket
- `storage.objects.create` on the destination Cloud Storage bucket
- `storage.objects.delete` on the destination Cloud Storage bucket
- `storage.objects.update` on the destination Cloud Storage bucket
- `storage.buckets.get`
- `storage.buckets.list`
- Permission to read and update the BigQuery dataset where the
BigQuery Migration Service writes the results:
- `bigquery.datasets.update`
- `bigquery.datasets.get`
- `bigquery.datasets.create`
- `bigquery.datasets.delete`
- `bigquery.jobs.create`
- `bigquery.jobs.delete`
- `bigquery.jobs.list`
- `bigquery.jobs.update`
- `bigquery.tables.create`
- `bigquery.tables.get`
- `bigquery.tables.getData`
- `bigquery.tables.list`
- `bigquery.tables.updateData`
To share the Data Studio report with a user, you need to grant the
following roles:
- `roles/bigquery.dataViewer`
- `roles/bigquery.jobUser`
The following example shows you how to grant the required roles to a user that you want to share the report with:
```bash
gcloud projects add-iam-policy-binding \
PROJECT \
--member=user:REPORT_VIEWER_EMAIL \
--role=roles/bigquery.dataViewer
gcloud projects add-iam-policy-binding \
PROJECT \
--member=user:REPORT_VIEWER_EMAIL \
--role=roles/bigquery.jobUser
```
Replace the following:
- `PROJECT`: the project that the user is in
- `REPORT_VIEWER_EMAIL`: the email of the user that you want to share the report with
### Create a project for the assessment
We recommend that you create and set up a new project to run your migration assessment.
You can use the following script to create a new Google Cloud project with
all the necessary permissions and role assignments to run the assessment:
```bash
#!/bin/bash
# --- Configuration ---
# Replace with your desired project ID, the email of the user that runs
# the assessment, and your organization ID.
export PROJECT_ID="PROJECT_ID"
export ASSESSMENT_RUNNER_EMAIL="RUNNER_EMAIL"
export ORGANIZATION_ID="ORGANIZATION_ID"
# --- Project Creation ---
echo "Creating project: $PROJECT_ID"
gcloud projects create $PROJECT_ID --organization=$ORGANIZATION_ID
# Set the new project as the default for subsequent gcloud commands
gcloud config set project $PROJECT_ID
# --- IAM Role Creation ---
echo "Creating custom role 'BQMSrole' in project $PROJECT_ID"
gcloud iam roles create BQMSrole \
--project=$PROJECT_ID \
--title=BQMSrole \
--permissions=bigquerymigration.subtasks.get,bigquerymigration.subtasks.list,bigquerymigration.workflows.create,bigquerymigration.workflows.get,bigquerymigration.workflows.list,bigquerymigration.workflows.delete,resourcemanager.projects.update,resourcemanager.projects.get,serviceusage.services.enable,serviceusage.services.get,storage.objects.get,storage.objects.list,storage.objects.create,storage.objects.delete,storage.objects.update,bigquery.datasets.get,bigquery.datasets.update,bigquery.datasets.create,bigquery.datasets.delete,bigquery.tables.get,bigquery.tables.create,bigquery.tables.updateData,bigquery.tables.getData,bigquery.tables.list,bigquery.jobs.create,bigquery.jobs.update,bigquery.jobs.list,bigquery.jobs.delete,storage.buckets.list,storage.buckets.get
# --- IAM Policy Binding for Assessment Runner ---
echo "Granting IAM roles to the assessment runner: $ASSESSMENT_RUNNER_EMAIL"
# Grant the custom BQMSrole to the assessment runner user
gcloud projects add-iam-policy-binding \
$PROJECT_ID \
--member=user:$ASSESSMENT_RUNNER_EMAIL \
--role=projects/$PROJECT_ID/roles/BQMSrole
# Grant the BigQuery Data Viewer role to the assessment runner user
gcloud projects add-iam-policy-binding \
$PROJECT_ID \
--member=user:$ASSESSMENT_RUNNER_EMAIL \
--role=roles/bigquery.dataViewer
# Grant the BigQuery Job User role to the assessment runner user
gcloud projects add-iam-policy-binding \
$PROJECT_ID \
--member=user:$ASSESSMENT_RUNNER_EMAIL \
--role=roles/bigquery.jobUser
echo "Project $PROJECT_ID created and configured for BigQuery Migration Assessment."
echo "Assessment Runner: $ASSESSMENT_RUNNER_EMAIL"
```
Replace the following:
- `PROJECT_ID`: the name of a new project ID
- `RUNNER_EMAIL`: the email of the user running the migration assessment
- `ORGANIZATION_ID`: the organization ID. For example, `123456789012`
### Supported locations
The BigQuery migration assessment feature is supported in all BigQuery
locations. For a list of BigQuery locations, see
[Supported locations](https://docs.cloud.google.com/bigquery/docs/locations#supported_locations).
### Before you begin
Before you run the assessment, you must enable the BigQuery Migration API and
create a BigQuery dataset to store the results of the assessment.
#### Enable the BigQuery Migration API
Enable the BigQuery Migration API as follows:
1. In the Google Cloud console, go to the **BigQuery Migration
API** page.
[Go to BigQuery Migration API](https://console.cloud.google.com/apis/api/bigquerymigration.googleapis.com/overview)
2. Click **Enable**.
#### Create a dataset for the assessment results
The BigQuery migration assessment writes the assessment results to tables in
BigQuery. Before you begin, [create a
dataset](https://docs.cloud.google.com/bigquery/docs/datasets) to hold these tables. When you share the
Data Studio report, you must also give users permission to read this
dataset. For more information, see [Make the report available to
users](https://docs.cloud.google.com/bigquery/docs/migration-assessment#share_the_data_studio_report).
> [!NOTE]
> **Note:** The dataset should be in the same region as the Cloud Storage bucket containing the metadata and log files extracted from the source database. However, if the Cloud Storage bucket is located in a multi-region, then the dataset must be in any of the regions inside this multi-region.
### Run the migration assessment
### Console
1. In the Google Cloud console, go to the **BigQuery** page.
[Go to BigQuery](https://console.cloud.google.com/bigquery)
2. In the navigation menu under `Migration`, click **Services**.
3. Click **Start Assessment**.
4. Fill in the assessment configuration dialog.
1. For **Display name**, enter the name which can contain letters, numbers or underscores. This name is only for display purposes and does not have to be unique.
2. For **Assessment data source**, choose your data warehouse.
3. For **Path to input files**, enter the path to the Cloud Storage bucket that contains your extracted files.
4. To choose how your assessment results are stored, do one of the
following options:
- Keep the **Automatically create the new BigQuery dataset** checkbox selected to have the BigQuery dataset created automatically. The name of the dataset is generated automatically.
- Clear the **Automatically create the new BigQuery dataset** checkbox and either choose the existing empty BigQuery dataset using the format `projectId.datasetId`, or create a new dataset name. In this option you can choose the BigQuery dataset name.
> [!IMPORTANT]
> **Important:** The Cloud Storage bucket location and the BigQuery dataset location must be in the same multi-region or in the location inside this multi-region. For more information on location constraints, see [Location considerations](https://docs.cloud.google.com/bigquery/docs/batch-loading-data#data-locations).
**Option 1** - automatic BigQuery dataset generation
(default)
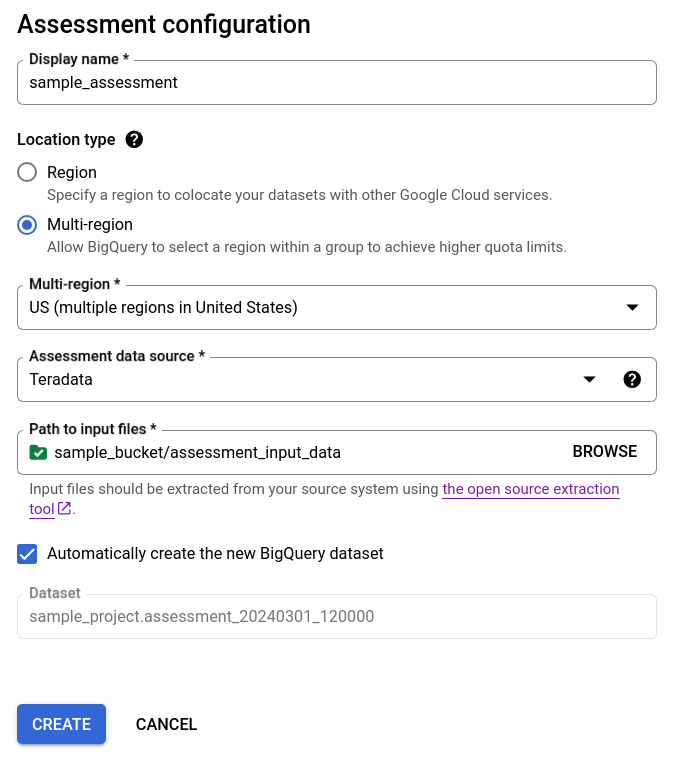
**Option 2** - manual BigQuery dataset creation:

5. Click **Create**. You can see the status of the job in the assessment jobs
list.
While the assessment is running, you can check its progress and estimated
time to complete in the tooltip of the status icon.
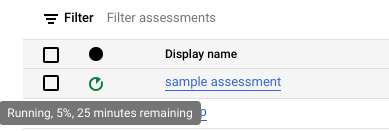
6. While the assessment is running, you can click the **View report** link in
the assessment jobs list to view the assessment report with partial data in
Data Studio. The **View report** link might take some time to
appear while the assessment is running. The report opens in a new tab.
The report is updated with new data as they are processed. Refresh the tab
with the report or click **View report** again to see the updated report.
7. After the assessment is complete, click **View report** to view the
complete assessment report in Data Studio. The report opens in a
new tab.
### API
Call the [`create`](https://docs.cloud.google.com/bigquery/docs/reference/migration/rest/v2/projects.locations.workflows/create)
method with a defined [workflow](https://docs.cloud.google.com/bigquery/docs/reference/migration/rest/v2/projects.locations.workflows).
Then call the [`start`](https://docs.cloud.google.com/bigquery/docs/reference/migration/rest/v2/projects.locations.workflows/start)
method to start the assessment workflow.
The assessment creates tables
in the BigQuery dataset you created earlier. You can query these
for information about the tables and queries used in your existing data
warehouse.
For information about the output files of the translation, see
[Batch SQL translator](https://docs.cloud.google.com/bigquery/docs/batch-sql-translator#explore_the_translation_output).
#### Shareable aggregated assessment result
> [!WARNING]
>
> **Preview**
>
>
> This feature is
>
> subject to the "Pre-GA Offerings Terms" in the General Service Terms section of the
> [Service Specific
> Terms](https://docs.cloud.google.com/terms/service-terms#1).
>
> Pre-GA features are available "as is" and might have limited support.
>
> For more information, see the
> [launch stage descriptions](https://cloud.google.com/products/#product-launch-stages).
For Amazon Redshift, Teradata, and Snowflake assessments, in
addition to the previously created BigQuery dataset, the workflow
creates another lightweight dataset with the same name, plus the
`_shareableRedactedAggregate` suffix. This dataset contains highly
aggregated data that is derived from the output dataset, and contains no
personally identifiable information (PII).
To find, inspect, and securely share the dataset with other users, see
[Query the migration assessment output tables](https://docs.cloud.google.com/bigquery/docs/migration-assessment#query_assessment_output).
The feature is on by default, but you can opt out using the
[public API](https://docs.cloud.google.com/bigquery/docs/reference/migration/rest/v2/projects.locations.workflows/create).
### Assessment details
To view the Assessment details page, click the display name in the assessment
jobs list.

The assessment details page contains the **Configuration** tab, where you can
view more information about an assessment job, and the **Errors** tab, where you
can review any errors that happened during the assessment processing.
View the **Configuration** tab to see the properties of the assessment.
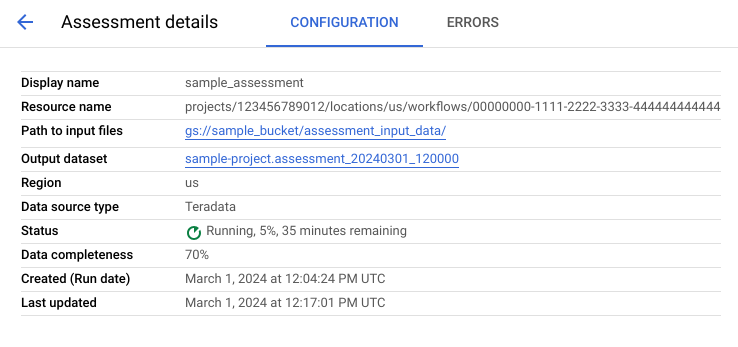
View the **Errors** tab to see the errors that happened during assessment
processing.
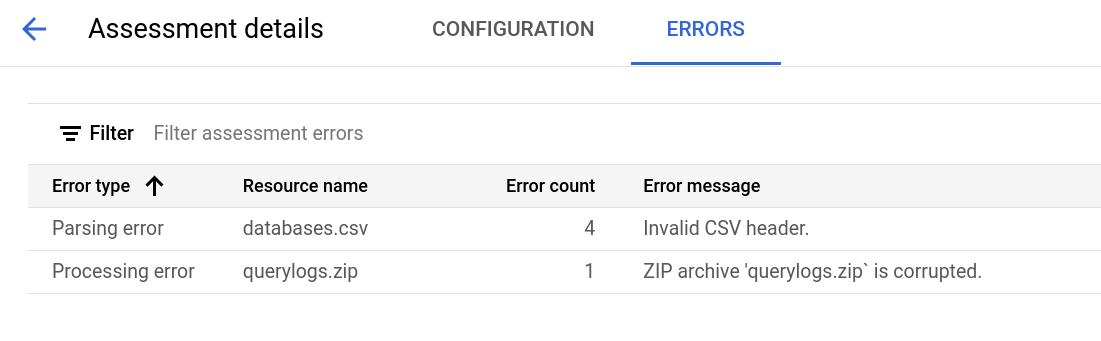
## Review and share the Data Studio report
After the assessment task completes, you can create and share a
Data Studio report of the results.
### Review the report
Click the **View report** link listed next to your individual assessment task.
The Data Studio report opens in a new tab, in a preview mode. You
can use preview mode to review the content of the report before sharing it
further.
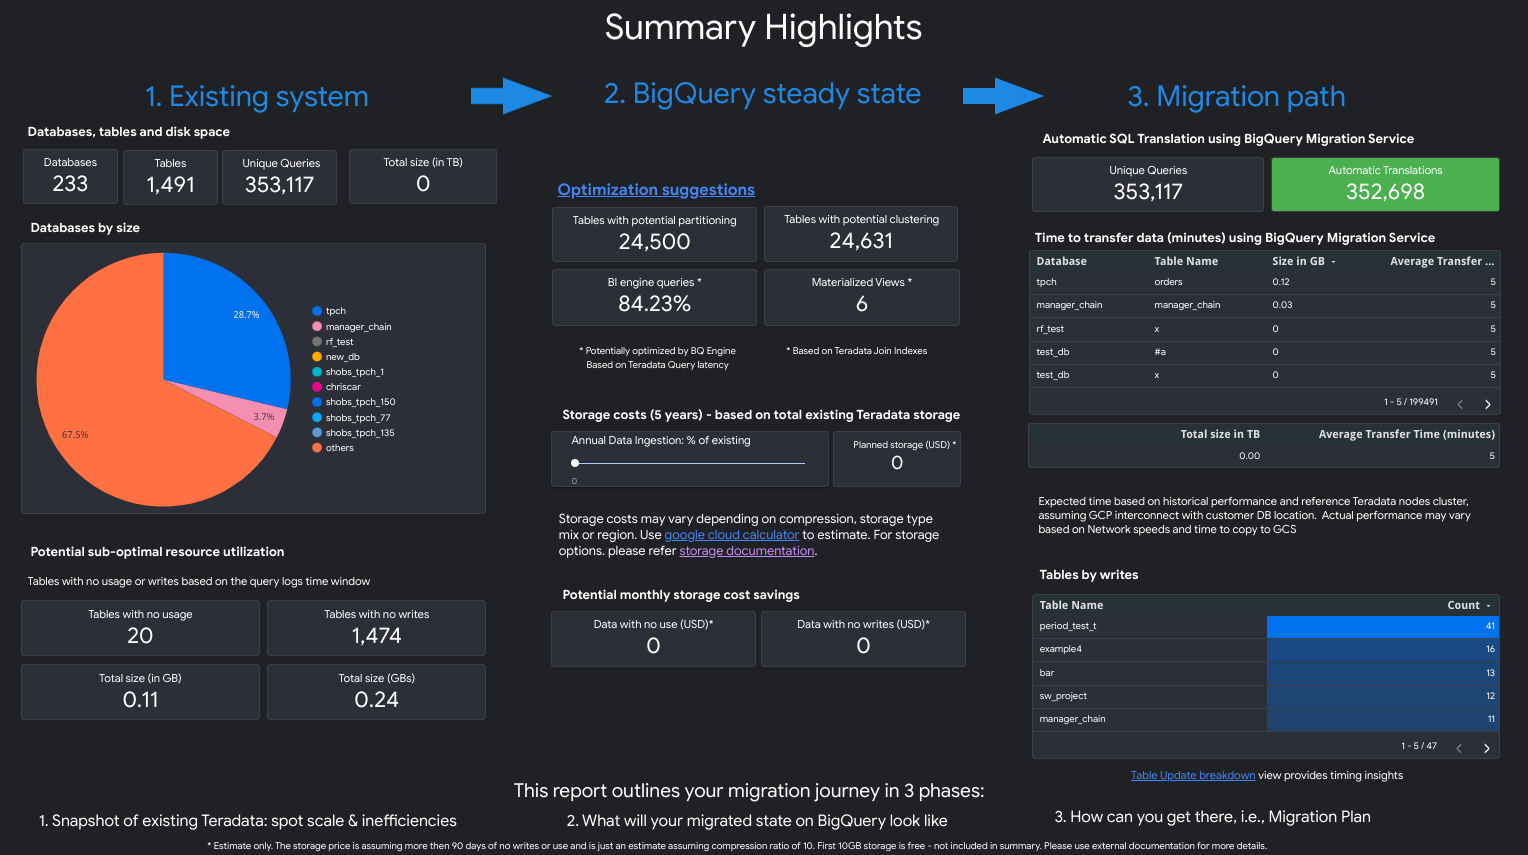
The report looks similar to the following screenshot:
To see which views are contained in the report, select your data warehouse:
### Snowflake
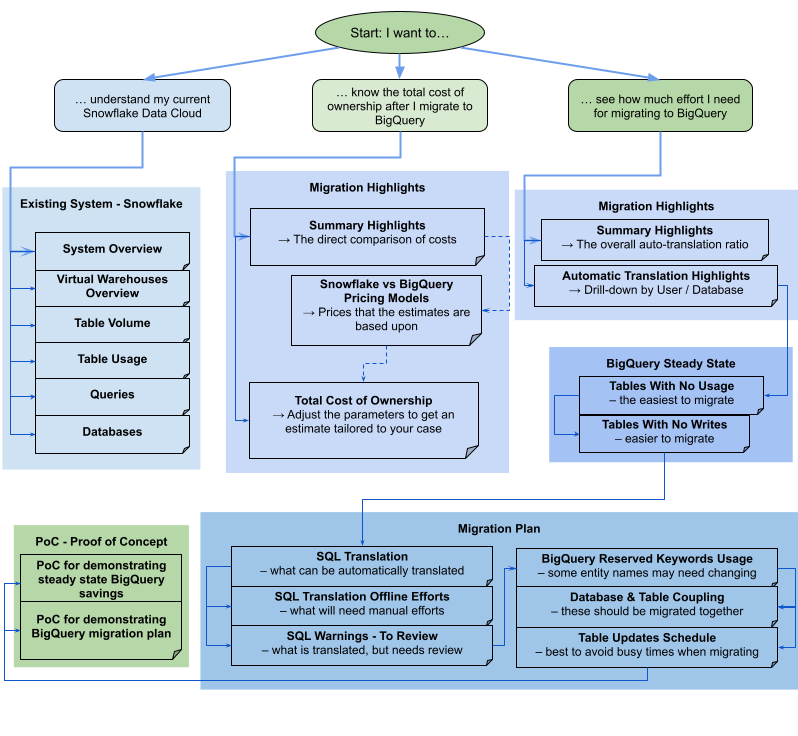
The report consists of different sections that can be used either separately
or together. The following diagram organizes these sections into three
common user goals to help you assess your migration needs:
### Migration Highlights views
The **Migration Highlights** section contains the following views:
Snowflake versus BigQuery Pricing Models
: Listing of the pricing with different tiers/editions. Also includes an
illustration of how BigQuery autoscaling can help save more
cost compared to that of Snowflake.
Total Cost of Ownership
: Interactive table, allowing the user to define: BigQuery
Edition, commitment, baseline slot commitment, percentage of active
storage, and percentage of data loaded or changed. Helps better estimate
the cost for custom cases.
Automatic Translation Highlights
: Aggregated translation ratio, grouped by either user or database, ordered
ascending or descending. Also includes the most common error message for
failed auto translation.
### Existing System views
The **Existing System** section contains the following views:
System Overview
: The System Overview view provides the high-level volume metrics of the key
components in the existing system for a specified time period. The
timeline that is evaluated depends on the logs that were analyzed by the
BigQuery migration assessment. This view gives you quick insight into the source
data warehouse utilization, which you can use for migration planning.
Virtual Warehouses Overview
: Shows the Snowflake cost by warehouse, as well as the node-based
rescaling over the period.
Table Volume
: The Table Volume view provides statistics on the largest tables and
databases found by the BigQuery migration assessment. Because large tables may
take longer to extract from the source data warehouse system, this view
can be helpful in migration planning and sequencing.
Table Usage
: The Table Usage view provides statistics on which tables are heavily used
within the source data warehouse system. Heavily used tables can help you
to understand which tables might have many dependencies and require
additional planning during the migration process.
Queries
: The Queries view gives a breakdown of the types of SQL statements executed
and statistics of their usage. You can use the histogram of Query Type and
Time to identify low periods of system utilization and optimal times of
day to transfer data. You can also use this view to identify frequently
executed queries and the users invoking those executions.
Databases
: The Databases view provides metrics on the size, tables, views, and
procedures defined in the source data warehouse system. This view provides
insight into the volume of objects that you need to migrate.
### BigQuery steady state views
The **BigQuery steady state** section contains the following
views:
Tables With No Usage
: The Tables With No Usage view displays tables in which the
BigQuery migration assessment couldn't find any usage during the logs
period that was analyzed. This can indicate which tables might not need to
be transferred to BigQuery during migration or that the
costs of storing data in BigQuery could be lower. You
must validate the list of unused tables since they could have usage
outside of the logs period analyzed, such as a table which is only used
once per quarter or half.
Tables With No Writes
: The Tables With No Writes view displays tables in which the
BigQuery migration assessment couldn't find any updates during the logs
period that was analyzed. This can indicate that the costs of storing data
in BigQuery could be lower.
### Migration Plan views
The **Migration Plan** section of the report contains the following views:
SQL Translation
: The SQL Translation view lists the count and details of queries that were
automatically converted by BigQuery migration assessment and don't need manual
intervention. Automated SQL Translation typically achieves high
translation rates if metadata is provided. This view is interactive and
allows analysis of common queries and how these are translated.
SQL Translation Offline Effort
: The Offline Effort view captures the areas that need manual intervention,
including specific UDFs and potential lexical structure and syntax
violations for tables or columns.
SQL Warnings - To Review
: The Warnings To Review view captures the areas that are mostly translated
but requires some human inspection.
BigQuery Reserved Keywords
: The BigQuery Reserved Keywords view displays detected usage
of keywords that have special meaning in the GoogleSQL language,
and cannot be used as identifiers unless enclosed by backtick (`` ` ``)
characters.
Database and Table Coupling
: The Database Coupling view provides a high-level view on databases and
tables that are accessed together in a single query. This view can show
what tables and databases are often referenced and what can be used for
migration planning.
Table Updates Schedule
: The Table Updates Schedule view shows when and how frequently tables
are updated to help you plan how and when to move them.
### Proof of Concept views
The **PoC** (proof of concept) section contains the following views:
PoC for demonstrating steady state BigQuery savings
: Includes the most frequent queries, the queries reading the most data, the
slowest queries, and the tables impacted by these aforementioned queries.
PoC for demonstrating BigQuery migration plan
: Showcases how BigQuery translate the most complex queries
and the tables they impact.
### Teradata
The report is a three-part narrative that's prefaced by a summary
highlights page. That page includes the following sections:
- **Existing system.** This section is a snapshot of the existing Teradata system and usage, including the number of databases, schemas, tables, and total size in TB. It also lists the schemas by size and points to potential sub-optimal resource utilization (tables with no writes or few reads).
- **BigQuery steady state transformations (suggestions).** This section shows what the system will look like on BigQuery after migration. It includes suggestions for optimizing workloads on BigQuery (and avoiding wastage).
- **Migration plan.** This section provides information about the migration effort itself---for example, getting from the existing system to the BigQuery steady state. This section includes the count of queries that were automatically translated and the expected time to move each table into BigQuery.
The details of each section include the following:
**Existing system**
- **Compute \& Queries**
- CPU utilization:
- Heatmap of hourly average CPU utilization (overall system resource utilization view)
- Queries by hour and day with CPU utilization
- Queries by type (read/write) with CPU utilization
- Applications with CPU utilization
- Overlay of the hourly CPU utilization with average hourly query performance and average hourly application performance
- Queries histogram by type and query durations
- Applications details view (app, user, unique queries, reporting versus ETL breakdown)
- **Storage Overview**
- Databases by volume, views, and access rates
- Tables with access rates by users, queries, writes, and temporary table creations
- **Applications**: Access rates and IP addresses
**BigQuery steady state transformations (suggestions)**
- Join indexes converted to materialized views
- Clustering and partitioning candidates based on metadata and usage
- Low latency queries identified as candidates for BigQuery BI Engine
- Columns configured with default values that use the column description feature to store default values
- Unique indexes in Teradata (to prevent rows with non-unique keys in a table) use staging tables and a `MERGE` statement to insert only unique records into the target tables and then discard duplicates
- Remaining queries and schema translated as-is
**Migration plan**
- Detailed view with automatically translated queries
- Count of total queries with ability to filter by user, application, affected tables, queried tables, and query type
- Buckets of queries with similar patterns grouped and shown together so that the user is able to see the translation philosophy by query types
- Queries requiring human intervention
- Queries with BigQuery lexical structure violations
- User-defined functions and procedures
- BigQuery reserved keywords
- Tables schedules by writes and reads (to group them for moving)
- Data migration with the BigQuery Data Transfer Service: Estimated time to migrate by table
The **Existing System** section contains the following views:
System Overview
: The System Overview view provides the high-level volume metrics of the key components
in the existing system for a specified time period. The timeline that is
evaluated depends on the logs that were analyzed by the BigQuery migration assessment.
This view gives you quick insight into the source data warehouse utilization,
which you can use for migration planning.
Table Volume
: The Table Volume view provides statistics on the largest tables and databases
found by the BigQuery migration assessment. Because large tables may take longer to
extract from the source data warehouse system, this view can be helpful in
migration planning and sequencing.
Table Usage
: The Table Usage view provides statistics on which tables are heavily used
within the source data warehouse system. Heavily used tables can help you to
understand which tables might have many dependencies and require additional
planning during the migration process.
Applications
: The Applications Usage view and the Applications Patterns view provide
statistics on applications found during processing of logs. These views
let users understand usage of specific applications over time and
the impact on
resource usage. During a migration, it's important to visualize the
ingestion and consumption of data to gain a better understanding of the
dependencies of the data warehouse, and to analyze the impact of moving
various dependent applications together. The IP Address table can be
useful for pinpointing the exact application using the data warehouse
over JDBC connections.
Queries
: The Queries view gives a breakdown of the types of SQL statements executed and
statistics of their usage. You can use the histogram of Query Type and Time to
identify low periods of system utilization and optimal times of day to
transfer data. You can also use this view to identify frequently executed
queries and the users invoking those executions.
Databases
: The Databases view provides metrics on the size, tables, views, and procedures
defined in the source data warehouse system. This view can give insight into
the volume of objects that you need to migrate.
Database Coupling
: The Database Coupling view provides a high-level view on databases and
tables that are accessed together in a single query. This view can show
what tables and databases are referenced often and what you can use for
migration planning.
The **BigQuery steady state** section contains the following
views:
Tables With No Usage
: The Tables With No Usage view displays tables in which the
BigQuery migration assessment couldn't find any usage during the logs period
that was analyzed.
A lack of usage might indicate that you don't need to transfer that table
to BigQuery during migration or that the costs of storing
data in BigQuery
could be lower. You should validate the list of unused tables because they
could have usage outside of the logs period, such as
a table that is only used once every three or six months.
Tables With No Writes
: The Tables With No Writes view displays tables in which the
BigQuery migration assessment couldn't find any updates during the logs
period that was analyzed. A lack of writes can indicate where you might
lower your storage costs in BigQuery.
Low-Latency Queries
: The Low-Latency Queries view displays a distribution of query runtimes based
on the log data analyzed. If the query duration distribution chart displays a
large number of queries with \< 1 second in runtime, consider enabling
BigQuery BI Engine to accelerate BI and other low-latency workloads.
Materialized Views
: The Materialized View provides further optimization suggestions to boost
performance on BigQuery.
Clustering and Partitioning
: The Partitioning and Clustering view displays tables that would benefit
from partitioning, clustering, or both.
: The Metadata suggestions are achieved by analyzing the source data
warehouse schema (like Partitioning and Primary Key in the source table)
and finding the closest BigQuery equivalent to achieve
similar optimization characteristics.
: The Workload suggestions are achieved by analyzing the source query logs.
The recommendation is determined by analyzing the workloads, especially
`WHERE` or `JOIN` clauses in the analyzed query logs.
Clustering Recommendation
: The Partitioning view displays tables which might have greater than 10,000
partitions, based on their partitioning constraint definition. These tables
tend to be good candidates for BigQuery clustering, which
enables fine-grained table partitions.
Unique Constraints
: The Unique Constraints view displays both `SET` tables and unique indexes
defined within the source data warehouse. In BigQuery, it's
recommended to use staging tables and a `MERGE` statement to insert only
unique records into a target table. Use the contents of this view to help
determine which tables you might need to adjust ETL for during the
migration.
Default Values / Check Constraints
: This view shows tables that use check constraints to set default column
values. In BigQuery, see
[Specify default column values](https://docs.cloud.google.com/bigquery/docs/default-values).
The **Migration path** section of the report contains the following views:
SQL Translation
: The SQL Translation view lists the count and details of queries that were
automatically converted by BigQuery migration assessment and don't need manual
intervention. Automated SQL Translation typically achieves high
translation rates if metadata is provided. This view is interactive and
allows analysis of common queries and how these are translated.
Offline Effort
: The Offline Effort view captures the areas that need manual intervention,
including specific UDFs and potential lexical structure and syntax
violations for tables or columns.
BigQuery Reserved Keywords
: The BigQuery Reserved Keywords view displays detected usage
of keywords that have special meaning in the GoogleSQL language,
and cannot be used as identifiers unless enclosed by backtick (`` ` ``)
characters.
Table Updates Schedule
: The Table Updates Schedule view shows when and how frequently tables
are updated to help you plan how and when to move them.
Data Migration to BigQuery
: The Data Migration to BigQuery view outlines the migration
path with the
expected time to migrate your data using the BigQuery Data Transfer Service.
For more information, see the
[BigQuery Data Transfer Service for Teradata guide](https://docs.cloud.google.com/bigquery/docs/migration/teradata).
The Appendix section contains the following views:
Case Sensitivity
: The Case Sensitivity view shows tables in the source data warehouse that are
configured to perform case-insensitive comparisons.
By default, string comparisons in
BigQuery are case-sensitive. For more information, see
[Collation](https://docs.cloud.google.com/bigquery/docs/reference/standard-sql/collation-concepts).
### Redshift
Migration Highlights
: The Migration Highlights view provides an executive summary of the three
sections of the report:
1. The **Existing System** panel provides information on the number of databases, schemas, tables, and the total size of the existing Redshift System. It also lists the schemas by size and potential sub-optimal resource utilization. You can use this information to optimize your data by removing, partitioning, or clustering your tables.
2. The **BigQuery Steady State** panel provides information on what your data will look like post-migration on BigQuery, including the number of queries that can be automatically translated using BigQuery Migration Service. This section also shows the costs of storing your data in BigQuery based on your annual data ingestion rate, along with optimization suggestions for tables, provisioning, and space.
3. The **Migration Path** panel provides information on the migration effort itself. For each table it shows the expected time to migrate, the number of rows in the table, and its size.
The **Existing System** section contains the following views:
Queries by Type and Schedule
: The Queries by Type and Schedule view categorizes your queries into
ETL/Write and Reporting/Aggregation. Seeing your query mix over time helps
you understand your existing usage patterns, and identify burstiness
and potential over-provisioning that can impact cost and performance.
Query Queuing
: The Query Queuing view provides additional details on system load
including query volume, mix, and any performance impacts due to queuing,
such as insufficient resources.
Queries and WLM Scaling
: The Queries and WLM Scaling view identifies concurrency scaling as an
added cost and configuration complexity. It shows how your Redshift system
routes queries based on the rules you specified, and performance impacts
due to queuing, concurrency scaling, and evicted queries.
Queuing and Waiting
: The Queuing and Waiting view is a deeper look into queue and wait times
for queries over time.
WLM Classes and Performance
: The WLM Classes and Performance view provides an optional way to map your
rules to BigQuery. However, we recommend you let
BigQuery automatically route your queries.
Query \& Table volume insights
: The Query \& Table volume insights view lists queries by size, frequency,
and top users. This helps you categorize the sources of load on the system
and plan how to migrate your workloads.
Databases and Schemas
: The Databases and Schemas view provides metrics on the size, tables,
views, and procedures defined in the source data warehouse system. This
provides insight into the volume of objects which need to be migrated.
Table Volume
: The Table Volume view provides statistics on the largest tables and
databases, showing how they are accessed. Because large tables may take
longer to extract from the source data warehouse system, this view helps
you with migration planning and sequencing.
Table Usage
: The Table Usage view provides statistics on which tables are heavily used
within the source data warehouse system. Heavily used tables can be
leveraged to understand tables which might have many dependencies and
warrant additional planning during the migration process.
Importers \& Exporters
: The Importers \& Exporters view provides information on data and users
involved in data import (using `COPY` queries) and data export (using `UNLOAD`
queries). This view helps to identify staging layer and processes related to
ingestion and exports.
Cluster Utilization
: The Cluster Utilization view provides general information about all
available clusters and displays CPU utilization for each cluster. This
view can help you understand system capacity reserve.
The **BigQuery steady state** section contains the following
views:
Clustering \& Partitioning
: The Partitioning and Clustering view displays tables that would benefit
from partitioning, clustering, or both.
The Metadata suggestions are achieved by analyzing the source data
warehouse schema (like Sort Key and Dist Key in the source table) and
finding the closest BigQuery equivalent to achieve
similar optimization characteristics.
The Workload suggestions are achieved by analyzing the source query
logs. The recommendation is determined by analyzing the workloads,
especially `WHERE` or `JOIN` clauses in the analyzed query logs.
At the bottom of the page, there is a translated create table statement
with all optimizations provided. All translated DDL statements can be
also extracted from the dataset. Translated DDL statements are stored in
`SchemaConversion` table in `CreateTableDDL` column.
The recommendations in the report are provided only for tables larger
than 1 GB because small tables won't benefit from clustering and
partitioning. However, DDL for all tables (including tables smaller than
1GB) are available in `SchemaConversion` table.
Tables With No Usage
: The Tables With No Usage view displays tables where the
BigQuery migration assessment did not identify any usage
during the analyzed logs period. A lack of usage might indicate
that you don't need to transfer that table to BigQuery
during migration or that the costs of storing data in
BigQuery could be lower (billed as
[Long-term storage](https://cloud.google.com/bigquery/pricing#storage)).
We recommend validating the list of unused tables because they could have
usage outside of the logs period, such as a table that is only used once
every three or six months.
Tables With No Writes
: The Tables With No Writes view displays tables where the BigQuery
migration assessment did not identify any updates during the analyzed logs period. A lack of writes can indicate where you might lower
your storage costs in BigQuery (billed as
[Long-term storage](https://cloud.google.com/bigquery/pricing#storage)).
BigQuery BI Engine and Materialized Views
: The BigQuery BI Engine and Materialized Views provides further
optimization suggestions to boost performance on BigQuery.
The **Migration path** section contains the following views:
SQL Translation
: The SQL Translation view lists the count and details of queries that were
automatically converted by BigQuery migration assessment and don't need manual
intervention. Automated SQL Translation typically achieves high
translation rates if metadata is provided.
SQL Translation Offline Effort
: The SQL Translation Offline Effort view captures the areas that need
manual intervention, including specific UDFs and queries with potential
translation ambiguities.
Alter Table Append Support
: The Alter Table Append Support view shows details about common Redshift
SQL constructs that don't have a direct BigQuery counterpart.
Copy Command Support
: The Copy Command Support view shows details about common Redshift SQL
constructs that don't have a direct BigQuery counterpart.
SQL Warnings
: The SQL Warnings view captures areas that are successfully translated,
but require a review.
Lexical Structure \& Syntax Violations
: The Lexical Structure \& Syntax Violations view displays names of
columns, tables, functions, and procedures that violate
BigQuery syntax.
BigQuery Reserved Keywords
: The BigQuery Reserved Keywords view displays detected usage
of keywords that have special meaning in the GoogleSQL language,
and cannot be used as identifiers unless enclosed by backtick (`` ` ``)
characters.
Schema Coupling
: The Schema Coupling view provides a high-level view on databases,
schemas, and tables that are accessed together in a single query. This
view can show what tables, schemas, and databases are referenced often
and what you can use for migration planning.
Table Updates Schedule
: The Table Updates Schedule view shows how when and how frequently tables
are updated to help you plan how and when to move them.
Table Scale
: The Table Scale view lists your tables with the most columns.
Data Migration to BigQuery
: The Data Migration to BigQuery view outlines the migration
path with
the expected time to migrate your data using the BigQuery Migration Service
Data Transfer Service. For more information, see the [BigQuery Data Transfer Service
for Redshift guide](https://docs.cloud.google.com/bigquery/docs/migration/redshift).
Assessment execution summary
: The Assessment execution summary contains the report completeness,
the progress of the on-going assessment, and the status of processed files
and errors.
Report completeness represents the percentage of successfully processed
data that is recommended to display meaningful insights in the
assessment report. If the data for a particular
section of the report is missing, this information is listed in the
**Assessment Modules** table under the **Report Completeness**
indicator.
The **progress** metric indicates the percentage of the data processed
so far along with the estimate of the remaining time to process all of
the data. After the processing is complete, the progress metric is not
displayed.
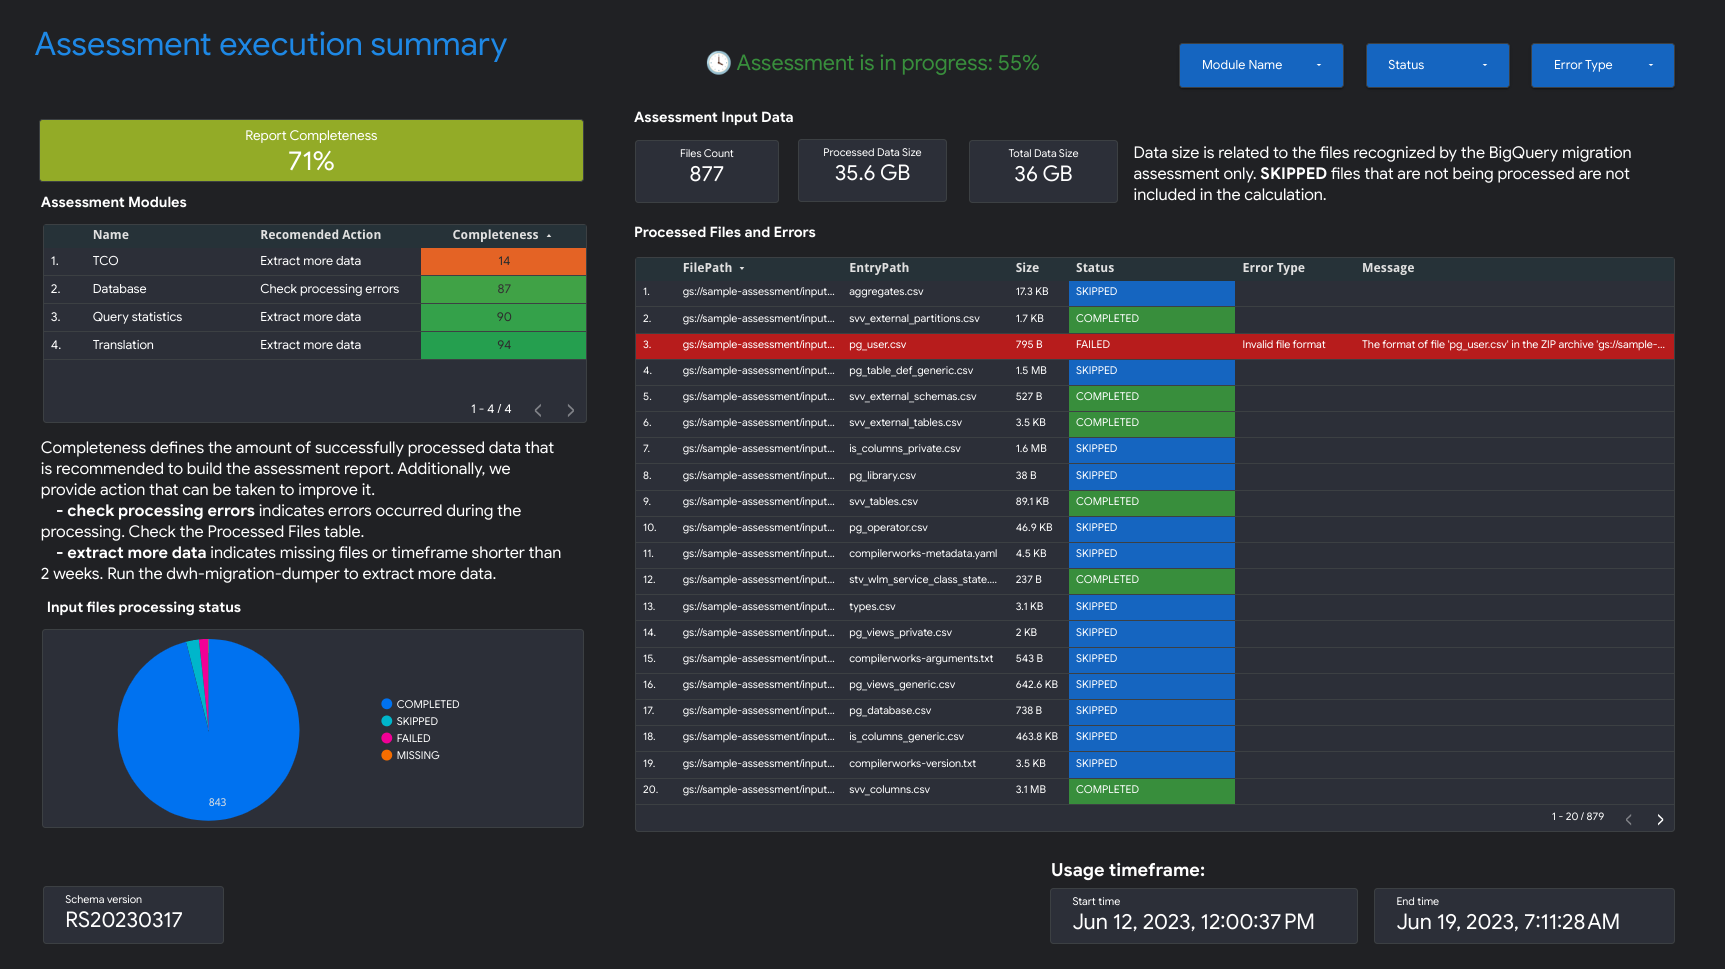
### Redshift Serverless
> [!WARNING]
> **Preview:** BigQuery Migration Assessment for Amazon Redshift Serverless is in [Preview](https://cloud.google.com/products#product-launch-stages). To use this feature, you must be added to the allowlist. To request access, fill out the [application form](https://docs.google.com/forms/d/e/1FAIpQLScr8inhgfdAFg5phMFjs9TQRTDuucmQ3vACzKgtRGmjmqlzdA/viewform) or send an email to [bq-edw-migration-support@google.com](mailto:bq-edw-migration-support@google.com).
Migration Highlights
: This report page shows the summary of existing Amazon Redshift
Serverless databases including the size and number of tables.
Additionally, it provides the high level estimate of the Annual Contract
Value (ACV)---the cost of compute and storage in BigQuery.
The Migration Highlights view provides an executive summary of the three
sections of the report.
The **Existing System** section has the following views:
Databases and Schemas
: Provides a breakdown of total storage size in GB for each database,
schema, or table.
External Databases and Schemas
: Provides a breakdown of total storage size in GB for each external
database, schema, or table.
System Utilization
: Provides general information about the historical system utilization. This
view displays the historical usage of RPU (Amazon Redshift Processing
Units) and daily storage consumption. This view can help you understand
the system capacity reserve.
The **BigQuery Steady State** section provides information
on what your data will look like post-migration on BigQuery,
including the number of queries that can be automatically translated
using BigQuery Migration Service. This section also shows the costs of storing
your data in BigQuery based on your annual data ingestion
rate, along with optimization suggestions for tables, provisioning, and
space. The Steady State section has the following views:
Amazon Redshift Serverless versus BigQuery pricing
: Provides a comparison of Amazon Redshift Serverless and
BigQuery pricing models to help you understand the
benefits and potential cost savings after you migrate to
BigQuery.
BigQuery Compute Cost (TCO)
: Lets you estimate the cost of compute in BigQuery. There
are four manual inputs in the calculator: BigQuery Edition,
Region, Commitment period, and Baseline. By default, the calculator
provides optimal, cost-effective baseline commitments that you can
manually override.
Total Cost of Ownership
: Lets you estimate the Annual Contract Value (ACV)---the cost of
compute and storage in BigQuery. The calculator also lets
you calculate the storage cost, which varies for active storage and
long-term storage, depending on the table modifications during the
analyzed time period. For more information, see [Storage pricing](https://cloud.google.com/bigquery/pricing#storage).
The **Appendix** section contains this view:
Assessment Execution Summary
: Provides the assessment execution details including the list of processed
files, errors and report completeness. You can use this page to
investigate missing data in the report and to better understand the
report's completeness.
### Oracle / Oracle Exadata
> [!WARNING]
>
> **Preview**
>
>
> This feature is
>
> subject to the "Pre-GA Offerings Terms" in the General Service Terms section of the
> [Service Specific
> Terms](https://docs.cloud.google.com/terms/service-terms#1).
>
> Pre-GA features are available "as is" and might have limited support.
>
> For more information, see the
> [launch stage descriptions](https://cloud.google.com/products/#product-launch-stages).
To request feedback or support for this feature, send email to [bq-edw-migration-support@google.com](mailto:bq-edw-migration-support@google.com).
### Migration Highlights
The **Migration Highlights** section contains the following views:
- Existing system: a snapshot of the existing Oracle system and usage, including the number of databases, schemas, tables, and total size in GB. It also provides the workload classification summary for each database to help you decide if BigQuery is the right migration target.
- Compatibility: provides information about the migration effort itself. For each analyzed database it shows the expected time to migrate and the number of database objects that can be migrated automatically with Google provided tools.
- BigQuery steady state: contains information on what your data will look like post-migration on BigQuery, including the costs of storing your data in BigQuery based on your annual data ingestion rate and the compute cost estimation. In addition, it provides insights into any underutilized tables.
### Existing System
The **Existing System** section contains the following views:
- Workloads Characteristic: describes the workload type for each database based on the analyzed performance metrics. Each database is classified as OLAP, Mixed, or OLTP. This information can help you to make a decision on which databases can be migrated to BigQuery.
- Databases and Schemas: provides a breakdown of total storage size in GB for each database, schema, or table. In addition you can use this view to identify materialized views and external tables.
- Database Features and Links: shows the list of Oracle features used in your database, together with the BigQuery equivalent features or services that can be used after the migration. In addition, you can explore the Database Links to better understand connections between the databases.
- Database Connections: provides insight into the database sessions started by the user or application. Analyzing this data can help you identify external applications that may require additional effort during the migration.
- Query Types: provides a breakdown of the types of SQL statements executed and statistics of their usage. You can use the hourly histogram of Query Executions or Query CPU Time to identify low periods of system utilization and optimal times of day to transfer data.
- PL/SQL Source Code: provides insight into the PL/SQL objects, like functions or procedures, and their size for each database and schema. In addition, the hourly executions histogram can be used to identify peak hours with most PL/SQL executions.
- System Utilization: provides general information about the historical system utilization. This view displays the hourly usage of CPU and daily storage consumption. This view can help to understand the system capacity reserve.
### BigQuery Steady State
The **BigQuery Steady State** section contains the following views:
- Exadata versus BigQuery pricing: provides the general comparison of Exadata and BigQuery pricing models to help you understand the benefits and potential cost savings after the migration to BigQuery.
- BigQuery Database Read/Writes: provides insights about the database's physical disk operations. Analyzing this data can help you find the best time to perform data migration from Oracle to BigQuery.
- BigQuery Compute Cost: lets you estimate the cost of compute in BigQuery. There are four manual inputs in the calculator: **BigQuery Edition** , **Region** , **Commitment period** , and **Baseline** . By default, the calculator provides optimal, cost-effective baseline commitment that you can manually override. The *Annual Autoscaling Slot Hours* value provides the number of slot hours used outside of commitment. This value is calculated using system utilization. The visual explanation of relationships between the baseline, autoscaling, and utilization is provided at the end of the page. Each estimation shows the probable number and an estimation range.
- Total Cost of Ownership (TCO): lets you estimate the Annual Contract Value (ACV) - the cost of compute and storage in BigQuery. The calculator also lets you calculate the storage cost. The calculator also lets you calculate the storage cost, which varies for *active storage* and *long-term storage* , depending on the table modifications during the analyzed time period. For more information about storage pricing, see [Storage pricing](https://cloud.google.com/bigquery/pricing#storage).
- Underutilized Tables: provides information about unused and read-only tables based on the usage metrics from the analyzed time period. A lack of usage might indicate that you don't need to transfer the table to BigQuery during a migration or that the costs of storing data in BigQuery could be lower (billed as long-term storage). We recommend that you validate the list of unused tables in case they have usage outside of the analyzed time period.
### Migration Hints
The **Migration Hints** section contains the following views:
- Database Objects Compatibility: provides the overview of database objects compatibility with BigQuery, including the number of objects that can be automatically migrated with Google provided tools or require manual action. This information is shown for each database, schema, and database object type.
- Database Objects Migration Effort: shows the estimate of migration effort in hours for each database, schema, or database object type. In addition it shows the percentage of small, medium, and large objects based on the migration effort.
- Database Schema Migration Effort: provides the list of all detected database object types, their number, compatibility with BigQuery and the estimated migration effort in hours.
- Database Schema Migration Effort Detailed: provides more deep dive insight into the database schema migration effort, including the information for each single object.
### Proof of Concept views
The **Proof of Concept views** section contains the following views:
- Proof of concept migration: shows the suggested list of databases with the lowest migration effort that are good candidates for initial migration. In addition, it shows the top queries that can help to demonstrate the time and cost savings, and value of BigQuery using a proof of concept.
### Appendix
The **Appendix** section contains the following views:
- Assessment Execution Summary: provides the assessment execution details including the list of processed files, errors, and report completeness. You can use this page to investigate missing data in the report and better understand the overall report completeness.
### Apache Hive
The report consisting of a three-part narrative is prefaced by a summary
highlights page that includes the following sections:
- **Existing System - Apache Hive.** This section consists of a
snapshot of the existing Apache Hive system and usage including
the number of databases, tables, their total size in GB, and the number
of query logs processed. This section also lists the databases by size
and points to potential sub-optimal resource utilization (tables with no
writes or few reads) and provisioning. The details of this section
include the following:
- **Compute and queries**
- CPU utilization:
- Queries by hour and day with CPU utilization
- Queries by type (read/write)
- Queues and applications
- Overlay of the hourly CPU utilization with average hourly query performance and average hourly application performance
- Queries histogram by type and query durations
- Queueing and waiting page
- Queues detailed view (queue, user, unique queries, reporting versus ETL breakdown, by metrics)
- **Storage overview**
- Databases by volume, views, and access rates
- Tables with access rates by users, queries, writes, and temporary table creations
- **Queues and applications**: Access rates and client IP addresses
- **BigQuery Steady State.**
This section
shows what the system will look like on BigQuery
after migration. It includes suggestions for optimizing
workloads on BigQuery (and avoiding wastage).
The details of this section include the following:
- Tables identified as candidates for materialized views.
- Clustering and partitioning candidates based on metadata and usage.
- Low-latency queries identified as candidates for BigQuery BI Engine.
- Tables without read or write usage.
- Partitioned tables with the data skew.
- **Migration Plan.** This section provides information about
the migration effort itself. For example, getting from the existing
system to the BigQuery steady
state. This section contains identified storage targets for each table,
tables identified as significant for migration, and the count of queries
that were automatically translated.
The details of this section include the following:
- Detailed view with automatically translated queries
- Count of total queries with ability to filter by user, application, affected tables, queried tables, and query type.
- Query buckets with similar patterns grouped together, enabling users to see the translation philosophy by query types.
- Queries requiring human intervention
- Queries with BigQuery lexical structure violations
- User-defined functions and procedures
- BigQuery reserved keywords
- Query requiring review
- Tables schedules by writes and reads (to group them for moving)
- Identified storage target for external and managed tables
The **Existing System - Hive** section contains the following views:
System Overview
: This view provides the high-level volume metrics of the key components
in the existing system for a specified time period. The timeline that is
evaluated depends on the logs that were analyzed by the BigQuery migration assessment.
This view gives you quick insight into the source data warehouse utilization,
which you can use for migration planning.
Table Volume
: This view provides statistics on the largest tables and databases
found by the BigQuery migration assessment. Because large tables may take longer to
extract from the source data warehouse system, this view can be helpful in
migration planning and sequencing.
Table Usage
: This view provides statistics on which tables are heavily used
within the source data warehouse system. Heavily used tables can help you to
understand which tables might have many dependencies and require additional
planning during the migration process.
Queues Utilization
: This view provides statistics on YARN queues
usage found during processing of logs. These views let users understand
usage of specific queues and applications over time and the impact on
resource usage. These views also help identify and prioritize workloads
for migration. During a migration, it's important to visualize the
ingestion and consumption of data to gain a better understanding of the
dependencies of the data warehouse, and to analyze the impact of moving
various dependent applications together. The IP address table can be
useful for pinpointing the exact application using the data warehouse
over JDBC connections.
Queues Metrics
: This view provides a breakdown of the different metrics on
YARN queues found during processing of logs. This view lets users to
understand patterns of usage in specific queues and impact on migration.
You can also use this view to identify connections between tables
accessed in queries and queues where the query was executed.
Queuing and Waiting
: This view provides an insight on the query queuing
time in the source data warehouse. Queuing times indicate performance
degradation due to under provisioning, and additional provisioning
requires increased hardware and maintenance costs.
Queries
: This view gives a breakdown of the types of SQL statements executed and
statistics of their usage. You can use the histogram of Query Type and Time to
identify low periods of system utilization and optimal times of day to
transfer data. You can also use this view to identify most-used
Hive execution engines and frequently executed
queries along with the user details.
Databases
: This view provides metrics on the size, tables, views, and procedures
defined in the source data warehouse system. This view can give insight into
the volume of objects that you need to migrate.
Database \& Table Coupling
: This view provides a high-level view on databases and
tables that are accessed together in a single query. This view can show
what tables and databases are referenced often and what you can use for
migration planning.
The **BigQuery Steady State** section contains the following
views:
Tables With No Usage
: The Tables With No Usage view displays tables in which the
BigQuery migration assessment couldn't find any usage during the logs period
that was analyzed.
A lack of usage might indicate that you don't need to transfer that table
to BigQuery during migration or that the costs of storing
data in BigQuery
could be lower. You must validate the list of unused tables because they
could have usage outside of the logs period, such as
a table that is only used once every three or six months.
Tables With No Writes
: The Tables With No Writes view displays tables in which the
BigQuery migration assessment couldn't find any updates during the logs
period that was analyzed. A lack of writes can indicate where you might
lower your storage costs in BigQuery.
Clustering and Partitioning Recommendations
: This view displays tables that would benefit
from partitioning, clustering, or both.
: The Metadata suggestions are achieved by analyzing the source data
warehouse schema (like Partitioning and Primary Key in the source table)
and finding the closest BigQuery equivalent to achieve
similar optimization characteristics.
: The Workload suggestions are achieved by analyzing the source query logs.
The recommendation is determined by analyzing the workloads, especially
`WHERE` or `JOIN` clauses in the analyzed query logs.
Partitions converted to Clusters
: This view displays tables that have more than 10,000
partitions, based on their partitioning constraint definition. These tables
tend to be good candidates for BigQuery clustering, which
enables fine-grained table partitions.
Skewed partitions
: The Skewed Partitions view displays tables that are based on the metadata
analysis and have data skew on one or several partitions. These tables are
good candidates for schema change, as queries on skewed partitions
might not perform well.
BI Engine and Materialized Views
: The Low-Latency Queries and Materialized Views view displays a
distribution of query runtimes based on the log data analyzed and a
further optimization suggestions to boost performance on
BigQuery. If the query duration distribution chart
displays a large number of queries with runtime less than 1 second, consider
enabling BI Engine to accelerate BI and other low-latency workloads.
The **Migration Plan** section of the report contains the following views:
SQL Translation
: The SQL Translation view lists the count and details of queries that were
automatically converted by BigQuery migration assessment and don't need manual
intervention. Automated SQL Translation typically achieves high
translation rates if metadata is provided. This view is interactive and
allows analysis of common queries and how these are translated.
SQL Translation Offline Effort
: The Offline Effort view captures the areas that need manual intervention,
including specific UDFs and potential lexical structure and syntax
violations for tables or columns.
SQL Warnings
: The SQL Warnings view captures areas that are successfully translated, but require a review.
BigQuery Reserved Keywords
: The BigQuery Reserved Keywords view displays detected usage
of keywords that have special meaning in the GoogleSQL language.
These keywords can't be used as identifiers unless enclosed by
backtick (`` ` ``) characters.
Table Updates Schedule
: The Table Updates Schedule view shows when and how frequently tables
are updated to help you plan how and when to move them.
BigLake External Tables
: The BigLake External Tables view outlines tables that are
identified as targets to migration to BigLake instead of
BigQuery.
The **Appendix** section of the report contains the following views:
Detailed SQL Translation Offline Effort Analysis
: The Detailed Offline Effort Analysis view provides an additional insight of the SQL areas that
need manual intervention.
Detailed SQL Warnings Analysis
: The Detailed Warnings Analysis view provides an additional insight of the SQL areas that are
successfully translated, but require a review.
### Share the report
The Data Studio report is a frontend dashboard for the migration
assessment. It relies on the underlying dataset access permissions. To share the
report, the recipient must have access to both the Data Studio
report itself and the BigQuery dataset that contains the
assessment results.
When you open the report from the Google Cloud console, you are viewing the
report in the preview mode. To create and share the report with other users,
perform the following steps:
1. Click **Edit and share**. Data Studio prompts you to attach newly created Data Studio connectors to the new report.
2. Click **Add to report**. The report receives an individual report ID, which you can use to access the report.
3. To share the Data Studio report with other users, follow the steps given in [Share reports with viewers and editors](https://support.google.com/looker-studio/answer/7459147).
4. Grant the users permission to view the BigQuery dataset that was used to run the assessment task. For more information, see [Granting access to a dataset](https://docs.cloud.google.com/bigquery/docs/migration-assessment#required_permissions).
## Query the migration assessment output tables
Although the Data Studio reports are the most convenient way to view
the assessment results, you can also [view and query the underlying data](https://docs.cloud.google.com/bigquery/docs/bigquery-web-ui#open-ui)
in the BigQuery dataset.
### Example query
The following example gets the total number of unique queries, the number of
queries that failed translation, and the percentage of unique queries that
failed translation.
```googlesql
SELECT
QueryCount.v AS QueryCount,
ErrorCount.v as ErrorCount,
(ErrorCount.v * 100) / QueryCount.v AS FailurePercentage
FROM
(
SELECT
COUNT(*) AS v
FROM
`your_project.your_dataset.TranslationErrors`
WHERE Severity = "ERROR"
) AS ErrorCount,
(
SELECT
COUNT(DISTINCT(QueryHash)) AS v
FROM
`your_project.your_dataset.Queries`
) AS QueryCount;
```
### Share your dataset with users in other projects
After inspecting the dataset, if you would like to share it with a user that is
not in your project, you can do so by utilizing the
[publisher workflow of BigQuery sharing (formerly Analytics Hub)](https://docs.cloud.google.com/bigquery/docs/analytics-hub-introduction#publisher_workflow).
> [!NOTE]
> **Note:** There is no additional cost for managing [data exchanges](https://docs.cloud.google.com/bigquery/docs/analytics-hub-manage-exchanges) or listings in sharing.
1. In the Google Cloud console, go to the **BigQuery** page.
[Go
to BigQuery](https://console.cloud.google.com/bigquery)
2. Click the dataset to view its details.
3. Click
**Sharing** \> **Publish as listing**.
4. In the dialog that opens, create a listing as prompted.
If you already have a data exchange, skip step 5.
5. [Create a data exchange and set permissions](https://docs.cloud.google.com/bigquery/docs/analytics-hub-manage-exchanges#create-exchange).
To allow a user to view your listings in this exchange, add them to the
**Subscribers** list.
6. Enter the listing details.
**Display name** is the name of this listing and is required; other fields
are optional.
7. Click **Publish**.
A private listing is created.
8. For your listing, select
**More actions** under **Actions**.
9. Click **Copy share link**.
You can share the link with users that have subscription access to your
exchange or listing.
## Troubleshooting
The following sections explain common issues and troubleshooting techniques for
migrating your data warehouse to BigQuery.
### `dwh-migration-dumper` tool errors
To troubleshoot errors and warnings in the `dwh-migration-dumper` tool terminal
output that occurred during metadata or query logs extraction, see
[generate metadata troubleshooting](https://docs.cloud.google.com/bigquery/docs/generate-metadata#troubleshooting).
### Hive migration errors
The following sections describe common issues that you might encounter when you
plan to migrate your data warehouse from Hive to
BigQuery.
The `hadoop-migration-assessment` query logs extraction logging hook writes debug log messages in your
`hive-server2` logs. If you encounter any issues, review the
logging hook debug logs, which contain the
`MigrationAssessmentLoggingHook` string.
#### Handle the `ClassNotFoundException` error
This error occurs when the `hive-server2` process can't locate
`com.google.cloud.bigquery.dwhassessment.hooks.MigrationAssessmentLoggingHook`
during query compilation.
Ensure that you added the
logging hook JAR file to the `auxlib` folder on the
Hive cluster, or that you specified the full path to the JAR file
in the `hive.aux.jars.path` property---for example,
`file://AUXLIB_PATH/HiveMigrationAssessmentQueryLogsHooks_deploy.jar`.
If the error persists, do the following:
- **Verify the JAR location on Cloudera (CDP or CDH):** In Cloudera
environments, auxiliary JAR properties (`hive.aux.jars.path`) might not
reliably load into the root query compilation classloader. To resolve this
issue, copy the logging hook JAR file directly into the
core Hive library directory on all HiveServer2
hosts---for example, `/opt/cloudera/parcels/CDH/lib/hive/lib/`.
- **Verify the configuration scope:** If you use Cloudera Manager, ensure that you place the
logging hook configuration properties
(for example, `hive.exec.pre.hooks`, `hive.exec.post.hooks`, `hive.exec.failure.hooks`,
and `dwhassessment.hook.base-directory`) in the active execution engine
configuration snippet. For example, if your cluster uses Tez execution, add
the XML properties to Hive on Tez Advanced
Configuration Snippet (Safety Valve) fields for `hive-site.xml`, or on the
service-wide Hive safety valve, rather than in the
standalone HiveServer2 configuration snippets. After you save the changes,
restart the Hive service, including the HiveServer2
and Hive Metastore roles.
#### Subfolders don't appear in the configured folder
This issue might be caused by a misconfiguration or problems during
logging hook initialization.
Search your `hive-server2` debug logs for the following
logging hook messages:
```
Unable to initialize logger, logging disabled
```
```
Log dir configuration key 'dwhassessment.hook.base-directory' is not set,
logging disabled.
```
```
Error while trying to set permission
```
Review the issue details and see if there is anything that you need to correct
to fix the problem.
#### Files don't appear in the folder
This issue might be caused by problems encountered during event processing or
while writing to a file.
Search your `hive-server2` debug logs for the following
logging hook messages:
```
Failed to close writer for file
```
```
Got exception while processing event
```
```
Error writing record for query
```
Review the issue details and see if there is anything that you need to correct
to fix the problem.
#### Some query events are missed
This issue might be caused by a logging hook thread queue
overflow.
Search your `hive-server2` debug logs for the following
logging hook message:
```
Writer queue is full. Ignoring event
```
If you find this message, consider increasing the
`dwhassessment.hook.queue.capacity` parameter.
## What's next
For more information about the `dwh-migration-dumper` tool, see
[dwh-migration-tools](https://github.com/google/dwh-migration-tools).
You can also learn more about the following steps in data warehouse migration:
- [Migration overview](https://docs.cloud.google.com/bigquery/docs/migration-intro)
- [Schema and data transfer overview](https://docs.cloud.google.com/bigquery/docs/migration/schema-data-overview)
- [Data pipelines](https://docs.cloud.google.com/bigquery/docs/migration/pipelines)
- [Batch SQL translation](https://docs.cloud.google.com/bigquery/docs/batch-sql-translator)
- [Interactive SQL translation](https://docs.cloud.google.com/bigquery/docs/interactive-sql-translator)
- [Data security and governance](https://docs.cloud.google.com/bigquery/docs/data-governance)
- [Data validation tool](https://github.com/GoogleCloudPlatform/professional-services-data-validator#data-validation-tool)