This tutorial shows you how to import an [Open Neural Network Exchange](https://onnx.ai/)
(ONNX) model that's trained with [scikit-learn](https://scikit-learn.org/stable/index.html). You import the model into a
BigQuery dataset and use it to make predictions using a SQL query.
ONNX provides a uniform format that is designed to represent any machine
learning (ML) framework. BigQuery ML support for ONNX lets you do the
following:
- Train a model using your favorite framework.
- Convert the model into the ONNX model format.
- Import the ONNX model into BigQuery and make predictions using BigQuery ML.
## Objectives
- Create and train a model using [scikit-learn](https://scikit-learn.org/stable/index.html).
- [Convert the model to ONNX format](https://github.com/onnx/tutorials#converting-to-onnx-format) using [sklearn-onnx](https://onnx.ai/sklearn-onnx/).
- Use the `CREATE MODEL` statement to import the ONNX model into BigQuery.
- Use the `ML.PREDICT` function to make predictions with the imported ONNX model.
## Costs
In this document, you use the following billable components of Google Cloud:
- [BigQuery](https://cloud.google.com/bigquery/pricing)
- [BigQuery ML](https://cloud.google.com/bigquery/pricing#bqml)
- [Cloud Storage](https://docs.cloud.google.com/storage/pricing)
To generate a cost estimate based on your projected usage,
use the [pricing calculator](https://docs.cloud.google.com/products/calculator).
New Google Cloud users might be eligible for a [free trial](https://docs.cloud.google.com/free).
When you finish the tasks that are described in this document, you can avoid
continued billing by deleting the resources that you created. For more information, see
[Clean up](https://docs.cloud.google.com/bigquery/docs/making-predictions-with-sklearn-models-in-onnx-format#clean-up).
## Before you begin
1.
[Verify that billing is enabled for your Google Cloud project](https://docs.cloud.google.com/billing/docs/how-to/verify-billing-enabled#confirm_billing_is_enabled_on_a_project).
2.
3.
Enable the BigQuery and Cloud Storage APIs, if any are not already enabled.
**Roles required to enable APIs**
To enable APIs, you need the `serviceusage.services.enable` permission. If you
created the project, then you likely already have this permission through the
Owner role (`roles/owner`). Otherwise, you can get this permission through the
Service Usage Admin role (`roles/serviceusage.serviceUsageAdmin`).
[Learn how to grant roles](https://docs.cloud.google.com/iam/docs/granting-changing-revoking-access).
[Enable the APIs](https://console.cloud.google.com/apis/enableflow?apiid=bigquery.googleapis.com,storage-component.googleapis.com)
4. Ensure that you have the [necessary permissions](https://docs.cloud.google.com/bigquery/docs/making-predictions-with-sklearn-models-in-onnx-format#required_permissions) to perform the tasks in this document.
### Required roles
If you create a new project, you're the project owner, and you're granted all
of the required Identity and Access Management (IAM) permissions that you need to complete
this tutorial.
If you're using an existing project, do the following.
Make sure that you have the following role or roles on the project:
- [BigQuery Studio Admin](https://docs.cloud.google.com/bigquery/docs/access-control#bigquery.studioUser) (`roles/bigquery.studioAdmin`)
- [Storage Object Creator](https://docs.cloud.google.com/storage/docs/access-control/iam-roles#standard-roles) (`roles/storage.objectCreator`)
#### Check for the roles
1.
In the Google Cloud console, go to the **IAM** page.
[Go to IAM](https://console.cloud.google.com/projectselector/iam-admin/iam?supportedpurview=project)
2. Select the project.
3.
In the **Principal** column, find all rows that identify you or a group that
you're included in. To learn which groups you're included in, contact your
administrator.
4. For all rows that specify or include you, check the **Role** column to see whether the list of roles includes the required roles.
#### Grant the roles
1.
In the Google Cloud console, go to the **IAM** page.
[Go to IAM](https://console.cloud.google.com/projectselector/iam-admin/iam?supportedpurview=project)
2. Select the project.
3. Click **Grant access**.
4.
In the **New principals** field, enter your user identifier.
This is typically the email address for a Google Account.
5. Click **Select a role**, then search for the role.
6. To grant additional roles, click **Add
another role** and add each additional role.
7. Click **Save**.
For more information about IAM permissions in BigQuery,
see [IAM permissions](https://docs.cloud.google.com/bigquery/docs/access-control#bq-permissions).
## Optional: Train a model and convert it to ONNX format
The following code samples show you how to train a classification model with
scikit-learn and how to convert the resulting pipeline into ONNX format. This
tutorial uses a prebuilt example model that's stored at
`gs://cloud-samples-data/bigquery/ml/onnx/pipeline_rf.onnx`. You don't have to
complete these steps if you're using the sample model.
### Train a classification model with scikit-learn
Use the following sample code to create and train a scikit-learn [pipeline](https://scikit-learn.org/stable/modules/compose.html#pipeline)
on the [Iris](https://scikit-learn.org/stable/auto_examples/datasets/plot_iris_dataset.html) dataset. For instructions about installing and using
scikit-learn, see the [scikit-learn installation guide](https://scikit-learn.org/stable/install.html).
import numpy
from sklearn.datasets import load_iris
from sklearn.pipeline import Pipeline
from sklearn.preprocessing import StandardScaler
from sklearn.ensemble import RandomForestClassifier
data = load_iris()
X = data.data[:, :4]
y = data.target
ind = numpy.arange(X.shape[0])
numpy.random.shuffle(ind)
X = X[ind, :].copy()
y = y[ind].copy()
pipe = Pipeline([('scaler', StandardScaler()),
('clr', RandomForestClassifier())])
pipe.fit(X, y)
> [!NOTE]
> **Note:** The scikit-learn pipeline lets you include models from other libraries such as [LightGBM](https://lightgbm.readthedocs.io/en/latest/) and [XGBoost](https://xgboost.readthedocs.io/en/latest/), which can be converted to ONNX by sklearn-onnx. For more information, see [Convert a pipeline](https://onnx.ai/sklearn-onnx/pipeline.html#convert-a-pipeline) and [Using
> converters from other libraries](https://onnx.ai/sklearn-onnx/tutorial_1-5_external.html#using-converters-from-other-libraries).
### Convert the pipeline into an ONNX model
Use the following sample code in [sklearn-onnx](https://onnx.ai/sklearn-onnx/) to convert the scikit-learn
pipeline into an ONNX model that's named `pipeline_rf.onnx`.
from skl2onnx import convert_sklearn
from skl2onnx.common.data_types import FloatTensorType
# Disable zipmap as it is not supported in BigQuery ML.
options = {id(pipe): {'zipmap': False}}
# Define input features. scikit-learn does not store information about the
# training dataset. It is not always possible to retrieve the number of features
# or their types. That's why the function needs another argument called initial_types.
initial_types = [
('sepal_length', FloatTensorType([None, 1])),
('sepal_width', FloatTensorType([None, 1])),
('petal_length', FloatTensorType([None, 1])),
('petal_width', FloatTensorType([None, 1])),
]
# Convert the model.
model_onnx = convert_sklearn(
pipe, 'pipeline_rf', initial_types=initial_types, options=options
)
# And save.
with open('pipeline_rf.onnx', 'wb') as f:
f.write(model_onnx.SerializeToString())
### Upload the ONNX model to Cloud Storage
After you save your model, do the following:
- [Create a Cloud Storage bucket](https://docs.cloud.google.com/storage/docs/creating-buckets) to store the model.
- [Upload the ONNX model to your Cloud Storage bucket](https://docs.cloud.google.com/storage/docs/uploading-objects).
## Create a dataset
To create a BigQuery dataset, select one of the following options:
### Console
1. In the Google Cloud console, go to the **BigQuery** page.
[Go to BigQuery](https://console.cloud.google.com/bigquery)
2. In the left pane, click
**Explorer**:

If you don't see the left pane, click
**Expand left pane** to open the pane.
3. In **Explorer** , expand your project, and then click **Datasets**.
4. On the **Datasets** page, click
**Create dataset**.
5. In the **Create dataset** pane, do the following:
- For **Dataset ID** , enter `bqml_tutorial`.
- For **Data location** , select **US**.
Leave the remaining default settings as they are.
6. Click **Create dataset**.
### bq
To create a new dataset, use the
[`bq mk --dataset` command](https://docs.cloud.google.com/bigquery/docs/reference/bq-cli-reference#mk-dataset).
1. Create a dataset named `bqml_tutorial` with the data location set to `US`:
```
bq mk --dataset \
--location=US \
--description "BigQuery ML tutorial dataset." \
bqml_tutorial
```
2. Confirm that the dataset was created:
```bash
bq ls
```
### API
Call the [`datasets.insert`](https://docs.cloud.google.com/bigquery/docs/reference/rest/v2/datasets/insert)
method with a defined [dataset resource](https://docs.cloud.google.com/bigquery/docs/reference/rest/v2/datasets):
```json
{
"datasetReference": {
"datasetId": "bqml_tutorial"
}
}
```
### BigQuery DataFrames
Before trying this sample, follow the BigQuery DataFrames
setup instructions in the [BigQuery quickstart
using BigQuery DataFrames](https://docs.cloud.google.com/bigquery/docs/dataframes-quickstart).
For more information, see the
[BigQuery DataFrames reference documentation](https://docs.cloud.google.com/python/docs/reference/bigframes/latest).
To authenticate to BigQuery, set up Application Default Credentials.
For more information, see [Set
up ADC for a local development environment](https://docs.cloud.google.com/docs/authentication/set-up-adc-local-dev-environment).
import google.cloud.bigquery
bqclient = google.cloud.https://docs.cloud.google.com/python/docs/reference/bigquery/latest.https://docs.cloud.google.com/python/docs/reference/bigquery/latest/google.cloud.bigquery.client.Client.html()
bqclient.https://docs.cloud.google.com/python/docs/reference/bigquery/latest/google.cloud.bigquery.client.Client.html#google_cloud_bigquery_client_Client_create_dataset("bqml_tutorial", exists_ok=True)
## Import the ONNX model into BigQuery
The following steps show you how to import the sample ONNX model from
Cloud Storage by using a [`CREATE MODEL`](https://docs.cloud.google.com/bigquery/docs/reference/standard-sql/bigqueryml-syntax-create-onnx) statement.
To import the ONNX model into your dataset, select one of the following options:
### Console
1. In the Google Cloud console, go to the **BigQuery Studio**
page.
[Go to BigQuery Studio](https://console.cloud.google.com/bigquery)
2. In the query editor, enter the following `CREATE MODEL` statement.
```googlesql
CREATE OR REPLACE MODEL `bqml_tutorial.imported_onnx_model`
OPTIONS (MODEL_TYPE='ONNX',
MODEL_PATH='BUCKET_PATH')
```
Replace `BUCKET_PATH` with the path to the model
that you uploaded to Cloud Storage. If you're using the sample model,
replace `BUCKET_PATH` with the following value:
`gs://cloud-samples-data/bigquery/ml/onnx/pipeline_rf.onnx`.
When the operation is complete, you see a message similar to the
following: `Successfully created model named imported_onnx_model`.
Your new model appears in the **Resources** panel. Models are
indicated by the model icon:

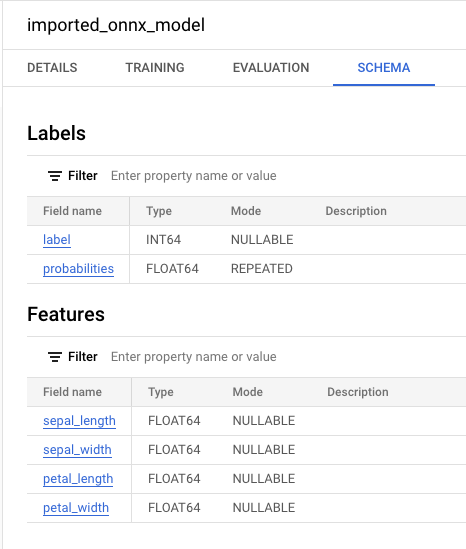
If you select the new model in the **Resources** panel, information
about the model appears adjacent to the **Query editor**.
### bq
1. Import the ONNX model from Cloud Storage by entering the
following `CREATE MODEL` statement.
```googlesql
bq query --use_legacy_sql=false \
"CREATE OR REPLACE MODEL
`bqml_tutorial.imported_onnx_model`
OPTIONS
(MODEL_TYPE='ONNX',
MODEL_PATH='BUCKET_PATH')"
```
Replace `BUCKET_PATH` with the path to the model
that you uploaded to Cloud Storage. If you're using the sample model,
replace `BUCKET_PATH` with the following value:
`gs://cloud-samples-data/bigquery/ml/onnx/pipeline_rf.onnx`.
When the operation is complete, you see a message similar to the
following: `Successfully created model named imported_onnx_model`.
2. After you import the model, verify that the model appears in the
dataset.
```
bq ls -m bqml_tutorial
```
The output is similar to the following:
```bash
tableId Type
--- ---
imported_onnx_model MODEL
```
### BigQuery DataFrames
Before trying this sample, follow the BigQuery DataFrames
setup instructions in the [BigQuery quickstart
using BigQuery DataFrames](https://docs.cloud.google.com/bigquery/docs/dataframes-quickstart).
For more information, see the
[BigQuery DataFrames reference documentation](https://docs.cloud.google.com/python/docs/reference/bigframes/latest).
To authenticate to BigQuery, set up Application Default Credentials.
For more information, see [Set
up ADC for a local development environment](https://docs.cloud.google.com/docs/authentication/set-up-adc-local-dev-environment).
Create the model by using the [`bigframes.bigquery.ml.create_model`](https://dataframes.bigquery.dev/reference/api/bigframes.bigquery.ml.create_model.html#bigframes.bigquery.ml.create_model) function.
import https://docs.cloud.google.com/python/docs/reference/bigframes/latest
import bigframes.pandas as bpd
from bigframes.bigquery import https://docs.cloud.google.com/python/docs/reference/bigframes/latest/bigframes.bigquery.ml.html
https://docs.cloud.google.com/python/docs/reference/bigframes/latest.options.bigquery.project = PROJECT_ID
# You can change the location to one of the valid locations: https://cloud.google.com/bigquery/docs/locations#supported_locations
https://docs.cloud.google.com/python/docs/reference/bigframes/latest.options.bigquery.location = "US"
# Set partial ordering mode for BigQuery DataFrames.
# For more information, see the BigQuery DataFrames performance documentation:
# https://cloud.google.com/bigquery/docs/dataframes-performance#partial-ordering-mode
bpd.options.bigquery.ordering_mode = "partial"
# Use ml.create_model to create and import the model in BigQuery.
# The options parameter specifies the model type and the Cloud Storage path.
# For more information, see the BigQuery DataFrames API reference documentation:
# https://dataframes.bigquery.dev/reference/api/bigframes.bigquery.ml.create_model.html#bigframes.bigquery.ml.create_model
https://docs.cloud.google.com/python/docs/reference/bigframes/latest/bigframes.bigquery.ml.html.https://docs.cloud.google.com/python/docs/reference/bigframes/latest/bigframes.bigquery.ml.html(
your_model_id, # For example: "bqml_tutorial.imported_onnx_model"
options={
"model_type": "ONNX",
"model_path": "gs://cloud-samples-data/bigquery/ml/onnx/pipeline_rf.onnx",
},
replace=True,
)
For more information about importing ONNX models into BigQuery,
including format and storage requirements, see [The `CREATE MODEL` statement for
importing ONNX models](https://docs.cloud.google.com/bigquery/docs/reference/standard-sql/bigqueryml-syntax-create-onnx).
## Make predictions with the imported ONNX model
After importing the ONNX model, you use the [`ML.PREDICT` function](https://docs.cloud.google.com/bigquery/docs/reference/standard-sql/bigqueryml-syntax-predict) to make
predictions with the model.
The query in the following steps uses `imported_onnx_model` to make predictions
using input data from the `iris` table in the `ml_datasets` public dataset. The
ONNX model expects four `FLOAT` values as input:
- `sepal_length`
- `sepal_width`
- `petal_length`
- `petal_width`
These inputs match the `initial_types` that were defined when you [converted the
model into ONNX format](https://github.com/onnx/tutorials#converting-to-onnx-format).
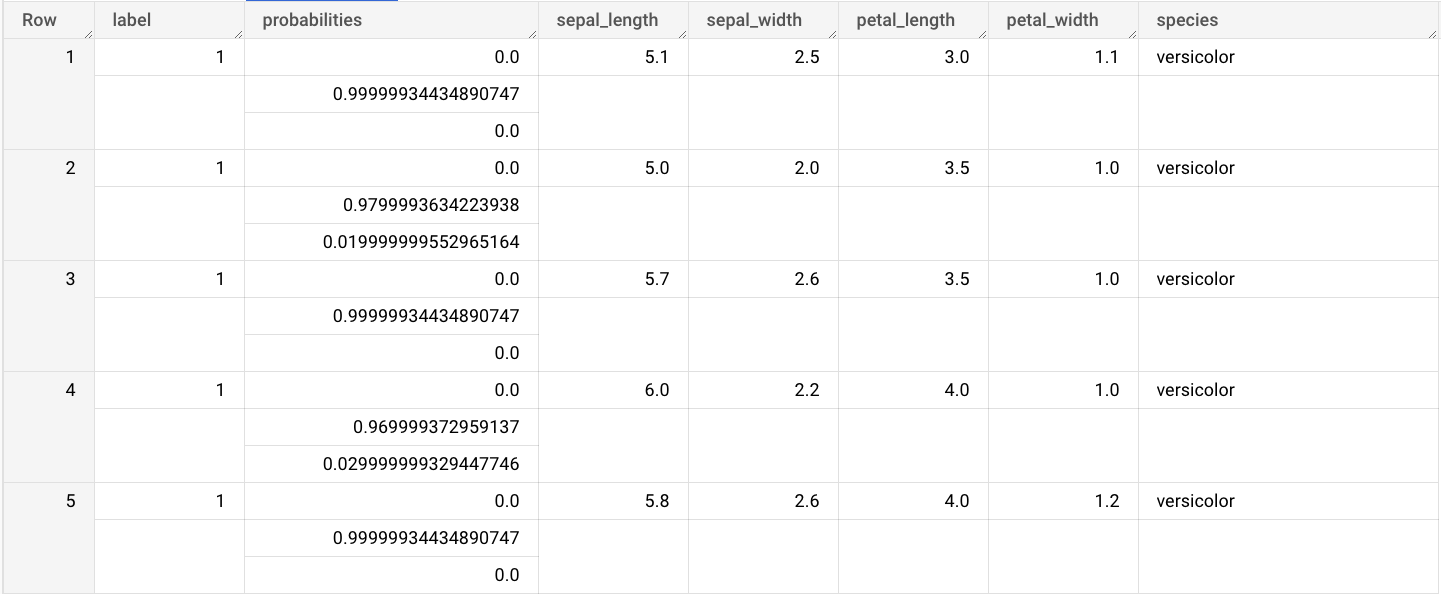
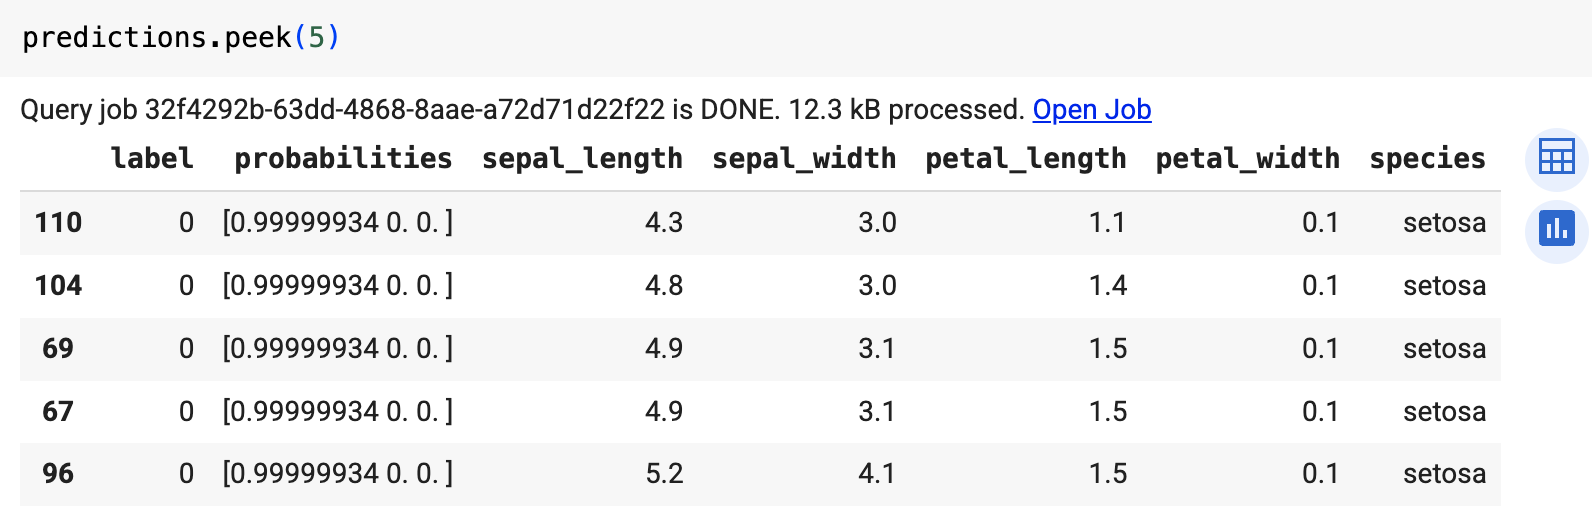
The outputs include the `label` and `probabilities` columns, and the columns
from the input table. `label` represents the predicted class label.
`probabilities` is an array of probabilities representing probabilities for
each class.
To make predictions with the imported ONNX model, choose
one of the following options:
### Console
1. Go to the **BigQuery Studio** page.
[Go to BigQuery Studio](https://console.cloud.google.com/bigquery)
2. In the query editor, enter this query that uses the `ML.PREDICT`
function.
```googlesql
SELECT *
FROM ML.PREDICT(MODEL `bqml_tutorial.imported_onnx_model`,
(
SELECT * FROM `bigquery-public-data.ml_datasets.iris`
)
)
```
The query results are similar to the following:
### bq
Run the query that uses `ML.PREDICT`.
```
bq query --use_legacy_sql=false \
'SELECT *
FROM ML.PREDICT(
MODEL `example_dataset.imported_onnx_model`,
(SELECT * FROM `bigquery-public-data.ml_datasets.iris`))'
```
### BigQuery DataFrames
Before trying this sample, follow the BigQuery DataFrames
setup instructions in the [BigQuery quickstart
using BigQuery DataFrames](https://docs.cloud.google.com/bigquery/docs/dataframes-quickstart).
For more information, see the
[BigQuery DataFrames reference documentation](https://docs.cloud.google.com/python/docs/reference/bigframes/latest).
To authenticate to BigQuery, set up Application Default Credentials.
For more information, see [Set
up ADC for a local development environment](https://docs.cloud.google.com/docs/authentication/set-up-adc-local-dev-environment).
Use the [`bigframes.bigquery.ml.predict`](https://dataframes.bigquery.dev/reference/api/bigframes.bigquery.ml.predict.html#bigframes.bigquery.ml.predict) function to run the ONNX model.
import bigframes.pandas as bpd
from bigframes.bigquery import ml
# Set partial ordering mode for BigQuery DataFrames.
# For more information, see the BigQuery DataFrames performance documentation:
# https://cloud.google.com/bigquery/docs/dataframes-performance#partial-ordering-mode
bpd.options.bigquery.ordering_mode = "partial"
df = bpd.read_gbq("bigquery-public-data.ml_datasets.iris")
# Use the ml.predict method to predict results using your model.
# For more information, see the BigQuery DataFrames API reference documentation:
# https://dataframes.bigquery.dev/reference/api/bigframes.bigquery.ml.predict.html#bigframes.bigquery.ml.predict
predictions = ml.https://docs.cloud.google.com/python/docs/reference/bigframes/latest/bigframes.bigquery.ml.html(
your_model_id, # For example: "bqml_tutorial.imported_onnx_model"
input_=df,
)
predictions.peek(5)
The result is similar to the following:
## Clean up
To avoid incurring charges to your Google Cloud account for the resources used in this
tutorial, either delete the project that contains the resources, or keep the project and
delete the individual resources.
### Delete the project
### Console
> [!CAUTION]
> **Caution** : Deleting a project has the following effects:
>
> - **Everything in the project is deleted.** If you used an existing project for the tasks in this document, when you delete it, you also delete any other work you've done in the project.
> - **Custom project IDs are lost.** When you created this project, you might have created a custom project ID that you want to use in the future. To preserve the URLs that use the project ID, such as an `appspot.com` URL, delete selected resources inside the project instead of deleting the whole project.
>
>
> If you plan to explore multiple architectures, tutorials, or quickstarts, reusing projects
> can help you avoid exceeding project quota limits.
1. In the Google Cloud console, go to the **Manage resources** page.
[Go to Manage resources](https://console.cloud.google.com/iam-admin/projects)
2. In the project list, select the project that you want to delete, and then click **Delete**.
3. In the dialog, type the project ID, and then click **Shut down** to delete the project.
### gcloud
> [!CAUTION]
> **Caution** : Deleting a project has the following effects:
>
> - **Everything in the project is deleted.** If you used an existing project for the tasks in this document, when you delete it, you also delete any other work you've done in the project.
> - **Custom project IDs are lost.** When you created this project, you might have created a custom project ID that you want to use in the future. To preserve the URLs that use the project ID, such as an `appspot.com` URL, delete selected resources inside the project instead of deleting the whole project.
>
>
> If you plan to explore multiple architectures, tutorials, or quickstarts, reusing projects
> can help you avoid exceeding project quota limits.
1. Delete a Google Cloud project:
```
gcloud projects delete PROJECT_ID
```
### Delete individual resources
Alternatively, to remove the individual resources used in this tutorial, do the
following:
1. [Delete the imported model](https://docs.cloud.google.com/bigquery/docs/deleting-models).
2. Optional: [Delete the dataset](https://docs.cloud.google.com/bigquery/docs/managing-datasets#delete-datasets).
## What's next
- For more information about importing ONNX models, see [The `CREATE MODEL` statement for ONNX models](https://docs.cloud.google.com/bigquery/docs/reference/standard-sql/bigqueryml-syntax-create-onnx).
- For more information about available ONNX converters and tutorials, see [Converting to ONNX format](https://github.com/onnx/tutorials#converting-to-onnx-format).
- For an overview of BigQuery ML, see [Introduction to BigQuery ML](https://docs.cloud.google.com/bigquery/docs/bqml-introduction).
- To get started using BigQuery ML, see [Create machine learning models in BigQuery ML](https://docs.cloud.google.com/bigquery/docs/create-machine-learning-model).