In this tutorial, you use a binary
[logistic regression model](https://docs.cloud.google.com/bigquery/docs/reference/standard-sql/bigqueryml-syntax-create-glm)
in BigQuery ML to predict the income range of individuals based on their
demographic data. A binary logistic regression model predicts whether a
value falls into one of two categories, in this case whether an individual's
annual income falls above or below $50,000.
This tutorial uses the
[`bigquery-public-data.ml_datasets.census_adult_income`](https://console.cloud.google.com/bigquery?p=bigquery-public-data&d=ml_datasets&t=census_adult_income&page=table)
dataset. This dataset contains the demographic and income information of US
residents from 2000 and 2010.
## Objectives
In this tutorial you will perform the following tasks:
- Create a logistic regression model.
- Evaluate the model.
- Make predictions by using the model.
- Explain the results produced by the model.
## Costs
This tutorial uses billable components of Google Cloud, including the following:
- BigQuery
- BigQuery ML
For more information on BigQuery costs, see the
[BigQuery pricing](https://cloud.google.com/bigquery/pricing) page.
For more information on BigQuery ML costs, see
[BigQuery ML pricing](https://cloud.google.com/bigquery/pricing#bqml).
## Before you begin
1. In the Google Cloud console, on the project selector page,
select or create a Google Cloud project.
**Roles required to select or create a project**
- **Select a project**: Selecting a project doesn't require a specific IAM role---you can select any project that you've been granted a role on.
- **Create a project** : To create a project, you need the Project Creator role (`roles/resourcemanager.projectCreator`), which contains the `resourcemanager.projects.create` permission. [Learn how to grant
roles](https://docs.cloud.google.com/iam/docs/granting-changing-revoking-access).
> [!NOTE]
> **Note**: If you don't plan to keep the resources that you create in this procedure, create a project instead of selecting an existing project. After you finish these steps, you can delete the project, removing all resources associated with the project.
[Go to project selector](https://console.cloud.google.com/projectselector2/home/dashboard)
2.
[Verify that billing is enabled for your Google Cloud project](https://docs.cloud.google.com/billing/docs/how-to/verify-billing-enabled#confirm_billing_is_enabled_on_a_project).
3.
Enable the BigQuery API, if it is not already enabled.
**Roles required to enable APIs**
To enable APIs, you need the `serviceusage.services.enable` permission. If you
created the project, then you likely already have this permission through the
Owner role (`roles/owner`). Otherwise, you can get this permission through the
Service Usage Admin role (`roles/serviceusage.serviceUsageAdmin`).
[Learn how to grant roles](https://docs.cloud.google.com/iam/docs/granting-changing-revoking-access).
[Enable the API](https://console.cloud.google.com/apis/enableflow?apiid=bigquery.googleapis.com)
## Required permissions
To create the model using BigQuery ML, you need the following
IAM permissions:
- `bigquery.jobs.create`
- `bigquery.models.create`
- `bigquery.models.getData`
- `bigquery.models.updateData`
- `bigquery.models.updateMetadata`
To run inference, you need the following permissions:
- `bigquery.models.getData` on the model
- `bigquery.jobs.create`
## Introduction
A common task in machine learning is to classify data into one of two types,
known as labels. For example, a retailer might want to predict whether a given
customer will purchase a new product, based on other information about that
customer. In that case, the two labels might be `will buy` and `won't buy`. The
retailer can construct a dataset such that one column represents both labels,
and also contains customer information such as the customer's location, their
previous purchases, and their reported preferences. The retailer can then use a
binary logistic regression model that uses this customer information to predict
which label best represents each customer.
In this tutorial, you create a binary logistic regression model that predicts
whether a US Census respondent's income falls into one of two ranges based on
the respondent's demographic attributes.
## Create a dataset
Create a BigQuery dataset to store your model:
1. In the Google Cloud console, go to the **BigQuery** page.
[Go to BigQuery](https://console.cloud.google.com/bigquery)
2. In the left pane, click **Explorer**:

If you don't see the left pane, click **Expand left pane** to open the pane.
3. In the **Explorer** pane, click your project name.
4. Click **View actions \> Create dataset**.
5. On the **Create dataset** page, do the following:
- For **Dataset ID** , enter `census`.
- For **Location type** , select **Multi-region** , and then select **US (multiple regions in United States)**.
The public datasets are stored in the
`US` [multi-region](https://docs.cloud.google.com/bigquery/docs/locations#multi-regions). For
simplicity, store your dataset in the same location.
- Leave the remaining default settings as they are, and click **Create dataset**.
## Examine the data
Examine the dataset and identify which columns to use as
training data for the logistic regression model. Select 100 rows from the
`census_adult_income` table:
### SQL
1. In the Google Cloud console, go to the **BigQuery** page.
[Go to BigQuery](https://console.cloud.google.com/bigquery)
2. In the query editor, run the following GoogleSQL query:
```googlesql
SELECT
age,
workclass,
marital_status,
education_num,
occupation,
hours_per_week,
income_bracket,
functional_weight
FROM
`bigquery-public-data.ml_datasets.census_adult_income`
LIMIT
100;
```
3. The results look similar to the following:

### BigQuery DataFrames
Before trying this sample, follow the BigQuery DataFrames
setup instructions in the [BigQuery quickstart
using BigQuery DataFrames](https://docs.cloud.google.com/bigquery/docs/dataframes-quickstart).
For more information, see the
[BigQuery DataFrames reference documentation](https://docs.cloud.google.com/python/docs/reference/bigframes/latest).
To authenticate to BigQuery, set up Application Default Credentials.
For more information, see [Set
up ADC for a local development environment](https://docs.cloud.google.com/docs/authentication/set-up-adc-local-dev-environment).
import bigframes.pandas as bpd
# Set partial ordering mode for BigQuery DataFrames.
# For more information, see the BigQuery DataFrames performance documentation:
# https://cloud.google.com/bigquery/docs/dataframes-performance#partial-ordering-mode
bpd.options.bigquery.ordering_mode = "partial"
df = bpd.read_gbq(
"bigquery-public-data.ml_datasets.census_adult_income",
columns=(
"age",
"workclass",
"marital_status",
"education_num",
"occupation",
"hours_per_week",
"income_bracket",
"functional_weight",
),
max_results=100,
)
df.peek()
# Output:
# age workclass marital_status education_num occupation hours_per_week income_bracket functional_weight
# 47 Local-gov Married-civ-spouse 13 Prof-specialty 40 >50K 198660
# 56 Private Never-married 9 Adm-clerical 40 <=50K 85018
# 40 Private Married-civ-spouse 12 Tech-support 40 >50K 285787
# 34 Self-emp-inc Married-civ-spouse 9 Craft-repair 54 >50K 207668
# 23 Private Married-civ-spouse 10 Handlers-cleaners 40 <=50K 40060
The query results show that the `income_bracket` column in the
`census_adult_income` table has only one of two values: `<=50K` or `>50K`.
## Prepare the sample data
In this tutorial, you predict census respondent income based on values of the
following columns in the `census_adult_income` table:
- `age`: the age of the respondent.
- `workclass`: class of work performed. For example local government, private, or self-employed.
- `marital_status`
- `education_num`: the respondent's highest level of education.
- `occupation`
- `hours_per_week`: hours worked per week.
You exclude columns that duplicate data. For example, the `education` column,
because the `education` and `education_num` column values express the
same data in different formats.
The `functional_weight` column is the number of individuals that the census
organization believes a particular row represents. Because the value of this
column is unrelated to the value of the `income_bracket` for any given row, you
use the value in this column to separate the data into training, evaluation,
and prediction sets by creating a new `dataframe` column that is derived from
the `functional_weight` column. You label 80% of the data for training the
model, 10% of data for evaluation, and 10% of the data for prediction.
### SQL
Create a [view](https://docs.cloud.google.com/bigquery/docs/views-intro) with the sample data.
This view is used by the `CREATE MODEL` statement later in this tutorial.
Run the query that prepares the sample data:
1. In the Google Cloud console, go to the **BigQuery** page.
[Go to BigQuery](https://console.cloud.google.com/bigquery)
2. In the query editor, run the following query:
```googlesql
CREATE OR REPLACE VIEW
`census.input_data` AS
SELECT
age,
workclass,
marital_status,
education_num,
occupation,
hours_per_week,
income_bracket,
CASE
WHEN MOD(functional_weight, 10) < 8 THEN 'training'
WHEN MOD(functional_weight, 10) = 8 THEN 'evaluation'
WHEN MOD(functional_weight, 10) = 9 THEN 'prediction'
END AS dataframe
FROM
`bigquery-public-data.ml_datasets.census_adult_income`;
```
3. View the sample data:
```googlesql
SELECT * FROM `census.input_data`;
```
### BigQuery DataFrames
Create a `DataFrame` called `input_data`. You use `input_data` later in
this tutorial to train the model, evaluate it, and make predictions.
Before trying this sample, follow the BigQuery DataFrames
setup instructions in the [BigQuery quickstart
using BigQuery DataFrames](https://docs.cloud.google.com/bigquery/docs/dataframes-quickstart).
For more information, see the
[BigQuery DataFrames reference documentation](https://docs.cloud.google.com/python/docs/reference/bigframes/latest).
To authenticate to BigQuery, set up Application Default Credentials.
For more information, see [Set
up ADC for a local development environment](https://docs.cloud.google.com/docs/authentication/set-up-adc-local-dev-environment).
import bigframes.pandas as bpd
# Set partial ordering mode for BigQuery DataFrames.
# For more information, see the BigQuery DataFrames performance documentation:
# https://cloud.google.com/bigquery/docs/dataframes-performance#partial-ordering-mode
bpd.options.bigquery.ordering_mode = "partial"
input_data = bpd.read_gbq(
"bigquery-public-data.ml_datasets.census_adult_income",
columns=(
"age",
"workclass",
"marital_status",
"education_num",
"occupation",
"hours_per_week",
"income_bracket",
"functional_weight",
),
)
input_data["dataframe"] = input_data["functional_weight"].case_when(
[
(((input_data["functional_weight"] % 10) == 8), "evaluation"),
(((input_data["functional_weight"] % 10) == 9), "prediction"),
(True, "training"),
]
)
del input_data["functional_weight"]
## Create a logistic regression model
Create a logistic regression model with the training data you labeled in the
previous section.
### SQL
Use the
[`CREATE MODEL` statement](https://docs.cloud.google.com/bigquery/docs/reference/standard-sql/bigqueryml-syntax-create-glm)
and specify `LOGISTIC_REG` for the model type.
The following are useful things to know about the `CREATE MODEL` statement:
- The [`input_label_cols`](https://docs.cloud.google.com/bigquery/docs/reference/standard-sql/bigqueryml-syntax-create-glm#input_label_cols)
option specifies which column in the `SELECT` statement to use as the label
column. Here, the label column is `income_bracket`, so the model learns
which of the two values of `income_bracket` is most likely for a given row
based on the other values present in that row.
- It is not necessary to specify whether a logistic regression model is binary
or multiclass. BigQuery ML determines which type of model to
train based on the number of unique values in the label column.
- The [`auto_class_weights`](https://docs.cloud.google.com/bigquery/docs/reference/standard-sql/bigqueryml-syntax-create-glm#auto_class_weights)
option is set to `TRUE` in order to balance the class labels in the training
data. By default, the training data is unweighted. If the labels in the
training data are imbalanced, the model may learn to predict the most
popular class of labels more heavily. In this case, most of the respondents
in the dataset are in the lower income bracket. This may lead to a model
that predicts the lower income bracket too heavily. Class weights balance
the class labels by calculating the weights for each class in inverse
proportion to the frequency of that class.
- The [`enable_global_explain` option](https://docs.cloud.google.com/bigquery/docs/reference/standard-sql/bigqueryml-syntax-create-glm#enable_global_explain)
is set to `TRUE` in order to let you
[use the `ML.GLOBAL_EXPLAIN` function on the model](https://docs.cloud.google.com/bigquery/docs/logistic-regression-prediction#globally_explain_the_model)
later in the tutorial.
- The [`SELECT` statement](https://docs.cloud.google.com/bigquery/docs/reference/standard-sql/bigqueryml-syntax-create-glm#query_statement)
queries the `input_data` view that contains the sample data. The `WHERE`
clause filters the rows so that only those rows labeled as
training data are used to train the model.
Run the query that creates your logistic regression model:
1. In the Google Cloud console, go to the **BigQuery** page.
[Go to BigQuery](https://console.cloud.google.com/bigquery)
2. In the query editor, run the following query:
```googlesql
CREATE OR REPLACE MODEL
`census.census_model`
OPTIONS
( model_type='LOGISTIC_REG',
auto_class_weights=TRUE,
enable_global_explain=TRUE,
data_split_method='NO_SPLIT',
input_label_cols=['income_bracket'],
max_iterations=15) AS
SELECT * EXCEPT(dataframe)
FROM
`census.input_data`
WHERE
dataframe = 'training'
```
3. In the left pane, click **Explorer**:

4. In the **Explorer** pane, click **Datasets**.
5. In the **Datasets** pane, click `census`.
6. Click the **Models** tab.
7. Click `census_model`.
8. The **Details** tab lists the attributes
that BigQuery ML used to perform logistic regression.
### BigQuery DataFrames
Use the
[`bigframes.bigquery.ml.create_model`](https://dataframes.bigquery.dev/reference/api/bigframes.bigquery.ml.create_model.html#bigframes.bigquery.ml.create_model)
function to train and save the model to your dataset.
Before trying this sample, follow the BigQuery DataFrames
setup instructions in the [BigQuery quickstart
using BigQuery DataFrames](https://docs.cloud.google.com/bigquery/docs/dataframes-quickstart).
For more information, see the
[BigQuery DataFrames reference documentation](https://docs.cloud.google.com/python/docs/reference/bigframes/latest).
To authenticate to BigQuery, set up Application Default Credentials.
For more information, see [Set
up ADC for a local development environment](https://docs.cloud.google.com/docs/authentication/set-up-adc-local-dev-environment).
import bigframes.pandas as bpd
from bigframes.bigquery import ml
# Set partial ordering mode for BigQuery DataFrames.
# For more information, see the BigQuery DataFrames performance documentation:
# https://cloud.google.com/bigquery/docs/dataframes-performance#partial-ordering-mode
bpd.options.bigquery.ordering_mode = "partial"
# input_data is defined in an earlier step.
training_data = input_data[input_data["dataframe"] == "training"].drop(
columns=["dataframe"]
)
# For more information, see the BigQuery DataFrames API reference documentation:
# https://dataframes.bigquery.dev/reference/api/bigframes.bigquery.ml.create_model.html#bigframes.bigquery.ml.create_model
ml.https://docs.cloud.google.com/python/docs/reference/bigframes/latest/bigframes.bigquery.ml.html(
your_model_id, # For example: "your-project.census.census_model"
options={
"model_type": "LOGISTIC_REG",
# Balance the class labels in the training data by setting
# auto_class_weights=True.
#
# By default, the training data is unweighted. If the labels
# in the training data are imbalanced, the model may learn to
# predict the most popular class of labels more heavily. In
# this case, most of the respondents in the dataset are in the
# lower income bracket. This may lead to a model that predicts
# the lower income bracket too heavily. Class weights balance
# the class labels by calculating the weights for each class in
# inverse proportion to the frequency of that class.
"auto_class_weights": True,
"enable_global_explain": True,
"data_split_method": "NO_SPLIT",
"input_label_cols": ["income_bracket"],
"max_iterations": 15,
},
training_data=training_data,
replace=True,
)
## Evaluate the model's performance
After creating the model, evaluate the model's performance against the
evaluation data.
### SQL
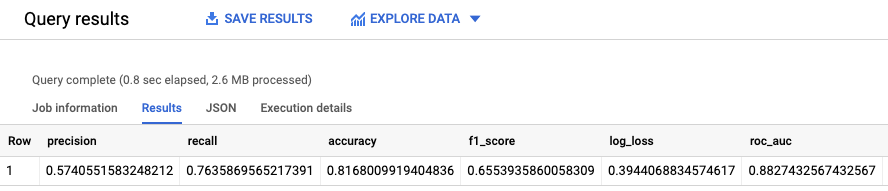
The
[`ML.EVALUATE` function](https://docs.cloud.google.com/bigquery/docs/reference/standard-sql/bigqueryml-syntax-evaluate) evaluates the predicted values generated by the model against the
evaluation data.
For input, the `ML.EVALUATE` function takes the trained model and the rows
from the`input_data` view that have `evaluation` as the `dataframe` column
value. The function returns a single row of statistics about the model.
Run the `ML.EVALUATE` query:
1. In the Google Cloud console, go to the **BigQuery** page.
[Go to BigQuery](https://console.cloud.google.com/bigquery)
2. In the query editor, run the following query:
```googlesql
SELECT
*
FROM
ML.EVALUATE (MODEL `census.census_model`,
(
SELECT
*
FROM
`census.input_data`
WHERE
dataframe = 'evaluation'
)
);
```
3. The results look similar to the following:
### BigQuery DataFrames
Use the
[`bigframes.bigquery.ml.evaluate`](https://dataframes.bigquery.dev/reference/api/bigframes.bigquery.ml.evaluate.html#bigframes.bigquery.ml.evaluate)
function to evaluate the model against the actual data.
Before trying this sample, follow the BigQuery DataFrames
setup instructions in the [BigQuery quickstart
using BigQuery DataFrames](https://docs.cloud.google.com/bigquery/docs/dataframes-quickstart).
For more information, see the
[BigQuery DataFrames reference documentation](https://docs.cloud.google.com/python/docs/reference/bigframes/latest).
To authenticate to BigQuery, set up Application Default Credentials.
For more information, see [Set
up ADC for a local development environment](https://docs.cloud.google.com/docs/authentication/set-up-adc-local-dev-environment).
import bigframes.pandas as bpd
from bigframes.bigquery import ml
# Set partial ordering mode for BigQuery DataFrames.
# For more information, see the BigQuery DataFrames performance documentation:
# https://cloud.google.com/bigquery/docs/dataframes-performance#partial-ordering-mode
bpd.options.bigquery.ordering_mode = "partial"
# input_data is defined in an earlier step.
evaluation_data = input_data[input_data["dataframe"] == "evaluation"]
# For more information, see the BigQuery DataFrames API reference documentation:
# https://dataframes.bigquery.dev/reference/api/bigframes.bigquery.ml.evaluate.html#bigframes.bigquery.ml.evaluate
ml.https://docs.cloud.google.com/python/docs/reference/bigframes/latest/bigframes.bigquery.ml.html(
your_model_id, # For example: "your-project.census.census_model"
input_=evaluation_data,
)
# Output:
# precision recall accuracy f1_score log_loss roc_auc
# 0 0.685764 0.536685 0.83819 0.602134 0.350417 0.882953
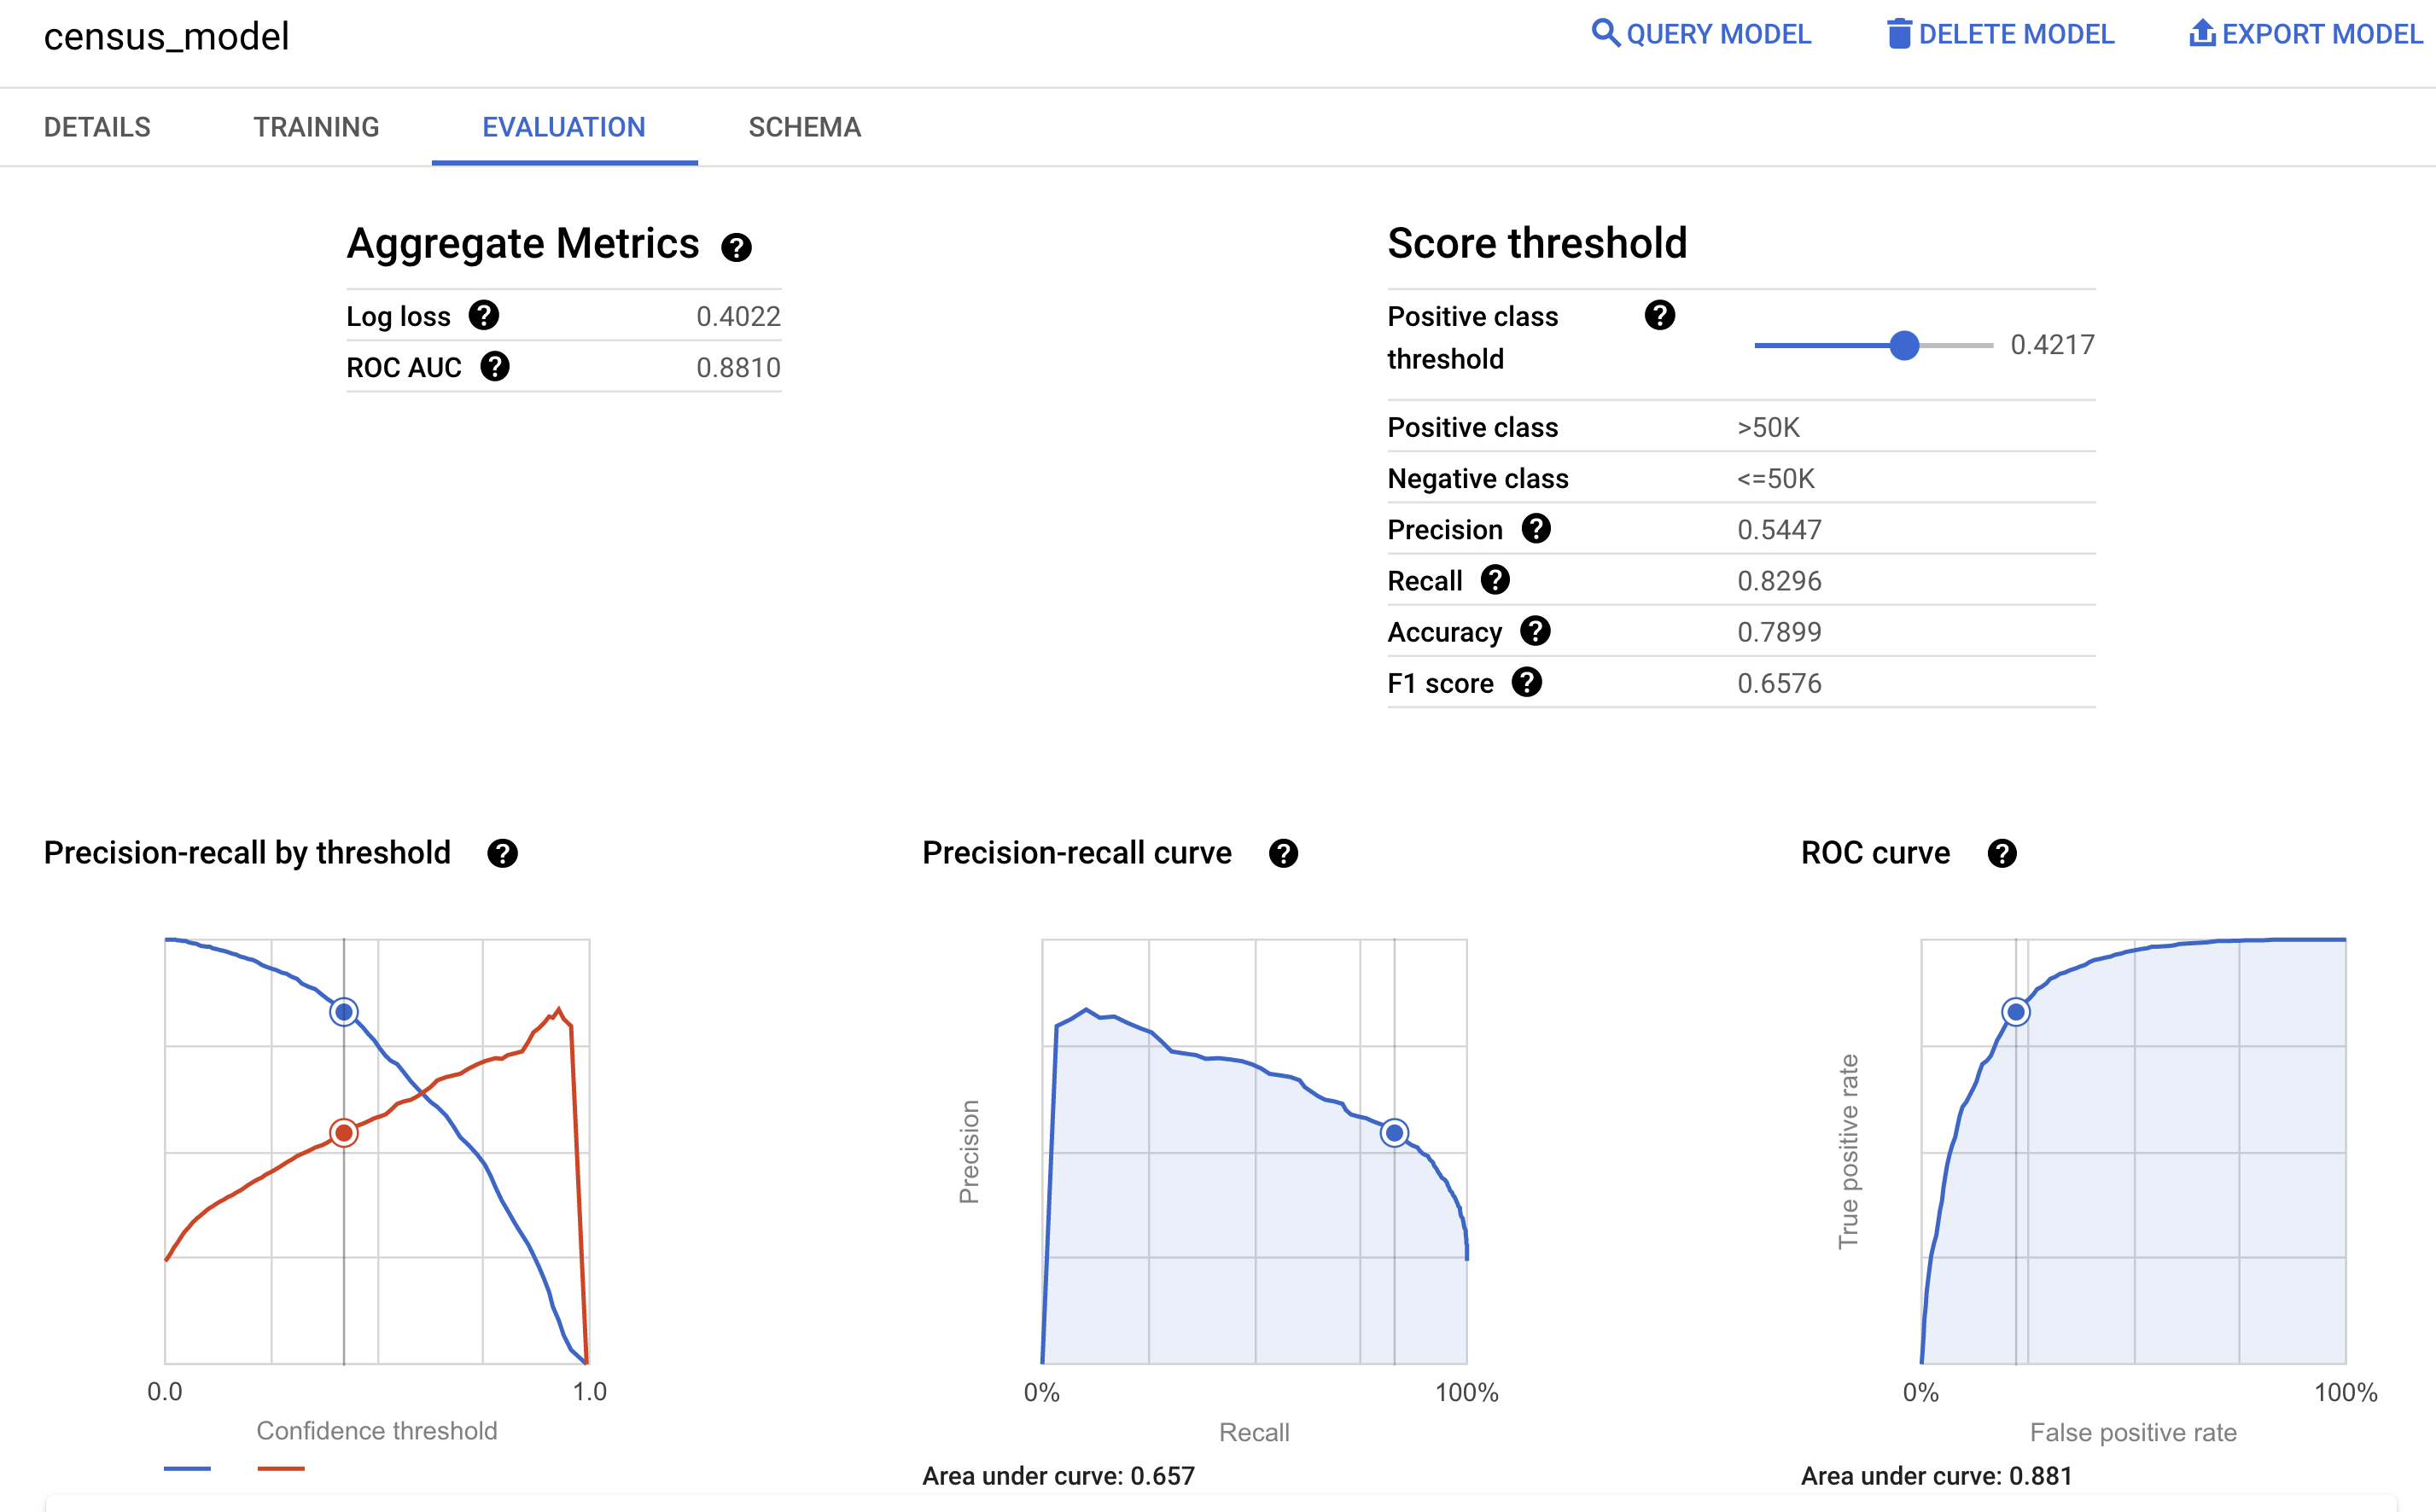
You can also look at the model's **Evaluation** pane in the Google Cloud console
to view the evaluation metrics calculated during the training:
## Predict the income bracket
Use the model to predict the most likely income bracket for each respondent.
### SQL
Use the
[`ML.PREDICT` function](https://docs.cloud.google.com/bigquery/docs/reference/standard-sql/bigqueryml-syntax-predict)
to make predictions about the likely income bracket. For input, the
`ML.PREDICT` function takes the trained model and the rows from the
`input_data` view that have `prediction` as the `dataframe` column value.
Run the `ML.PREDICT` query:
1. In the Google Cloud console, go to the **BigQuery** page.
[Go to BigQuery](https://console.cloud.google.com/bigquery)
2. In the query editor, run the following query:
```googlesql
SELECT
*
FROM
ML.PREDICT (MODEL `census.census_model`,
(
SELECT
*
FROM
`census.input_data`
WHERE
dataframe = 'prediction'
)
);
```
3. The results look similar to the following:
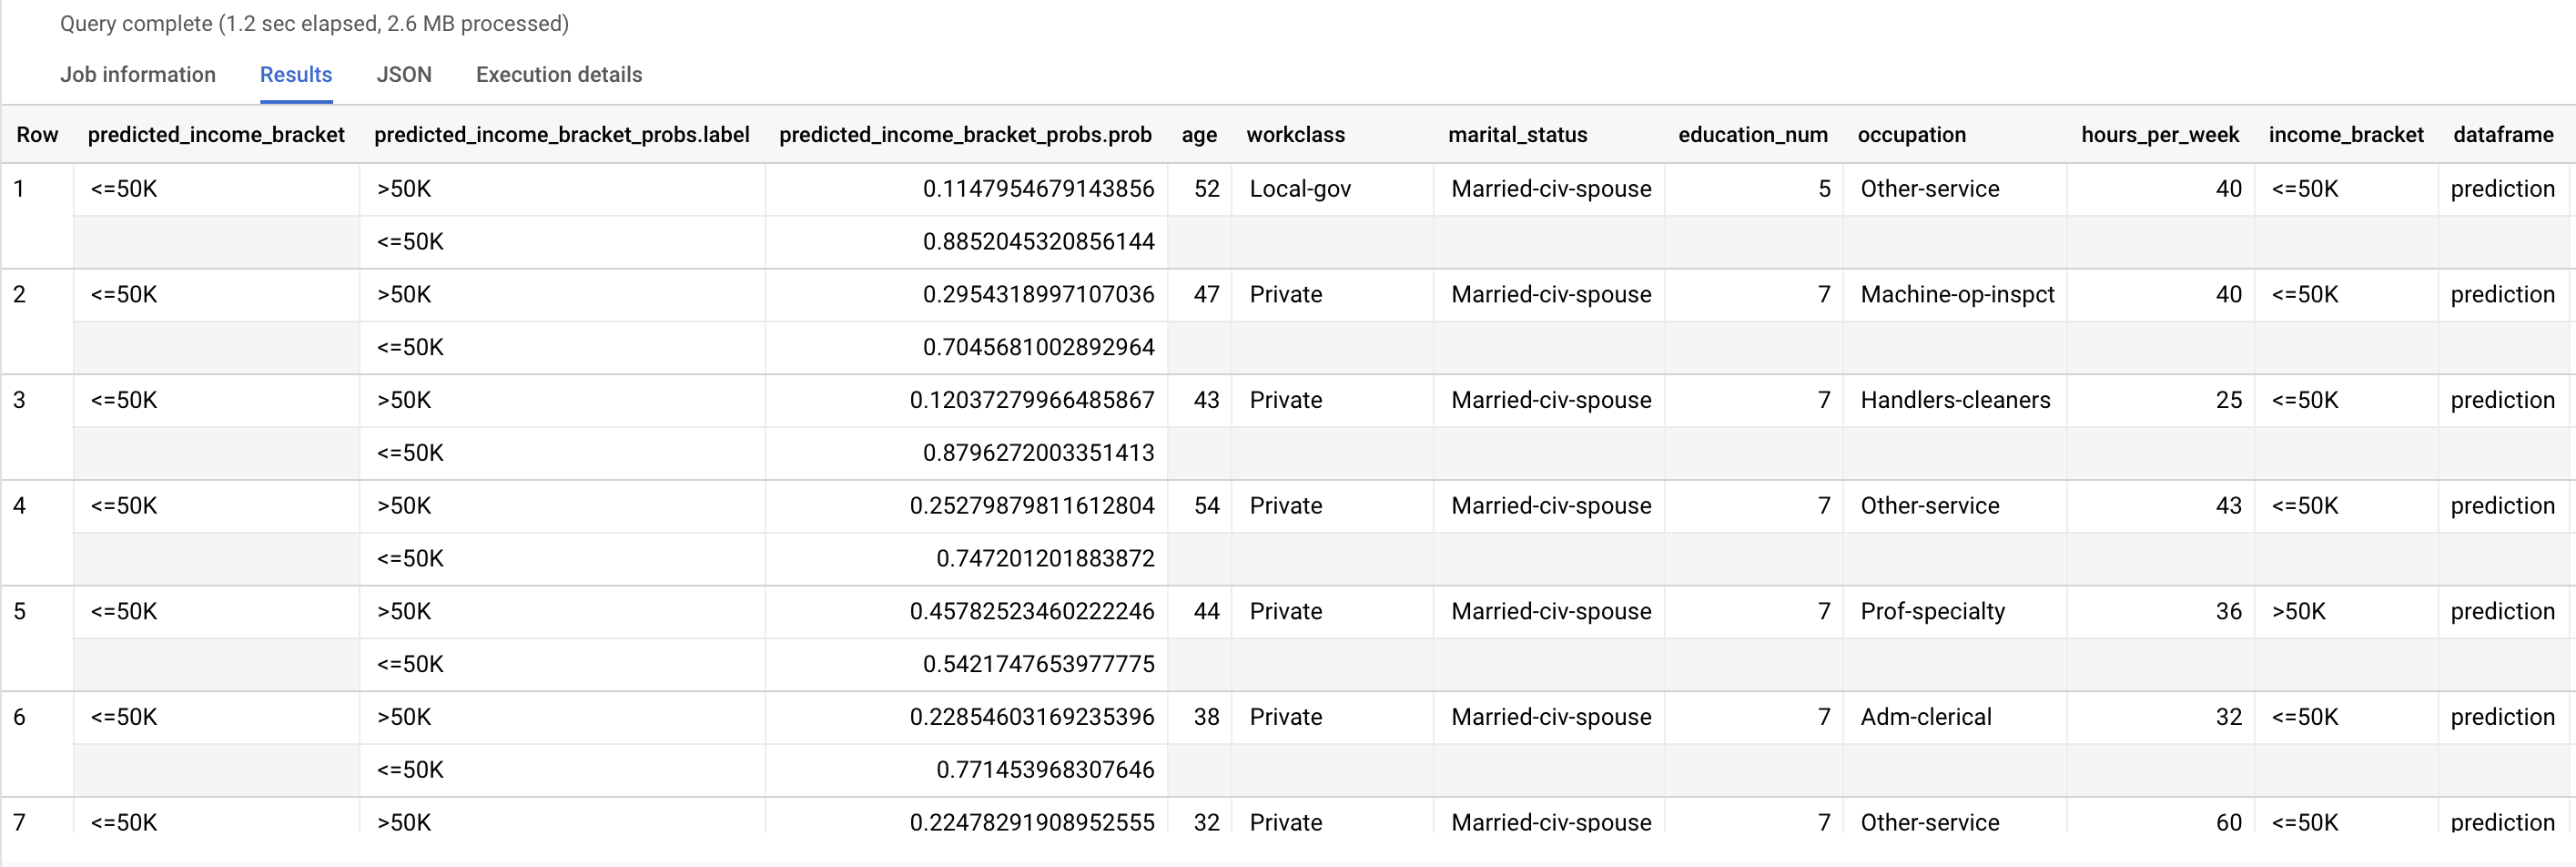
The `predicted_income_bracket` column contains the predicted income bracket
for the respondent.
### BigQuery DataFrames
Use the
[`bigframes.bigquery.ml.predict`](https://dataframes.bigquery.dev/reference/api/bigframes.bigquery.ml.predict.html#bigframes.bigquery.ml.predict)
function to make predictions about the likely income bracket.
Before trying this sample, follow the BigQuery DataFrames
setup instructions in the [BigQuery quickstart
using BigQuery DataFrames](https://docs.cloud.google.com/bigquery/docs/dataframes-quickstart).
For more information, see the
[BigQuery DataFrames reference documentation](https://docs.cloud.google.com/python/docs/reference/bigframes/latest).
To authenticate to BigQuery, set up Application Default Credentials.
For more information, see [Set
up ADC for a local development environment](https://docs.cloud.google.com/docs/authentication/set-up-adc-local-dev-environment).
import bigframes.pandas as bpd
from bigframes.bigquery import ml
# Set partial ordering mode for BigQuery DataFrames.
# For more information, see the BigQuery DataFrames performance documentation:
# https://cloud.google.com/bigquery/docs/dataframes-performance#partial-ordering-mode
bpd.options.bigquery.ordering_mode = "partial"
# input_data is defined in an earlier step.
prediction_data = input_data[input_data["dataframe"] == "prediction"]
# For more information, see the BigQuery DataFrames API reference documentation:
# https://dataframes.bigquery.dev/reference/api/bigframes.bigquery.ml.predict.html#bigframes.bigquery.ml.predict
ml.https://docs.cloud.google.com/python/docs/reference/bigframes/latest/bigframes.bigquery.ml.html(
your_model_id, # For example: "your-project.census.census_model"
input_=prediction_data,
)
# Output:
# predicted_income_bracket predicted_income_bracket_probs age workclass ... occupation hours_per_week income_bracket dataframe
# 18004 <=50K [{'label': ' >50K', 'prob': 0.0763305999358786... 75 ? ... ? 6 <=50K prediction
# 18886 <=50K [{'label': ' >50K', 'prob': 0.0448866871906495... 73 ? ... ? 22 >50K prediction
# 31024 <=50K [{'label': ' >50K', 'prob': 0.0362982319421936... 69 ? ... ? 1 <=50K prediction
# 31022 <=50K [{'label': ' >50K', 'prob': 0.0787836112058324... 75 ? ... ? 5 <=50K prediction
# 23295 <=50K [{'label': ' >50K', 'prob': 0.3385373037905673... 78 ? ... ? 32 <=50K prediction
## Explain the prediction results
To understand why the model is generating these prediction results, you can use
the
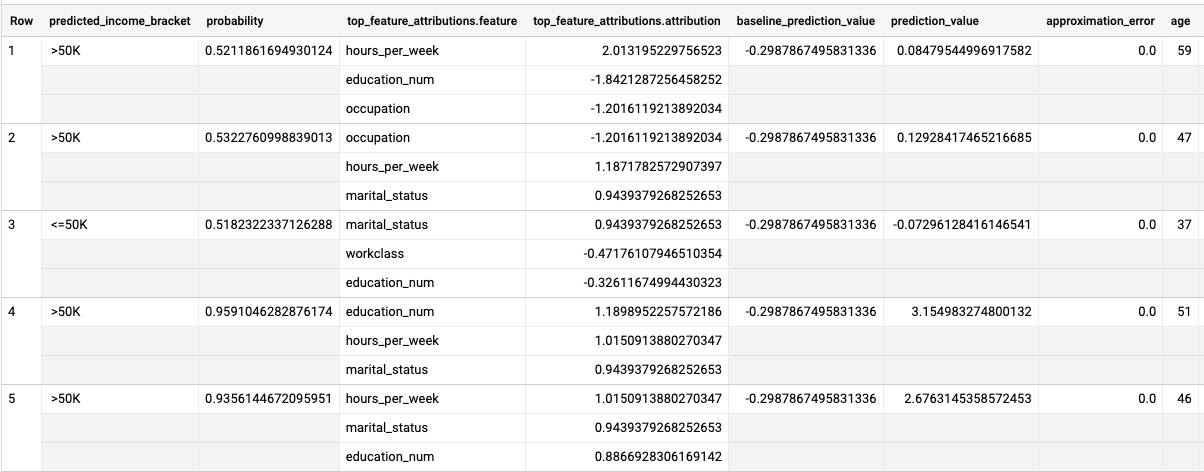
[`ML.EXPLAIN_PREDICT` function](https://docs.cloud.google.com/bigquery/docs/reference/standard-sql/bigqueryml-syntax-explain-predict).
`ML.EXPLAIN_PREDICT` is an extended version of the `ML.PREDICT` function.
`ML.EXPLAIN_PREDICT` not only outputs prediction results, but also outputs
additional columns to explain the prediction results. For more information
about explainability, see
[BigQuery ML explainable AI overview](https://docs.cloud.google.com/bigquery/docs/xai-overview#explainable-ai-offerings).
Run the `ML.EXPLAIN_PREDICT` query:
1. In the Google Cloud console, go to the **BigQuery** page.
[Go to BigQuery](https://console.cloud.google.com/bigquery)
2. In the query editor, run the following query:
```googlesql
SELECT
*
FROM
ML.EXPLAIN_PREDICT(MODEL `census.census_model`,
(
SELECT
*
FROM
`census.input_data`
WHERE
dataframe = 'evaluation'),
STRUCT(3 as top_k_features));
```
3. The results look similar to the following:
> [!NOTE]
> **Note:** The `ML.EXPLAIN_PREDICT` query outputs all the input feature columns, similar to what `ML.PREDICT` does. For readability purposes, only one feature column, `age`, is shown in the preceding figure.
For logistic regression models, [Shapley
values](https://wikipedia.org/wiki/Shapley_value) are used to determine relative
feature attribution for each feature in the model. Because the `top_k_features`
option was set to `3` in the query, `ML.EXPLAIN_PREDICT` outputs the top three
feature attributions for each row of the `input_data` view. These attributions
are shown in descending order by the absolute value of the attribution.
## Globally explain the model
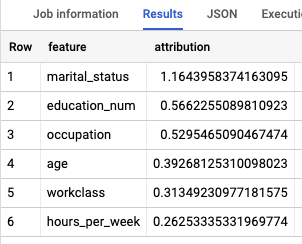
To know which features are the most important to determine the income bracket,
use the
[`ML.GLOBAL_EXPLAIN` function](https://docs.cloud.google.com/bigquery/docs/reference/standard-sql/bigqueryml-syntax-global-explain).
Get global explanations for the model:
1. In the Google Cloud console, go to the **BigQuery** page.
[Go to BigQuery](https://console.cloud.google.com/bigquery)
2. In the query editor, run the following query to get global explanations:
```googlesql
SELECT
*
FROM
ML.GLOBAL_EXPLAIN(MODEL `census.census_model`)
```
3. The results look similar to the following:
## Clean up
To avoid incurring charges to your Google Cloud account for the resources used in this
tutorial, either delete the project that contains the resources, or keep the project and
delete the individual resources.
### Delete your dataset
Deleting your project removes all datasets and all tables in the project. If you
prefer to reuse the project, you can delete the dataset you created in this
tutorial:
1. If necessary, open the BigQuery page in the
Google Cloud console.
[Go to the BigQuery page](https://console.cloud.google.com/bigquery)
2. In the navigation, click the **census** dataset you created.
3. Click **Delete dataset** on the right side of the window.
This action deletes the dataset and the model.
4. In the **Delete dataset** dialog, confirm the delete command by typing
the name of your dataset (`census`) and then click **Delete**.
### Delete your project
To delete the project:
> [!CAUTION]
> **Caution** : Deleting a project has the following effects:
>
> - **Everything in the project is deleted.** If you used an existing project for the tasks in this document, when you delete it, you also delete any other work you've done in the project.
> - **Custom project IDs are lost.** When you created this project, you might have created a custom project ID that you want to use in the future. To preserve the URLs that use the project ID, such as an `appspot.com` URL, delete selected resources inside the project instead of deleting the whole project.
>
>
> If you plan to explore multiple architectures, tutorials, or quickstarts, reusing projects
> can help you avoid exceeding project quota limits.
1. In the Google Cloud console, go to the **Manage resources** page.
[Go to Manage resources](https://console.cloud.google.com/iam-admin/projects)
2. In the project list, select the project that you want to delete, and then click **Delete**.
3. In the dialog, type the project ID, and then click **Shut down** to delete the project.
## What's next
- For an overview of BigQuery ML, see [Introduction to BigQuery ML](https://docs.cloud.google.com/bigquery/docs/bqml-introduction).
- For information on creating models, see the [`CREATE MODEL`](https://docs.cloud.google.com/bigquery/docs/reference/standard-sql/bigqueryml-syntax-create) syntax page.