In this tutorial, you use the [Hugging Face Optimum CLI](https://huggingface.co/docs/optimum-onnx/onnx/overview)
to export the `sentence-transformers/all-MiniLM-L6-v2` model to [Open Neural
Network Exchange (ONNX)](https://onnx.ai) format. You use the [`CREATE MODEL`
statement](https://docs.cloud.google.com/bigquery/docs/reference/standard-sql/bigqueryml-syntax-create-onnx)
to import the ONNX model into BigQuery. And finally, you use
the [`ML.PREDICT` function](https://docs.cloud.google.com/bigquery/docs/reference/standard-sql/bigqueryml-syntax-predict)
to generate embeddings with the imported ONNX model.
This tutorial uses the [`sentence-transformers/all-MiniLM-L6-v2`
model](https://huggingface.co/sentence-transformers/all-MiniLM-L6-v2). This
sentence transformer model is known for its fast and effective performance at
generating sentence embeddings. Sentence embedding enables tasks like semantic
search, clustering, and sentence similarity by capturing the underlying meaning
of the text.
ONNX provides a uniform format that is designed to represent any machine
learning (ML) framework. BigQuery ML support for ONNX lets you do the
following:
- Train a model using your favorite framework.
- Convert the model into the ONNX model format.
- Import the ONNX model into BigQuery and make predictions using BigQuery ML.
## Objectives
- Export the `sentence-transformers/all-MiniLM-L6-v2` model to ONNX.
- Import the ONNX model into BigQuery.
- Use the `ML.PREDICT` function to generate embeddings with the imported ONNX model.
## Costs
In this document, you use the following billable components of Google Cloud:
- [BigQuery](https://cloud.google.com/bigquery/pricing)
- [BigQuery ML](https://cloud.google.com/bigquery/pricing#bigquery-ml-pricing)
- [Cloud Storage](https://cloud.google.com/storage/pricing)
To generate a cost estimate based on your projected usage,
use the [pricing calculator](https://docs.cloud.google.com/products/calculator).
New Google Cloud users might be eligible for a [free trial](https://docs.cloud.google.com/free).
When you finish the tasks that are described in this document, you can avoid
continued billing by deleting the resources that you created. For more information, see
[Clean up](https://docs.cloud.google.com/bigquery/docs/generate-embeddings-onnx-format#clean-up).
## Before you begin
1.
[Verify that billing is enabled for your Google Cloud project](https://docs.cloud.google.com/billing/docs/how-to/verify-billing-enabled#confirm_billing_is_enabled_on_a_project).
2.
3.
Enable the BigQuery and Cloud Storage APIs, if any are not already enabled.
**Roles required to enable APIs**
To enable APIs, you need the `serviceusage.services.enable` permission. If you
created the project, then you likely already have this permission through the
Owner role (`roles/owner`). Otherwise, you can get this permission through the
Service Usage Admin role (`roles/serviceusage.serviceUsageAdmin`).
[Learn how to grant roles](https://docs.cloud.google.com/iam/docs/granting-changing-revoking-access).
[Enable the APIs](https://console.cloud.google.com/apis/enableflow?apiid=bigquery.googleapis.com,storage-component.googleapis.com)
4. Ensure that you have the [necessary permissions](https://docs.cloud.google.com/bigquery/docs/generate-embeddings-onnx-format#required_permissions) to perform the tasks in this document.
### Required roles
To get the permissions that
you need to complete this tutorial,
ask your administrator to grant you the
following IAM roles on the project:
- Create datasets, tables, and models, and run BigQuery jobs: [BigQuery Studio Admin](https://docs.cloud.google.com/iam/docs/roles-permissions/bigquery#bigquery.studioAdmin) (`roles/bigquery.studioAdmin`)
- Create a Cloud Storage bucket and create storage objects (if you're manually converting the transformer model files to ONNX): [Storage Admin](https://docs.cloud.google.com/iam/docs/roles-permissions/storage#storage.admin) (`roles/storage.admin`)
For more information about granting roles, see [Manage access to projects, folders, and organizations](https://docs.cloud.google.com/iam/docs/granting-changing-revoking-access).
You might also be able to get
the required permissions through [custom
roles](https://docs.cloud.google.com/iam/docs/creating-custom-roles) or other [predefined
roles](https://docs.cloud.google.com/iam/docs/roles-overview#predefined).
If you create a new project, you're the project owner, and you're granted all
of the required Identity and Access Management (IAM) permissions that you need to complete
this tutorial.
For more information about IAM permissions in
BigQuery, see [IAM
permissions](https://docs.cloud.google.com/bigquery/docs/access-control#bq-permissions).
## Optional: Manually convert the transformer model files to ONNX
If you're manually converting the `sentence-transformers/all-MiniLM-L6-v2` model
and tokenizer to ONNX, follow the steps in the following sections. Alternatively, you can
use the sample files in the `gs://cloud-samples-data` Cloud Storage bucket.
The files in this bucket are already converted. If you use the sample files,
skip to [Create a dataset](https://docs.cloud.google.com/bigquery/docs/generate-embeddings-onnx-format#create_a_dataset).
If you choose to manually convert the files, you must have a local command-line
environment that has Python installed. For more information on installing
Python, see [Python downloads](https://www.python.org/downloads/).
### Export the transformer model to ONNX
Use the Hugging Face Optimum CLI to export the
`sentence-transformers/all-MiniLM-L6-v2` model to ONNX.
For more information about exporting models with the Optimum CLI, see
[Export a model to ONNX with `optimum.exporters.onnx`](https://huggingface.co/docs/optimum-onnx/onnx/usage_guides/export_a_model#exporting-a-model-to-onnx-using-the-cli).
To export the model, open a command-line environment and follow these steps:
1. Install the Optimum CLI:
pip install optimum[onnx]
2. Export the model:
optimum-cli export onnx \
--model sentence-transformers/all-MiniLM-L6-v2 \
--task sentence-similarity \
--opset 17 all-MiniLM-L6-v2/
The `--model` argument specifies the Hugging Face model
ID. The `--opset` argument specifies the ONNXRuntime library version and is
set to `17` to maintain compatibility with the ONNXRuntime library
supported by BigQuery.
The model file is exported to the `all-MiniLM-L6-v2` directory as `model.onnx`.
### Apply quantization to the transformer model
Use the Optimum CLI to apply quantization to the exported transformer model in
order to reduce model size and speed up inference. For more information, see
[Quantization](https://huggingface.co/docs/optimum-onnx/onnxruntime/usage_guides/quantization).
To apply quantization to the model, run the following command:
optimum-cli onnxruntime quantize \
--onnx_model all-MiniLM-L6-v2/ \
--avx512_vnni -o all-MiniLM-L6-v2_quantized
The quantized model file is exported to the `all-MiniLM-L6-v2_quantized`
directory as `model_quantized.onnx`.
### Convert the tokenizer to ONNX
To generate embeddings using a transformer model in ONNX format, you typically
use a
[tokenizer](https://huggingface.co/docs/transformers/en/main_classes/tokenizer)
to produce two inputs to the model,
[`input_ids`](https://huggingface.co/docs/transformers/glossary#input-ids) and
[`attention_mask`](https://huggingface.co/docs/transformers/glossary#attention-mask).
To produce these inputs, convert the tokenizer for the
`sentence-transformers/all-MiniLM-L6-v2` model to ONNX format by using the
[`onnxruntime-extensions`](https://github.com/microsoft/onnxruntime-extensions)
library. After you convert the tokenizer, you can perform tokenization
directly on raw text inputs to generate ONNX predictions.
To convert the tokenizer, follow these steps on the command-line:
1. Install the Optimum CLI:
pip install optimum[onnx]
2. Using the text editor of your choice, create a file named
`convert-tokenizer.py`. The following example uses the nano text editor:
nano convert-tokenizer.py
3. Copy and paste the following Python script into the `convert-tokenizer.py`
file:
from onnxruntime_extensions import gen_processing_models
# Load the Huggingface tokenizer
tokenizer = AutoTokenizer.from_pretrained("sentence-transformers/all-MiniLM-L6-v2")
# Export the tokenizer to ONNX using gen_processing_models
onnx_tokenizer_path = "tokenizer.onnx"
# Generate the tokenizer ONNX model, and set the maximum token length.
# Ensure 'max_length' is set to a value less than the model's maximum sequence length, failing to do so will result in error during inference.
tokenizer_onnx_model = gen_processing_models(tokenizer, pre_kwargs={'max_length': 256})[0]
# Modify the tokenizer ONNX model signature.
# This is because certain tokenizers don't support batch inference.
tokenizer_onnx_model.graph.input[0].type.tensor_type.shape.dim[0].dim_value = 1
# Save the tokenizer ONNX model
with open(onnx_tokenizer_path, "wb") as f:
f.write(tokenizer_onnx_model.SerializeToString())
4. Save the `convert-tokenizer.py` file.
5. To convert the tokenizer, run the Python script:
python convert-tokenizer.py
The converted tokenizer is exported to the `all-MiniLM-L6-v2_quantized`
directory as `tokenizer.onnx`.
### Upload the converted model files to Cloud Storage
After you have converted the transformer model and the tokenizer, do the
following:
- [Create a Cloud Storage bucket](https://docs.cloud.google.com/storage/docs/creating-buckets) to store the converted files.
- [Upload the converted transformer model and tokenizer files to your
Cloud Storage bucket](https://docs.cloud.google.com/storage/docs/uploading-objects).
## Create a dataset
To create a BigQuery dataset, select one of the following options:
### Console
1. In the Google Cloud console, go to the **BigQuery** page.
[Go to BigQuery](https://console.cloud.google.com/bigquery)
2. In the left pane, click
**Explorer**:

If you don't see the left pane, click
**Expand left pane** to open the pane.
3. In **Explorer** , expand your project, and then click **Datasets**.
4. On the **Datasets** page, click
**Create dataset**.
5. In the **Create dataset** pane, do the following:
- For **Dataset ID** , enter `bqml_tutorial`.
- For **Data location** , select **US**.
Leave the remaining default settings as they are.
6. Click **Create dataset**.
### bq
To create a new dataset, use the
[`bq mk --dataset` command](https://docs.cloud.google.com/bigquery/docs/reference/bq-cli-reference#mk-dataset).
1. Create a dataset named `bqml_tutorial` with the data location set to `US`:
```
bq mk --dataset \
--location=US \
--description "BigQuery ML tutorial dataset." \
bqml_tutorial
```
2. Confirm that the dataset was created:
```bash
bq ls
```
### API
Call the [`datasets.insert`](https://docs.cloud.google.com/bigquery/docs/reference/rest/v2/datasets/insert)
method with a defined [dataset resource](https://docs.cloud.google.com/bigquery/docs/reference/rest/v2/datasets):
```json
{
"datasetReference": {
"datasetId": "bqml_tutorial"
}
}
```
### BigQuery DataFrames
Before trying this sample, follow the BigQuery DataFrames
setup instructions in the [BigQuery quickstart
using BigQuery DataFrames](https://docs.cloud.google.com/bigquery/docs/dataframes-quickstart).
For more information, see the
[BigQuery DataFrames reference documentation](https://docs.cloud.google.com/python/docs/reference/bigframes/latest).
To authenticate to BigQuery, set up Application Default Credentials.
For more information, see [Set
up ADC for a local development environment](https://docs.cloud.google.com/docs/authentication/set-up-adc-local-dev-environment).
import google.cloud.bigquery
bqclient = google.cloud.https://docs.cloud.google.com/python/docs/reference/bigquery/latest.https://docs.cloud.google.com/python/docs/reference/bigquery/latest/google.cloud.bigquery.client.Client.html()
bqclient.https://docs.cloud.google.com/python/docs/reference/bigquery/latest/google.cloud.bigquery.client.Client.html#google_cloud_bigquery_client_Client_create_dataset("bqml_tutorial", exists_ok=True)
## Import the ONNX models into BigQuery
Import the converted tokenizer and the sentence transformer models as
BigQuery ML models.
Select one of the following options:
### Console
1. In the Google Cloud console, go to the BigQuery **Studio** page.
[Go to Studio](https://console.cloud.google.com/bigquery)
2. In the query editor, run the following `CREATE MODEL` statement
to create the `tokenizer` model:
```googlesql
CREATE OR REPLACE MODEL `bqml_tutorial.tokenizer`
OPTIONS (MODEL_TYPE='ONNX',
MODEL_PATH='TOKENIZER_BUCKET_PATH');
```
Replace `TOKENIZER_BUCKET_PATH` with the path to
the model that you uploaded to Cloud Storage. If you use the sample
model, replace `TOKENIZER_BUCKET_PATH` with the
following value:
`gs://cloud-samples-data/bigquery/ml/onnx/all-MiniLM-L6-v2/tokenizer.onnx`.
When the operation is complete, you see a message in the
**Query results** pane that's similar to the
following: `Successfully created model named tokenizer`.
3. To open the **Details** pane, click **Go to model**.
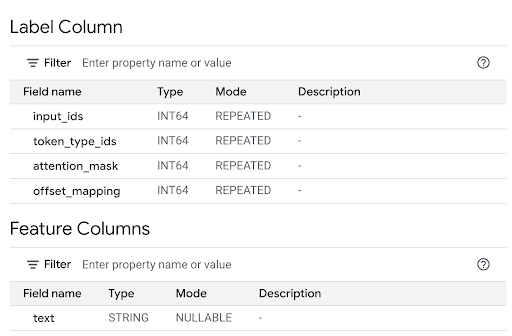
4. To see the model inputs and the model output in the **Label Column** ,
review the **Feature Columns** section:
5. To create the `all-MiniLM-L6-v2` model, in the query editor, run the
following `CREATE MODEL` statement:
```googlesql
CREATE OR REPLACE MODEL `bqml_tutorial.all-MiniLM-L6-v2`
OPTIONS (MODEL_TYPE='ONNX',
MODEL_PATH='TRANSFORMER_BUCKET_PATH');
```
Replace `TRANSFORMER_BUCKET_PATH` with the path to the model
that you uploaded to Cloud Storage. If you use the sample model,
replace `TRANSFORMER_BUCKET_PATH` with the following value:
`gs://cloud-samples-data/bigquery/ml/onnx/all-MiniLM-L6-v2/model_quantized.onnx`.
When the operation is complete, you see a message in the
**Query results** pane that's similar to the
following: `Successfully created model named all-MiniLM-L6-v2`.
6. To open the **Details** pane, click **Go to model**.
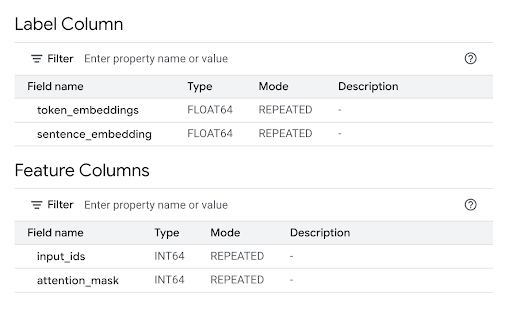
7. To see the model inputs and the model outputs in the **Label Column** ,
review the **Feature Columns** section:
### bq
Run the `CREATE MODEL` statement by using the bq command-line tool
[`query` command](https://docs.cloud.google.com/bigquery/docs/reference/bq-cli-reference#bq_query).
1. Create the `tokenizer` model:
```
bq query --use_legacy_sql=false \
"CREATE OR REPLACE MODEL
`bqml_tutorial.tokenizer`
OPTIONS
(MODEL_TYPE='ONNX',
MODEL_PATH='TOKENIZER_BUCKET_PATH')"
```
Replace `TOKENIZER_BUCKET_PATH` with the path to
the model that you uploaded to Cloud Storage. If you use the sample model,
replace `TOKENIZER_BUCKET_PATH` with the following value:
`gs://cloud-samples-data/bigquery/ml/onnx/all-MiniLM-L6-v2/tokenizer.onnx`.
When the operation is complete, you see a message similar to the
following: `Successfully created model named tokenizer`.
2. Create the `all-MiniLM-L6-v2` model:
```
bq query --use_legacy_sql=false \
"CREATE OR REPLACE MODEL
`bqml_tutorial.all-MiniLM-L6-v2`
OPTIONS
(MODEL_TYPE='ONNX',
MODEL_PATH='TRANSFORMER_BUCKET_PATH')"
```
Replace `TRANSFORMER_BUCKET_PATH` with the path to the model
that you uploaded to Cloud Storage. If you use the sample model,
replace `TRANSFORMER_BUCKET_PATH` with the following value:
`gs://cloud-samples-data/bigquery/ml/onnx/all-MiniLM-L6-v2/model_quantized.onnx`.
When the operation is complete, you see a message similar to the
following: `Successfully created model named all-MiniLM-L6-v2`.
3. After you import the models, verify that the models appear in the
dataset.
```
bq ls -m bqml_tutorial
```
The output is similar to the following:
```bash
tableId Type
---
tokenizer MODEL
all-MiniLM-L6-v2 MODEL
```
### API
Use the [`jobs.insert` method](https://docs.cloud.google.com/bigquery/docs/reference/rest/v2/jobs/insert)
to import the models. Populate the `query` parameter of the
[`QueryRequest` resource](https://docs.cloud.google.com/bigquery/docs/reference/rest/v2/jobs/query#QueryRequest)
in the request body with the `CREATE MODEL` statement.
1. To create the `tokenizer` model, use the following `query` parameter:
```
{
"query": "CREATE MODEL `PROJECT_ID :bqml_tutorial.tokenizer` OPTIONS(MODEL_TYPE='ONNX' MODEL_PATH='TOKENIZER_BUCKET_PATH')"
}
```
Replace the following:
- `PROJECT_ID`: your project ID.
- `TOKENIZER_BUCKET_PATH`: the path to the model that you uploaded to Cloud Storage. If you use the sample model, replace `TOKENIZER_BUCKET_PATH` with the following value: `gs://cloud-samples-data/bigquery/ml/onnx/all-MiniLM-L6-v2/tokenizer.onnx`.
2. To create the `all-MiniLM-L6-v2` model, use the following `query`
parameter value:
```
{
"query": "CREATE MODEL `PROJECT_ID :bqml_tutorial.all-MiniLM-L6-v2` OPTIONS(MODEL_TYPE='ONNX' MODEL_PATH='TRANSFORMER_BUCKET_PATH')"
}
```
Replace the following:
- `PROJECT_ID`: your project ID.
- `TRANSFORMER_BUCKET_PATH`: the path to the model that you uploaded to Cloud Storage. If you use the sample model, replace `TRANSFORMER_BUCKET_PATH` with the following value: `gs://cloud-samples-data/bigquery/ml/onnx/all-MiniLM-L6-v2/model_quantized.onnx`.
### BigQuery DataFrames
Before trying this sample, follow the BigQuery DataFrames
setup instructions in the [BigQuery quickstart
using BigQuery DataFrames](https://docs.cloud.google.com/bigquery/docs/dataframes-quickstart).
For more information, see the
[BigQuery DataFrames reference documentation](https://docs.cloud.google.com/python/docs/reference/bigframes/latest).
To authenticate to BigQuery, set up Application Default Credentials.
For more information, see [Set
up ADC for a local development environment](https://docs.cloud.google.com/docs/authentication/set-up-adc-local-dev-environment).
Import the tokenizer and sentence transformer models by using the
`ONNXModel` object.
```python
import bigframes
from bigframes.ml.imported import ONNXModel
bigframes.options.bigquery.project = PROJECT_ID
bigframes.options.bigquery.location = "US"
tokenizer = ONNXModel(
model_path= "TOKENIZER_BUCKET_PATH"
)
imported_onnx_model = ONNXModel(
model_path="TRANSFORMER_BUCKET_PATH"
)
```
Replace the following:
- `PROJECT_ID`: your project ID.
- `TOKENIZER_BUCKET_PATH`: the path to the model that you uploaded to Cloud Storage. If you use the sample model, replace `TOKENIZER_BUCKET_PATH` with the following value: `gs://cloud-samples-data/bigquery/ml/onnx/all-MiniLM-L6-v2/tokenizer.onnx`.
- `TRANSFORMER_BUCKET_PATH`: the path to the model that you uploaded to Cloud Storage. If you use the sample model, replace `TRANSFORMER_BUCKET_PATH` with the following value: `gs://cloud-samples-data/bigquery/ml/onnx/all-MiniLM-L6-v2/model_quantized.onnx`.
## Generate embeddings with the imported ONNX models
Use the imported tokenizer and the sentence transformer models to generate
embeddings based on data from the `bigquery-public-data.imdb.reviews`
public dataset.
Select one of the following options:
### Console
Use the
[`ML.PREDICT` function](https://docs.cloud.google.com/bigquery/docs/reference/standard-sql/bigqueryml-syntax-predict)
to generate embeddings with the models.
The query uses a nested `ML.PREDICT` call to process raw text directly
through the tokenizer and the embedding model as follows:
- **Tokenization (inner query):** the inner `ML.PREDICT` call uses the `bqml_tutorial.tokenizer` model. It takes the `title` column from the `bigquery-public-data.imdb.reviews` public dataset as its `text` input. The `tokenizer` model converts the raw text strings into the numerical token inputs that the main model requires, including the `input_ids` and `attention_mask` inputs.
- **Embedding generation (outer query):** the outer `ML.PREDICT` call uses the `bqml_tutorial.all-MiniLM-L6-v2` model. The query takes the `input_ids` and `attention_mask` columns from the inner query's output as its input.
The `SELECT` statement retrieves the `sentence_embedding` column, which
is an array of `FLOAT` values that represent the text's semantic embedding.
To generate the embeddings, follow these steps:
1. In the Google Cloud console, go to the BigQuery **Studio** page.
[Go to Studio](https://console.cloud.google.com/bigquery)
2. In the query editor, run the following query.
```googlesql
SELECT
sentence_embedding
FROM
ML.PREDICT (MODEL `bqml_tutorial.all-MiniLM-L6-v2`,
(
SELECT
input_ids, attention_mask
FROM
ML.PREDICT(MODEL `bqml_tutorial.tokenizer`,
(
SELECT
title AS text
FROM
`bigquery-public-data.imdb.reviews` limit 10))));
```
The result is similar to the following:
```
+---+
| sentence_embedding |
+---+
| -0.02361682802438736 |
| 0.02025664784014225 |
| 0.005168713629245758 |
| -0.026361213997006416 |
| 0.0655381828546524 |
| ... |
+---+
```
### bq
Use the bq command-line tool
[`query` command](https://docs.cloud.google.com/bigquery/docs/reference/bq-cli-reference#bq_query)
to run a query. The query uses the
[`ML.PREDICT` function](https://docs.cloud.google.com/bigquery/docs/reference/standard-sql/bigqueryml-syntax-predict)
to generate embeddings with the models.
The query uses a nested `ML.PREDICT` call to process raw text directly
through the tokenizer and the embedding model as follows:
- **Tokenization (inner query):** the inner `ML.PREDICT` call uses the `bqml_tutorial.tokenizer` model. It takes the `title` column from the `bigquery-public-data.imdb.reviews` public dataset as its `text` input. The `tokenizer` model converts the raw text strings into the numerical token inputs that the main model requires, including the `input_ids` and `attention_mask` inputs.
- **Embedding generation (outer query):** the outer `ML.PREDICT` call uses the `bqml_tutorial.all-MiniLM-L6-v2` model. The query takes the `input_ids` and `attention_mask` columns from the inner query's output as its input.
The `SELECT` statement retrieves the `sentence_embedding` column, which
is an array of `FLOAT` values that represent the text's semantic embedding.
On the command line, run the following command to run the query.
```
bq query --use_legacy_sql=false \
'SELECT
sentence_embedding
FROM
ML.PREDICT (MODEL `bqml_tutorial.all-MiniLM-L6-v2`,
(
SELECT
input_ids, attention_mask
FROM
ML.PREDICT(MODEL `bqml_tutorial.tokenizer`,
(
SELECT
title AS text
FROM
`bigquery-public-data.imdb.reviews` limit 10))))'
```
The result is similar to the following:
```
+---+
| sentence_embedding |
+---+
| -0.02361682802438736 |
| 0.02025664784014225 |
| 0.005168713629245758 |
| -0.026361213997006416 |
| 0.0655381828546524 |
| ... |
+---+
```
### BigQuery DataFrames
Before trying this sample, follow the BigQuery DataFrames
setup instructions in the [BigQuery quickstart
using BigQuery DataFrames](https://docs.cloud.google.com/bigquery/docs/dataframes-quickstart).
For more information, see the
[BigQuery DataFrames reference documentation](https://docs.cloud.google.com/python/docs/reference/bigframes/latest).
To authenticate to BigQuery, set up Application Default Credentials.
For more information, see [Set
up ADC for a local development environment](https://docs.cloud.google.com/docs/authentication/set-up-adc-local-dev-environment).
Use the [`predict` method](https://dataframes.bigquery.dev/reference/api/bigframes.ml.llm.TextEmbeddingGenerator.predict.html#bigframes.ml.llm.TextEmbeddingGenerator.predict)
to generate embeddings using the ONNX models.
import bigframes.pandas as bpd
df = bpd.read_gbq("bigquery-public-data.imdb.reviews", max_results=10)
df_pred = df.rename(columns={"title": "text"})
tokens = tokenizer.predict(df_pred)
predictions = imported_onnx_model.predict(tokens)
predictions.peek(5)
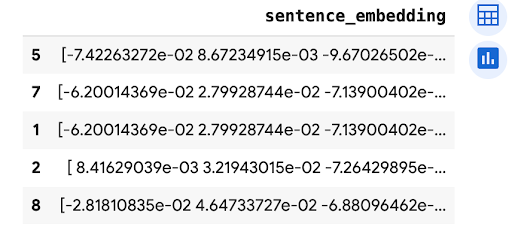
The output is similar to the following:
## Clean up
To avoid incurring charges to your Google Cloud account for the resources used in this
tutorial, either delete the project that contains the resources, or keep the project and
delete the individual resources.
### Delete the project
### Console
> [!CAUTION]
> **Caution** : Deleting a project has the following effects:
>
> - **Everything in the project is deleted.** If you used an existing project for the tasks in this document, when you delete it, you also delete any other work you've done in the project.
> - **Custom project IDs are lost.** When you created this project, you might have created a custom project ID that you want to use in the future. To preserve the URLs that use the project ID, such as an `appspot.com` URL, delete selected resources inside the project instead of deleting the whole project.
>
>
> If you plan to explore multiple architectures, tutorials, or quickstarts, reusing projects
> can help you avoid exceeding project quota limits.
1. In the Google Cloud console, go to the **Manage resources** page.
[Go to Manage resources](https://console.cloud.google.com/iam-admin/projects)
2. In the project list, select the project that you want to delete, and then click **Delete**.
3. In the dialog, type the project ID, and then click **Shut down** to delete the project.
### gcloud
> [!CAUTION]
> **Caution** : Deleting a project has the following effects:
>
> - **Everything in the project is deleted.** If you used an existing project for the tasks in this document, when you delete it, you also delete any other work you've done in the project.
> - **Custom project IDs are lost.** When you created this project, you might have created a custom project ID that you want to use in the future. To preserve the URLs that use the project ID, such as an `appspot.com` URL, delete selected resources inside the project instead of deleting the whole project.
>
>
> If you plan to explore multiple architectures, tutorials, or quickstarts, reusing projects
> can help you avoid exceeding project quota limits.
1. Delete a Google Cloud project:
```
gcloud projects delete PROJECT_ID
```
### Delete individual resources
Alternatively, to keep the project and delete the resources used in this
tutorial, follow these steps:
1. In the Google Cloud console, go to the BigQuery **Studio** page.
[Go to Studio](https://console.cloud.google.com/bigquery)
2. In the left pane, expand your project, and then click **Datasets**.
3. For the `bqml_tutorial` dataset, click
**Open actions \> Delete**.
4. In the **Delete dataset** dialog, click **Delete** to confirm.
5. If you followed the steps to manually convert the transformer model files to
ONNX, [delete the Cloud Storage bucket](https://docs.cloud.google.com/storage/docs/deleting-buckets#delete-bucket).
## What's next
- Learn how to [use text embeddings for semantic search and retrieval-augmented generation (RAG)](https://docs.cloud.google.com/bigquery/docs/vector-index-text-search-tutorial).
- For more information about converting transformers models to ONNX, see [Export a model to ONNX with `optimum.exporters.onnx`](https://huggingface.co/docs/optimum-onnx/onnx/usage_guides/export_a_model).
- For more information about importing ONNX models, see [The `CREATE MODEL` statement for ONNX models](https://docs.cloud.google.com/bigquery/docs/reference/standard-sql/bigqueryml-syntax-create-onnx).
- For more information about performing prediction, see [The `ML.PREDICT` function](https://docs.cloud.google.com/bigquery/docs/reference/standard-sql/bigqueryml-syntax-predict).
- For an overview of BigQuery ML, see [Introduction to BigQuery ML](https://docs.cloud.google.com/bigquery/docs/bqml-introduction).
- To get started using BigQuery ML, see [Create machine learning models in BigQuery ML](https://docs.cloud.google.com/bigquery/docs/create-machine-learning-model).