# Analyze data with BI Engine and Tableau Desktop
Integrating BI Engine with Tableau Desktop lets you build fast,
interactive reports and dashboards backed by BigQuery. You can
connect Tableau to a BI Engine reservation to perform
low-latency analysis and visualize massive datasets without compromising on
query performance.
## Objectives
- Create a dataset and copy data.
- Create a BI reservation and add capacity using the Google Cloud console.
- Use Tableau Desktop to connect to a BigQuery table that's managed by BI Engine.
- Create dashboards using Tableau Desktop.
## Costs
In this document, you use the following billable components of Google Cloud:
- [BigQuery](https://docs.cloud.google.com/bigquery/pricing)
- [BI Engine](https://docs.cloud.google.com/bigquery/pricing#bi-engine-pricing)
To generate a cost estimate based on your projected usage,
use the [pricing calculator](https://docs.cloud.google.com/products/calculator).
New Google Cloud users might be eligible for a [free trial](https://docs.cloud.google.com/free).
When you finish the tasks that are described in this document, you can avoid
continued billing by deleting the resources that you created. For more information, see
[Clean up](https://docs.cloud.google.com/bigquery/docs/analyze-data-tableau#clean-up).
## Before you begin
Before you begin, ensure that you have a project to use, that you have enabled
billing for that project, and that you have enabled the BigQuery API.
1.
Enable the BigQuery API, if it is not already enabled.
**Roles required to enable APIs**
To enable APIs, you need the `serviceusage.services.enable` permission. If you
created the project, then you likely already have this permission through the
Owner role (`roles/owner`). Otherwise, you can get this permission through the
Service Usage Admin role (`roles/serviceusage.serviceUsageAdmin`).
[Learn how to grant roles](https://docs.cloud.google.com/iam/docs/granting-changing-revoking-access).
[Enable the API](https://console.cloud.google.com/apis/enableflow?apiid=bigquery)
For new projects, the BigQuery API is
automatically enabled.
### Required roles
To get the permissions that
you need to create a dataset, create a table, copy data, query data, and create a BI Engine reservation,
ask your administrator to grant you the
following IAM roles on the project:
- Run copy jobs and query jobs: [BigQuery Job User](https://docs.cloud.google.com/iam/docs/roles-permissions/bigquery#bigquery.jobUser) (`roles/bigquery.jobUser`)
- Create a dataset, create a table, copy data into a table, and query a table: [BigQuery Data Editor](https://docs.cloud.google.com/iam/docs/roles-permissions/bigquery#bigquery.dataEditor) (`roles/bigquery.dataEditor`)
- Create a BI Engine reservation: [BigQuery Resource Admin](https://docs.cloud.google.com/iam/docs/roles-permissions/bigquery#bigquery.resourceAdmin) (`roles/bigquery.resourceAdmin`)
For more information about granting roles, see [Manage access to projects, folders, and organizations](https://docs.cloud.google.com/iam/docs/granting-changing-revoking-access).
You might also be able to get
the required permissions through [custom
roles](https://docs.cloud.google.com/iam/docs/creating-custom-roles) or other [predefined
roles](https://docs.cloud.google.com/iam/docs/roles-overview#predefined).
Additional permissions might be needed if you have are using a custom OAuth
client in Tableau Desktop to connect to BigQuery. For more
information, see [Troubleshooting Errors](https://docs.cloud.google.com/bigquery/docs/analyze-data-tableau#troubleshooting_errors).
## Create a BigQuery dataset
The first step is to create a BigQuery dataset to store your
BI Engine-managed table. To create your dataset, follow these
steps:
1. In the Google Cloud console, go to the BigQuery page.
[Go to BigQuery](https://console.cloud.google.com/bigquery)
2. In the left pane, click **Explorer**:

If you don't see the left pane, click **Expand left pane** to open the pane.
3. In the **Explorer** pane, click your project.
4. In the details pane, click
**View actions** , and then click **Create dataset**.
5. On the **Create dataset** page, do the following:
- For **Dataset ID** , enter `biengine_tutorial`.
- For **Data location** , choose **us (multiple regions in United
States)** , the [multi-region
location](https://docs.cloud.google.com/bigquery/docs/locations#multi-regions) where public datasets
are stored.
- For this tutorial, you can select **Enable table expiration**, and then
specify the number of days before the table expires.
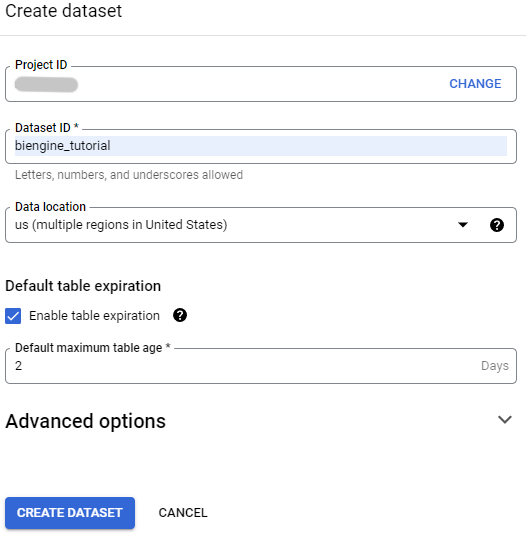
6. Leave all of the other default settings in place and click **Create dataset**.
## Create a table by copying data from a public dataset
This tutorial uses a dataset available through the
[Google Cloud Public Dataset Program](https://docs.cloud.google.com/bigquery/public-data). Public datasets
are datasets that BigQuery hosts for you to access and integrate
into your applications.
In this section, you create a table by copying data from the
[San Francisco 311 service requests](https://console.cloud.google.com/marketplace/details/san-francisco-public-data/sf-311?filter=solution-type:dataset)
dataset. You can explore the dataset by using the
[Google Cloud console](https://console.cloud.google.com/bigquery?p=bigquery-public-data&d=san_francisco_311&page=dataset).
### Create your table
To create your table, follow these steps:
1. In the Google Cloud console, go to the BigQuery page.
[Go to BigQuery](https://console.cloud.google.com/bigquery)
2. In the left pane, click **Explorer**:

3. In the **Explorer** pane, search for the `san_francisco_311` dataset.
4. Click the dataset, and then click **Overview \> Tables**.
5. Click the `311_service_requests` table.
6. In the details pane, click **More \> Make a copy of table**.
7. In the **Copy table** dialog, in the **Destination** section, do the
following:
- For **Project** , click **Browse**, and then select your project.
- For **Dataset** , select **biengine_tutorial**.
- For **Table** , enter `311_service_requests_copy`.
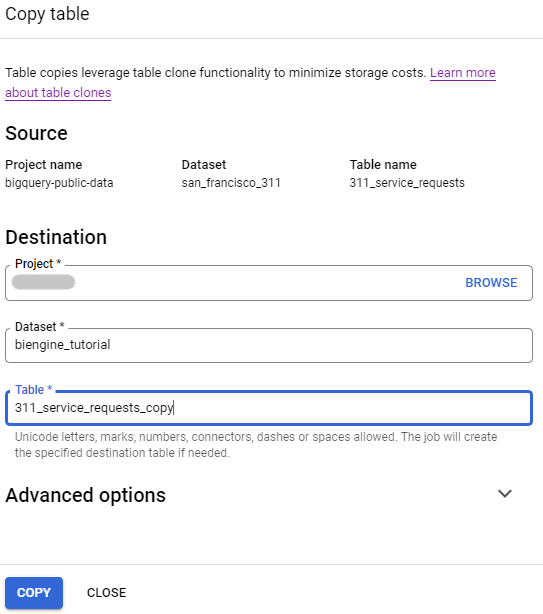
8. Click **Copy**.
9. Optional: After the copy job is complete, verify the table contents by expanding
**`PROJECT_NAME` \> biengine_tutorial** and
clicking **311_service_requests_copy \> Preview** . Replace
**`PROJECT_NAME`** with name of your Google Cloud project
for this tutorial.
## Create your BI Engine reservation
1. In the Google Cloud console, under **Administration** go to the
**BI Engine** page.
[Go to the BI Engine page](https://console.cloud.google.com/bigquery/admin/bi-engine)
> [!NOTE]
> **Note:** If prompted to enable **BigQuery Reservation API** , click **Enable**.
2. Click **Create reservation**.
3. On the **Create Reservation** page, configure your BI Engine
reservation:
- In the **Project** list, verify your Google Cloud project.
- In the **Location** list, select a location. The location should match the [location of the datasets](https://docs.cloud.google.com/bigquery/docs/locations) that you're querying.
- Adjust the **GiB of Capacity** slider to the amount of memory capacity
that you're reserving. The following example sets the capacity to
2 GiB. The maximum is 250 GiB.
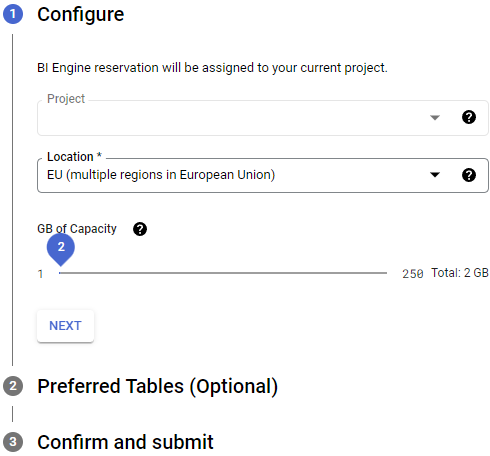
4. Click **Next**.
5. In the **Preferred Tables** section, optionally specify tables for
acceleration with BI Engine. To find table names, do the
following:
1. In the **Table Id** field, type part of the name of the table that you want accelerated by BI Engine---for example, `311`.
2. From the list of suggested names, select your table names.
Only specified tables are eligible for acceleration. If no preferred
tables are specified, all project queries are eligible for acceleration.
6. Click **Next**.
7. In the **Confirm and submit** section, review the agreement.
8. If you accept the terms of agreement, click **Create**.
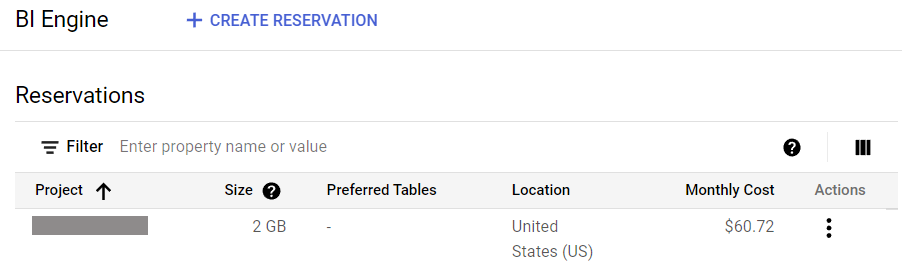
After you confirm your reservation, the details are displayed on the
**Reservations** page.
## Connect to a dataset from Tableau Desktop
To connect to a dataset from Tableau Desktop, you need to take some steps in
Tableau Desktop and then some steps in BI Engine.
### Steps to take in Tableau
1. Start [Tableau Desktop](https://www.tableau.com/products/desktop).
2. Under **Connect** , select **Google BigQuery**.
3. In the tab that opens, select the account that has the BigQuery data that you want to access.
4. If you're not already signed in, enter your email or phone, select **Next**, and enter your password.
5. Select **Accept**.
Tableau can now access your BigQuery data.
In [Tableau Desktop](https://www.tableau.com/products/desktop), on the **Data Source** page:
1. From the **Billing Project** drop-down, select the billing project where you created the reservation.
2. From the **Project** drop-down, select your project.
3. From the **Dataset** drop-down, select the dataset `biengine_tutorial`.
4. Under **Table** , select the table `311_service_requests_copy`.
## Creating a chart
Once you have added the data source to the report, the next step is to create a
visualization.
Create a chart that displays the top complaints by neighborhood:
1. In the Google Cloud console, click **New worksheet**.
2. Set the **Dimension** to **Complaint Type**.
3. Filter based on the dimension called `neighborhood`.
4. Under **Measures** , select **Number of Records**.
5. Right-click on the **Neighborhood** filter and click **Edit Filter**.
6. Add a filter to exclude null: select **Null**.
7. Click **OK**.
For more information, see the
[Tableau documentation](https://help.tableau.com/current/pro/desktop/en-us/examples_googlebigquery.htm).
## Clean up
To avoid incurring charges to your Google Cloud account for
the resources used on this page, follow these steps.
To avoid incurring charges to your Google Cloud account for the resources used
in this quickstart, you can delete the project, delete the
BI Engine reservation, or both.
### Deleting the project
The easiest way to eliminate billing is to delete the project that you
created for the tutorial.
To delete the project:
> [!CAUTION]
> **Caution** : Deleting a project has the following effects:
>
> - **Everything in the project is deleted.** If you used an existing project for the tasks in this document, when you delete it, you also delete any other work you've done in the project.
> - **Custom project IDs are lost.** When you created this project, you might have created a custom project ID that you want to use in the future. To preserve the URLs that use the project ID, such as an `appspot.com` URL, delete selected resources inside the project instead of deleting the whole project.
>
>
> If you plan to explore multiple architectures, tutorials, or quickstarts, reusing projects
> can help you avoid exceeding project quota limits.
1. In the Google Cloud console, go to the **Manage resources** page.
[Go to Manage resources](https://console.cloud.google.com/iam-admin/projects)
2. In the project list, select the project that you want to delete, and then click **Delete**.
3. In the dialog, type the project ID, and then click **Shut down** to delete the project.
### Deleting the reservation
Alternatively, if you intend to keep the project, then you can avoid additional
BI Engine costs by deleting your capacity reservation.
To delete your reservation, follow these steps:
1. In the Google Cloud console, under **Administration** go to the
**BI Engine** page.
[Go to the BI Engine page](https://console.cloud.google.com/bigquery/admin/bi-engine)
> [!NOTE]
> **Note:** If prompted to enable **BigQuery Reservation API** , click **Enable**.
2. In the **Reservations** section, locate your reservation.
3. In the **Actions** column, click the icon to the right of your
reservation and choose **Delete**.
4. In the **Delete reservation?** dialog, enter **Delete** and then
click **DELETE**.
## Troubleshooting errors
If you are using a custom OAuth configuration in Tableau Desktop to connect to
BigQuery, some users might experience issues connecting to a
Tableau server and encounter the following error message:
the app is blocked
To resolve this error, verify that the user is assigned to a role that has all
the [required permissions](https://docs.cloud.google.com/bigquery/docs/analyze-data-tableau#required_permissions) to connect Tableau to BigQuery.
If the problem persists, add the user to the
[OAuth Config Viewer role](https://docs.cloud.google.com/iam/docs/roles-permissions/oauthconfig#oauthconfig.viewer)
(`roles/oauthconfig.viewer`).
## What's next
- For an overview of the BI Engine, see [Introduction to BI Engine](https://docs.cloud.google.com/bigquery/docs/bi-engine-intro).