# Maintain the Bare Metal Solution environment
After your Bare Metal Solution environment is up and running, use the information
included in this guide to maintain your Bare Metal Solution servers, storage, and
networking.
To run SAP HANA, see [Bare metal machines for SAP HANA](https://docs.cloud.google.com/sap/docs/sap-hana-planning-guide#bare-metal-machines-for-hana).
## Set up your Google Cloud project to use the Bare Metal Solution API and gcloud CLI
The Bare Metal Solution API provides many tools that let you monitor and
maintain your Bare Metal Solution environment. Typically, you only need to use
this procedure the first time you use the Bare Metal Solution API. However, reuse
these instructions as needed for troubleshooting purposes in case the API does
not respond as expected.
> [!NOTE]
> **Note:** The Bare Metal Solution API needs to be enabled for all the projects where the Bare Metal Solution resources are configured. If you're using a separate networking project for VLAN attachments with the Bare Metal Solution, ensure the API is enabled in that project as well.
1. Assign the Bare Metal Solution Admin or Bare Metal Solution Editor predefined
IAM role to your principals. To learn how to map IAM roles, see
[Grant an IAM role](https://docs.cloud.google.com/bare-metal/docs/bms-iam#grant_an_iam_role_bms).
2. Enable and activate the Bare Metal Solution API in your Google Cloud project where the
Bare Metal Solution resources are configured, including the networking projects
where the Interconnect Attachments are created.
> [!NOTE]
> **Note:** To enable an API service, you must have an IAM role that gives you permission to activate services, such as **Owner** or **Service Usage Admin** . For more information, see [Access Control](https://docs.cloud.google.com/iam/docs/roles-permissions/serviceusage).
### Console
1. Go to the [Bare Metal Solution API](https://console.developers.google.com/apis/api/baremetalsolution.googleapis.com/overview) in your Google Cloud console dashboard. You can also search for the Bare Metal Solution API in the API Library here: [**APIs \& Services \> Library**](https://console.cloud.google.com/apis/library).
2. On the **Bare Metal Solution API** page, click **Enable**.
3. Click the Back button on your browser. If you see a green checkmark next to the words **API Enabled**, you can use the API.
4. To activate Bare Metal Solution API, either:
- Navigate to any Bare Metal Solution page within your Google Cloud project.
- Execute any Bare Metal Solution command using the Google Cloud CLI within your Google Cloud project.
### gcloud
1. To enable the Bare Metal Solution API through `gcloud`, enter your
gcloud CLI project ID in the following command, copy
the command, paste it into the Cloud Shell prompt, and
press the **Enter** or **Return** key:
```
gcloud services enable baremetalsolution.googleapis.com --project=PROJECT_ID
```
2. To activate Bare Metal Solution API, either:
- Navigate to any Bare Metal Solution page within your Google Cloud project.
- Execute any Bare Metal Solution command using the Google Cloud CLI within your Google Cloud project.
3. Allow the [Google Cloud CLI](https://cloud.google.com/sdk) to work with
your Google Cloud project where the Bare Metal Solution API was enabled and activated.
1. In your Cloud Shell window, enter the `gcloud auth login` command.
```
gcloud auth login
```
2. Copy the resulting URL and paste it into a separate browser tab or window.
3. Log in to the page by using your username associated with your Google Cloud project.
4. Click **Allow** to enable the gcloud CLI.
5. Copy the authorization code.
6. Paste the code into your Cloud Shell client command line.
7. Press the **Enter** or **Return** key.
For additional information about the general steps required to set up an API in
Google Cloud, see: [Getting Started with Google Cloud APIs](https://docs.cloud.google.com/apis/docs/getting-started).
## Operate your Bare Metal Solution server
> [!WARNING]
> **Warning:** Don't turn the power off for a Bare Metal Solution server or use it as a cold standby. A Bare Metal Solution server must always be kept in powered on state. It must only be powered off when it is due for maintenance in which case we inform you to do so.
You can perform the following operations on your Bare Metal Solution server:
- Start---Turns the power on for the server.
- Stop---Turns the power off for the server.
- Reset---Restarts the server.
### Console
To perform these operations on your server, follow these steps:
1. Go to the [**Compute Engine** \> **Bare Metal Solution** \> **Servers**](https://console.cloud.google.com/compute/bareMetalSolution/servers) page.
2. For the server that you want to start, stop, or reset, click
.
3. Do the following:
- To turn the power on for your server, click **Start**.
- To turn the power off for your server, click **Stop**.
- To restart the server, click **Reset**.
### gcloud
1. To turn the power off and restart your Bare Metal Solution server, use the
following steps.
1. **Make sure you follow the API set up steps.**
Restarting a server requires you to [Enable and activate the Bare Metal Solutions API and the gcloud CLI](https://docs.cloud.google.com/bare-metal/docs/bms-maintenance#set_up_the_bms_api). You also need to grant either
the Bare Metal Solution Admin or Bare Metal Solution Editor IAM role to
your principals.
2. To turn the power off and restart a Bare Metal Solution server, issue the
`gcloud bms instances reset` command:
> [!NOTE]
> **Note:** By default, this command runs in synchronous mode and prevents you from issuing additional commands until the restart operation completes. If you have an automated environment or need to work on other tasks during the restart operation, add the `--async` option to run this command in asynchronous mode.
```
gcloud bms instances reset SERVER_NAME --project=PROJECT_ID --region=REGION
```
The output displays the status of your server restart request.
```
Reset request issued for: [SERVER_NAME]
Waiting for operation [operations/880d346a-4836-4467-acc4-29e6a430bfdd] to complete...done.
```
After you enter the command, your Bare Metal Solution server restarts. The restart takes from 15 to 60 minutes to complete, depending on your server configuration.
The output from this command provides an operations ID that you can
use to check on the status of the restart. To use the operations ID
and view the restart status, see [View the status of a long-running
operation](https://docs.cloud.google.com/bare-metal/docs/bms-maintenance#view_the_status_of_a_long-running_operation).
2. To turn the power on for your server, use the `gcloud bms
instances start` command.
> [!NOTE]
> **Note:** By default, this command runs in synchronous mode and prevents you from issuing additional commands until the start operation completes. If you have an automated environment or need to work on other tasks during the start operation, add the `--async` option to run this command in asynchronous mode.
```
gcloud bms instances start SERVER_NAME --project=PROJECT_ID --region=REGION
```
The output displays the status of your server restart request.
```
Start request issued for: [SERVER_NAME]
Waiting for operation [operations/880d346a-4836-4467-acc4-29e6a430bfdd] to complete...done.
```
In most cases, the power for your server stays on. If you need to turn off the power, use the following options:
- Use the shutdown commands of your server's operating system.
- Some applications turn off the power to the server automatically after a reimage.
3. To turn the power off for your server, use the `gcloud bms instances stop` command.
```
gcloud bms instances stop --project=PROJECT_ID --region=REGION SERVER_NAME
```
### API
1. To turn the power off and restart your Bare Metal Solution server, use the
following steps.
1. **Make sure you follow the API set up steps.**
Restarting a server requires you to [Enable and activate the Bare Metal Solutions API and the gcloud CLI](https://docs.cloud.google.com/bare-metal/docs/bms-maintenance#set_up_the_bms_api). You also need to grant either
the Bare Metal Solution Admin or Bare Metal Solution Editor IAM role.
2. **Log in to your Bare Metal Solution server to watch the server
restart.**
- Open a Google Cloud console window.
- Navigate to your jump host VM instance: [**Compute Engine** \> **VM Instances**](https://console.cloud.google.com/compute/instances)
- Click the **SSH** button to connect to your jump host VM instance.
- To log in to your Bare Metal Solution server, enter the SSH
command in the jump host command line.
```
[username@instance-jump-host ~]$ ssh customeradmin@bms-ip-address>
customeradmin@bms-ip-address's password: bms-password
Last login: Mon Mar 15 22:43:19 2022 from bms-ip-address
[customeradmin@BMS_SERVER_NAME ~]$
```
- Enter the `top` command to verify that the server is running.
You can use this window to monitor the progress of the reboot.
3. **Run the restart command**
- Open the Cloud Shell window.
- Add your Google Cloud project ID, region, and
Bare Metal Solution server name into the following command.
```
curl -X POST \
-H "Authorization: Bearer $(gcloud auth print-access-token)" \
-H "X-Goog-User-Project: PROJECT_ID" \
-H "Content-Type: application/json" \
"https://baremetalsolution.googleapis.com/v2/projects/PROJECT_ID/locations/REGION/instances/BMS_SERVER_NAME:reset"
```
**Note:** The V2 version of this command has replaced the V1 version. We recommend that you use the V2 version of this command.
- Copy and paste the command into your Cloud Shell
window, and press the **Enter** or **Return** key.
Your Bare Metal Solution server restarts. The restart takes from
15 to 60 minutes to complete, depending on your server
configuration.
The output from this command provides an operations ID that you
can use to check on the status of the restart. To use the
operations ID and view the status, see [View the status of a
long-running operation](https://docs.cloud.google.com/bare-metal/docs/bms-maintenance#view_the_status_of_a_long-running_operation).
```
{
"name": "operations/5c0c8b3f-5edc-4117-be9f-812af9740aaf"
}
```
While the server reboots, you cannot use ping or SSH from your
jump host VM instance to reach the Bare Metal Solution server.
After several minutes, the Bare Metal Solution server comes back
online.
When the server comes back online, you can successfully issue a
ping or use SSH from your jump host VM instance to reach your
Bare Metal Solution server.
> [!NOTE]
> **Note:** The restart takes from 15 to 60 minutes to complete. If you try to reissue the restart command before the server is ready, you'll receive an error message. Wait and run the command again after the server comes back online.
For more information on restarting your Bare Metal Solution server, see
the [Bare Metal Solution API](https://docs.cloud.google.com/bare-metal/docs/reference/rest).
2. To turn the power on for your server, enter your project ID, region,
and server name, then issue the following `curl` command.
```
curl -X POST \
-H "Authorization: Bearer $(gcloud auth print-access-token)" \
-H "X-Goog-User-Project: PROJECT_ID" \
-H "Content-Type: application/json" \
"https://baremetalsolution.googleapis.com/v2/projects/PROJECT_ID/locations/REGION/instances/SERVER_NAME:start"
```
In most cases, the power for your server stays on. If you need to turn
off the power, use the following options:
- Use the shutdown commands of your server's operating system.
- Some applications turn off the power to the server automatically after a reimage.
3. To turn the power off for your server, enter your project ID, region, and server name
and issue the following `curl` command.
```
curl -X POST \
-H "Authorization: Bearer $(gcloud auth print-access-token)" \
-H "X-Goog-User-Project: PROJECT_ID" \
-H "Content-Type: application/json" \
"https://baremetalsolution.googleapis.com/v2/projects/PROJECT_ID/locations/REGION/instances/SERVER_NAME:stop"
```
Because starting, stopping, and restarting a server takes a while to complete,
you can check the status by following the steps in [View the status of a
long-running operation](https://docs.cloud.google.com/bare-metal/docs/bms-maintenance#view_the_status_of_a_long-running_operation).
## Check the status of a server
A server transitions through many states as a part of its lifecycle. When you
start a server, Bare Metal Solution provisions the resources for the server.
Next, the server prepares for the boot sequence. After the server starts up, the server
moves to the running state. During its normal operation, you can stop and restart
a running server.
A server can be in one of the following states:
- `PROVISIONING`: Resources are allocated for the server. The server is not running yet.
- `STARTING`: Resources are acquired. The server is booting up.
The boot operation usually takes 30 minutes, after which the server state is
set to `RUNNING`.
- `RUNNING`: The server is up and running.
If the server state is `RUNNING`, but you're unable to use the server, it
might still be booting up. This might happen if your server
is large or has many storage volumes and LUNs. For more information, see [Server takes a long time to boot](https://docs.cloud.google.com/bare-metal/docs/known-issues#server_takes_a_long_time_to_boot).
- `STOPPING`: The server is stopping.
- `SHUTDOWN`: The server is stopped and powered off.
- `DELETED`: The server is deleted.
### Console
1. Go to the [**Compute Engine** \> **Bare Metal Solution** \> **Servers**](https://console.cloud.google.com/compute/bareMetalSolution/servers) page.
2. In the **Status** column, you can view the status of the server.
### gcloud
To check the status of a server, issue the `gcloud bms instances describe`
command.
```
gcloud bms instances describe --project=PROJECT_ID --region=REGION SERVER_NAME
```
You can view the status of the server in the `state` field in the output.
For example,
```
state: RUNNING
```
### API
To check the status of a server, enter your project ID, region, and server
name into the following `curl` command. Copy the command, paste it into the
Cloud Shell prompt, and press the **Enter** or **Return** key.
```
curl -X GET \
-H "Authorization: Bearer $(gcloud auth print-access-token)" \
-H "X-Goog-User-Project: PROJECT_ID" \
-H "Content-Type: application/json" \
"https://baremetalsolution.googleapis.com/v2/projects/PROJECT_ID/locations/REGION/instances/SERVER_NAME"
```
You can view the status of the server in the `state` field in the output.
For example,
```
"state" : "RUNNING"
```
## Manage resources in your Bare Metal Solution environment
Bare Metal Solution management APIs, gcloud commands, and the Google Cloud console
enable you to view the status of the resources in your Bare Metal Solution
environment, such as servers, networking, and storage.
**Note:** If you receive an error message stating that a **gcloud bms** command does not exist, try updating the Google Cloud CLI with the following commands:
- **gcloud components update** (this does not work with Cloud Shell) or
- **sudo apt-get update \&\& sudo apt-get --only-upgrade install google-cloud-sdk**
### Make sure you set up the Bare Metal Solution API
Viewing resource status requires you to [Enable and activate the Bare Metal Solutions API and the gcloud CLI](https://docs.cloud.google.com/bare-metal/docs/bms-maintenance#set_up_the_bms_api) in your Bare Metal Solution project. You also need to grant one of the Bare Metal Solution IAM roles to
your principals, such as Bare Metal Solution Admin or Bare Metal Solution Editor.
### List Bare Metal Solution resources in an organization and folder
Sometimes, you might need to view your Bare Metal Solution resources at an
organization level or a folder level. To list resources at an organization or
folder level, you need the IAM permissions to list those
resources at the corresponding level.
To learn how to grant IAM permissions to a user, see
[Access control for organization resources with IAM](https://docs.cloud.google.com/resource-manager/docs/access-control-org).
Following is a sample Python script that lists storage volumes in an
organization or a folder. You can modify this sample script as per your
requirements and use it. For example, by using a filter such as `attached=false`,
you can list all the unattached storage volumes.
To list storage volumes at the organization level using this script, you need the
following IAM permissions at the organization level:
- `resourcemanager.folders.get`
- `resourcemanager.folders.list`
- `resourcemanager.organizations.get`
- `resourcemanager.projects.get`
- `resourcemanager.projects.list`
- `baremetalsolution.volumes.list`
- `baremetalsolution.luns.list`
#!/usr/bin/env python
# Copyright 2022 Google LLC
#
# Licensed under the Apache License, Version 2.0 (the "License");
# you may not use this file except in compliance with the License.
# You may obtain a copy of the License at
#
# http://www.apache.org/licenses/LICENSE-2.0
#
# Unless required by applicable law or agreed to in writing, software
# distributed under the License is distributed on an "AS IS" BASIS,
# WITHOUT WARRANTIES OR CONDITIONS OF ANY KIND, either express or implied.
# See the License for the specific language governing permissions and
# limitations under the License.
# This file is automatically generated. Please do not modify it directly.
# Find the relevant recipe file in the samples/recipes or samples/ingredients
# directory and apply your changes there.
from typing import Sequence
from typing import Tuple
from absl import app
from absl import flags
from google.api_core.exceptions import PermissionDenied
from google.cloud import resourcemanager_v3
from google.cloud.bare_metal_solution_v2.services.bare_metal_solution import BareMetalSolutionClient
from google.cloud.bare_metal_solution_v2.types import ListVolumesRequest
_ORGANIZATION_ID = flags.DEFINE_string(
"organization-id",
None,
"Your organization id retrieved from its name:"
" organizations/.",
)
_FOLDER_ID = flags.DEFINE_string(
"folder-id",
None,
"Your folder id retrieved from its name: folders/.",
)
_FILTER = flags.DEFINE_string(
"filter",
"",
"Filter for the resource list request. Syntax should be per"
" https://google.aip.dev/160",
)
def get_projects(
parent: str,
folders_client: resourcemanager_v3.FoldersClient,
projects_client: resourcemanager_v3.ProjectsClient,
) -> str:
"""Retrieves a list of all project IDs available in given organization or folder parent.
Args:
parent: Organization ID or Folder ID of the Cloud org or folder you want
to recursively list project IDs from.
folders_client: Resource manager folder API client.
projects_client: Resource manager project API client.
Yields:
The list of project ids as a string.
"""
projects_request = resourcemanager_v3.ListProjectsRequest(parent=parent)
for project in projects_client.list_projects(request=projects_request):
yield project.project_id
folders_request = resourcemanager_v3.ListFoldersRequest(parent=parent)
for folder in folders_client.list_folders(request=folders_request):
get_projects(folder.name, folders_client, projects_client)
def get_volumes_list(parent: str, filter: str) -> Tuple[str, str]:
"""Retrieves a list of all volume names available in given project.
Args:
parent: Organization ID or Folder ID of the Cloud org or folder you want
to recursively list volumes from.
filter: Filter string for the resource list call. Syntax is per
https://google.aip.dev/160.
Returns:
The list of volumes as a string and the list of PermissionDenied errors in
individual folder or projects, if any.
"""
folders_client = resourcemanager_v3.FoldersClient()
projects_client = resourcemanager_v3.ProjectsClient()
bms_client = BareMetalSolutionClient()
output = []
errors = []
try:
for project in get_projects(parent, folders_client, projects_client):
volumes_list_request = ListVolumesRequest(
parent="projects/" + project + "/locations/global",
filter=filter,
)
try:
for volume in bms_client.list_volumes(request=volumes_list_request):
output.append(f" - {volume.name}")
# This could happen because BMS API is not enabled in a certain project.
except PermissionDenied as e:
errors.append(
f"Unable to list bms resources for project {project}: {e}"
)
except PermissionDenied as e:
errors.append(f"Unable to access folder or project: {e}")
return "\n".join(output), "\n".join(errors)
def main(_: Sequence[str]):
if _ORGANIZATION_ID.value is not None and _FOLDER_ID.value is not None:
raise Exception("Only one of organization ID or folder ID must be provided")
elif _ORGANIZATION_ID.value is None and _FOLDER_ID.value is None:
raise Exception(
"Either one of organization ID or folder ID must be provided"
)
elif _ORGANIZATION_ID.value is not None:
parent = f"organizations/{_ORGANIZATION_ID.value}"
else:
parent = f"folders/{_FOLDER_ID.value}"
volumes, errors = get_volumes_list(parent, filter=_FILTER.value)
print(
"=================== Flat list of volumes in the folder or organization"
" ==================="
)
print(volumes)
print(
"=================== List of folders or projects with errors"
" ==================="
)
print(errors)
if __name__ == "__main__":
app.run(main)
## Manage servers
You can manage the servers in your Bare Metal Solution environment in the
following ways:
- [View servers](https://docs.cloud.google.com/bare-metal/docs/bms-maintenance#view-servers)
- [Organize servers by using labels](https://docs.cloud.google.com/bare-metal/docs/bms-maintenance#organize-servers-using-labels)
- [Rename a server](https://docs.cloud.google.com/bare-metal/docs/bms-maintenance#rename-server)
- [Retrieve the initial password for a server](https://docs.cloud.google.com/bare-metal/docs/bms-maintenance#retrieve-initial-server-password)
- [View OS details](https://docs.cloud.google.com/bare-metal/docs/bms-maintenance#view-os-details)
- [Change the OS for a server](https://docs.cloud.google.com/bare-metal/docs/bms-maintenance#change-os-for-server)
- [Enable hyperthreading on a server](https://docs.cloud.google.com/bare-metal/docs/bms-maintenance#enable-hyperthreading-on-server)
### View servers
To view the details of your Bare Metal Solution servers, follow these steps:
### Console
1. Go to the **Servers** page.
[Go to Servers](https://console.cloud.google.com/compute/bareMetalSolution/servers)
The **Servers** page lists all your servers with the following details:
| **Field** | **Description** | **Example** |
|---|---|---|
| **Status** | Indicates the availability of a server | A green circle with a check mark indicates that the server is provisioned and available. |
| **Name** | Server name. Click the name to view additional information about the server.
**Note:** If you did not enter a name when you provisioned your server, the **ID** appears in this field. | `server-1` |
| **ID** | Identifier assigned to your server. - Click the ID to view basic information about the server. - Share the ID with Google Cloud support when troubleshooting this resource. | `at-1234567-svr001` |
| **Location** | Bare Metal Solution region | `asia-southeast1` |
| **Pod** | Pod that contains your server. A pod is a unit of isolation that contains your Bare Metal Solution resources. Resources in different pods cannot be connected. A region can have multiple pods. The **Pod** column is disabled by default. To enable it, do the following: 1. Click **Column display options** . 2. Select the **Pod** checkbox. 3. Click **OK**. If you don't want to enable the **Pod** column, you can view the pod of a server by clicking the server name. | `asia-southeast1-pod1` |
| **Server Type** | Server specifications | `o2-standard-32-metal` |
| **Client IP** | Server IP address that connects to your Google Virtual Private Cloud | `10.200.0.5` |
| **Private IP** | Server IP address that connects to other Bare Metal Solution environment resources | `192.168.2.5` |
| **Labels** | Displays any labels that you added to this server
You can use labels to filter the console output by copying the text of a label and pasting it in the **Filter** box just above the **Status** field. | `environment:test` |
| **Server activity** | Informs about any Bare Metal Solution infrastructure issue that might impact your workload. The **Server activity** field is empty if your server is running normally and there is no issue. However, it shows **Anomaly detected** when there's an issue with the server. In this case, we investigate and inform you. While we resolve the issue, if your workload is disrupted, contact [Customer Care](https://cloud.google.com/support-hub). |
2. To see the additional details about a server, click the
**Name** of the server.
The **Server details** page shows the following additional details:
| **Field** | **Description** |
|---|---|
| **Hyperthreading** | Indicates if the hyperthreading is enabled on the server. |
| **OS image** | OS that is running on your server. |
| **Firmware version** | Current firmware version of your server. |
| **Network template** | Network template being used by your server. |
| **SSH keys** | SSH keys of your server, if you have configured any. |
| **Password encryption key** | Encryption key of your server, if you have configured any. |
| **Login info** | Procedure to obtain your login password. |
| **User accounts** | User names and their corresponding encrypted passwords. |
| **Networks** | Details of the networks attached to the server. |
| **LUNs** | Details of the LUNs attached to the server. |
### gcloud
1. To list the servers in your Bare Metal Solution environment and see their
status, enter your project ID and issue the `gcloud bms instances list`
command:
```
gcloud bms instances list --project=PROJECT_ID
```
The following output example shows information for a server, such as the
server name, type, IP addresses, and state.
```
NAME PROJECT REGION MACHINE_TYPE IP_ADDRESSES STATE
SERVER_NAME PROJECT_ID REGION o2-standard-32-metal 192.168.1.1,192.168.2.1 RUNNING
```
Additional command options include:
- `--region`: View devices in a specific Google Cloud region.
- `--limit`: Limit the output to show a specific number of devices
2. To get network and storage information for a specific server in your
Bare Metal Solution environment, enter your server name, project ID, and
region, and issue the `gcloud bms instances describe` command:
```
gcloud bms instances describe SERVER_NAME --project=PROJECT_ID --region=REGION
```
The following output example shows an operational server with 12 LUNs, a
client network of 192.168.1.1, and a private network of 192.168.2.1.
```
luns:
- bootLun: true
name: SERVER_NAME-lun000-b1
sizeGb: '200'
state: READY
storageVolume: SERVER_NAME-vol000-b1
- name: STORAGE_DEVICE_NAME-lun001
sizeGb: '85'
state: READY
storageVolume: STORAGE_DEVICE_NAME-vol001
- name: STORAGE_DEVICE_NAME-lun002
sizeGb: '85'
state: READY
storageVolume: STORAGE_DEVICE_NAME-vol001
- name: STORAGE_DEVICE_NAME-lun003
sizeGb: '85'
state: READY
storageVolume: STORAGE_DEVICE_NAME-vol001
- name: STORAGE_DEVICE_NAME-lun004
sizeGb: '85'
state: READY
storageVolume: STORAGE_DEVICE_NAME-vol001
- name: STORAGE_DEVICE_NAME-lun005
sizeGb: '85'
state: READY
storageVolume: STORAGE_DEVICE_NAME-vol001
- name: STORAGE_DEVICE_NAME-lun006
sizeGb: '85'
state: READY
storageVolume: STORAGE_DEVICE_NAME-vol001
- name: STORAGE_DEVICE_NAME-lun007
sizeGb: '85'
state: READY
storageVolume: STORAGE_DEVICE_NAME-vol001
- name: STORAGE_DEVICE_NAME-lun008
sizeGb: '85'
state: READY
storageVolume: STORAGE_DEVICE_NAME-vol001
- name: STORAGE_DEVICE_NAME-lun009
sizeGb: '85'
state: READY
storageVolume: STORAGE_DEVICE_NAME-vol001
- name: STORAGE_DEVICE_NAME-lun010
sizeGb: '85'
state: READY
storageVolume: STORAGE_DEVICE_NAME-vol001
- name: STORAGE_DEVICE_NAME-lun011
sizeGb: '85'
state: READY
storageVolume: STORAGE_DEVICE_NAME-vol001
- name: STORAGE_DEVICE_NAME-lun012
sizeGb: '85'
state: READY
storageVolume: STORAGE_DEVICE_NAME-vol001
machineType: o2-standard-32-metal
name: projects/PROJECT_ID/locations/REGION/instances/SERVER_NAME
networks:
- ipAddress: 192.168.1.1
macAddress:
- 34:80:0D:52:AF:28
- 34:80:0D:15:3E:0D
network: STORAGE_DEVICE_NAME-vlan001
- ipAddress: 192.168.2.1
macAddress:
- 34:80:0D:52:AF:38
- 34:80:0D:15:3E:1D
network: STORAGE_DEVICE_NAME-vlan002
state: RUNNING
```
### API
1. Open a
[Cloud Shell terminal window](https://console.cloud.google.com/welcome?&cloudshell=true)
in your Google Cloud console.
2. To list the servers in your Bare Metal Solution environment and see their
status, enter your project ID and region into the following `curl`
command, copy the command, paste it into the Cloud Shell
prompt, and press the **Enter** or **Return** key:
```
curl -X GET \
-H "Authorization: Bearer $(gcloud auth print-access-token)" \
-H "Content-Type: application/json" \
"https://baremetalsolution.googleapis.com/v2/projects/PROJECT_ID/locations/REGION/instances"
```
3. To get network and storage information for a server in your
Bare Metal Solution environment, issue the following command:
```
curl -X GET \
-H "Authorization: Bearer $(gcloud auth print-access-token)" \
-H "Content-Type: application/json" \
"https://baremetalsolution.googleapis.com/v2/projects/PROJECT_ID/locations/REGION/instances/SERVER_NAME"
```
### Organize servers by using labels
To help organize your servers, you can use labels. Labels are key-value pairs
that you can attach to each server, then filter the servers based on their
labels. For example, you can use labels to group servers by purpose,
environment, location, department, and so on. Labels are optional.
#### Add or update labels for servers
You can add or update labels for the existing servers.
### Console
1. Go to the
[**Compute Engine** \> **Bare Metal Solution** \> **Servers**](https://console.cloud.google.com/compute/bareMetalSolution/servers) page.
2. For the server that you want to label, click
.
3. Click **Edit labels**.
4. On the **Labels editor** page:
1. Click **Add label** and add the key-value pair.
2. To update labels, select the existing labels and modify their values.
3. Click **Submit**.
5. After you return to the **Servers** page, refresh the page to view your
changes.
### gcloud
To add or update labels for a server, use the `gcloud bms instances update`
command with the `--update-labels` option.
The following sample command adds the labels **environment = dev** and
**location = branch**:
```
gcloud bms instances update SERVER_NAME --project=PROJECT_ID --region=REGION --update-labels environment=dev,location=branch
```
If you provide a new value for a label that already exists, the system updates
the existing key with the new label value. If you provide a new label, the
system adds the new label to the list of labels.
### API
To add or update labels for a server, enter your project ID, region, server
name, and a list of labels in the following `curl` command. Copy the command,
paste it into the Cloud Shell prompt, and press the **Enter**
or **Return** key.
The following sample command assigns a label of **environment = test**.
```
curl -X PATCH \
-H "Authorization: Bearer $(gcloud auth print-access-token)" \
-H "X-Goog-User-Project: PROJECT_ID" \
-H "Content-Type: application/json" \
"https://baremetalsolution.googleapis.com/v2/projects/PROJECT_ID/locations/REGION/instances/SERVER_NAME?updateMask=labels"
-d "{
'labels' : {'environment': 'test'}
}"
```
#### Remove labels from servers
You can remove labels from the servers.
### Console
1. Go to the
[**Compute Engine** \> **Bare Metal Solution** \> **Servers**](https://console.cloud.google.com/compute/bareMetalSolution/servers) page.
2. For a server with labels that you want to remove, click
.
3. Click **Edit labels**.
4. On the **Labels editor** page:
1. To delete a label, click .
2. Click **Submit**.
5. After you return to the **Servers** page, refresh the page to view your
changes.
### gcloud
To remove labels from a server, use the `gcloud bms instances update`
command with the following options:
- `--remove-labels`: Removes the specified label.
- `--clear-labels`: Removes all the labels.
The following sample command removes the label **department** from a server:
```
gcloud bms instances update SERVER_NAME --project=PROJECT_ID --region=REGION --remove-labels=department
```
The following sample command removes all the labels from a server:
```
gcloud bms instances update SERVER_NAME --project=PROJECT_ID --region=REGION --clear-labels
```
### API
To remove labels from a server, enter your project ID, region, and server
name in the following `curl` command. Provide an empty list of labels to
remove all labels, or provide a list of labels you want to keep
(omitting the labels you want to remove). Copy the command, paste it into
the Cloud Shell prompt, and press the **Enter** or **Return** key.
The following sample command removes all the labels except
**environment = test**.
```
curl -X PATCH \
-H "Authorization: Bearer $(gcloud auth print-access-token)" \
-H "X-Goog-User-Project: PROJECT_ID" \
-H "Content-Type: application/json" \
"https://baremetalsolution.googleapis.com/v2/projects/PROJECT_ID/locations/REGION/instances/SERVER_NAME?updateMask=labels"
-d "{
'labels' : {'environment': 'test'}
}"
```
#### Filter servers using labels
You can search your servers and filter results by using labels.
### Console
1. Go to the
[**Compute Engine** \> **Bare Metal Solution** \> **Servers**](https://console.cloud.google.com/compute/bareMetalSolution/servers) page.
2. Click in the **Filter**
bar above the list of servers.
3. From the **Properties** list, select **Labels**.
4. Enter the key, value, or key-value pair for your label.
For example, to view only servers with the label `env:dev`, you can
enter any of the following:
- Enter the key: `env`
- Enter the value: `dev`
- Enter the key-value pair: `env:dev`
5. To apply the label filter, click anywhere outside the filter bar.
### gcloud
To filter servers by using labels, use the `gcloud bms instances list`
command with the `--filter` option.
The value of `--filter` option must be in the
`labels.KEY=VALUE` format. For example,
if you want to filter on a label with `env` as the key and `dev` as the
value, issue this command:
```
gcloud bms instances list --project=PROJECT_ID --region=REGION --filter labels.environment=dev
```
For more information about the filter syntax in the gcloud CLI,
see the
[`gcloud topic filters` documentation](https://docs.cloud.google.com/sdk/gcloud/reference/topic/filters).
### API
To filter servers by using labels, enter your project ID and region
along with `filter=labels` and a key-value pair label. Copy the command,
paste it into the Cloud Shell prompt, and press the **Enter** or
**Return** key.
The following sample command limits the output to find servers with the
key-value pair label **environment = test**.
```
curl -X GET \
-H "Authorization: Bearer $(gcloud auth print-access-token)" \
-H "X-Goog-User-Project: PROJECT_ID" \
-H "Content-Type: application/json" \
"https://baremetalsolution.googleapis.com/v2/projects/PROJECT_ID/locations/REGION/instances"?filter=labels.environment=test
```
### Rename a server
To rename a server, follow these steps:
### Console
1. In the Google Cloud console, go to the
[**Compute Engine** \> **Bare Metal Solution** \> **Servers**](https://console.cloud.google.com/compute/bareMetalSolution/servers) page.
2. Click the server name.
3. On the **Server details** page, in the **Name** field, click **Edit name**.
4. On the **Editing name** page, enter a new name.
5. Click **Save**.
6. To view your changes, refresh the page.
### gcloud
To rename a server, use the `gcloud bms instances rename` command.
```
gcloud bms instances rename SERVER_NAME --new-name=NEW_NAME --project=PROJECT_ID --region=REGION
```
Replace the following:
- SERVER_NAME: Current name of the server.
- NEW_NAME: New name of the server.
- PROJECT_ID: Your project ID.
- REGION: The location of the server.
### Retrieve the initial password for a server
When you first receive your Bare Metal Solution server or [change the operating
system](https://docs.cloud.google.com/bare-metal/docs/bms-maintenance#change-os-for-server), the server
begins in a default state and has an initial password. You must use this
password the first time you gain access to the server. After you enter the
initial password, the server prompts you to change the password.
To find your initial password:
### gcloud
1. Authorize yourself to impersonate your Google Cloud service account. Run
the `gcloud iam service-accounts add-iam-policy-binding` command.
```
gcloud iam service-accounts add-iam-policy-binding \
SERVICE_ACCOUNT_NAME@PROJECT_ID. \
--member=user:USER_EMAIL \
--project=PROJECT_ID \
--role=roles/iam.serviceAccountTokenCreator
```
If you're already authorized, you can skip this step.
2. In the project that contains your Bare Metal Solution server, run the
`gcloud bms instances describe` command.
```
gcloud bms instances describe SERVER_NAME --project=PROJECT_ID --region=REGION
```
In the output, look for the `loginInfo` field.
3. From the `loginInfo` field, copy and paste the
`gcloud beta secrets versions access` command in the command line prompt.
4. Add the `--impersonate-service-account` parameter to the
`gcloud beta secrets versions access` command as follows and run it.
```
gcloud beta secrets versions access \
--project=PROJECT_ID \
--secret machine-reg-SERVER_NAME-customeradmin latest \
--impersonate-service-account=SERVICE_ACCOUNT_NAME@PROJECT_ID.
```
The command outputs the credentials of your server.
5. Retrieve the username (usually `customeradmin`) and password.
6. Use these credentials to [log in to the server](https://docs.cloud.google.com/bare-metal/docs/bms-setup#bms-first-logon).
7. Change the password.
### API
1. Before you retrieve a password, make sure you have activated the service account provided to you by Google Cloud.
2. In the project that contains your Bare Metal Solution resources, access the Cloud Shell.
3. Enter your project ID, region, and server name into the following `curl`
command, copy and paste the command into the command line prompt, and
press the **Enter** or **Return** key.:
```
curl -X GET \
-H "Authorization: Bearer $(gcloud auth print-access-token)" \
-H "Content-Type: application/json" \
"https://baremetalsolution.googleapis.com/v2/projects/PROJECT_ID/locations/REGION/instances/SERVER_NAME"
```
4. In the output, look for the `loginInfo` field and follow the instructions.
5. If the `loginInfo` field contains a `gcloud beta secrets
versions access` command, copy and paste the command into the command
line prompt and press the **Enter** or **Return** key.
6. Retrieve the username (usually `customeradmin`) and password.
7. Use these credentials to [log in to the server](https://docs.cloud.google.com/bare-metal/docs/bms-setup#bms-first-logon).
8. Change the password.
### View OS details
To view the details of the operating system (OS) of your server, run the
`gcloud bms os-images describe` command to view the OS details.
```
gcloud bms os-images describe OS_IMAGE --project=PROJECT_ID
```
Replace the following:
- OS_IMAGE: The OS image code. To get the OS image code for your OS, see [Operating systems](https://docs.cloud.google.com/bare-metal/docs/bms-planning#operating_systems).
- PROJECT_ID: The project ID.
Example:
```
gcloud bms os-images describe OEL8x --project=test-project
```
Following is a sample output:
```
applicableInstanceTypes:
- o2-highmem-224-metal
- o2-standard-112-metal
- o2-standard-16-metal
- o2-standard-32-metal
- o2-standard-48-metal
code: OEL8x
description: Oracle Linux 8.8 [5.4.17-2136.324.5.3.el8uek.x86_64]
name: projects/bmaas-testing/locations/global/osImages/OEL8x
supportedNetworkTemplates:
- s200-bondaa-bondaa
- s400-bondaa-bondaa
```
### Change the OS for a server
You can reimage a Bare Metal Solution server with a different OS image. Changing
the OS image takes a long time to complete and requires a power cycle of the
server. To select one of the available OS images, visit [Operating systems](https://docs.cloud.google.com/bare-metal/docs/bms-planning#operating_systems).
> [!NOTE]
> **Note:** A server reimage overwrites the boot configuration and creates a new login password. To retrieve the new password, see [Retrieve the initial password for a
> server](https://docs.cloud.google.com/bare-metal/docs/bms-maintenance#retrieve_the_initial_password_for_a_server). If you cannot retrieve the password, please contact [Customer Care](https://cloud.google.com/support-hub).
### Console
You can reimage your Bare Metal Solution server from the
Google Cloud console.
1. Go to [**Compute Engine** \> **Bare Metal Solution** \> **Servers**](https://console.cloud.google.com/compute/bareMetalSolution/servers).
2. For the server you want to reimage, click menu.
3. Click **Edit**.
4. On the **Edit server** page:
- Select the **Reimage server** checkbox.
- From the **OS image** list, select the OS image you want to install.
- (Optional) Set up an encryption key for the server's password.
> [!WARNING]
>
> **Preview**
>
>
> This feature is
>
> subject to the "Pre-GA Offerings Terms" in the General Service Terms section of the
> [Service Specific
> Terms](https://docs.cloud.google.com/terms/service-terms#1).
>
> Pre-GA features are available "as is" and might have limited support.
>
> For more information, see the
> [launch stage descriptions](https://cloud.google.com/products/#product-launch-stages).
- In the **Password encryption key** list, select a key.
- In the **Version** list, select a version of the encryption key.
To learn more about how to use encryption keys with Bare Metal Solution, see
[Set up encryption keys for a server](https://docs.cloud.google.com/bare-metal/docs/bms-encryption-keys).
- (Optional) Set up or change SSH keys for the server.
> [!WARNING]
>
> **Preview**
>
>
> This feature is
>
> subject to the "Pre-GA Offerings Terms" in the General Service Terms section of the
> [Service Specific
> Terms](https://docs.cloud.google.com/terms/service-terms#1).
>
> Pre-GA features are available "as is" and might have limited support.
>
> For more information, see the
> [launch stage descriptions](https://cloud.google.com/products/#product-launch-stages).
- In the **SSH keys** list, select the keys. The list displays only the SSH keys that exist in the same project as that of your server.
To change the existing SSH keys for the server, deselect the keys you want to change and select the new ones.
To learn more about how to use SSH keys with Bare Metal Solution, see
[Set up SSH keys for a server](https://docs.cloud.google.com/bare-metal/docs/bms-ssh-keys).
- Click **Save**.
### gcloud
Run the `gcloud bms instances update` command to change the OS image on
your server. For the OS image code, see [Operating systems](https://docs.cloud.google.com/bare-metal/docs/bms-planning#operating_systems).
```
gcloud bms instances update SERVER_NAME --region REGION --os-image=OS_IMAGE
```
To set up SSH keys, encryption keys, or both, use the
`gcloud alpha bms instances update` command. You can specify keys as either
names or as full resources.
> [!WARNING]
>
> **Preview**
>
>
> This feature is
>
> subject to the "Pre-GA Offerings Terms" in the General Service Terms section of the
> [Service Specific
> Terms](https://docs.cloud.google.com/terms/service-terms#1).
>
> Pre-GA features are available "as is" and might have limited support.
>
> For more information, see the
> [launch stage descriptions](https://cloud.google.com/products/#product-launch-stages).
```
gcloud alpha bms instances update SERVER_NAME --region REGION --os-image=OS_IMAGE --kms-crypto-key-version=KMS_CRYPTO_KEY_VERSION --ssh-keys=KEY_1,KEY_2
```
Example:
```
gcloud alpha bms instances update server1 --region europe-west3 --os-image=OS_IMAGE --kms-crypto-key-version=projects/bmaas-testing/locations/global/keyRings/e2e-test/cryptoKeys/e2e-test-key/cryptoKeyVersions/1 --ssh-keys=e2e-test-key-1,e2e-test-key-2
```
### API
To update an OS image on your Bare Metal Solution server, enter your project
ID, region, server name, and OS image, then issue the following `curl`
command. For the OS image code, see [Operating systems](https://docs.cloud.google.com/bare-metal/docs/bms-planning#operating_systems).
```
curl -X PATCH \
-H "Authorization: Bearer $(gcloud auth print-access-token)" \
-H "X-Goog-User-Project: PROJECT_ID" \
-H "Content-Type: application/json" \
"https://baremetalsolution.googleapis.com/v2/projects/PROJECT_ID/locations/REGION/instances/SERVER_NAME?updateMask=os_image"
-d "{
'osImage' : 'OS_IMAGE'
}"
```
Because this change takes awhile to complete, you can check the status by
following the steps in
[View the status of a long-running operation](https://docs.cloud.google.com/bare-metal/docs/bms-maintenance#view_the_status_of_a_long-running_operation).
### Enable hyperthreading on a server
You can enable or disable hyperthreading on your Bare Metal Solution servers.
This action takes a long time to complete and requires a power cycle of the
server.
### Console
You can enable or disable hyperthreading on your Bare Metal Solution server
in the Google Cloud console.
1. Go to [**Compute Engine** \> **Bare Metal Solution** \> **Servers**](https://console.cloud.google.com/compute/bareMetalSolution/servers).
2. For the server on which you want to enable/disable hyperthreading, click menu.
3. Click **Edit**.
4. On the **Edit server** page:
- To enable hyperthreading, select the **Enable hyperthreading** checkbox.
- To disable hyperthreading, clear the **Enable hyperthreading** checkbox.
- Click **Save**.
### gcloud
Run the **gcloud bms instances update** command to enable or
disable hyperthreading.
- Include the **--enable-hyperthreading** option to enable it.
- Include the **--no-enable-hyperthreading** option to disable it.
```
gcloud bms instances update SERVER_NAME --region REGION --enable-hyperthreading
```
### API
To change the current hyperthreading capabilities of your server, enter your
project ID, region, and server name into the following `curl` command. Add
`true` for the hyperthreading value if you want to enable it or `false` to
disable it.
```
curl -X PATCH \
-H "Authorization: Bearer $(gcloud auth print-access-token)" \
-H "X-Goog-User-Project: PROJECT_ID" \
-H "Content-Type: application/json" \
"https://baremetalsolution.googleapis.com/v2/projects/PROJECT_ID/locations/REGION/instances/SERVER_NAME?updateMask=hyperthreading_enabled"
-d "{
'hyperthreadingEnabled' : 'HYPERTHREADING_VALUE'
}"
```
Because this change takes awhile to complete, you can check the status by
following the steps in
[View the status of a long-running operation](https://docs.cloud.google.com/bare-metal/docs/bms-maintenance#view_the_status_of_a_long-running_operation).
## Manage VRFs
In Bare Metal Solution environment, a VRF (Virtual Routing and Forwarding) is a
connecting interface between a client network and VLAN attachments
(also known as `interconnectAttachments`).
Using a VRF, you can map your client network to your VLAN attachments in the
following ways:
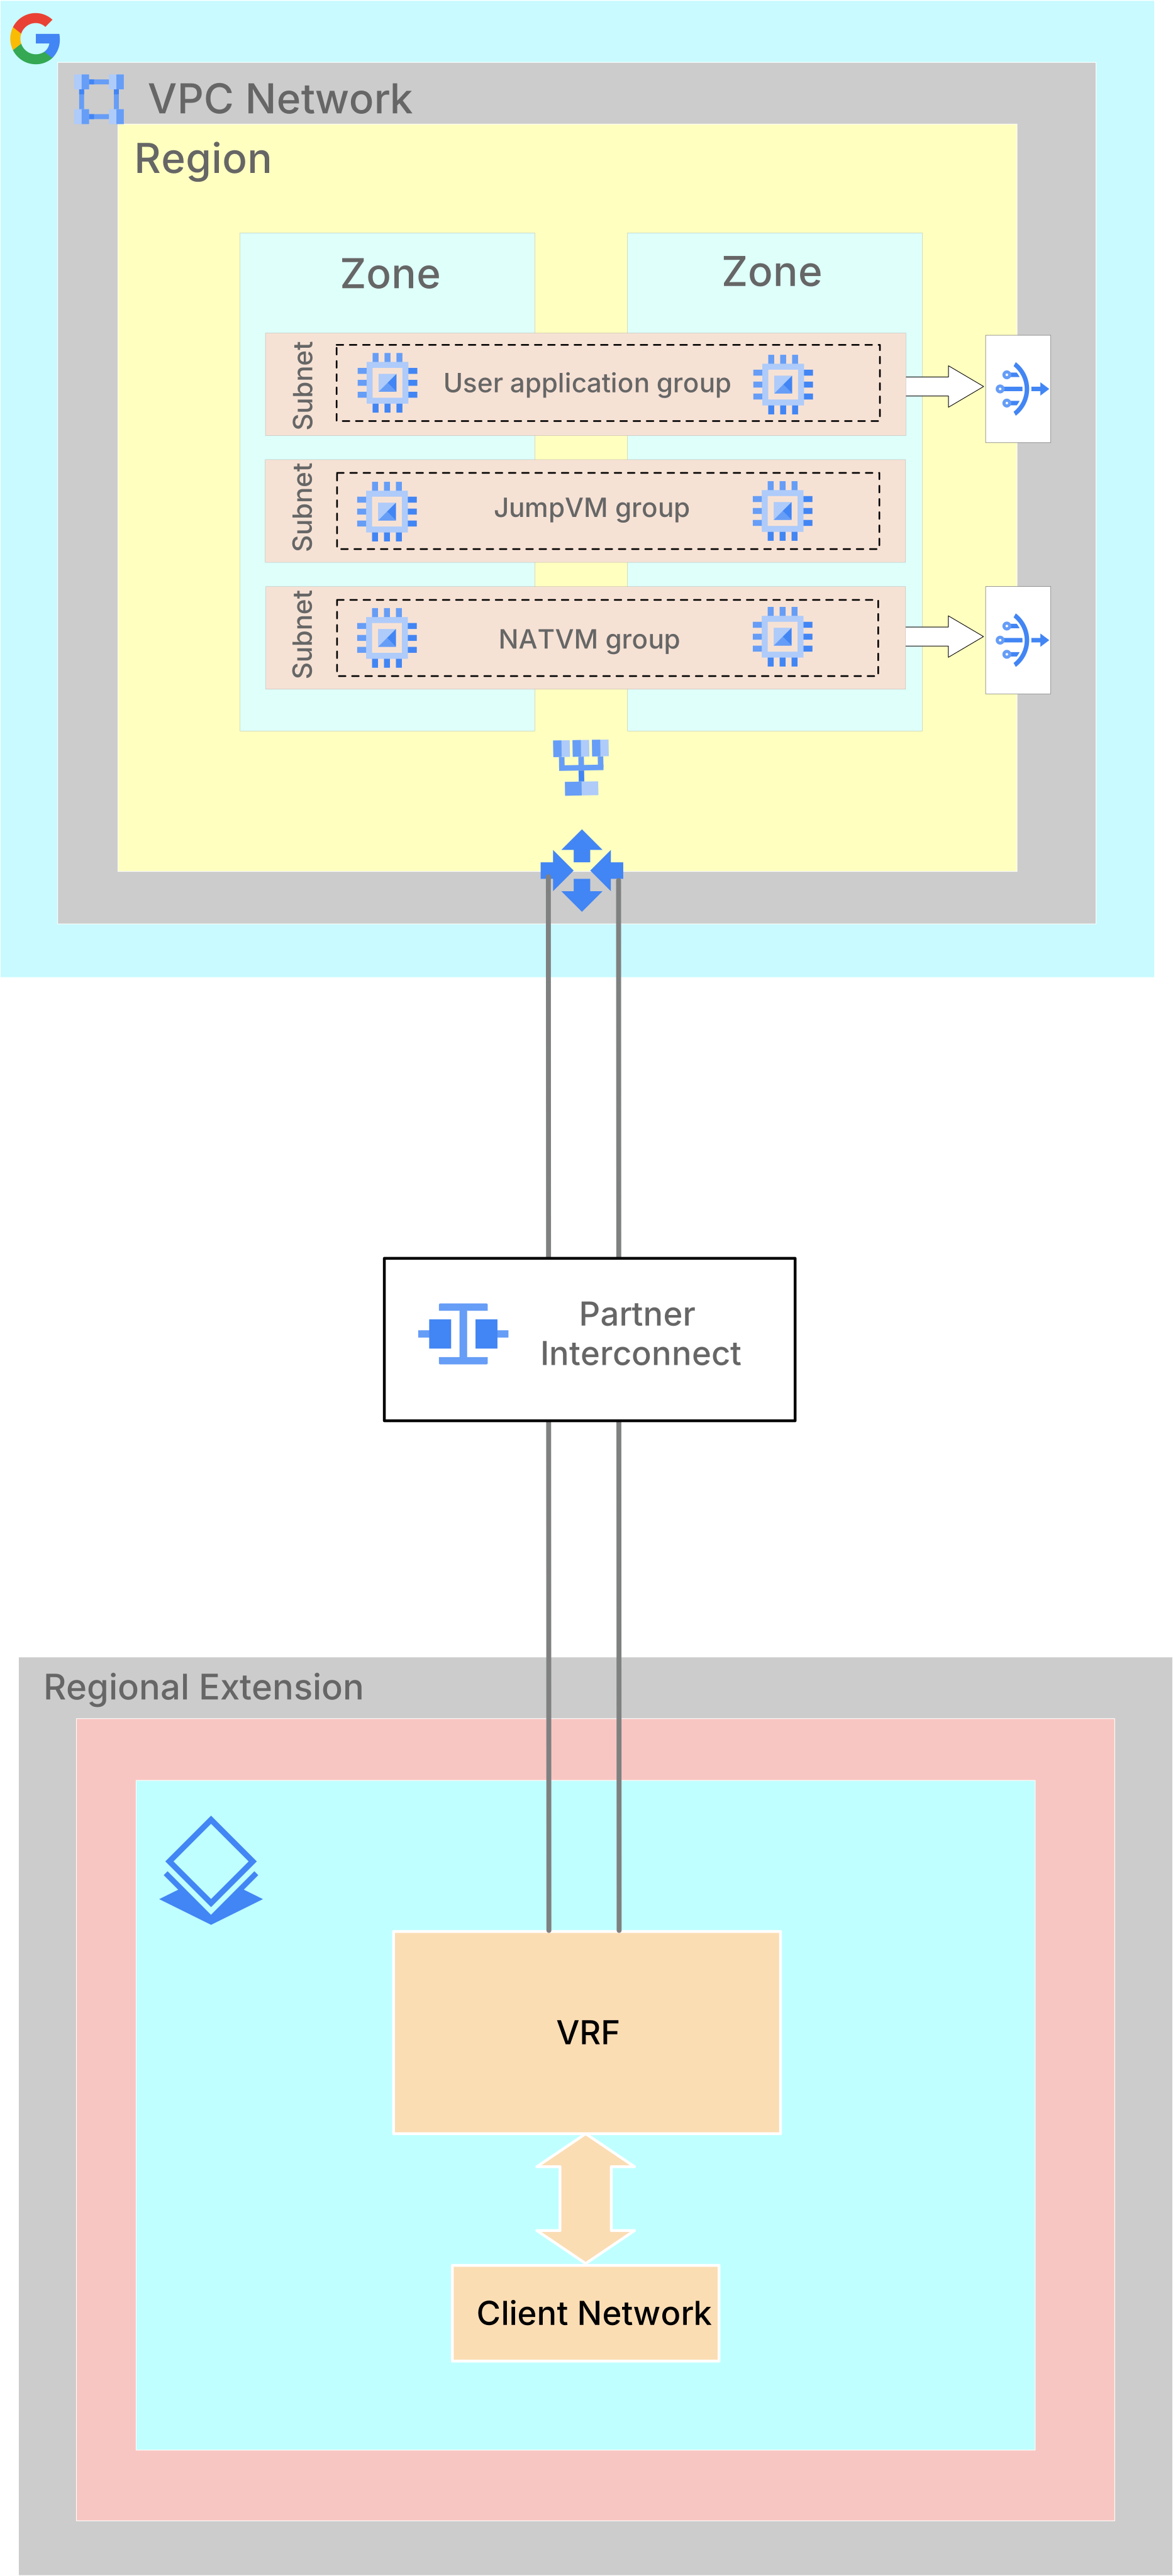
- Map a single client network to a single VLAN attachment pair through a
single VRF. This is the default mapping. When you create a client network
through the [Google Cloud console intake form](https://docs.cloud.google.com/bare-metal/docs/bms-deploy#use_the_console_intake_form_to_enter_your_selections),
a VRF is created implicitly. This VRF is used to establish a connection
from your client network and its VLAN attachment towards Google Cloud.
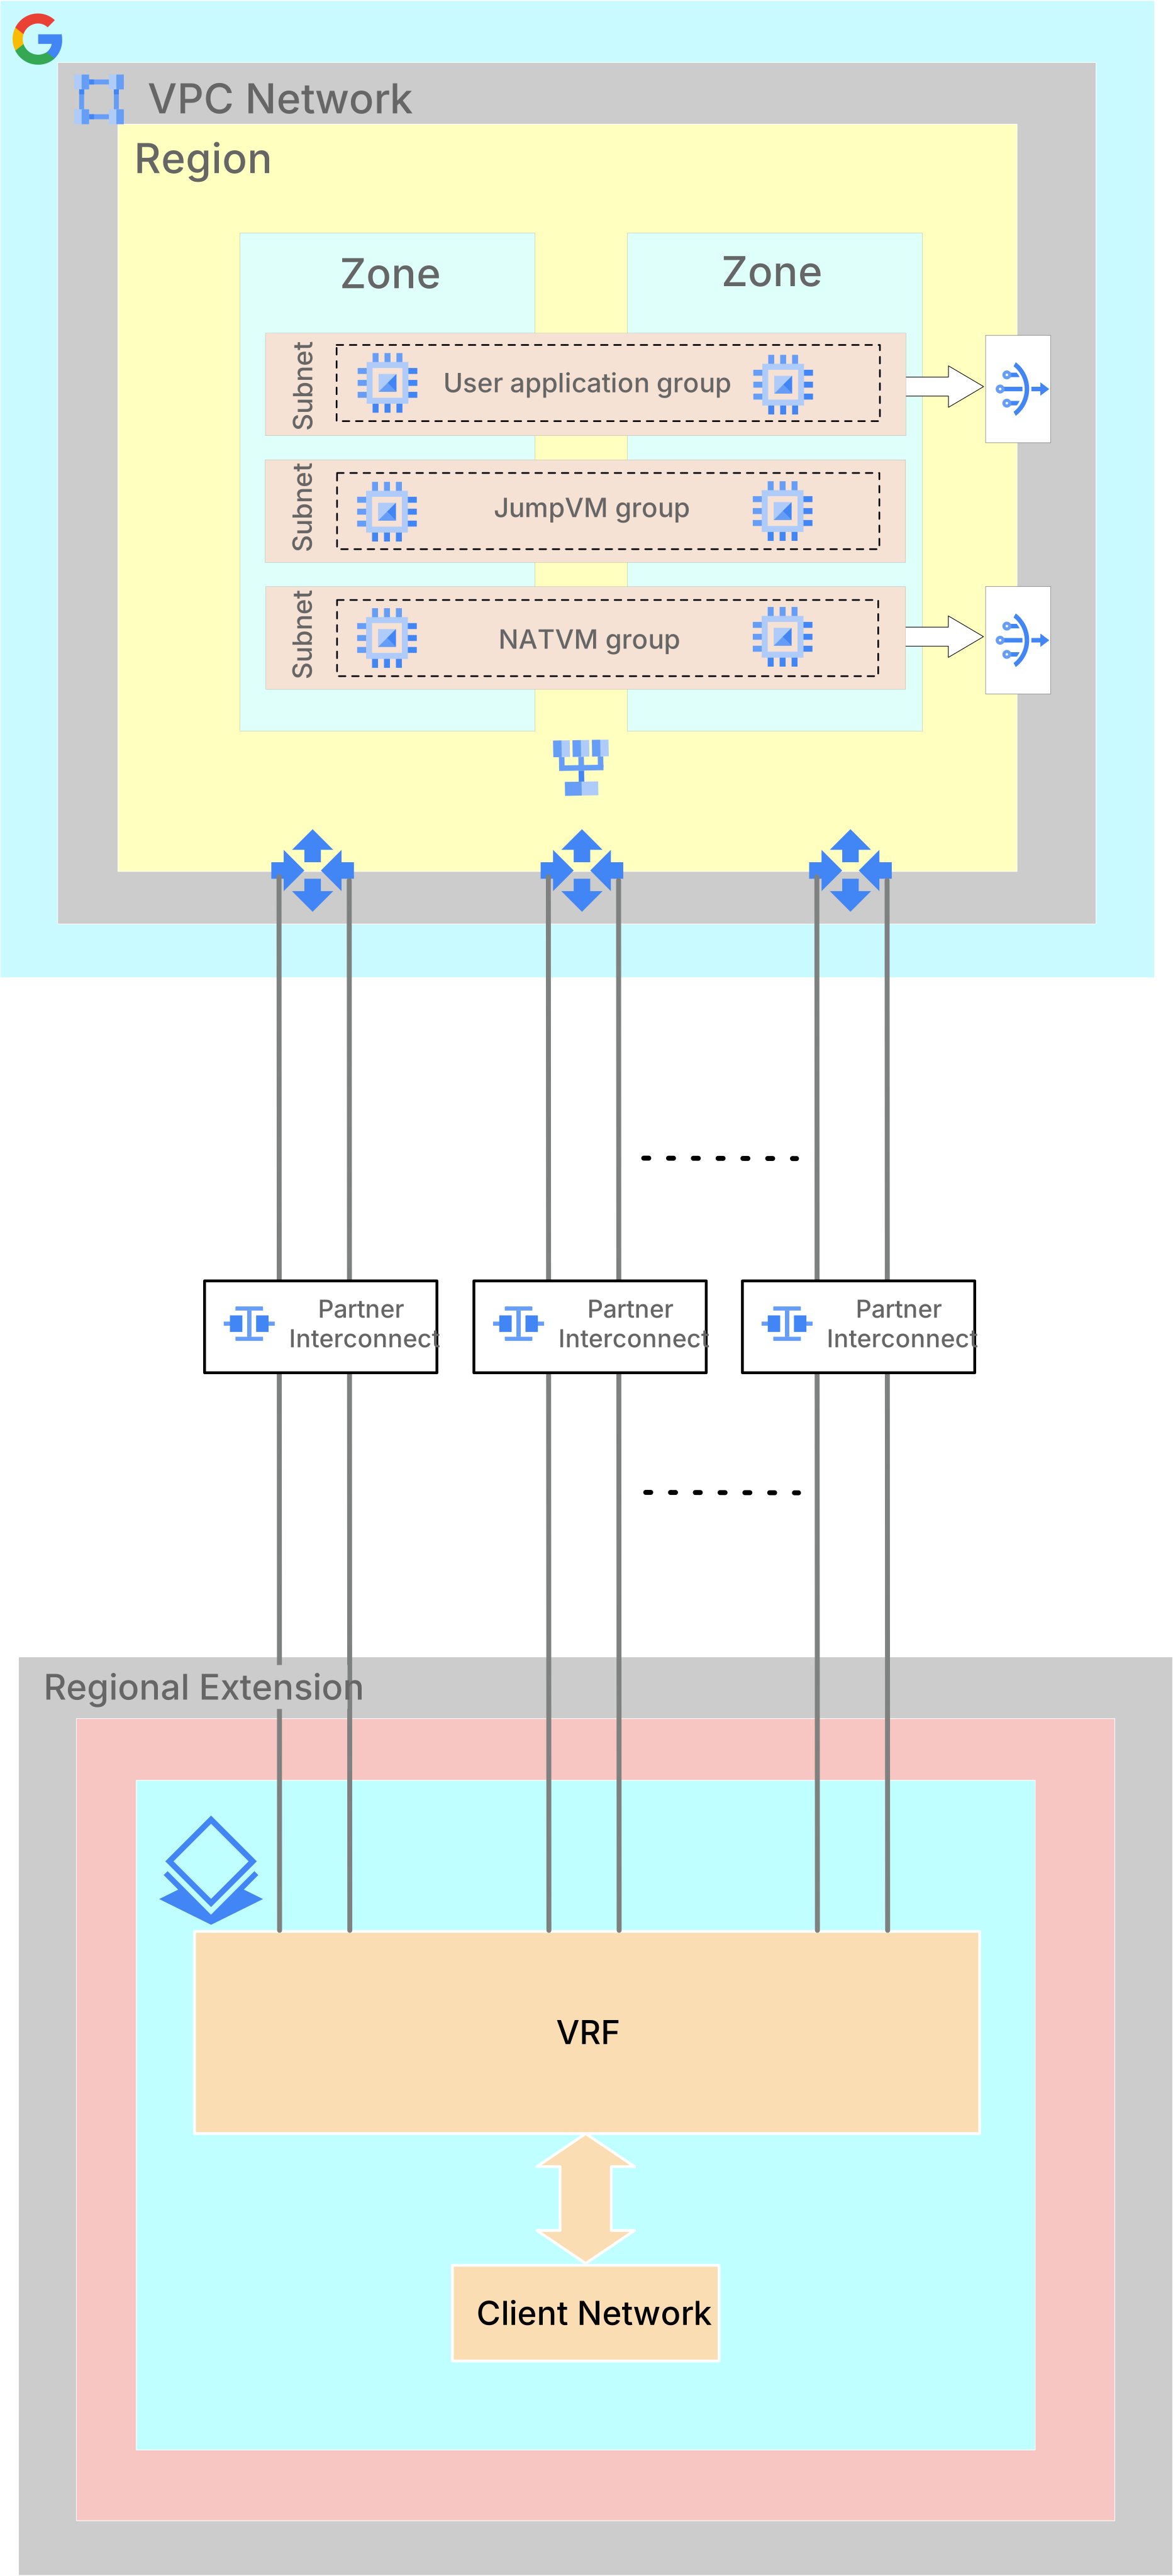
- Map a single client network to multiple VLAN attachments through a single
VRF. This way, you can increase the bandwidth between your Bare Metal Solution
environment and Google Cloud.
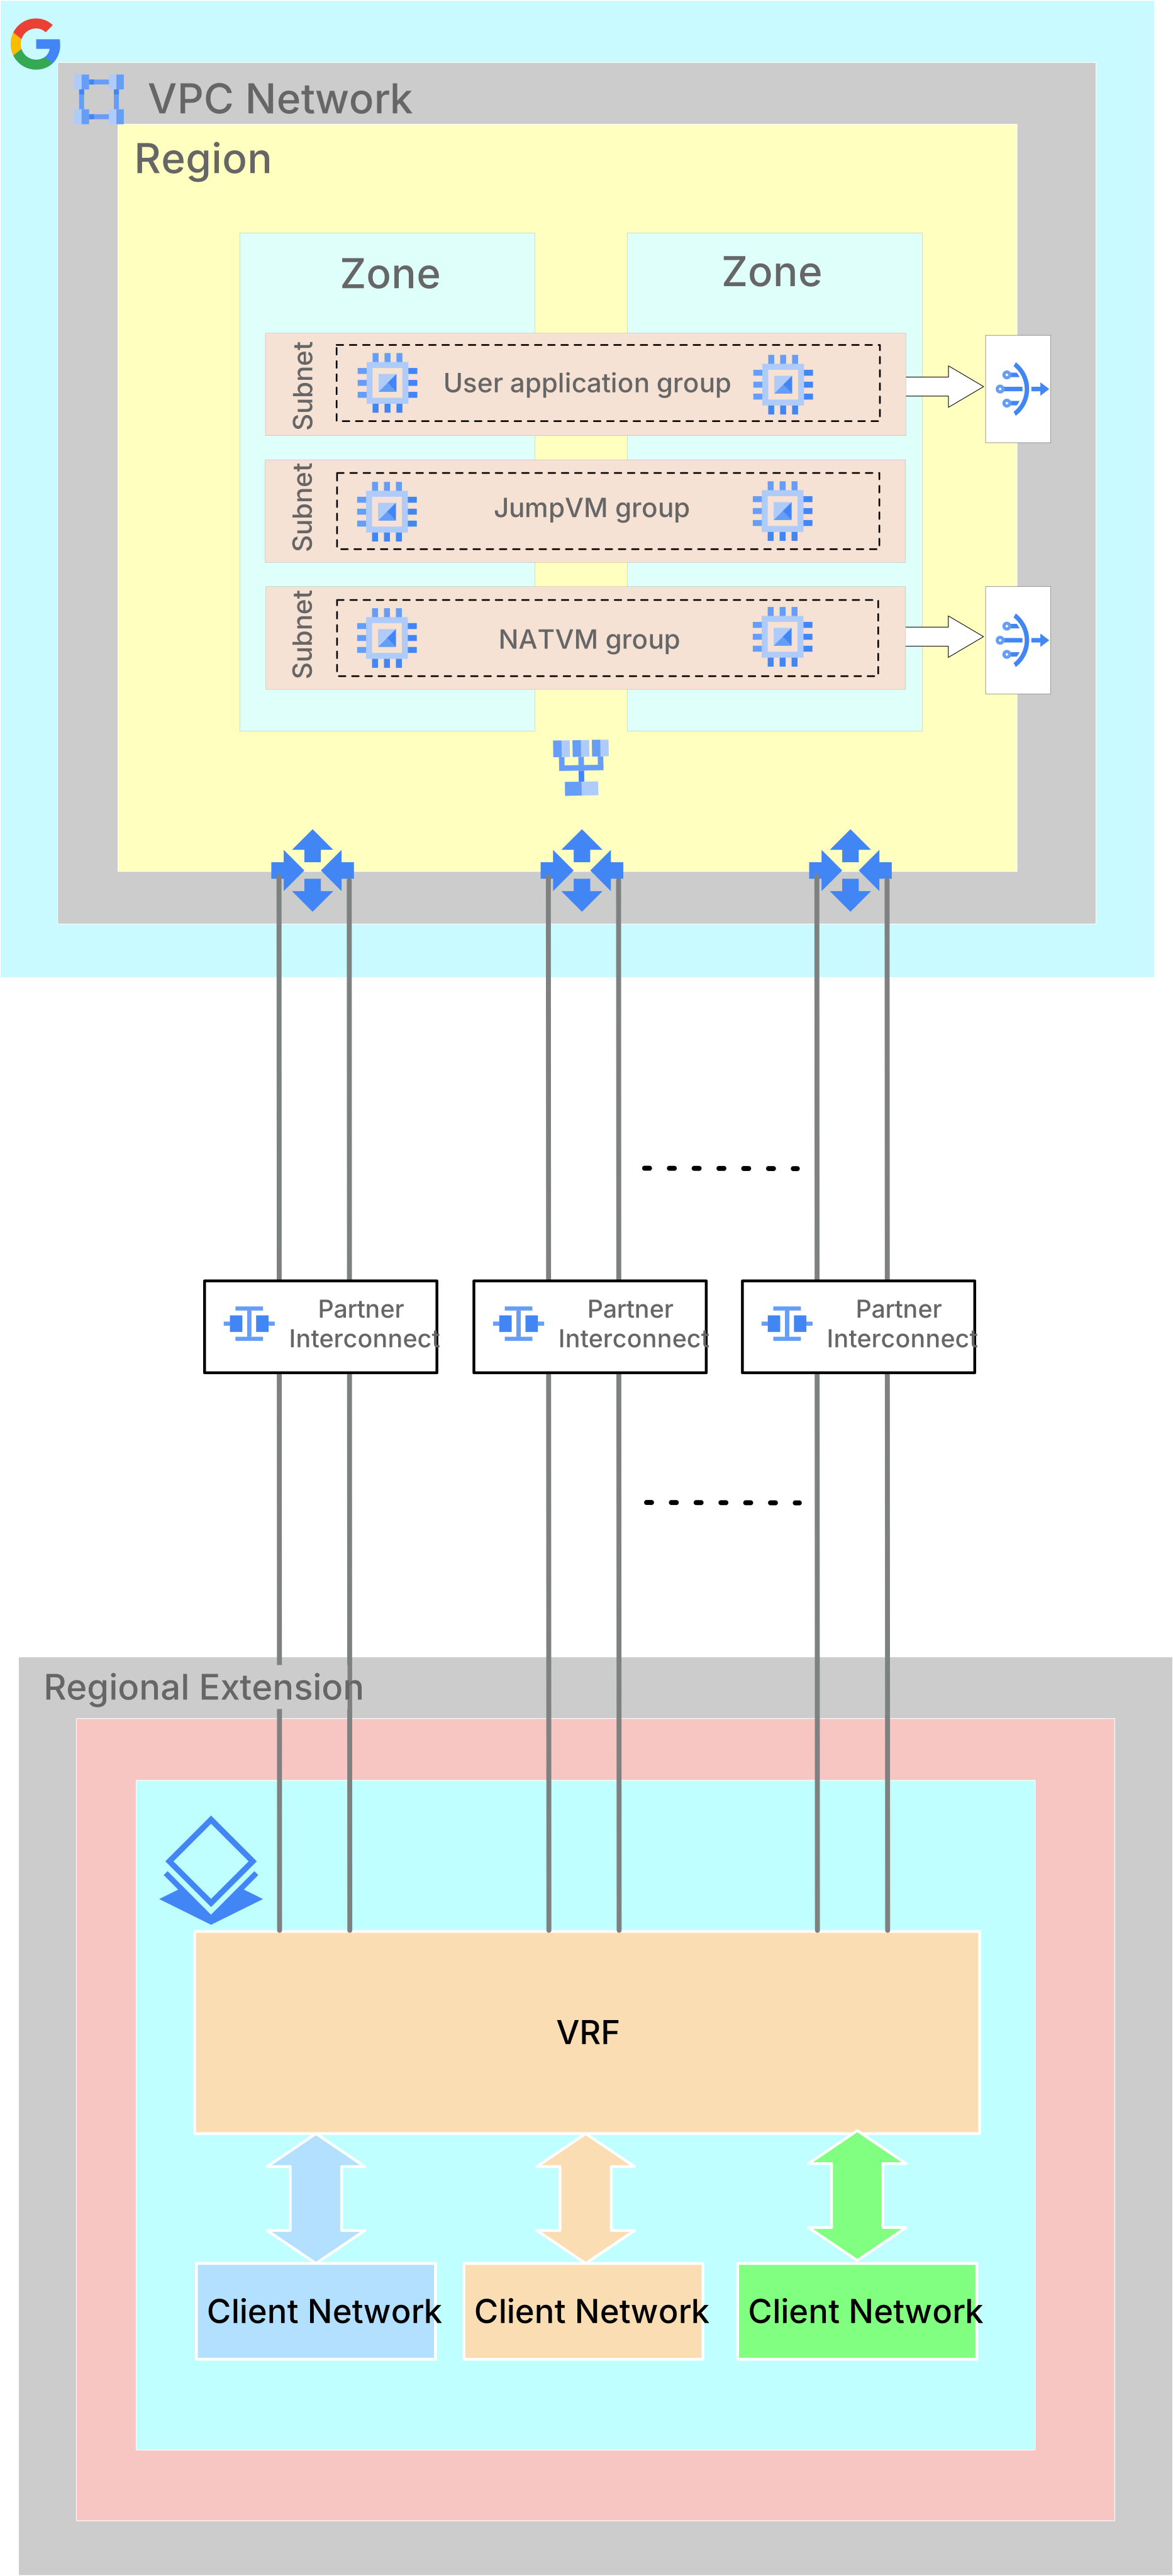
- Map multiple client networks using a single VRF to share multiple VLAN
attachments. This way, you can increase the bandwidth between your
Bare Metal Solution environment and Google Cloud.
In this mapping, the client networks aren't isolated from each
other. They are routed between each other through a common VRF. Therefore,
the hosts in these networks can talk to each other without any traffic
filtering.
- Map multiple client networks to their dedicated VLAN attachments using
dedicated VRFs. This way, you can achieve a particular bandwidth for each
client network.
In this mapping, the client networks are isolated from each other. You can't
use the VPC network (that is, the Google Cloud network) as a transit
between these client networks.

You can manage the VRFs and VLAN attachments in your Bare Metal Solution
environment in the following ways:
- [View VRFs](https://docs.cloud.google.com/bare-metal/docs/bms-maintenance#view-vrfs)
- [Create a VRF](https://docs.cloud.google.com/bare-metal/docs/bms-maintenance#create-vrf)
- [Delete a VRF](https://docs.cloud.google.com/bare-metal/docs/bms-maintenance#delete-vrf)
- [Add a VLAN attachment pair](https://docs.cloud.google.com/bare-metal/docs/bms-maintenance#add-vlan-attachment)
- [Update a VLAN attachment pair](https://docs.cloud.google.com/bare-metal/docs/bms-maintenance#update-vlan-attachment)
- [Delete a VLAN attachment pair](https://docs.cloud.google.com/bare-metal/docs/bms-maintenance#delete-vlan-attachment)
> [!NOTE]
> **Note:** Bare Metal Solution doesn't support moving an existing client network between VRFs. To do this, delete the client network and recreate it with the VRF that you want to use.
### View VRFs
To view the details of your VRFs, follow these steps:
1. Go to the **VRFs** page.
[Go to VRFs](https://console.cloud.google.com/compute/bareMetalSolution/vrfs)
The **VRFs** page lists all your VRFs with the following details:
| **Field** | **Description** |
|---|---|
| **Status** | Indicates the availability of a VRF. |
| **Name** | Name of the VRF. Click the name to view additional information about the VRF. **Note:** If you did not enter a name when you provisioned your VRF, the **ID** appears in this field. |
| **ID** | Identifier assigned to your VRF. - Click the ID to view additional information about the VRF. - Share the ID with Google Cloud support when troubleshooting this resource. |
| **Region** | Region where the VRF is located. |
| **Pod** | Pod that contains your VRF. A pod is a unit of isolation that contains your Bare Metal Solution resources. Resources in different pods cannot be connected. A region can have multiple pods. The **Pod** column is disabled by default. To enable it, do the following: 1. Click **Column display options** . 2. Select the **Pod** checkbox. 3. Click **OK**. If you don't want to enable the **Pod** column, you can view the pod of a VRF by clicking the VRF name or ID. |
2. To see the additional details about a VRF, click the **Name** or **ID** of
the VRF.
The **VRF details** page shows the following additional details:
| **Field** | **Description** |
|---|---|
| **VLAN attachment pairs** | Details of the VLAN attachment pairs associated with the VRF, such as peer IP, router IP, and bandwidth. |
| **Member networks** | List of networks associated with the VRF. You can view the details of a network by clicking it. |
### Create a VRF
When you provision a new network through the
[Google Cloud console intake form](https://docs.cloud.google.com/bare-metal/docs/bms-deploy#use_the_console_intake_form_to_enter_your_selections),
a VRF is created implicitly. However, you can also create more VRFs afterwards.
To create a new VRF, follow these steps:
1. Go to the **VRFs** page.
[Go to VRFs](https://console.cloud.google.com/compute/bareMetalSolution/vrfs)
2. Click **Create**.
3. Enter a name for the VRF.
4. In the **Region** list, select a region for the VRF.
5. In the **Pod** list, select a pod for the VRF.
The **Pod** drop-down list also shows the number of your existing
Bare Metal Solution resources in each pod of the selected
location.
If you're unsure about which pod to select, contact
[Google Cloud Sales](https://cloud.google.com/contact).
6. [Add VLAN attachment pairs](https://docs.cloud.google.com/bare-metal/docs/bms-maintenance#add-vlan-attachment).
While creating a VRF, you can only add one VLAN attachment pair. You can add
more VLAN attachment pairs after you have created the VRF by following the
steps in [Add a VLAN attachment pair](https://docs.cloud.google.com/bare-metal/docs/bms-maintenance#add-vlan-attachment).
7. Click **Create**.
### Delete a VRF
Before deleting a VRF, you must delete all its VLAN attachment pairs and
attached networks. See [Delete a VLAN attachment pair](https://docs.cloud.google.com/bare-metal/docs/bms-maintenance#delete-vlan-attachment)
and [Delete a network](https://docs.cloud.google.com/bare-metal/docs/bms-maintenance#delete-network).
To delete a VRF, follow these steps:
1. Go to the **VRFs** page.
[Go to VRFs](https://console.cloud.google.com/compute/bareMetalSolution/vrfs)
2. Select the VRF to delete.
3. Click **Delete**.
4. Click **Confirm**.
### Manage VLAN attachments
You can manage your VLAN attachment pairs in the following ways:
- [Add a VLAN attachment pair](https://docs.cloud.google.com/bare-metal/docs/bms-maintenance#add-vlan-attachment)
- [Update a VLAN attachment pair](https://docs.cloud.google.com/bare-metal/docs/bms-maintenance#update-vlan-attachment)
- [Delete a VLAN attachment pair](https://docs.cloud.google.com/bare-metal/docs/bms-maintenance#delete-vlan-attachment)
#### Add a VLAN attachment pair
A VRF can have multiple VLAN attachment pairs. However, a VLAN attachment can
only be paired with one VRF.
For a Bare Metal Solution network, we recommend that you create VLAN attachments
in pairs for high availability.
> [!NOTE]
> **Note:** If you don't have bandwidth to create a new VLAN attachment pair, delete an existing VLAN attachment pair or request additional bandwidth from [Google Cloud Sales](https://cloud.google.com/contact).
1. Go to the **VRFs** page.
[Go to VRFs](https://console.cloud.google.com/compute/bareMetalSolution/vrfs)
2. Click the VRF name.
3. On the **VRF details** page, in the **VLAN Attachment pairs** section,
click **Create**.
4. On the **New VLAN attachment pair** page:
5. From the **Bandwidth** list, select the amount of bandwidth that you
want to allocate to the VLAN attachment pair.
6. To add a VLAN attachment pair from the current project:
1. Select **Select VLAN attachments from your current project** checkbox.
2. In the **First VLAN attachment ID** field, enter the ID of the first VLAN attachment and in the **Second VLAN attachment ID** field, enter the ID of the second VLAN attachment.
7. To add a VLAN attachment pair from different project:
1. Make sure to [Enable and activate the Bare Metal Solutions API and gcloud CLI](https://docs.cloud.google.com/bare-metal/docs/bms-maintenance#set_up_the_bms_api) in your networking project that contains your VLAN attachments
2. Clear the **Select VLAN attachments in your current project** checkbox.
3. In the **First VLAN attachment ID** field, enter the ID of the first VLAN attachment and in the
**Second VLAN attachment ID** field, enter the ID of the second VLAN attachment.
Enter the VLAN attachments in the following format
projects/PROJECT_ID/regions/INTERCONNECT_REGION/interconnectAttachments/VLAN_ATTACHMENT_NAME
8. Click **Create**.
Because creating a VLAN attachment pair takes a while to complete, you can check the
status by following the steps in
[View the status of a long-running operation](https://docs.cloud.google.com/bare-metal/docs/bms-maintenance#view_the_status_of_a_long-running_operation).
#### Update a VLAN attachment pair
You can update only the bandwidth of a VLAN attachment pair.
> [!WARNING]
> **Warning:** While updating the bandwidth of a VLAN attachment is typically non-disruptive, in rare cases it can cause a brief traffic disruption of less than one minute. For critical workloads, consider scheduling this operation during a maintenance window or temporarily routing traffic away from the VLAN attachment before performing the update.
> [!NOTE]
> **Note:** If you want to increase the bandwidth of a VLAN attachment but have reached your project's total bandwidth quota limit, you must delete or reduce the bandwidth of another VLAN attachment pair to free up quota, or request a quota increase from [Google Cloud Sales](https://cloud.google.com/contact).
1. Go to the **VRFs** page.
[Go to VRFs](https://console.cloud.google.com/compute/bareMetalSolution/vrfs)
2. Click the VRF name.
3. On the **VRF details** page, in the **VLAN Attachment pairs** section,
select the VLAN attachment pair that you want to update.
4. Click **Edit**.
5. On the **Edit VLAN attachment pair** page, do the following:
1. From the **Bandwidth** list, select the amount of bandwidth that you want to allocate to the VLAN attachment pair.
2. Click **Save**.
Because updating a VLAN attachment pair takes a while to complete, you can check
the status by following the steps in
[View the status of a long-running operation](https://docs.cloud.google.com/bare-metal/docs/bms-maintenance#view_the_status_of_a_long-running_operation).
#### Delete a VLAN attachment pair
Deleting a VLAN attachment pair using the steps in this procedure only unlinks
a VLAN attachment pair from the VRF and does not actually delete it.
1. Go to the **VRFs** page.
[Go to VRFs](https://console.cloud.google.com/compute/bareMetalSolution/vrfs)
2. Click the VRF name.
3. On the **VRF details** page, in the **VLAN Attachment pairs** section,
select the VLAN attachment pair that you want to delete.
4. Click **Delete**.
Because deleting a VLAN attachment pair takes a while to complete, you can check the
status by following the steps in [View the status of a long-running operation](https://docs.cloud.google.com/bare-metal/docs/bms-maintenance#view_the_status_of_a_long-running_operation).
## Manage networks
You can manage the networks in your Bare Metal Solution environment in the
following ways:
- [View networks](https://docs.cloud.google.com/bare-metal/docs/bms-maintenance#view-networks-in-your-bare-metal-solution-environment)
- [Organize networks by using labels](https://docs.cloud.google.com/bare-metal/docs/bms-maintenance#organize-networks-using-labels)
- [Rename a network](https://docs.cloud.google.com/bare-metal/docs/bms-maintenance#rename-network)
- [Create a network](https://docs.cloud.google.com/bare-metal/docs/bms-maintenance#create-network)
- [Attach a network to a server](https://docs.cloud.google.com/bare-metal/docs/bms-maintenance#attach-existing-network)
- [Detach a network from a server](https://docs.cloud.google.com/bare-metal/docs/bms-maintenance#detach-network)
- [Delete a network](https://docs.cloud.google.com/bare-metal/docs/bms-maintenance#delete-network)
- [View advanced networking information for a Bare Metal Solution environment](https://docs.cloud.google.com/bare-metal/docs/bms-maintenance#view-advanced-networking-info)
- [Implement IP address management in a Bare Metal Solution environment](https://docs.cloud.google.com/bare-metal/docs/bms-maintenance#implement-ip-address-management)
### View networks
Monitoring your network resources in the Bare Metal Solution environment lets
you know how your servers connect to other resources.
To view the details of your networks, follow these steps:
### Console
1. Go to the **Networks** page.
[Go to Networks](https://console.cloud.google.com/compute/bareMetalSolution/networks)
The **Networks** page lists all your networks with the following
details:
| **Field** | **Description** | **Example** |
|---|---|---|
| **Status** | Indicates the availability of a network | A green circle with a check mark indicates that the network is provisioned and available. |
| **ID** | Identifier assigned to your network. - Click the ID to view basic information about the network. - Share the ID with Google Cloud support when troubleshooting this resource. | `at-1234567-vlan001` |
| **Name** | Network name. Click the name to view additional information about the network.
**Note:** If you did not enter a name when you provisioned your network, the **ID** appears in this field. | `network-1` |
| **Location** | Region where the network is located | `asia-southeast1` |
| **Pod** | Pod that contains your network. A pod is a unit of isolation that contains your Bare Metal Solution resources. Resources in different pods cannot be connected. A region can have multiple pods. The **Pod** column is disabled by default. To enable it, do the following: 1. Click **Column display options** . 2. Select the **Pod** checkbox. 3. Click **OK**. If you don't want to enable the **Pod** column, you can view the pod of a network by clicking the network name. | `asia-southeast1-pod1` |
| **Type** | Client or private network | `Client` |
| **CIDR** | IP address range for the network | `192.168.1.0/24` |
| **VLAN ID** | VLAN identifier assigned by Google Cloud | `100` |
| **Labels** | Displays any labels you added to this networking resource
You can use labels to filter the console output by copying the text of a label and pasting it in the **Filter** box just above the **Status** field. | `environment:test` |
2. To view the additional details of a network, click the
**Name** or **ID** of the network.
The **Network details** page shows the following additional details:
| **Field** | **Description** |
|---|---|
| **Gateway IP** | The IP address of the gateway in the network. |
| **Service IP address range** | The IP address range reserved for services such as NFS on the network. |
| **MTU** | The MTU of the network. |
| **VRF** | The VRF associated with the network. |
| **Used addresses** | The IP addresses of the servers connected by the network. |
### gcloud
1. To view all networks in your Bare Metal Solution environment and see
their status, enter your project ID and issue the `gcloud bms networks
list` command.
```
gcloud bms networks list --project=PROJECT_ID
```
The following output example shows a network name, region, IP address range, network type, and VLAN ID for each network.
```
NAME REGION RANGE TYPE VLAN_ID
at-1111111-vlan001 REGION 192.168.1.0/24 CLIENT 122
at-1111111-vlan002 REGION 192.168.2.0/24 PRIVATE 123
```
2. To view details for a single network, enter the project ID, region, and
network name, and issue the `gcloud bms networks describe` command:
```
gcloud bms networks describe NETWORK_NAME --project=PROJECT_ID --region=REGION
```
The following output example shows the IP address range, network name, state, network type, VLAN ID, and virtual routing and forwarding (VRF) details.
```
cidr: 192.168.1.0/24
name: projects/PROJECT_ID/locations/REGION/networks/NETWORK_NAME
state: PROVISIONED
type: CLIENT
vlanId: '122'
vrf:
autonomousSystemNumber: '65500'
juniperAlias: g00000-at-1111111-ic001
name: at-1111111-ic001
routeTarget: '282'
state: PROVISIONED
```
### API
1. Open a Cloud Shell terminal window in your Google Cloud console.
2. To view all networks in your Bare Metal Solution environment and see
their status, enter your project ID and region into the following `curl`
command. Copy the command, paste it into the Cloud Shell prompt,
and press the **Enter** or **Return** key:
```
curl -X GET \
-H "Authorization: Bearer $(gcloud auth print-access-token)" \
-H "X-Goog-User-Project: PROJECT_ID" \
-H "Content-Type: application/json" \
"https://baremetalsolution.googleapis.com/v2/projects/PROJECT_ID/locations/REGION/networks"
```
3. To view details for a single network, enter your project ID, region, and
network name and issue the following command:
```
curl -X GET \
-H "Authorization: Bearer $(gcloud auth print-access-token)" \
-H "X-Goog-User-Project: PROJECT_ID" \
-H "Content-Type: application/json" \
"https://baremetalsolution.googleapis.com/v2/projects/PROJECT_ID/locations/REGION/networks/NETWORK_NAME"
```
### Organize networks by using labels
To help organize your networks, you can use labels. Labels are key-value pairs
that you can attach to each network, then filter the networks based on their
labels. For example, you can use labels to group networks by purpose,
environment, location, department, and so on. Labels are optional.
#### Add or update labels for networks
You can add or update labels for the existing networks.
### Console
1. Go to the
[**Compute Engine** \> **Bare Metal Solution** \> **Networks**](https://console.cloud.google.com/compute/bareMetalSolution/networks) page.
2. For the network that you want to label, click
.
3. Click **Edit labels**.
4. On the **Labels editor** page:
1. Click **Add label** and add the key-value pair.
2. To update labels, select the existing labels and modify their values.
3. Click **Submit**.
5. After you return to the **Networks** page, refresh the page to view your
changes.
### gcloud
To add or update labels for a network, use the `gcloud bms networks update`
command with the `--update-labels` option.
The following sample command adds the labels **environment = dev** and
**location = branch**:
```
gcloud bms networks update NETWORK_NAME --project=PROJECT_ID --region=REGION --update-labels environment=dev,location=branch
```
If you provide a new value for a label that already exists, the system updates
the existing label with the new value. If you provide a new label, the
system adds the new label to the list of labels.
### API
To add or update labels for a network, enter your project ID, region, network
name, and a list of labels in the following `curl` command. Copy the command,
paste it into the Cloud Shell prompt, and press the **Enter**
or **Return** key.
The following sample command assigns a label of **environment = test**.
```
curl -X PATCH \
-H "Authorization: Bearer $(gcloud auth print-access-token)" \
-H "X-Goog-User-Project: PROJECT_ID" \
-H "Content-Type: application/json" \
"https://baremetalsolution.googleapis.com/v2/projects/PROJECT_ID/locations/REGION/networks/NETWORK_NAME?updateMask=labels"
-d "{
'labels' : {'environment': 'test'}
}"
```
#### Remove labels from networks
You can remove labels from networks.
### Console
1. Go to the
[**Compute Engine** \> **Bare Metal Solution** \> **Networks**](https://console.cloud.google.com/compute/bareMetalSolution/networks) page.
2. For a network with labels that you want to remove, click
.
3. Click **Edit labels**.
4. On the **Labels editor** page:
1. To delete a label, click .
2. Click **Submit**.
5. After you return to the **Networks** page, refresh the page to view your
changes.
### gcloud
To remove labels from a network, use the `gcloud bms networks update`
command with the following options:
- `--remove-labels`: Removes the specified label.
- `--clear-labels`: Removes all the labels.
The following sample command removes the label **department** from a network:
```
gcloud bms networks update NETWORK_NAME --project=PROJECT_ID --region=REGION --remove-labels=department
```
The following sample command removes all the labels from a network:
```
gcloud bms networks update NETWORK_NAME --project=PROJECT_ID --region=REGION --clear-labels
```
### API
To remove labels from a network, enter your project ID, region, and network
name in the following `curl` command. Provide an empty list of labels to
remove all labels, or provide a list of labels you want to keep
(omitting the labels you want to remove). Copy the command, paste it into
the Cloud Shell prompt, and press the **Enter** or **Return** key.
The following sample command removes all the labels except
**environment = test**.
```
curl -X PATCH \
-H "Authorization: Bearer $(gcloud auth print-access-token)" \
-H "X-Goog-User-Project: PROJECT_ID" \
-H "Content-Type: application/json" \
"https://baremetalsolution.googleapis.com/v2/projects/PROJECT_ID/locations/REGION/networks/NETWORK_NAME?updateMask=labels"
-d "{
'labels' : {'environment': 'test'}
}"
```
#### Filter networks using labels
You can search your networks and filter results by using labels.
### Console
1. Go to the
[**Compute Engine** \> **Bare Metal Solution** \> **Networks**](https://console.cloud.google.com/compute/bareMetalSolution/networks) page.
2. Click in the **Filter**
bar above the list of networks.
3. From the **Properties** list, select **Labels**.
4. Enter the key, value, or key-value pair for your label.
For example, to view only networks with the label `env:dev`, you can
enter any of the following:
- Enter the key: `env`
- Enter the value: `dev`
- Enter the key-value pair: `env:dev`
5. To apply the label filter, click anywhere outside the filter bar.
### gcloud
To filter networks by using labels, use the `gcloud bms networks list`
command with the `--filter` option.
The value of `--filter` option must be in the
`labels.KEY=VALUE` format. For example,
if you want to filter on a label with `env` as the key and `dev` as the
value, issue this command:
```
gcloud bms networks list --project=PROJECT_ID --region=REGION --filter labels.environment=dev
```
For more information about the filter syntax in the gcloud CLI,
see the
[`gcloud topic filters` documentation](https://docs.cloud.google.com/sdk/gcloud/reference/topic/filters).
### API
To filter networks by using labels, enter your project ID and region
along with `filter=labels` and a key-value pair label. Copy the command,
paste it into the Cloud Shell prompt, and press the **Enter** or
**Return** key.
The following sample command limits the output to find networks with the
key-value pair label **environment = test**.
```
curl -X GET \
-H "Authorization: Bearer $(gcloud auth print-access-token)" \
-H "X-Goog-User-Project: PROJECT_ID" \
-H "Content-Type: application/json" \
"https://baremetalsolution.googleapis.com/v2/projects/PROJECT_ID/locations/REGION/networks"?filter=labels.environment=test
```
### Rename a network
To rename a network, follow these steps:
### Console
1. In the Google Cloud console, go to the [**Compute Engine** \> **Bare Metal Solution** \> **Networks**](https://console.cloud.google.com/compute/bareMetalSolution/networks) page.
2. Click the network name.
3. On the **Network details** page, in the **Name** field, click **Edit name**.
4. On the **Editing name** page, enter a new name.
5. Click **Save**.
6. To view your changes, refresh the page.
### gcloud
To rename a network, use the `gcloud bms networks rename` command.
```
gcloud bms networks rename NETWORK_NAME --new-name=NEW_NAME --project=PROJECT_ID --region=REGION
```
Replace the following:
- NETWORK_NAME: Current name of the network.
- NEW_NAME: New name of the network.
- PROJECT_ID: Your project ID.
- REGION: The location of the network.
### Create a network
Before creating a network, you must create a VRF. See [Create a VRF](https://docs.cloud.google.com/bare-metal/docs/bms-maintenance#create-vrf).
> [!NOTE]
> **Note:** You can also configure multiple networks on a server while provisioning through the Google Cloud console intake form. See [Choose standard networking or
> explore advanced networking options](https://docs.cloud.google.com/bare-metal/docs/bms-planning#choose_standard_networking_or_explore_advanced_networking_options) and [Use the Google Cloud console intake form
> to enter your selections](https://docs.cloud.google.com/bare-metal/docs/bms-deploy#use_the_console_intake_form_to_enter_your_selections).
To create a network, follow these steps:
1. Go to the **Networks** page.
[Go to Networks](https://console.cloud.google.com/compute/bareMetalSolution/networks)
2. Click **Create**.
3. Enter a name for the network.
4. In the **Location** list, select a region for the network.
5. In the **Pod** list, select a pod for the network.
The **Pod** drop-down list also shows the number of your existing
Bare Metal Solution resources in each pod of the selected
location.
If you're unsure about which pod to select, contact
[Google Cloud Sales](https://cloud.google.com/contact).
6. Select the type of the network:
1. To create a client network, select **Client**.
2. To create a private network, select **Private**.
7. (Applicable only if you selected the **Client** network type) In the **VRF**
list, select a VRF.
8. In the **Network IP address range** field, enter the IP address range of
the network.
> [!WARNING]
> **Warning:** Ensure that the client network IP address range doesn't overlap with a connecting VPC subnet. If they overlap, the client network isn't installed in the VPC routing table. This can cause your Bare Metal Solution environment to become unreachable from the VPC.
9. (Optional) In the **Service IP address range** field, enter the service
IP address range of the network.
> [!NOTE]
> **Note:** The service IP address range is required if you plan to use NFS shares on this network. Bare Metal Solution servers communicate with the NFS volume across this services subnet. For typical /24 networks, we recommend using a /28 subnet (for example, `192.168.1.240/28`).
The service IP address range can only be defined if the network IP
address range does not overlap with any other Bare Metal Solution network
in the organization within the region.
10. Select the **MTU** for the network:
1. 1500---For standard sized frames.
2. 9000---For jumbo frames.
> [!NOTE]
> **Note:** We recommend you to configure standard MTU (1500) consistent between BMS network segments (BMS Client Network, VLAN attachment, VPC Network, On-premises network)
1. Click **Save**.
### Attach a network to a server
You can't attach a network to a server if the IP address range of the
network overlaps with another network attached to the server.
To attach a network, follow these steps:
1. Go to the **Servers** page.
[Go to Servers](https://console.cloud.google.com/compute/bareMetalSolution/servers)
2. Click the server name.
3. On the **Server details** page, click **Attach network**.
4. On the **Attach a network** page, do the following:
1. To select a network from other projects in your organization:
1. Select the **Select networks from other projects in your organization** checkbox.
2. From the **Select an existing network** list, select a network.
2. To select a network from the current project:
1. Clear the **Select networks from other projects in your organization** checkbox.
2. From the **Select an existing network** list, select a network.
3. Set the interface configuration:
> [!NOTE]
> **Note:** In addition to the configuration set here, you need to configure the interface on your server. Refer to your OS documentation.
1. From the **Interface** list, select a bond interface for this network.
In most cases, select `bond0` for a client network and `bond1` for a
private network.
2. In the **IP address** field, enter an IP address from the network
that you are attaching.
5. (Optional) To make this network the default gateway, select the
**Default gateway** checkbox.
6. Click **Attach network**.
The server status changes to "Provisioning". Attaching a network is a
long-running operation. To check the status, in the Google Cloud console, click **Notifications** . You can also follow the steps in
[View the status of a long-running operation](https://docs.cloud.google.com/bare-metal/docs/bms-maintenance#view_the_status_of_a_long-running_operation).
When the operation completes, the server status changes to "Running".
7. Update the OS configuration of your Bare Metal Solution server.
Once you complete the previous steps for attaching the network through
the Google Cloud console and the server status changes to "Running", you
must update the OS configuration of your Bare Metal Solution server. If you
don't update the OS configuration, the changes made in the
Google Cloud console are not implemented completely. The next steps in this
procedure show you how to update your OS configuration.
> [!CAUTION]
> **Caution:** Updating the OS configuration incorrectly can result in a loss of network connectivity. If in doubt, consult with your network administrator. We recommend that, before updating the OS configuration, you [configure and test the interactive serial console access](https://docs.cloud.google.com/bare-metal/docs/troubleshooting/configure-serial-console) to your Bare Metal Solution server. This way you can continue updating even if you lose connectivity. We also recommend that you [create a boot volume snapshot](https://docs.cloud.google.com/bare-metal/docs/bms-maintenance#create-boot-volume-snapshots) in case you might want to restore the previous OS configuration.
The next steps are only for example and might vary depending on your OS.
Refer to your OS configuration guide if you face any issue.
### RHEL and Oracle Linux
1. Log in as the root user.
2. Create a new connection. Run the following command:
> [!NOTE]
> **Note:** The following command does not designate the new network as the default gateway.
```
nmcli connection add type vlan con-name INTERFACE_NAME.VLAN_ID ifname INTERFACE_NAME.VLAN_ID dev INTERFACE_NAME mtu MTU id VLAN_ID ip4 IP_ADDRESS/NETMASK ipv6.method "ignore"
```
Replace the following:
- INTERFACE_NAME: The name of the interface to which you want to attach the network. This is the same interface that you selected in **Step 6 (Set the interface configuration)** of this procedure. You can get the interface name from the **Server details** page, in the **Networks** section. See [View servers](https://docs.cloud.google.com/bare-metal/docs/bms-maintenance#view-servers).
- VLAN_ID: The VLAN ID of the network that you want to attach. You can get the VLAN ID from the **Network details** page. See [View networks](https://docs.cloud.google.com/bare-metal/docs/bms-maintenance#view-networks-in-your-bare-metal-solution-environment).
- IP_ADDRESS: The IP address of the Bare Metal Solution server in the network. This is the same IP address that you entered in **Step 6 (Set the interface configuration)** of this procedure. You can get the IP address from the **Server details** page, in the **Networks** section. See [View servers](https://docs.cloud.google.com/bare-metal/docs/bms-maintenance#view-servers).
- NETMASK: The network mask of the network that you want to attach. You can get the network mask from the CIDR field on the **Network details** page. See [View networks](https://docs.cloud.google.com/bare-metal/docs/bms-maintenance#view-networks-in-your-bare-metal-solution-environment).
- MTU: The MTU of the network that you want to attach. You can get the MTU from the **Network details** page. See [View networks](https://docs.cloud.google.com/bare-metal/docs/bms-maintenance#view-networks-in-your-bare-metal-solution-environment).
Example:
```
nmcli connection add type vlan con-name bond0.114 ifname bond0.114 dev bond0 mtu 1500 id 114 ip4 172.16.80.1/24 ipv6.method "ignore"
```
3. (Optional) If you have created a **Client** network and you want to
use this network to connect from your VPC to VLAN attachments or other environment (such as, an on-prem environment), configure a
route to your specific subnet. Run the following commands as the root
user:
```
nmcli connection modify INTERFACE_NAME.VLAN_ID +ipv4.routes "SUBNET GATEWAY_IP"
```
```
nmcli connection up INTERFACE_NAME.VLAN_ID
```
Replace the following:
- INTERFACE_NAME: The name of the interface to which you want to attach the network. This is the same interface that you selected in **Step 6 (Set the interface configuration)** of this procedure. You can get the interface name from the **Server details** page, in the **Networks** section. See [View servers](https://docs.cloud.google.com/bare-metal/docs/bms-maintenance#view-servers).
- VLAN_ID: The VLAN ID of the network that you want to attach. You can get the VLAN ID from the **Network details** page. See [View networks](https://docs.cloud.google.com/bare-metal/docs/bms-maintenance#view-networks-in-your-bare-metal-solution-environment).
- SUBNET: The IP address and the mask of the network in CIDR notation that is used to connect to your Bare Metal Solution server through the client network. If this is your VPC network, you can get the subnet from the **VPC networks** page, in the **Subnets** section. See [List subnets](https://docs.cloud.google.com/vpc/docs/create-modify-vpc-networks#listing_existing_subnets). If this is another environment, contact your network administrator.
- GATEWAY_IP: The IP address of the gateway in the network that you want to attach. You can get the Gateway IP from the **Network details** page. See [View networks](https://docs.cloud.google.com/bare-metal/docs/bms-maintenance#view-networks-in-your-bare-metal-solution-environment).
Example:
```
nmcli connection modify bond0.114 +ipv4.routes "192.168.122.0/24 172.16.80.254"
nmcli connection up bond0.114
```
4. (Optional) If you created a **Client** network and set it as the
default gateway in **Step 7 (Default gateway)** of this procedure,
follow these steps to update your OS configuration:
1. Complete the previous step, that is, **Step 9.c**.
2. Ensure that you are connected to your Bare Metal Solution server through the new client network. For example, by connecting to the server from a VM in your VPC that this network is attached to with VLAN attachments.
3. To set this network as the default gateway, disable the default
gateway settings on the old network and then enable the default
gateway settings on this network. Run the following commands as the
root user:
```
nmcli connection modify OLD_INTERFACE_NAME.OLD_VLAN_ID ipv4.gateway ""
```
```
nmcli connection modify INTERFACE_NAME.VLAN_ID ipv4.gateway GATEWAY_IP
```
```
nmcli connection up INTERFACE_NAME.VLAN_ID
```
```
nmcli connection up OLD_INTERFACE_NAME.OLD_VLAN_ID
```
Replace the following:
- OLD_INTERFACE_NAME: The name of the interface to which the old default gateway network is attached to. You can get the interface name from the **Server details** page, in the **Networks** section, or by examining your Bare Metal Solution server OS configuration, that is, by using `ip a` or `nmcli connection show` commands.
- OLD_VLAN_ID: The VLAN ID of the old default gateway network. You can get the VLAN ID from the **Network details** page. See [View networks](https://docs.cloud.google.com/bare-metal/docs/bms-maintenance#view-networks-in-your-bare-metal-solution-environment), or by examining your Bare Metal Solution server OS configuration, that is, by using `ip a` or `nmcli connection show commands`.
- INTERFACE_NAME: The name of the interface to which the the new network network is attached to. This is the same interface that you selected in **Step 11 (Set the interface configuration)** of this procedure. You can get the interface name from the **Server details** page, in the **Networks** section. See [View servers](https://docs.cloud.google.com/bare-metal/docs/bms-maintenance#view-servers).
- VLAN_ID: The VLAN ID of the new network. You can get the VLAN ID from the **Network details** page. See [View networks](https://docs.cloud.google.com/bare-metal/docs/bms-maintenance#view-networks-in-your-bare-metal-solution-environment).
- GATEWAY_IP: The IP address of the gateway in the new network. You can get the Gateway IP from the **Network details** page. See [View networks](https://docs.cloud.google.com/bare-metal/docs/bms-maintenance#view-networks-in-your-bare-metal-solution-environment).
Example:
```
nmcli connection modify bond0.143 ipv4.gateway ""
nmcli connection modify bond0.114 ipv4.gateway 172.16.80.254
nmcli connection up bond0.114
nmcli connection up bond0.143
```
### SLES
1. Log in as the root user.
2. Create an interface configuration (`ifcfg`) file at the location
`/etc/sysconfig/network` with the following naming convention:
```
ifcfg-INTERFACE_NAME.VLAN_ID
```
Replace the following:
- INTERFACE_NAME: The name of the interface to which you want to attach the network. This is the same interface that you selected in **Step 6 (Set the interface configuration)** of this procedure. You can get the interface name from the **Server details** page, in the **Networks** section. See [View servers](https://docs.cloud.google.com/bare-metal/docs/bms-maintenance#view-servers).
- VLAN_ID: The VLAN ID of the network that you want to attach. You can get the VLAN ID from the **Network details** page. See [View networks](https://docs.cloud.google.com/bare-metal/docs/bms-maintenance#view-networks-in-your-bare-metal-solution-environment).
When you are done, the path to your file looks like this:
```
/etc/sysconfig/network/ifcfg-INTERFACE_NAME.VLAN_ID
```
3. Add the following information for the network interface in the
`ifcfg` file.
```
NAME='INTERFACE_NAME.VLAN_ID'
ETHERDEVICE='INTERFACE_NAME'
STARTMODE='auto'
USERCONTROL='no'
BOOTPROTO='static'
IPADDR='IP_ADDRESS/NETMASK'
MTU=MTU
VLAN='yes'
```
Replace the following:
- INTERFACE_NAME: The name of the interface to which you want to attach the network. This is the same interface that you selected in **Step 6 (Set the interface configuration)** of this procedure. You can get the interface name from the **Server details** page, in the **Networks** section. See [View servers](https://docs.cloud.google.com/bare-metal/docs/bms-maintenance#view-servers).
- VLAN_ID: The VLAN ID of the network that you want to attach. You can get the VLAN ID from the **Network details** page. See [View networks](https://docs.cloud.google.com/bare-metal/docs/bms-maintenance#view-networks-in-your-bare-metal-solution-environment).
- IP_ADDRESS: The IP address of the Bare Metal Solution server in the network. This is the same IP address that you entered in **Step 6 (Set the interface configuration)** of this procedure. You can find the IP address in the Server details page in the **Networks** section.
- NETMASK: The network mask of the network that you want to attach. You can get the network mask from the CIDR field on the **Network details** page. See [View networks](https://docs.cloud.google.com/bare-metal/docs/bms-maintenance#view-networks-in-your-bare-metal-solution-environment).
- MTU: The MTU of the network that you want to attach. You can get the MTU from the **Network details** page. See [View networks](https://docs.cloud.google.com/bare-metal/docs/bms-maintenance#view-networks-in-your-bare-metal-solution-environment).
For example, a sample file `/etc/sysconfig/network/ifcfg-bond1.121`
looks like this:
```
NAME='bond1.121'
ETHERDEVICE='bond1'
STARTMODE='auto'
USERCONTROL='no'
BOOTPROTO='static'
IPADDR='192.168.200.10/24'
MTU=1500
VLAN='yes'
```
1. Bring up the interface to apply the changes.
```
ifup INTERFACE_NAME.VLAN_ID
```
Replace the following:
- INTERFACE_NAME: The name of the interface to which you want to attach the network. This is the same interface that you selected in **Step 6 (Set the interface configuration)** of this procedure. You can get the interface name from the **Server details** page, in the **Networks** section. See [View servers](https://docs.cloud.google.com/bare-metal/docs/bms-maintenance#view-servers).
- VLAN_ID: The VLAN ID of the network that you want to attach. You can get the VLAN ID from the **Network details** page. See [View networks](https://docs.cloud.google.com/bare-metal/docs/bms-maintenance#view-networks-in-your-bare-metal-solution-environment).
4. (Optional) If you have created a **Client** network and you want to
use this network to connect from your VPC to VLAN attachments or other environment (such as, an on-prem environment), configure a
route to your specific subnet.
1. Create an interface route configuration (`ifroute`) file at the
location `/etc/sysconfig/network` with the following naming
convention:
```
ifroute-INTERFACE_NAME.VLAN_ID
```
When you're done, the path to your file looks like this:
```
/etc/sysconfig/network/ifroute-INTERFACE_NAME.VLAN_ID
```
2. Add the following information for the network interface in the
`ifroute` file.
```
SUBNET GATEWAY_IP - -
```
Replace the following:
- SUBNET: The IP address and the mask of the network in CIDR notation that is used to connect to your Bare Metal Solution server through the client network. If this is your VPC network, you can get the subnet from the **VPC networks** page, in the **Subnets** section. See [List subnets](https://docs.cloud.google.com/vpc/docs/create-modify-vpc-networks#listing_existing_subnets). If this is another environment, contact your network administrator.
- GATEWAY_IP: The IP address of the gateway in the network that you want to attach. You can get the Gateway IP from the **Network details** page. See [View networks](https://docs.cloud.google.com/bare-metal/docs/bms-maintenance#view-networks-in-your-bare-metal-solution-environment).
3. Bring up the interface to apply the changes.
```
ifup INTERFACE_NAME.VLAN_ID
```
Replace the following:
- INTERFACE_NAME: The name of the interface to which you want to attach the network. This is the same interface that you selected in **Step 6 (Set the interface configuration)** of this procedure. You can get the interface name from the **Server details** page, in the **Networks** section. See [View servers](https://docs.cloud.google.com/bare-metal/docs/bms-maintenance#view-servers).
- VLAN_ID: The VLAN ID of the network that you want to attach. You can get the VLAN ID from the **Network details** page. See [View networks](https://docs.cloud.google.com/bare-metal/docs/bms-maintenance#view-networks-in-your-bare-metal-solution-environment).
5. (Optional) If you created a **Client** network and set it as the
default gateway in **Step 7 (Default gateway)** of this procedure,
follow these steps to update your OS configuration:
1. Complete the previous step, that is, **Step 9.c**.
2. Ensure that you are connected to your Bare Metal Solution server through this network. For example, by connecting to the server from a VM in your VPC that this network is attached to through VLAN attachments.
3. To set this network as the default gateway, change your system
default route configuration:
Edit the file `/etc/sysconfig/network/routes` to replace the IP
address of the current default gateway with IP address of the new
default gateway.
Update file contents to match the following:
```
default GATEWAY_IP - -
```
Replace the following:
- GATEWAY_IP: The IP address of the gateway in the new network. You can get the Gateway IP from the **Network details** page. See [View networks](https://docs.cloud.google.com/bare-metal/docs/bms-maintenance#view-networks-in-your-bare-metal-solution-environment).
4. Reload network configuration to apply the change.
```
systemctl reload network
```
### Detach a network from a server
You can detach only one network at a time from a server, and the server can be
running or powered-off.
**Note:**
- Ensure that you are not connected through the IP address assigned to the interface that's attached to the network you want to remove. Use a different IP address assigned for the server.
- To detach the network that is the default gateway, you must first attach another network to the server as the default gateway. This automatically updates the old network as a non-default gateway and you can delete it using the steps in this procedure.
To detach a network, follow these steps:
1. Update the OS configuration of your Bare Metal Solution server.
Before detaching a network through the Google Cloud console, you
must first update the OS configuration of your Bare Metal Solution
server. If you don't update the OS configuration, the changes made in the Google Cloud console are not implemented completely.
> [!CAUTION]
> **Caution:** Updating the OS configuration incorrectly can result in a loss of network connectivity. If in doubt, consult with your network administrator. We recommend that, before updating the OS configuration, you [configure and test the interactive serial console access](https://docs.cloud.google.com/bare-metal/docs/troubleshooting/configure-serial-console) to your Bare Metal Solution server. This is helpful in case you lose connectivity while making the changes. With interactive serial console you can continue updating. We also recommend that you [create a boot volume snapshot](https://docs.cloud.google.com/bare-metal/docs/bms-maintenance#create-boot-volume-snapshots) in case you might want to restore the previous OS configuration.
The actions in this step are only for example and might vary depending
on your OS. Refer to your OS configuration guide if you face any issue.
### RHEL and Oracle Linux
1. Delete the bond interface for the network that you want to detach.
As the root user, run the following command:
```
nmcli connection delete INTERFACE_NAME.VLAN_ID
```
Replace the following:
- INTERFACE_NAME: The name of the interface for the network that you want to detach. You can get the interface name from the **Server details** page, in the **Networks** section. See [View servers](https://docs.cloud.google.com/bare-metal/docs/bms-maintenance#view-servers).
- VLAN_ID: The VLAN ID of the network that you want to detach. You can get the VLAN ID from the **Network details** page. See [View networks](https://docs.cloud.google.com/bare-metal/docs/bms-maintenance#view-networks-in-your-bare-metal-solution-environment).
Example:
```
nmcli connection delete bond0.148
```
### SLES
1. Bring the interface down. As the root user, run the following command:
```
ifdown INTERFACE_NAME.VLAN_ID
```
Replace the following:
- INTERFACE_NAME: The name of the interface for the network that you want to detach. You can get the interface name from the **Server details** page, in the **Networks** section. See [View servers](https://docs.cloud.google.com/bare-metal/docs/bms-maintenance#view-servers).
- VLAN_ID: The VLAN ID of the network that you want to detach. You can get the VLAN ID from the **Network details** page. See [View networks](https://docs.cloud.google.com/bare-metal/docs/bms-maintenance#view-networks-in-your-bare-metal-solution-environment).
Example:
```
ifdown bond1.121
```
2. Backup the information of the interface configuration file into a
different file so that it is not processed on the next boot. Run the
following command:
```
mv /etc/sysconfig/network/ifcfg-INTERFACE_NAME.VLAN_ID /etc/sysconfig/network/ifcfg-INTERFACE_NAME.VLAN_ID.backup
```
Replace the following:
- INTERFACE_NAME: The name of the interface for the network that you want to detach. You can get the interface name from the **Server details** page, in the **Networks** section. See [View servers](https://docs.cloud.google.com/bare-metal/docs/bms-maintenance#view-servers).
- VLAN_ID: The VLAN ID of the network that you want to detach. You can get the VLAN ID from the **Network details** page. See [View networks](https://docs.cloud.google.com/bare-metal/docs/bms-maintenance#view-networks-in-your-bare-metal-solution-environment).
Example:
```
mv /etc/sysconfig/network/ifcfg-bond1.121 /etc/sysconfig/network/ifcfg-bond1.121.backup
```
3. (Optional) If you want to detach a **Client** network and you configured
routes specific for this network. Backup the information of the
interface route configuration file into a different file so that it
is not processed on the next boot. Run the following command:
```
mv /etc/sysconfig/network/ifroute-INTERFACE_NAME.VLAN_ID /etc/sysconfig/network/ifroute-INTERFACE_NAME.VLAN_ID.backup
```
Replace the following:
- INTERFACE_NAME: The name of the interface for the network that you want to detach. You can get the interface name from the **Server details** page, in the **Networks** section. See [View servers](https://docs.cloud.google.com/bare-metal/docs/bms-maintenance#view-servers).
- VLAN_ID: The VLAN ID of the network that you want to detach. You can get the VLAN ID from the **Network details** page. See [View networks](https://docs.cloud.google.com/bare-metal/docs/bms-maintenance#view-networks-in-your-bare-metal-solution-environment).
Example:
```
mv /etc/sysconfig/network/ifroute-bond1.121 /etc/sysconfig/network/ifroute-bond1.121.backup
```
2. Detach the network through the Google Cloud console:
1. Go to the [**Compute Engine** \> **Bare Metal Solution** \> **Servers**](https://console.cloud.google.com/compute/bareMetalSolution/servers) page.
2. Click the server name.
3. On the **Server details** page, select the network that you want to detach.
4. Click **Detach network**.
5. When prompted, click **Confirm**.
The server status changes to "Provisioning". Detaching a network is a
long-running operation. To check the status, in the Google Cloud console,
click **Notifications** . You
can also follow the steps in
[View the status of a long-running operation](https://docs.cloud.google.com/bare-metal/docs/bms-maintenance#view_the_status_of_a_long-running_operation). When the operation completes, the server status changes to "Running".
### Delete a network
Multiple client networks attached to the same VRF can't be deleted. In this case,
contact [Customer Care](https://cloud.google.com/support-hub).
> [!NOTE]
> **Note:** Before deleting a network, ensure that the network is detached from all the servers it was attached to. See [Detach a network from a server](https://docs.cloud.google.com/bare-metal/docs/bms-maintenance#detach-network).
To delete a network, follow these steps:
### Console
1. Go to the [**Compute Engine** \> **Bare Metal Solution** \> **Networks**](https://console.cloud.google.com/compute/bareMetalSolution/networks) page.
2. Select the network that you want to delete.
3. Click **Delete**.
4. When prompted, click **Confirm**.
Deleting a network is a long-running operation. To check the status, in the
Google Cloud console, click **Notifications** . You can also follow the steps in
[View the status of a long-running operation](https://docs.cloud.google.com/bare-metal/docs/bms-maintenance#view_the_status_of_a_long-running_operation).
### View advanced networking information for a Bare Metal Solution environment
If you selected the advanced networking option for complex deployments in your
Bare Metal Solution environment, you can view this information by using the
following server commands.
### Console
1. Go to the
[**Compute Engine** \> **Bare Metal Solution** \> **Servers**](https://console.cloud.google.com/compute/bareMetalSolution/servers) page.
2. Click the server name.
3. On the **Server details** page, you can view the following information:
1. Under basic details, you can view the network template.
2. In the **Networks** section, you can view the following information:
- Network name
- Network type
- IP address
- Default gateway
- Interface name
### gcloud
Run the **gcloud bms instances describe** command to view advanced networking
settings for your server.
```
gcloud bms instances describe SERVER_NAME --project=PROJECT_ID --region=REGION
```
### API
To view advanced networking settings for your server, enter your project ID,
region, and server name, then issue the following `curl` command. In the
networks section of the output, you can view the network template, logical
interfaces, bonded interfaces, and network type assigned to each interface.
```
curl -X GET \
-H "Authorization: Bearer $(gcloud auth print-access-token)" \
-H "X-Goog-User-Project: PROJECT_ID" \
-H "Content-Type: application/json" \
"https://baremetalsolution.googleapis.com/v2/projects/PROJECT_ID/locations/REGION/instances/SERVER_NAME"
```
### Implement IP Address Management in a Bare Metal Solution environment
Being able to manage your network topology inside your Bare Metal Solution
environment is important. IP address management helps you create, view, and
delete IP addresses for your resources. You can use this information to prevent
overlapping IP addresses and resolve conflicts when requesting new resources.
#### View IP address reservations
To view IP addresses for existing reservations:
### gcloud
Run the **gcloud bms networks list-ip-reservations** command:
```
gcloud bms networks list-ip-reservations --project=PROJECT_ID --region REGION
```
### API
To view IP address reservations for existing resources, enter your project
ID, region, and network name, then issue the following `curl` command. The
**reservations** section in the output shows reserved IP address ranges.
```
curl -X GET \
-H "Authorization: Bearer $(gcloud auth print-access-token)" \
-H "X-Goog-User-Project: PROJECT_ID" \
-H "Content-Type: application/json" \
"https://baremetalsolution.googleapis.com/v2/projects/PROJECT_ID/locations/REGION/networks/NETWORK_NAME"
```
#### Create and update an IP address reservation
To create a new IP address reservation or update an existing one:
### gcloud
Run the **gcloud bms networks update** command to manage IP address
reservations:
```
gcloud bms networks update NETWORK_NAME --project=PROJECT_ID --region REGION --add-ip-range-reservation=start-address=START_ADDRESS,end-address=END_ADDRESS,note="NOTE"
```
- To remove all IP address reservations, add the **--clear-ip-range-reservations** option.
- To delete one of the reserved address blocks, add the **--remove-ip-range-reservation** option and specify the start address and end address of the reserved IP address block that you wish to remove.
```
gcloud bms networks update NETWORK_NAME --project=PROJECT_ID --region REGION --remove-ip-range-reservation=start-address=START_ADDRESS,end-address=END_ADDRESS
```
### API
To create a new IP address reservation or update an existing one, enter your
project ID, region, and network name into the following command. Add a start
address, end address, and a note for each block of IP addresses you want to
reserve, then issue the `curl` command.
```
curl -X PATCH \
-H "Authorization: Bearer $(gcloud auth print-access-token)" \
-H "X-Goog-User-Project: PROJECT_ID" \
-H "Content-Type: application/json" \
"https://baremetalsolution.googleapis.com/v2/projects/PROJECT_ID/locations/REGION/networks/NETWORK_NAME?updateMask=reservations"
-d "{
'reservations' : [
{
'startAddress' : 'START_ADDRESS_1',
'endAddress' : 'END_ADDRESS_1',
'note' : 'NOTES_1'
},
{
'startAddress' : 'START_ADDRESS_2',
'endAddress' : 'END_ADDRESS_2',
'note' : 'NOTES_2'
}
]
}"
```
- The IP address reservation blocks must fall within the CIDR range of the target network.
- Do not use .1 (the gateway IP address) in a reservation block.
- Each time you run this `curl` command, it overwrites the previous set of reservations. If you need to make updates, be sure to include all sets of reservation blocks before you issue the command.
- To clear all reservations, replace the end of the command with the following:
```
-d "{
'reservations' : []
}"
```
## Manage NFS file storage
You can manage your NFS file storage in the following ways:
- [View NFS volumes](https://docs.cloud.google.com/bare-metal/docs/bms-maintenance#view-nfs-file-storage-in-your-bare-metal-solution-environment)
- [Organize NFS volumes by using labels](https://docs.cloud.google.com/bare-metal/docs/bms-maintenance#organize-nfsShares-using-labels)
- [Rename an NFS volume](https://docs.cloud.google.com/bare-metal/docs/bms-maintenance#rename-nfs-volume)
- [Create an NFS volume](https://docs.cloud.google.com/bare-metal/docs/bms-maintenance#create-nfs-volume)
- [Update an NFS volume](https://docs.cloud.google.com/bare-metal/docs/bms-maintenance#update-nfs-volume)
- [Delete an NFS volume](https://docs.cloud.google.com/bare-metal/docs/bms-maintenance#delete-nfs-volume)
### View NFS volumes
After you order and provision NFS for Bare Metal Solution, you can view the
status of your NFS file storage and confirm that Google Cloud implemented
your configured settings as expected.
To view the details of your NFS volumes, follow these steps:
### Console
1. Go to the **NFS Shares** page.
[Go to NFS Shares](https://console.cloud.google.com/compute/bareMetalSolution/nfsShares)
The **NFS Shares** page lists all your NFS volumes with the following
details:
2. View the available information.
| **Field** | **Description** | **Example** |
|---|---|---|
| **Status** | Indicates the availability of an NFS volume | A green circle with a check mark indicates that the NFS volume is provisioned. |
| **ID** | Identifier assigned to your NFS storage device that hosts your volume. - Click the ID to view additional information about the storage volume, including allowed clients and NFS properties. - Share the ID with Google Cloud support when troubleshooting this resource. | `at-2222222-nfs001` |
| **Name** | Name of the NFS storage device that hosts your volume. Click the name to view additional information about the storage volume, including allowed clients and NFS properties.
**Note:** If you did not enter a name when you provisioned your NFS storage device, the **ID** appears in this field. | `nfs-share-7` |
| **Location** | Region for the NFS storage volume | `asia-southeast1` |
| **Pod** | Pod that contains your NFS volume. A pod is a unit of isolation that contains your Bare Metal Solution resources. Resources in different pods cannot be connected. A region can have multiple pods. The **Pod** column is disabled by default. To enable it, do the following: 1. Click **Column display options** . 2. Select the **Pod** checkbox. 3. Click **OK**. If you don't want to enable the **Pod** column, you can view the pod of an NFS volume by clicking the NFS volume name. | `asia-southeast1-pod1` |
| **Volume** | Name of the NFS storage volume. Click the name to view additional information about the NFS storage volume, such as snapshots. | `at-2222222-nfs001-vol000` |
| **Labels** | Displays any labels you added to this NFS file storage resource
You can use labels to filter the console output by copying the text of a label and pasting it in the **Filter** box just above the **Status** field. | `environment:test` |
### gcloud
1. To view the status of your NFS file storage within the
Bare Metal Solution environment, issue the `gcloud bms nfs-shares
list` command:
```
gcloud bms nfs-shares list --project=PROJECT_ID --region=REGION
```
Additional command options include:
- `--limit:` Limit the output to show a specific number of devices.
- `--filter:` Limit the output to show devices with a specific label or other filter parameter.
The output provides details about your NFS file storage, including the
name, ID, volume, and allowed clients.
```
NAME: nfs-share-7
ID: at-2222222-nfs001
PROJECT: PROJECT_ID
REGION: REGION
VOLUME_NAME: at-2222222-nfs001-vol000
STATE: PROVISIONED
ALLOWED_CLIENTS: [{"allowedCidr": "192.168.1.1/32", "networkName": "at-1111111-vlan001", "shareIp": "192.168.1.240"}]
```
2. To view the status of a specific NFS file storage device, issue the
`gcloud bms nfs-shares describe` command. You can use either the
NFS share name or ID as the NFS_SHARE variable:
```
gcloud bms nfs-shares describe NFS_SHARE --project=PROJECT_ID --region=REGION
```
The output provides details about the allowed clients, NFS settings, the NFS server and its state, and the storage volume.
```
allowedClients:
– allowDev: true
allowedClientsCidr: 192.168.1.1/32
mountPermissions: READ_WRITE
network: projects/PROJECT_ID/locations/REGION/networks/at-1111111-vlan001
noRootSquash: true
shareIp: 192.168.1.240
name: projects/PROJECT_ID/locations/REGION/nfsShares/NFS_SHARE
nfsShareId: at-2222222-nfs001
state: PROVISIONED
volume: projects/PROJECT_ID/locations/REGION/volumes/at-2222222-nfs001-vol000
```
### API
1. To view the status of your NFS file storage within theBare Metal Solution
environment, including allowed clients and NFS properties, enter your
project ID and region into the following `curl` command. Copy the command,
paste it into the Cloud Shell prompt, and press the **Enter** or
**Return** key:
```
curl -X GET \
-H "Authorization: Bearer $(gcloud auth print-access-token)" \
-H "X-Goog-User-Project: PROJECT_ID" \
-H "Content-Type: application/json" \
"https://baremetalsolution.googleapis.com/v2/projects/PROJECT_ID/locations/REGION/nfsShares"
```
2. To view the status of a specific NFS file storage device, enter your
project ID, region, and NFS server name or ID, then issue the following command:
```
curl -X GET \
-H "Authorization: Bearer $(gcloud auth print-access-token)" \
-H "X-Goog-User-Project: PROJECT_ID" \
-H "Content-Type: application/json" \
"https://baremetalsolution.googleapis.com/v2/projects/PROJECT_ID/locations/REGION/nfsShares/NFS_SHARE"
```
### Organize NFS file storage by using labels
To help organize your NFS file storage, you can use labels. Labels are key-value
pairs that you can attach to each NFS volume, then filter the NFS volumes based
on their labels. For example, you can use labels to group NFS volumes by
purpose, environment, location, department, and so on. Labels are optional.
#### Add or update labels for NFS volumes
You can add or update labels for the existing NFS volumes.
### Console
1. Go to the
[**Compute Engine** \> **Bare Metal Solution** \> **NFS Shares**](https://console.cloud.google.com/compute/bareMetalSolution/nfsShares) page.
2. For the NFS volume that you want to label, click
.
3. Click **Edit labels**.
4. On the **Labels editor** page:
1. Click **Add label** and add the key-value pair.
2. To update labels, select the existing labels and modify their values.
3. Click **Submit**.
5. After you return to the **NFS Shares** page, refresh the page to view your
changes.
### gcloud
To add or update labels for an NFS volume, use the `gcloud bms nfs-shares update`
command with the `--update-labels` option.
The following sample command adds the labels **environment = dev** and
**location = branch**:
```
gcloud bms nfs-shares update NFS_VOLUME_NAME --project=PROJECT_ID --region=REGION --update-labels environment=dev,location=branch
```
If you provide a new value for a label that already exists, the system updates
the existing label with the new value. If you provide a new label, the
system adds the new label to the list of labels.
### API
To add or update labels for an NFS volume, enter your project ID, region, NFS volume
name, and a list of labels in the following `curl` command. Copy the command,
paste it into the Cloud Shell prompt, and press the **Enter**
or **Return** key.
The following sample command assigns a label of **environment = test**.
```
curl -X PATCH \
-H "Authorization: Bearer $(gcloud auth print-access-token)" \
-H "X-Goog-User-Project: PROJECT_ID" \
-H "Content-Type: application/json" \
"https://baremetalsolution.googleapis.com/v2/projects/PROJECT_ID/locations/REGION/nfsShares/NFS_VOLUME_NAME?updateMask=labels"
-d "{
'labels' : {'environment': 'test'}
}"
```
#### Remove labels from NFS volumes
You can remove labels from the NFS volumes.
### Console
1. Go to the
[**Compute Engine** \> **Bare Metal Solution** \> **NFS Shares**](https://console.cloud.google.com/compute/bareMetalSolution/nfsShares) page.
2. For the NFS volume with labels that you want to remove, click
.
3. Click **Edit labels**.
4. On the **Labels editor** page:
1. To delete a label, click .
2. Click **Submit**.
5. After you return to the **NFS Shares** page, refresh the page to view your
changes.
### gcloud
To remove labels from an NFS volume, use the `gcloud bms nfs-shares update`
command with the following options:
- `--remove-labels`: Removes the specified label.
- `--clear-labels`: Removes all the labels.
The following sample command removes the label **department** from an NFS volume:
```
gcloud bms nfs-shares update NFS_VOLUME_NAME --project=PROJECT_ID --region=REGION --remove-labels=department
```
The following sample command removes all the labels from an NFS volume:
```
gcloud bms nfs-shares update NFS_VOLUME_NAME --project=PROJECT_ID --region=REGION --clear-labels
```
### API
To remove labels from an NFS volume, enter your project ID, region, and NFS volume
name in the following `curl` command. Provide an empty list of labels to
remove all labels, or provide a list of labels you want to keep
(omitting the labels you want to remove). Copy the command, paste it into
the Cloud Shell prompt, and press the **Enter** or **Return** key.
The following sample command removes all the labels except
**environment = test**.
```
curl -X PATCH \
-H "Authorization: Bearer $(gcloud auth print-access-token)" \
-H "X-Goog-User-Project: PROJECT_ID" \
-H "Content-Type: application/json" \
"https://baremetalsolution.googleapis.com/v2/projects/PROJECT_ID/locations/REGION/nfsShares/NFS_VOLUME_NAME?updateMask=labels"
-d "{
'labels' : {'environment': 'test'}
}"
```
If you issue the `curl` command without any labels or values, you
clear all the labels.
```
'labels' : {
}
```
If you issue the `curl` command with new values for a label, the new
value overwrites the previous value.
```
'labels' : {
'user': 'production',
'env': 'production',
'purpose': 'shared_data_store'
}
```
#### Filter NFS volumes using labels
You can search your NFS volumes and filter results by using labels.
### Console
1. Go to the
[**Compute Engine** \> **Bare Metal Solution** \> **NFS Shares**](https://console.cloud.google.com/compute/bareMetalSolution/nfsShares) page.
2. Click in the **Filter**
bar above the list of NFS volumes.
3. From the **Properties** list, select **Labels**.
4. Enter they key, value, or key-value pair for your label.
For example, to view only NFS volumes with the label `env:dev`, you can
enter any of the following:
- Enter the key: `env`
- Enter the value: `dev`
- Enter the key-value pair: `env:dev`
5. To apply the label filter, click anywhere outside the filter bar.
### gcloud
To filter NFS volumes by using labels, use the `gcloud bms nfs-shares list`
command with the `--filter` option.
The value of `--filter` option must be in the
`labels.KEY=VALUE` format. For example,
if you want to filter on a label with `env` as the key and `dev` as the
value, issue this command:
```
gcloud bms nfs-shares list --project=PROJECT_ID --region=REGION --filter labels.environment=dev
```
For more information about the filter syntax in the gcloud CLI,
see the
[`gcloud topic filters` documentation](https://docs.cloud.google.com/sdk/gcloud/reference/topic/filters).
### API
To filter NFS volumes by using labels, enter your project ID and region
along with `filter=labels` and a key-value pair label. Copy the command,
paste it into the Cloud Shell prompt, and press the **Enter** or
**Return** key.
The following sample command limits the output to find NFS volumes with the
key-value pair label **environment = test**.
```
curl -X GET \
-H "Authorization: Bearer $(gcloud auth print-access-token)" \
-H "X-Goog-User-Project: PROJECT_ID" \
-H "Content-Type: application/json" \
"https://baremetalsolution.googleapis.com/v2/projects/PROJECT_ID/locations/REGION/nfsShares"?filter=labels.environment=test
```
### Rename an NFS volume
To rename an NFS volume, follow these steps:
### Console
1. In the Google Cloud console, go to the [**Compute Engine** \> **Bare Metal Solution** \> **NFS Shares**](https://console.cloud.google.com/compute/bareMetalSolution/nfsShares) page.
2. Click the NFS volume name.
3. On the **NFS share details** page, in the **Name** field, click **Edit name**.
4. On the **Editing name** page, enter a new name.
5. Click **Save**.
6. To view your changes, refresh the page.
### gcloud
To rename an NFS volume, use the `gcloud bms nfs-shares rename` command.
```
gcloud bms nfs-shares rename NFS_VOLUME_NAME --new-name=NEW_NAME --project=PROJECT_ID --region=REGION
```
Replace the following:
- NFS_VOLUME_NAME: Current name of the NFS volume.
- NEW_NAME: New name of the NFS volume.
- PROJECT_ID: Your project ID.
- REGION: The location of the NFS volume.
### Create an NFS volume
You can create an NFS volume with one or more allowed clients.
> [!NOTE]
> **Note:**
>
> - Networks of all allowed clients must already exist. However, they can be from a different Google Cloud CLI project.
> - You cannot specify the IP address for the NFS volume of an allowed client. It is assigned automatically during the provisioning from your services IP address range.
### Console
1. Go to the **NFS Shares** page.
[Go to NFS Shares](https://console.cloud.google.com/compute/bareMetalSolution/nfsShares)
2. Click **Create**.
3. In the **Name** field, enter a name for your NFS volume.
4. From the **Region** drop-down list, select the Google Cloud region
in which you want to create your NFS volume.
5. Select the storage type.
6. In the **Size** field, enter the size of the drive in GiB.
The size ranges from a minimum of 100 GiB to a maximum of 16 TiB. If you
need more than 16 TiB, create additional NFS volumes as needed.
7. In the **Allowed clients** section, add the allowed client networks:
1. Click **Add an item**.
2. Select **Select networks from other projects in your organization** checkbox to enable selecting networks from your other projects.
3. From the **Select an existing network** drop-down list, select a network.
4. Enter an IP address range permitted to access the NFS volume.
5. From the **Mount permissions** drop-down list, select the mount permissions for the allowed client network.
6. Select the **Allow dev** checkbox to enable the creation of devices.
7. Select the **Allow SUID** checkbox to enable SUID.
8. Select the **No root squash** checkbox to enable root squash.
We recommend that you disable root squash for new NFS volumes. By
default, an NFS volume has permission `755` and owner `root(0)`.
Writing files to new NFS volumes is not possible when root squash is
enabled, as all new NFS volumes are owned by the `root` user. Therefore,
first create an NFS volume with root squash disabled, build the
directory structure, and change permission or ownership of the NFS volume.
Then, enable the root squash on the NFS volume by removing and
re-adding the allowed client. See [Update an NFS volume](https://docs.cloud.google.com/bare-metal/docs/bms-maintenance#update-nfs-volume).
9. Click **Done**.
8. Click **Create**.
### gcloud
To create an NFS volume, issue the `gcloud bms nfs-shares create` command.
Use the `--allowed-client` option to specify an allowed client. To specify
multiple allowed clients, repeat the `--allowed-client` option.
Enter the following values before you issue the command:
- NFS_VOLUME_NAME: Name of the NFS volume.
- REGION: Region of the NFS volume.
- SIZE_GIB: Size of the NFS volume in GiB.
- STORAGE_TYPE: Storage type of the underlying volume.
- NETWORK_NAME: Name of the network to allow.
- (Optional) PROJECT_ID: Project ID of the allowed client network. If you do not provide a project ID, it will default to the project to which the NFS volume belongs.
- IP_ADDRESS_RANGE: Subnet of the IP addresses permitted to access the NFS volume. This is usually the client network.
- MOUNT_PERMISSIONS: Mount permissions for the allowed client network.
- ALLOW_DEV: Allow creation of devices (yes/no).
- ALLOW_SUID: Allow SUID (yes/no).
- ENABLE_ROOT_SQUASH: Enable root squash (yes/no). We recommend that you disable root squash for new NFS volumes. By default, an NFS volume has permission `755` and owner `root(0)`. Writing files to new NFS volumes is not possible when root squash is enabled, as all new NFS volumes are owned by the `root` user. Therefore, first create an NFS volume with root squash disabled, build the directory structure, and change permission or ownership of the NFS volume. Then, enable the root squash on the NFS volume by removing and re-adding the allowed client. See [Update an NFS volume](https://docs.cloud.google.com/bare-metal/docs/bms-maintenance#update-nfs-volume).
```
gcloud bms nfs-shares create --project=PROJECT_ID --region=REGION NFS_VOLUME_NAME \
--size-gib=SIZE_GIB --storage-type=STORAGE_TYPE \
--allowed-client=network=NETWORK_NAME,\
network-project-id=PROJECT_ID,cidr=IP_ADDRESS_RANGE,\
mount-permissions=MOUNT_PERMISSIONS,allow-dev=ALLOW_DEV,allow-suid=ALLOW_SUID,\
enable-root-squash=ENABLE_ROOT_SQUASH \
```
### API
To create an NFS volume, enter the values for the variables into the
following `curl` command. You can use the `allowedClients` list to specify
the allowed clients.
Enter the following values before you issue the command:
- NFS_VOLUME_NAME: Name of the NFS volume.
- REGION: Region of the NFS volume.
- SIZE_GIB: Size of the NFS volume in GiB.
- STORAGE_TYPE: Storage type of the underlying volume.
- NETWORK_NAME: Name of the network to allow.
- (Optional) PROJECT_ID: Project ID of the allowed client network. If you do not provide a project ID, it will default to the project to which the NFS volume belongs.
- IP_ADDRESS_RANGE: Subnet of the IP addresses permitted to access the NFS volume. This is usually the client network.
- MOUNT_PERMISSIONS: Mount permissions for the allowed client network.
- ALLOW_DEV: Allow creation of devices (yes/no).
- ALLOW_SUID: Allow SUID (yes/no).
- ENABLE_ROOT_SQUASH: Enable root squash (yes/no). We recommend that you disable root squash for new NFS volumes. By default, an NFS volume has permission `755` and owner `root(0)`. Writing files to new NFS volumes is not possible when root squash is enabled, as all new NFS volumes are owned by the `root` user. Therefore, first create an NFS volume with root squash disabled, build the directory structure, and change permission or ownership of the NFS volume. Then, enable the root squash on the NFS volume by removing and re-adding the allowed client. See [Update an NFS volume](https://docs.cloud.google.com/bare-metal/docs/bms-maintenance#update-nfs-volume).
Copy the command, paste it into the Cloud Shell
prompt, and press the **Enter** or **Return** key.
```
curl -X POST \
-H "Authorization: Bearer $(gcloud auth print-access-token)" \
-H "X-Goog-User-Project: PROJECT_ID" \
-H "Content-Type: application/json" \
"https://baremetalsolution.googleapis.com/v2/projects/PROJECT_ID/locations/REGION/nfsShares"
-d \
'{
"name": "projects/PROJECT_ID/locations/REGION/nfsShares/NFS_VOLUME_NAME",
"labels": {
"nfsKey1": "some_value",
"key2": "another_value",
},
"requestedSizeGib": "SIZE_GIB",
"storageType": "STORAGE_TYPE",
"allowedClients": [
{
"network": "projects/PROJECT_ID/locations/REGION/networks/NETWORK_NAME",
"allowedClientsCidr": "IP_ADDRESS_RANGE",
"mountPermissions": "MOUNT_PERMISSIONS",
"allowDev": ALLOW_DEV,
"allowSuid": ALLOW_SUID,
"noRootSquash": ENABLE_ROOT_SQUASH,
}
],
}'
```
Because creating an NFS volume takes a while to complete, you can check the
status by following the steps in [View the status of a long-running operation](https://docs.cloud.google.com/bare-metal/docs/bms-maintenance#view_the_status_of_a_long-running_operation).
### Update an NFS volume
After an NFS volume has been created, you can update only its allowed clients.
> [!NOTE]
> **Note:** You cannot expand an existing NFS volume. For assistance, contact [Google Cloud Sales](https://cloud.google.com/contact).
### Console
1. Go to the **NFS Shares** page.
[Go to NFS Shares](https://console.cloud.google.com/compute/bareMetalSolution/nfsShares)
2. Click the name of the NFS volume.
3. To add an allowed client, do the following:
1. In the **Allowed clients** section, click **Add**.
2. On the **Add allowed clients** page, click **Add an item**.
3. Select **Select networks from other projects in your organization** checkbox to enable selecting networks from your other projects.
4. From the **Select an existing network** drop-down list, select a network.
5. Enter an IP address range permitted to access the NFS volume.
6. From the **Mount permissions** drop-down list, select the mount permissions for the allowed client network.
7. Select the **Allow dev** checkbox to enable the creation of devices.
8. Select the **Allow SUID** checkbox to enable SUID.
9. Select the **No root squash** checkbox to enable root squash.
We recommend that you disable root squash for new NFS volumes. By
default, an NFS volume has permission `755` and owner `root(0)`.
Writing files to new NFS volumes is not possible when root squash is
enabled, as all new NFS volumes are owned by the `root` user. Therefore,
first create an NFS volume with root squash disabled, build the
directory structure, and change permission or ownership of the NFS volume.
Then, enable the root squash on the NFS volume by removing and
re-adding the allowed client. See [Update an NFS volume](https://docs.cloud.google.com/bare-metal/docs/bms-maintenance#update-nfs-volume).
10. Click **Done**.
11. Click **Add**.
4. To update an allowed client, do the following:
1. Select the allowed client network.
2. Click **Update**.
3. On the **Update allowed clients** page, click the client network to expand its details.
4. Update the required fields.
5. Click **Done**.
6. Click **Update**.
### gcloud
To update the list of allowed clients for an NFS volume, you can use the
following options with the `gcloud bms nfs-shares update` command:
- `--add-allowed-client`: Add an allowed client. Repeat this option to add multiple allowed clients.
- `--remove-allowed-client`: Remove an allowed client. You need to provide the values for `NETWORK_NAME` and `IP_ADDRESS_RANGE` with this option. Repeat this option to remove multiple allowed clients.
- `--clear-allowed-client`: Remove all the allowed clients.
To update an NFS volume, issue the `gcloud bms nfs-shares update` command
with appropriate options. For example:
```
gcloud bms nfs-shares update --project=PROJECT_ID --region=REGION NFS_VOLUME_NAME --remove-allowed-client=network=NETWORK_NAME,network-project-id=PROJECT_ID,cidr=IP_ADDRESS_RANGE
```
To update the attributes of an allowed client, remove it using the
`--remove-allowed-client` option, and then add it again with updated
attributes using the `--add-allowed-client` option.
### API
To update an NFS volume, enter the values for the variables into the
following `curl` command. For a full list of variables, see [Create an NFS
volume](https://docs.cloud.google.com/bare-metal/docs/bms-maintenance#create-nfs-volume). Copy the
command, paste it into the Cloud Shell
prompt, and press the **Enter** or **Return** key.
```
curl -X PATCH \
-H "Authorization: Bearer $(gcloud auth print-access-token)" \
-H "X-Goog-User-Project: PROJECT_ID" \
-H "Content-Type: application/json" \
"https://baremetalsolution.googleapis.com/v2/projects/PROJECT_ID/locations/REGION/nfsShares/NFS_VOLUME_NAME?updateMask=allowed_clients%2Clabels"
-d \
'{
"name": "projects/PROJECT_ID/locations/REGION/nfsShares/NFS_VOLUME_NAME",
"labels": {
"newKey": "newVal",
},
"allowedClients": [
{
"network": "projects/PROJECT_ID/locations/REGION/networks/NFS_VOLUME_NAME",
"allowedClientsCidr": "IP_ADDRESS_RANGE",
"mountPermissions": "MOUNT_PERMISSIONS",
"allowDev": ALLOW_DEV,
"allowSuid": ALLOW_SUID,
"noRootSquash": ENABLE_ROOT_SQUASH,
}
],
}'
```
Because updating an NFS volume takes a while to complete, you can check the
status by following the steps in [View the status of a long-running operation](https://docs.cloud.google.com/bare-metal/docs/bms-maintenance#view_the_status_of_a_long-running_operation).
### Delete an NFS volume
Deleting an NFS volume automatically triggers a cooling-off period of seven days
during which time Google Cloud removes the volume from use.
### Console
1. Go to the **NFS Shares** page.
[Go to NFS Shares](https://console.cloud.google.com/compute/bareMetalSolution/nfsShares)
2. Select the NFS volume.
3. Click **Delete**.
4. Click **Confirm**.
### gcloud
To delete an NFS volume, issue the `gcloud bms nfs-shares delete` command.
```
gcloud bms nfs-shares delete --project=PROJECT_ID --region=REGION NFS_VOLUME_NAME
```
### API
To delete an NFS volume, enter your project ID, region, and NFS volume name
into the following `curl` command. Copy the command, paste it into the
Cloud Shell prompt, and press the **Enter** or **Return** key.
```
curl -X DELETE \
-H "Authorization: Bearer $(gcloud auth print-access-token)" \
-H "X-Goog-User-Project: PROJECT_ID" \
-H "Content-Type: application/json" \
"https://baremetalsolution.googleapis.com/v2/projects/PROJECT_ID/locations/REGION/nfsShares/NFS_VOLUME_NAME"
```
Because deleting an NFS volume takes a while to complete, you can check the
status by following the steps in [View the status of a long-running operation](https://docs.cloud.google.com/bare-metal/docs/bms-maintenance#view_the_status_of_a_long-running_operation).
## View the status of a long-running operation
Some `gcloud` or API commands, such as a server reset, might take a long
time to complete. A command that produces a long-running operation also
generates output that contains an operation ID. You can use the operation ID to
check the status of the long-running operation.
In the `name` field of the output, you can find the operation ID located after
the `operations`
directory. For example, the following output of the `reset` API command
displays the operation ID as `eb0056e2-b6f6-4792-8255-59cd79d5c686`.
```
{
"name": "projects/PROJECT_ID/locations/REGION/operations/eb0056e2-b6f6-4792-8255-59cd79d5c686",
"done": true
}
```
To check the status of a long-running operation, use the following options:
### gcloud
To view the status of a long-running operation, use the `gcloud
bms operations describe` command.
```
gcloud bms operations describe --project=PROJECT_ID --region=REGION OPERATION_ID
```
### API
1. Open a Cloud Shell terminal window in your
Google Cloud console.
2. To view the status of a long-running operation in your Bare Metal Solution
environment, enter your project ID, region, and the operation ID into the
following `curl` command. Copy the command, paste it into the
Cloud Shell prompt, and press the **Enter** or **Return** key:
```
curl -X GET \
-H "Authorization: Bearer $(gcloud auth print-access-token)" \
-H "X-Goog-User-Project: PROJECT_ID" \
-H "Content-Type: application/json" \
"https://baremetalsolution.googleapis.com/v2/projects/PROJECT_ID/locations/REGION/operations/OPERATION_ID"
```
When the operation completes, the **done** field appears as `true` in the output.
```
{
"name": "operations/OPERATION_ID",
"done": true
}
```