This document shows how to set up an access-controlled credit and debit card
tokenization service on Cloud Run functions. To set up the service, the deployment
in this document uses these Google Cloud services:
[Identity and Access Management (IAM)](https://docs.cloud.google.com/iam) and
[Cloud Key Management Service (KMS)](https://docs.cloud.google.com/kms).
*Tokenization* is the process of substituting a benign placeholder value, or
token, for sensitive information such as credit card data. Part 3 of the Payment
Card Industry Data Security Standard (PCI DSS) requires that most of the data
stored on a credit card be treated as sensitive information.
A token by itself is meaningless except as a means of looking up
[tokenized data](https://www.pcisecuritystandards.org/documents/Tokenization_Guidelines_Info_Supplement.pdf)
in a particular context. However, you still need to ensure that your tokens
don't contain any user-specific information and that they aren't directly
decryptable. This way, if you lose control over your customers' payment card
tokens, no one can use the tokens to compromise the cardholder data.
## A service for handling sensitive information
You have many choices for the platform or service to host your cardholder data
environment (CDE). This document guides you through a sample deployment using
Cloud Run functions and helps you on the next steps toward a
production-ready solution.
Cloud Run functions is a serverless platform that hosts and executes code,
and it's a convenient place to quickly launch an application that scales without
intervention. Keep in mind that in a PCI DSS compliant CDE, you must limit all
inbound and outbound traffic to authorized connections. Such fine-grained
controls are not currently available for Cloud Run functions. Therefore, you
must implement compensating controls elsewhere (such as in your application) or
choose a different platform. The same Tokenization service can be run in a
containerized manner such as an autoscaling
[managed instance group](https://docs.cloud.google.com/compute/docs/instance-groups#managed_instance_groups)
or a Kubernetes cluster. These would be preferable production environments with
their complete VPC network controls.
Cloud KMS is Google Cloud's key-management service.
Cloud KMS hosts your encryption keys,
[rotates them regularly](https://docs.cloud.google.com/kms/docs/key-rotation),
and encrypts or decrypts stored account data.
IAM is used in this document to provide tight controls on all of
the resources used in the tokenization service. You need a special service
account that has frequently expiring tokens to grant access to
Cloud KMS and to execute the tokenizer.
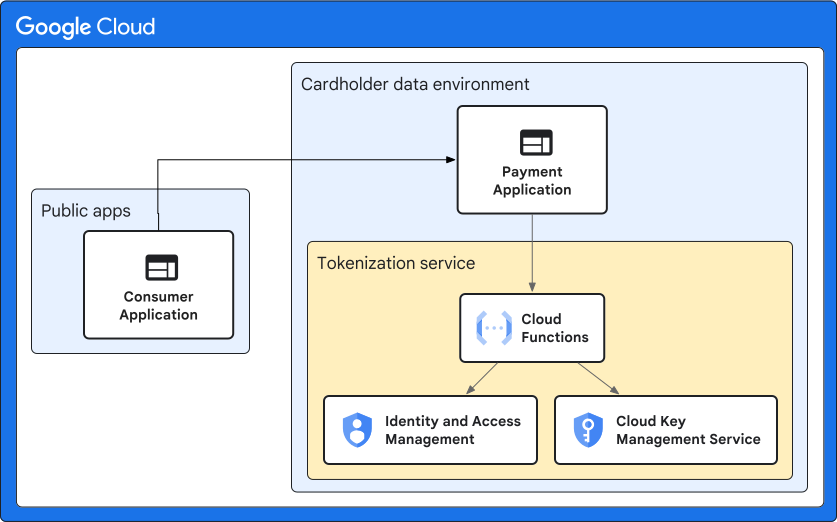
The following figure illustrates the tokenization app architecture that you
create in this document.
## Objectives
- Create a service account.
- Set up Cloud KMS.
- Create two Cloud Run functions.
- Create an authentication token.
- Call the tokenizer.
## Costs
In this document, you use the following billable components of Google Cloud:
- [Cloud KMS](https://docs.cloud.google.com/kms/pricing)
- [Cloud Run functions](https://docs.cloud.google.com/functions/pricing)
- [Cloud Build](https://docs.cloud.google.com/build/pricing)
To generate a cost estimate based on your projected usage,
use the [pricing calculator](https://docs.cloud.google.com/products/calculator).
New Google Cloud users might be eligible for a [free trial](https://docs.cloud.google.com/free).
## Before you begin
1. Ensure that you have the Project Creator IAM role (`roles/resourcemanager.projectCreator`). [Learn how to grant
roles](https://docs.cloud.google.com/iam/docs/granting-changing-revoking-access).
2. In the Google Cloud console, go to the project selector page.
[Go to project selector](https://console.cloud.google.com/projectselector2/home/dashboard)
3. Click **Create project**.
4. Name your project. Make a note of your generated project ID.
5. Edit the other fields as needed.
6. Click **Create**.
7.
[Verify that billing is enabled for your Google Cloud project](https://docs.cloud.google.com/billing/docs/how-to/verify-billing-enabled#confirm_billing_is_enabled_on_a_project).
8.
Enable the Cloud Build, Cloud Run functions, and Cloud KMS APIs, if any are not already enabled.
**Roles required to enable APIs**
To enable APIs, you need the `serviceusage.services.enable` permission. If you
created the project, then you likely already have this permission through the
Owner role (`roles/owner`). Otherwise, you can get this permission through the
Service Usage Admin role (`roles/serviceusage.serviceUsageAdmin`).
[Learn how to grant roles](https://docs.cloud.google.com/iam/docs/granting-changing-revoking-access).
[Enable the APIs](https://console.cloud.google.com/apis/enableflow?apiid=cloudbuild.googleapis.com,cloudfunctions.googleapis.com,cloudkms.googleapis.com&redirect=https://console.cloud.google.com)
When you finish the tasks that are described in this document, you can avoid
continued billing by deleting the resources that you created. For more information, see
[Clean up](https://docs.cloud.google.com/architecture/tokenizing-sensitive-cardholder-data-for-pci-dss#clean-up).
## Create the service account
The [default runtime service account](https://docs.cloud.google.com/functions/docs/securing/function-identity#runtime_service_account)
for Cloud Run functions has the Editor role, which allows broad access to
many Google Cloud services. Although this is the fastest way to develop
functions, Google recommends using the default service account only for testing
and development. You create a service account to limit the APIs that the
function can use in accordance with the
[principle of least privilege](https://cloud.google.com/blog/products/application-development/least-privilege-for-cloud-functions-using-cloud-iam).
To create a service account, do the following:
1. In the Google Cloud console, go to the **Service Accounts** page.
[Go to Service Accounts](https://console.cloud.google.com/iam-admin/serviceaccounts)
2. Select your project.
3. Click **Create Service Account**.
4. In the **Service account name** field, enter `Tokenization Service
User`. The Google Cloud console fills in the **Service account ID**
field based on this name.
5. Optional: In the **Service account description** field, enter a
description for the service account.
6. Click **Create and continue**.
7. Click **Select a role** , and then select
**Cloud KMS CryptoKey Encrypter/Decrypter**.
8. To finish creating the service account, click **Done**.
You now have a service account user with the following email address:
tokenization-service-user@YOUR_PROJECT_ID.iam.gserviceaccount.com
## Set up Cloud KMS
1. In the Google Cloud console, open **Key Management**.
[Go to the Cryptographic Keys page](https://console.cloud.google.com/security/kms)
2. Click **+ Create key ring**. In the dialog that appears, do the following:
1. Name the key ring `tokenization-service-kr`.
2. For **Key ring location** , select **global** . This is a common choice that suffices for this example deployment. Before you make any production architecture decisions, however, make sure you understand the [differences between the various Cloud KMS locations](https://docs.cloud.google.com/kms/docs/locations).
3. Double-check your choices, because you can't rename key rings after they are created.
4. Click **Create**.
The system creates the key ring and forwards you to the key creation page.
3. In the **Create key** dialog, do the following:
1. Name the key `cc-tokenization`.
2. For **Purpose** , select `Symmetric encrypt/decrypt`.
3. Set **Rotation period** to a value you choose, and click **Create**.
> [!NOTE]
> **Note:** Keep track of your entries here. You need the project name, key ring name, key ring location, and key name to use in the Cloud Run functions.
## Create Cloud Run functions
This document assumes you'll be using Cloud Shell. If you use a different
terminal, be sure you have the
[latest version of the Google Cloud CLI](https://cloud.google.com/sdk/gcloud/).
1. In the Google Cloud console, open Cloud Shell:
[Go to Cloud Shell](https://console.cloud.google.com/cloudshell/)
2. Clone the GitHub project repository and move to the working folder:
git clone https://github.com/GoogleCloudPlatform/community gcp-community
cd gcp-community/tutorials/pci-tokenizer/
The `gcs-cf-tokenizer` folder contains the file `index.js`, which is the
source for two different Cloud Run functions that you will create. It
also contains `package.json`, which tells Cloud Run functions which
packages to run.
3. Apply the KMS configuration: copy the config template file and open it for
editing:
cp config/default.json config/local.json
nano config/local.json
The Node.js runtime
[requires you to explicitly define](https://docs.cloud.google.com/functions/docs/configuring/env-var#nodejs_10_and_subsequent_runtimes)
the Google Cloud project ID:
"project_id": "YOUR_PROJECT_ID"
4. Find the KMS configuration and apply the KMS values you created in the
previous section:
"location": "global",
"key_ring": "tokenization-service-kr",
"key_name": "cc-tokenization"
5. Deploy the tokenize function.
```
gcloud functions deploy tokenize --runtime=nodejs18 --trigger-http \
--entry-point=kms_crypto_tokenize --memory=256MB \
--service-account=tokenization-service-user@YOUR_PROJECT_ID.iam.gserviceaccount.com \
--no-allow-unauthenticated --source=.
```
This function turns the credit card information into a token.
6. Look for the value of the URL under `httpsTrigger` in the output of the
`gcloud functions deploy` command. Store the value of the URL
in the `TOK_URL` environment variable:
```
TOK_URL="TOK_URL"
```
You will use the `TOK_URL` environment variable to call the
`tokenize` function.
7. Deploy the detokenize function in KMS mode.
```
gcloud functions deploy detokenize --runtime=nodejs18 --trigger-http \
--entry-point=kms_crypto_detokenize --memory=256MB \
--service-account=tokenization-service-user@YOUR_PROJECT_ID.iam.gserviceaccount.com \
--no-allow-unauthenticated --source=.
```
This function reverses the tokenization process.
8. Look for the value of the URL under `httpsTrigger` in the output of the
`gcloud functions deploy` command. Store the value of the URL
in the `DETOK_URL` environment variable:
```
DETOK_URL="DETOK_URL"
```
You will use the `DETOK_URL` environment variable to call the
detokenize function.
You have created two separate Cloud Run functions: one for turning
the card number into a token, and another to reverse the process. The
differing entry points direct execution to the proper starting function in
the `index.js` file.
9. When the functions are deployed, open the Cloud Run functions console.
[Open the Cloud Run functions console](https://console.cloud.google.com/functions/list)
10. Verify that the functions were created. If all went well, you will see your
two functions with a check mark next to each one.
### Create an authentication token
The `no-allow-unauthenticated` option in the
`gcloud functions deploy` command means that a caller that invokes
the functions must present an authentication token to assert the identity of the
caller. The caller must have the `cloudfunctions.functions.invoke`
permission. The following
[pre-defined roles](https://docs.cloud.google.com/functions/docs/reference/iam/roles) have this permission:
Cloud Functions Invoker, Cloud Functions Admin, and Cloud Functions Developer.
- Create the authentication token:
AUTH_TOKEN=$(gcloud auth print-identity-token)
echo $AUTH_TOKEN
These commands generate an authentication token string, store it in the
environment variable `$AUTH_TOKEN`, and then display the token. Later you call
the Cloud Run functions that you deployed with the token.
### Call the tokenizer
1. Create some sample data to pass to the tokenizer:
export TOK_CC=4000300020001000
export TOK_MM=11
export TOK_YYYY=2028
export TOK_UID=543210
2. Generate an authentication token as described in the previous section, and then call
the tokenizer:
```
CC_TOKEN=$(curl -s \
-X POST "$TOK_URL" \
-H "Content-Type:application/json" \
-H "Authorization: Bearer $AUTH_TOKEN" \
--data '{"cc": "'$TOK_CC'", "mm": "'$TOK_MM'", "yyyy": "'$TOK_YYYY'", "user_id": "'$TOK_UID'"}' \
)
echo $CC_TOKEN
```
The tokenization string representing the credit card data is displayed. This
string has been stored in the environment variable `CC_TOK`. You can
retrieve the card information by invoking the detokenizer.
3. Reverse the tokenization with the following command.
```
DETOK_DATA=$(curl -s \
-X POST "$DETOK_URL" \
-H "Content-Type:application/json" \
-H "Authorization: Bearer $AUTH_TOKEN" \
--data '{"user_id": "'$TOK_UID'", "token": "'$CC_TOKEN'"}' \
)
echo -e "$DETOK_DATA\n"
```
The output looks something like the following:
```
{"cc":"4000300020001000","mm":"11","yyyy":"2028","userid":"543210"}
```
This data is what was originally sent into the tokenizer, decrypted, and
retrieved by your app.
## Expand on this example
The [sample code on GitHub](https://github.com/GoogleCloudPlatform/community/tree/master/tutorials/pci-tokenizer)
is an excellent start, but there is more to
consider before moving to production.
If you choose to use Cloud Run functions for payment card tokenization, you
might need to do more work to satisfy your Qualified Security Assessor or
Self-Assessment Questionnaire. Specifically, PCI DSS sections 1.2 and 1.3
require tight controls on inbound and outbound traffic. Cloud Run functions
and App Engine don't offer a two-way configurable firewall, so you must either
create compensating controls or deploy the tokenization service on
Compute Engine or Google Kubernetes Engine. If you would like to explore
containerization, the GitHub code is Docker compatible and contains supporting
documentation.
This sample code also pulls in the npm (Node.js package manager) dependencies on
deployment. In your production environment, always pin dependencies to specific
vetted versions. Then bundle these versions with the app itself or
serve them from a private and trusted location. Either approach helps you avoid
downtime resulting from an outage at the public npm repository or from a
supply-chain attack that infects packages that you assumed were safe. If you
pre-build and bundle the complete app, your deployment time typically
decreases, which means faster launches and smoother scaling.
## Clean up
To avoid incurring charges to your Google Cloud account for the resources
used in this example deployment you can delete the project that contains the
resources.
> [!CAUTION]
> **Caution** : Deleting a project has the following effects:
>
> - **Everything in the project is deleted.** If you used an existing project for the tasks in this document, when you delete it, you also delete any other work you've done in the project.
> - **Custom project IDs are lost.** When you created this project, you might have created a custom project ID that you want to use in the future. To preserve the URLs that use the project ID, such as an `appspot.com` URL, delete selected resources inside the project instead of deleting the whole project.
1. In the Google Cloud console, go to the **Manage resources** page.
[Go to Manage resources](https://console.cloud.google.com/iam-admin/projects)
2. In the project list, select the project that you want to delete, and then click **Delete**.
3. In the dialog, type the project ID, and then click **Shut down** to delete the project.
## What's next
- [PCI Data Security Standard compliance](https://docs.cloud.google.com/solutions/pci-dss-compliance-in-gcp).
- [Using OAuth 2.0 to Access Google APIs](https://developers.google.com/identity/protocols/OAuth2).
- [PCI DSS requirements](https://www.pcisecuritystandards.org/documents/PCI_DSS_v3-2-1.pdf?agreement=true).
- [PCI DSS Tokenization Info Supplement](https://www.pcisecuritystandards.org/documents/Tokenization_Guidelines_Info_Supplement.pdf).
- For more reference architectures, diagrams, and best practices, explore the [Cloud Architecture Center](https://docs.cloud.google.com/architecture).