This document describes how you deploy a Cloud Logging log sink and a
Dataflow pipeline to stream logs from Google Cloud to Datadog. It
assumes that you're familiar with the reference architecture in
[Stream logs from Google Cloud to Datadog](https://docs.cloud.google.com/architecture/partners/stream-cloud-logs-to-datadog).
These instructions are intended for IT professionals who want to stream logs
from Google Cloud to Datadog. Although it's not required, having
experience with the following Google products is useful for deploying
this architecture:
- Dataflow pipelines
- Pub/Sub
- Cloud Logging
- Identity and Access Management (IAM)
- Cloud Storage
You must have a Datadog account to complete this deployment. However, you don't
need any familiarity with Datadog Log Management.
## Architecture
The following diagram shows the architecture that's described in this document.
This diagram demonstrates how log files that are generated by Google Cloud
are ingested by Datadog and shown to Datadog users.
Click the diagram to enlarge it.
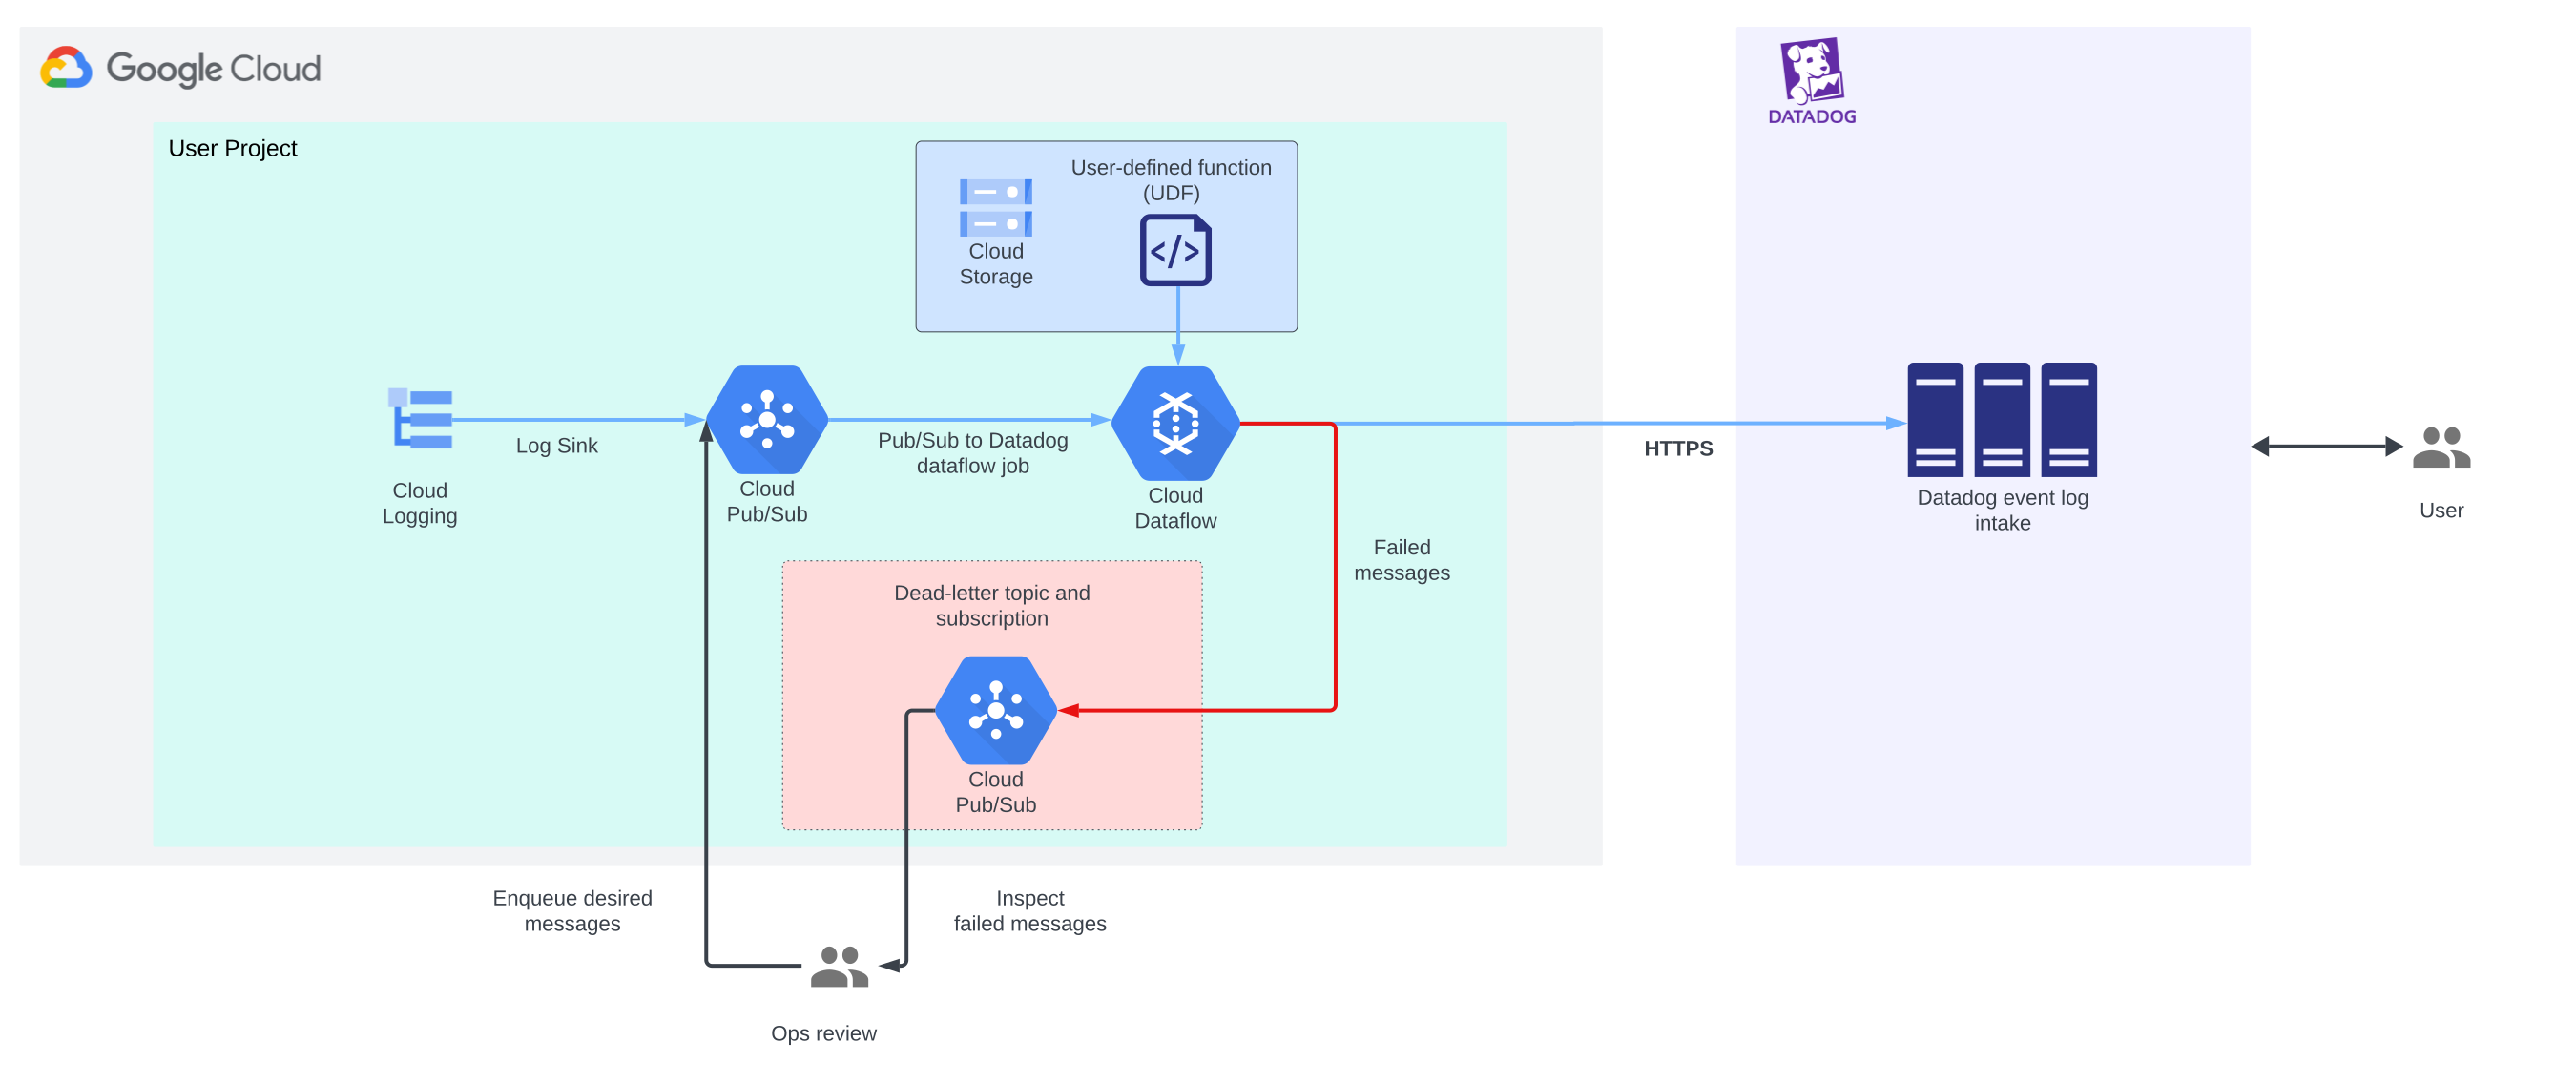

As shown in the preceding diagram, the following events occur:
1. Cloud Logging collects log files from a Google Cloud project into a designated Cloud Logging log sink and then forwards them to a Pub/Sub topic.
2. A Dataflow pipeline pulls the logs from the Pub/Sub topic, batches them, compresses them into a payload, and then delivers them to Datadog.
1. If there's a delivery failure, a secondary Dataflow pipeline sends messages from a dead-letter topic back to the primary log-forwarding topic to be redelivered.
3. The logs arrive in Datadog for further analysis and monitoring.
For more information, see the
[Architecture](https://docs.cloud.google.com/architecture/partners/stream-cloud-logs-to-datadog#architecture/)
section of the reference architecture.
## Objectives
- Create the secure networking infrastructure.
- Create the logging and Pub/Sub infrastructure.
- Create the credentials and storage infrastructure.
- Create the Dataflow infrastructure.
- Validate that Datadog Log Explorer received logs.
- Manage delivery errors.
## Costs
In this document, you use the following billable components of Google Cloud:
- [Cloud Logging](https://cloud.google.com/stackdriver/pricing)
- [Cloud Storage](https://cloud.google.com/storage/pricing)
- [Dataflow](https://cloud.google.com/dataflow/pricing)
- [Pub/Sub](https://cloud.google.com/pubsub/pricing)
To generate a cost estimate based on your projected usage,
use the [pricing calculator](https://docs.cloud.google.com/products/calculator).
New Google Cloud users might be eligible for a [free trial](https://docs.cloud.google.com/free).
You also use the following billable components for Datadog:
- [Datadog Log Management](https://www.datadoghq.com/pricing/?product=log-management#products)
## Before you begin
### IAM role requirements
-
Make sure that you have the following role or roles on the project:
Compute \> Compute Network Admin, Compute \> Compute Security Admin, Dataflow \> Dataflow Admin, Dataflow \> Dataflow Worker, IAM \> Project IAM Admin, IAM \> Service Account Admin, IAM \> Service Account User, Logging \> Logs Configuration Writer, Logging \> Logs Viewer, Pub/Sub \> Pub/Sub Admin, Secret Manager \> Secret Manager Admin, Storage \> Storage Admin
#### Check for the roles
1.
In the Google Cloud console, go to the **IAM** page.
[Go to IAM](https://console.cloud.google.com/projectselector/iam-admin/iam?supportedpurview=project)
2. Select the project.
3.
In the **Principal** column, find all rows that identify you or a group that
you're included in. To learn which groups you're included in, contact your
administrator.
4. For all rows that specify or include you, check the **Role** column to see whether the list of roles includes the required roles.
#### Grant the roles
1.
In the Google Cloud console, go to the **IAM** page.
[Go to IAM](https://console.cloud.google.com/projectselector/iam-admin/iam?supportedpurview=project)
2. Select the project.
3. Click **Grant access**.
4.
In the **New principals** field, enter your user identifier.
This is typically the email address for a Google Account.
5. Click **Select a role**, then search for the role.
6. To grant additional roles, click **Add
another role** and add each additional role.
7. Click **Save**.
## Create network infrastructure
This section describes how to create your network infrastructure to support the
deployment of a Cloud Logging log sink and a Dataflow pipeline to
stream logs from Google Cloud to Datadog.
### Create a Virtual Private Cloud (VPC) network and subnet
To host the Dataflow pipeline worker VMs, create a
Virtual Private Cloud (VPC) network and subnet:
1. In the Google Cloud console, go to the
**VPC networks** page.
[Go to VPC networks](https://console.cloud.google.com/networking/networks/)
2. Click **Create VPC network**.
3. In the **Name** field, provide a name for the network.
4. In the **Subnets** section, provide a name, region, and IP address range for
the subnetwork. The size of the IP address range might vary based on your
environment. A subnet mask of length `/24` is sufficient for most use cases.
5. In the **Private Google Access** section, select **On**.
6. Click **Done** and then click **Create**.
### Create a VPC firewall rule
To restrict traffic to the Dataflow VMs, create a
VPC firewall rule:
1. In the Google Cloud console, go to the
**Create a firewall rule** page.
[Go to Create a firewall rule](https://console.cloud.google.com/net-security/firewall-manager/firewall-policies/add)
2. In the **Name** field, provide a name for the rule.
3. In the **Description** field, explain what the rule does.
4. In the **Network** list, select the network for your
Dataflow VMs.
5. In the **Priority** field, specify the order in which this rule is applied.
Set the **Priority** to `0`.
Rules with lower numbers get prioritized first. The default value for this
field is `1,000`.
6. In the **Direction of traffic** section, select **Ingress**.
7. In the **Action on match** section, select **Allow**.
### Create targets, source tags, protocols, and ports
1. In the Google Cloud console, go to the
**Create a firewall rule** page.
[Go to Create a firewall rule](https://console.cloud.google.com/net-security/firewall-manager/firewall-policies/add)
2. Find the **Targets** list and select **Specified target tags**.
3. In the **Target tags** field, enter `dataflow`.
4. In the **Source filter** list, select **Source tags**.
5. In the **Source tags** field, enter `dataflow`.
6. In the **Protocols and Ports** section complete the following tasks:
1. Select **Specified protocols and ports**.
2. Select the **TCP** checkbox.
3. In the **Ports** field, enter `12345-12346`.
7. Click **Create**.
### Create a Cloud NAT gateway
To help enable secure outbound connections between Google Cloud and
Datadog, create a
[Cloud NAT](https://docs.cloud.google.com/nat/docs/overview)
gateway.
1. In the Google Cloud console, go to the **Cloud NAT** page.
[Go to Cloud NAT](https://console.cloud.google.com/net-services/nat)
2. In the Cloud NAT page, click **Create Cloud NAT gateway**.
3. In the **Gateway name** field, provide a name for the gateway.
4. In the **NAT type** section, select **Public**.
5. In the **Select Cloud Router** section, in the **Network** list, select
your network from the list of available networks.
6. In the **Region** list, select the region that contains your
Cloud Router.
7. In the **Cloud Router** list, select or
[create a new router](https://docs.cloud.google.com/network-connectivity/docs/router/how-to/create-router-vpc-network#create-a-cloud-router)
in the same network and region.
8. In the **Cloud NAT mapping** section, in the **Cloud NAT
IP addresses** list, select **Automatic**.
9. Click **Create**.
## Create logging and Pub/Sub infrastructure
Create Pub/Sub topics and subscriptions to receive and forward
your logs, and to handle any delivery failures.
1. In the Google Cloud console, go to the
**Create a Pub/Sub topic** page.
[Go to Create a Pub/Sub topic](https://console.cloud.google.com/cloudpubsub/topic/create?project=dataflow-cli)
2. In the **Topic ID** field, provide a name for the topic.
1. Leave the **Add a default subscription** checkbox selected.
3. Click **Create**.
4. To handle any log messages that are rejected by the Datadog API, create an
additional topic and default subscription. To create an
additional topic and default subscription, repeat the steps
in this procedure.
The additional topic is used within the Datadog Dataflow
template as part of the path configuration for the `outputDeadletterTopic`
template parameter.
### Route the logs to Pub/Sub
This deployment describes how to create a project-level
[Cloud Logging log sink](https://docs.cloud.google.com/logging/docs/routing/overview#sinks).
However, you can also create an
[organization-level aggregated sink](https://docs.cloud.google.com/logging/docs/export/aggregated_sinks)
that combines logs from multiple projects. Set the `includeChildren` parameter
on the organization-level sink:
1. In the Google Cloud console, go to the
**Create logs routing sink** page.
[Go to Create logs routing sink](https://console.cloud.google.com/logs/router/sink)
2. In the **Sink details** section, in the **Sink name** field, enter a name.
3. Optional: In the **Sink description** field, explain the purpose of the log
sink.
4. Click **Next**.
5. In the **Sink destination** section, in the **Select sink service** list,
select **Cloud Pub/Sub topic**.
6. In the **Select a Cloud Pub/Sub topic** list, select the
input topic that you just created.
7. Click **Next**.
8. Optional: In the **Choose logs to include in sink** section, in the
**Build inclusion filter** field, specify
which logs to include in the sink by entering your logging queries.
For example, to include only 10% of the logs with a severity level of
`INFO`, create an inclusion filter with
severity=`INFO AND sample(insertId, 0.1)`.
For more information, see
[Logging query language](https://docs.cloud.google.com/logging/docs/view/logging-query-language).
> [!NOTE]
> **Note:** If you don't set a filter, all logs for all resources in your project, including audit logs, are routed to the destination that you create in this section.
9. Click **Next**.
10. Optional: In the **Choose logs to filter out of sink (optional)** section,
create logging queries to specify which logs to exclude from the sink:
1. To build an exclusion filter, click **Add exclusion**.
2. In the **Exclusion filter name** field, enter a name.
3. In the **Build an exclusion filter** field, enter a
[filter expression](https://google.aip.dev/160)
that matches the log entries that you want to exclude. You can also use the
[`sample` function](https://docs.cloud.google.com/logging/docs/view/logging-query-language#functions)
to select a portion of the log entries to exclude.
To create the sink with your new exclusion filter turned off, click
**Disable** after you enter the expression. You can update the sink
later to enable the filter.
11. Click **Create sink**.
### Identify writer-identity values
1. In the Google Cloud console, go to the **Log Router**
page.
[Go to Log Router](https://console.cloud.google.com/logs/router)
2. In the **Log Router Sinks** section, find your log sink and then click
**More actions**.
3. Click **View sink details**.
4. In the **Writer identity** row, next to `serviceAccount`, copy the service
account ID. You use the copied service account ID value in the next section.
### Add a principal value
1. Go to the **Pub/Sub Topics** page.
[Go to Pub/Sub Topics](https://console.cloud.google.com/cloudpubsub/topic/)
2. Select your input topic.
3. Click **Show info panel**.
4. On the **Info Panel** , in the **Permissions** tab, click **Add principal**.
5. In the **Add principals** section, in the
**New principals** field, paste the **Writer identity** service
account ID that you copied in the previous section.
6. In the **Assign roles** section, in the **Select a role** list, point to
**Pub/Sub** and click **Pub/Sub Publisher**.
7. Click **Save**.
## Create credentials and storage infrastructure
To store your
[Datadog API key](https://docs.datadoghq.com/account_management/api-app-keys/#api-keys)
value, create a secret in
[Secret Manager](https://docs.cloud.google.com/security/products/secret-manager).
This API key is used by the Dataflow pipeline to forward
logs to Datadog.
1. In the Google Cloud console, go to the **Create secret** page.
[Go to Create secret](https://console.cloud.google.com/security/secret-manager/create)
2. In the **Name** field, provide a name for your secret---for example,
`my_secret`. A secret name can contain uppercase and lowercase letters,
numerals, hyphens, and underscores. The maximum allowed length for a name is
255 characters.
3. In the **Secret value** section, in the
**Secret value** field, paste your Datadog API key value.
You can find the Datadog API key value on the Datadog
[Organization Settings](https://app.datadoghq.com/organization-settings/api-keys)
page.
4. Click **Create secret**.
## Create storage infrastructure
To stage temporary files for the Dataflow pipeline, create a
Cloud Storage bucket with
[Uniform bucket-level access](https://docs.cloud.google.com/storage/docs/uniform-bucket-level-access)
enabled:
1. In the Google Cloud console, go to the **Create a bucket** page.
[Go to Create a bucket](https://console.cloud.google.com/storage/create-bucket)
2. In the **Get Started** section, enter a globally unique, permanent
[name for the bucket](https://docs.cloud.google.com/storage/docs/buckets#naming).
3. Click **Continue**.
4. In the **Choose where to store your data** section, select **Region** ,
select a region for your bucket, and then click **Continue**.
5. In the **Choose a storage class for your data** section,
select **Standard** , and then click **Continue**.
6. In the **Choose how to control access to objects** section,
find the **Access control** section, select **Uniform** ,
and then click **Continue**.
7. Optional: In the **Choose how to protect object data** section, configure
additional security settings.
8. Click **Create** . If prompted, leave the
**Enforce public access prevention on this bucket** item selected.
## Create Dataflow infrastructure
In this section you create a custom Dataflow worker
[service account](https://docs.cloud.google.com/iam/docs/service-account-overview).
This account should follow the
[principle of least privilege](https://en.wikipedia.org/wiki/Principle_of_least_privilege).
The default behavior for Dataflow pipeline workers is
to use your project's
[Compute Engine default service account](https://docs.cloud.google.com/compute/docs/access/service-accounts#default_service_account),
which grants permissions to all resources in the project. If you are forwarding
logs from a production environment, create a custom worker service account with
only the necessary roles and permissions. Assign this service account to your
Dataflow pipeline workers.
The following IAM roles are required for the
Dataflow worker service account that you create in this section.
The service account uses these IAM roles to interact with your
Google Cloud resources and to forward your logs to Datadog
through Dataflow.
| Role | Effect |
|---|---|
| - Dataflow Admin - Dataflow Worker | Allows creating, running, and examining Dataflow jobs. For more information, see [Roles](https://docs.cloud.google.com/pubsub/docs/access-control#roles) in the Dataflow access control documentation. |
| - Pub/Sub Publisher - Pub/Sub Subscriber - Pub/Sub Viewer | Allows viewing subscriptions and topics, consuming messages from a subscription, and publishing messages to a topic. For more information, see [Roles](https://docs.cloud.google.com/pubsub/docs/access-control#roles) in the Pub/Sub access control documentation. |
| - Secret Manager Secret Accessor | Allows accessing the payload of secrets. For more information, see [Access control with IAM](https://docs.cloud.google.com/secret-manager/docs/access-control). |
| - Storage Object Admin | Allows listing, creating, viewing, and deleting objects. For more information, see [IAM roles for Cloud Storage](https://docs.cloud.google.com/storage/docs/access-control/iam-roles). |
### Create a Dataflow worker service account
1. In the Google Cloud console, go to the **Service Accounts** page.
[Go to Service Accounts](https://console.cloud.google.com/projectselector2/iam-admin/serviceaccounts)
2. In the **Select a recent project** section, select your project.
3. On the **Service Accounts** page, click **Create service account**.
4. In the **Service account details** section, in the **Service account name** field, enter a name.
5. Click **Create and continue**.
6. In the **Grant this service account access to project** section, add the
following project-level roles to the service account:
- Dataflow Admin
- Dataflow Worker
7. Click **Done** . The **Service Accounts** page appears.
8. On the **Service Accounts** page, click your service account.
9. In the **Service account details** section, copy the **Email** value. You
use this value in the next section. The system uses the value to configure
access to your Google Cloud resources, so that the service account can
interact with them.
### Provide access to the Dataflow worker service account
To view and consume messages from the Pub/Sub input subscription,
provide access to the Dataflow worker service account:
1. In the Google Cloud console, go to the
**Pub/Sub Subscriptions** page.
[Go to Pub/Sub Subscriptions](https://console.cloud.google.com/cloudpubsub/subscription/)
2. Select the checkbox next to your input subscription.
3. Click **Show info panel**.
4. In the **Permissions** tab, click **Add principal**.
5. In the **Add principals** section, in the **New principals** field, paste
the email of the service account that you created earlier.
6. In the **Assign roles** section, assign the following resource-level roles
to the service account:
- Pub/Sub Subscriber
- Pub/Sub Viewer
7. Click **Save**.
### Handle failed messages
To handle failed messages, you configure the Dataflow worker
service account to send any failed messages to a dead-letter topic. To send
the messages back to the primary input topic after any issues are resolved,
the service account needs to view and consume messages from the dead-letter
subscription.
#### Grant access to the service account
1. In the Google Cloud console, go to the
**Pub/Sub Topics** page.
[Go to Pub/Sub Topics](https://console.cloud.google.com/cloudpubsub/topic/)
2. Select the checklist next to your input topic.
3. Click **Show info panel**.
4. In the **Permissions** tab, click **Add principal**.
5. In the **Add principals** section, in the **New principals** field, paste
the email of the service account that you created earlier.
6. In the **Assign roles** section, assign the following resource-level role
to the service account:
- Pub/Sub Publisher
7. Click **Save**.
#### Create a dead-letter topic
1. In the Google Cloud console, go to the
**Pub/Sub Topics** page.
[Go to Pub/Sub Topics](https://console.cloud.google.com/cloudpubsub/topic/)
2. Select the checkbox next to your dead-letter topic.
3. Click **Show info panel**.
4. In the **Permissions** tab, click **Add principal**.
5. In the **Add principals** section, in the **New principals** field, paste
the email of the service account that you created earlier.
6. In the **Assign roles** section, assign the following resource-level role
to the service account:
- Pub/Sub Publisher
7. Click **Save**.
#### Create a dead-letter subscription
1. In the Google Cloud console, go to the
**Pub/Sub Subscriptions** page.
[Go to Pub/Sub Subscriptions](https://console.cloud.google.com/cloudpubsub/subscription/)
2. Select the checkbox next to your dead-letter subscription.
3. Click **Show info panel**.
4. In the **Permissions** tab, click **Add principal**.
5. In the **Add principals** section, in the **New principals** field, paste
the email of the service account that you created earlier.
6. In the **Assign roles** section, assign the following resource-level roles
to the service account:
- Pub/Sub Subscriber
- Pub/Sub Viewer
7. Click **Save**.
#### Enable the Dataflow worker service account
To access the Datadog API key secret in Secret Manager, you must
first enable the Dataflow worker service account. Doing so lets
the Dataflow worker service account access the Datadog API key
secret.
1. In the Google Cloud console, go to the
**Secret Manager** page.
[Go to Secret Manager](https://console.cloud.google.com/security/secret-manager)
2. Select the checkbox next to your secret.
3. Click **Show info panel**,
4. In the **Permissions** tab, click **Add principal**.
5. In the **Add principals** section, in the **New principals** field, paste
the email of the service account that you created earlier.
6. In the **Assign roles** section, assign the following resource-level role
to the service account:
- Secret Manager Secret Accessor
7. Click **Save**.
#### Stage files to the Cloud Storage bucket
Give the Dataflow worker service account access to read and write
the Dataflow job's staging files to the Cloud Storage
bucket:
1. In the Google Cloud console, go to the **Buckets** page.
[Go to Buckets](https://console.cloud.google.com/storage/)
2. Select the checklist next to your bucket.
3. Click **Permissions**.
4. In the **Add principals** section, in the **New principals** field, paste
the email of the service account that you created earlier.
5. In the **Assign roles** section, assign the following role
to the service account:
- Storage Object Admin
6. Click **Save**.
### Export logs with the Pub/Sub-to-Datadog pipeline
Provide a baseline configuration for running the Pub/Sub to
Datadog pipeline in a secure network with a custom Dataflow
worker service account. If you expect to stream a high volume of logs, you can
also configure the following parameters and features:
- `batchCount`: The number of messages in each batched request to Datadog (from 10 to 1,000 messages, with a default value of `100`). To ensure a timely and consistent flow of logs, a batch is sent at least every two seconds.
- `parallelism`: The number of requests that are being sent to Datadog in parallel, with a default value of `1` (no parallelism).
- Horizontal Autoscaling: Enabled by default for streaming jobs that use Streaming Engine. For more information, see [Streaming autoscaling](https://docs.cloud.google.com/dataflow/docs/horizontal-autoscaling#streaming).
- [User-defined functions](https://docs.cloud.google.com/dataflow/docs/guides/templates/provided/pubsub-to-datadog#user-defined-function): Optional JavaScript functions that you configure to act as extensions to the template (not enabled by default).
For the Dataflow job's `URL` parameter, ensure that you
select the Datadog logs API URL that corresponds to your
[Datadog site](https://docs.datadoghq.com/getting_started/site/):
| Site | Logs API URL |
|---|---|
| **US1** | ` https://http-intake.logs.datadoghq.com ` |
| **US3** | ` https://http-intake.logs.us3.datadoghq.com ` |
| **US5** | ` https://http-intake.logs.us5.datadoghq.com ` |
| **EU** | ` https://http-intake.logs.datadoghq.eu ` |
| **AP1** | ` https://http-intake.logs.ap1.datadoghq.com ` |
| **US1-FED** | ` https://http-intake.logs.ddog-gov.com ` |
#### Create your Dataflow job
1. In the Google Cloud console, go to the
**Create job from template** page.
[Go to Create job from template](https://console.cloud.google.com/dataflow/createjob)
2. In the **Job name** field, name the project.
3. From the **Regional endpoint** list, select a Dataflow
endpoint.
4. In the **Dataflow template** list,
select **Pub/Sub to Datadog** .
The **Required Parameters** section appears.
5. Configure the **Required Parameters** section:
1. In the **Pub/Sub input subscription** list, select the input subscription.
2. In the **Datadog Logs API URL** field, enter the URL that corresponds to your Datadog site.
3. In the **Output deadletter Pub/Sub topic** list, select the topic that you created to receive message failures.
6. Configure the **Streaming Engine** section:
1. In the **Temporary location** field, specify a path for temporary files in the storage bucket that you created for that purpose.
7. Configure the **Optional Parameters** section:
1. In the **Google Cloud Secret Manager ID** field, enter the resource name of the secret that you configured with your Datadog API key value.
#### Configure your credentials, service account, and networking parameters
1. In the **Source of the API key passed** field, select **SECRET_MANAGER**.
2. In the **Worker region** list, select the region where you created your custom VPC and subnet.
3. In the **Service account email** list, select the custom Dataflow worker service account that you created for that purpose.
4. In the **Worker IP Address Configuration** list, select **Private**.
5. In the **Subnetwork** field, specify the private subnetwork that you
created for the Dataflow worker VMs.
For more information, see
[Guidelines for specifying a subnetwork parameter for Shared VPC](https://docs.cloud.google.com/dataflow/docs/guides/specifying-networks#shared).
6. Optional: Customize other settings.
7. Click **Run job**. The Dataflow service allocates
resources to run the pipeline.
## Validate that Datadog Log Explorer received logs
Open the
[Datadog Log Explorer](https://app.datadoghq.com/logs),
and ensure that the timeframe is expanded to encompass the timestamp of the
logs. To validate that Datadog Log Explorer received logs, search for logs with
the `gcp.dataflow.step` source attribute, or any other log attribute.
- Validate that Datadog Log Explorer received logs from Google Cloud:
Source:gcp.dataflow.step
The output will display all of the Datadog log messages that you forwarded
from the dead-letter topic to the primary log forwarding pipeline.
For more information, see
[Search logs](https://docs.datadoghq.com/logs/explorer/search/)
in the Datadog documentation.
## Manage delivery errors
Log file delivery from the Dataflow pipeline that streams
Google Cloud logs to Datadog can fail occasionally. Delivery errors can be
caused by:
- `4xx` errors from the Datadog logs endpoint (related to authentication or network issues).
- `5xx` errors caused by server issues at the destination.
### Manage `401` and `403` errors
If you encounter a `401` error or a `403` error, you must replace the
primary log-forwarding job with a replacement job that has a valid API key
value. You must then clear the messages generated by those errors from the
dead-letter topic. To clear the error messages, follow the steps in the
Troubleshoot failed messages section.
For more information about replacing the primary log-forwarding job with a
replacement job, see
[Launch a replacement job](https://docs.cloud.google.com/dataflow/docs/guides/updating-a-pipeline#Launching).
### Manage other `4xx` errors
To resolve all other `4xx` errors, follow the steps in the Troubleshoot
failed messages section.
### Manage `5xx` errors
For`5xx` errors, delivery is automatically retried with
[exponential backoff](https://en.wikipedia.org/wiki/Exponential_backoff),
for a maximum of 15 minutes. This automatic process might not resolve all errors.
To clear any remaining `5xx` errors, follow the steps in the
Troubleshoot failed messages section.
## Troubleshoot failed messages
When you see failed messages in the dead-letter topic, examine them. To resolve
the errors, and to forward the messages from the dead-letter topic to the
primary log-forwarding pipeline,
complete all of the following subsections in order.
### Review your dead-letter subscription
1. In the Google Cloud console, go to the
**Pub/Sub Subscriptions** page.
[Go to Pub/Sub Subscriptions](https://console.cloud.google.com/cloudpubsub/subscription/list)
2. Click the subscription ID of the dead-letter subscription
that you created.
3. Click the **Messages** tab.
4. To view the messages, leave the **Enable ack messages** checkbox cleared and
click **Pull**.
5. Inspect the failed messages and resolve any issues.
### Reprocess dead-letter messages
To reprocess dead-letter messages, first create a Dataflow job
and then configure parameters.
#### Create your Dataflow job
1. In the Google Cloud console, go to the
**Create job from template** page.
[Go to Create job from template](https://console.cloud.google.com/dataflow/createjob)
2. Give the job a name and specify the regional endpoint.
#### Configure your messaging and storage parameters
1. In the **Create job from template** page, in the **Dataflow template** list, select the **Pub/Sub to Pub/Sub** template.
2. In the **Source** section, in the **Pub/Sub input subscription** list, select your dead-letter subscription.
3. In the **Target** section, in the **Output Pub/Sub topic** list, select the primary input topic.
4. In the **Streaming Engine** section, in the **Temporary
location** field, specify a path and filename prefix for temporary files in the storage bucket that you created for that purpose. For example, `gs://my-bucket/temp`.
#### Configure your networking and service account parameters
1. In the **Create job from template** page, find the **Worker region** list and select the region where you created your custom VPC and subnet.
2. In the **Service Account email** list, select the custom Dataflow worker service account email address that you created for that purpose.
3. In the **Worker IP Address Configuration** list, select **Private**.
4. In the **Subnetwork** field, specify the private subnetwork that you created
for the Dataflow worker VMs.
For more information, see
[Guidelines for specifying a subnetwork parameter for Shared VPC](https://docs.cloud.google.com/dataflow/docs/guides/specifying-networks#shared).
5. Optional: Customize other settings.
6. Click **Run job**.
#### Confirm the dead-letter subscription is empty
Confirming that the dead-letter subscription is empty helps ensure that you have
forwarded all messages from that Pub/Sub subscription to the
primary input topic.
1. In the Google Cloud console, go to the **Pub/Sub
Subscriptions** page.
[Go to Pub/Sub Subscriptions](https://console.cloud.google.com/cloudpubsub/subscription/list)
2. Click the subscription ID of the dead-letter subscription that you created.
3. Click the **Messages** tab.
4. Confirm that there are no more unacknowledged messages through the
Pub/Sub subscription metrics.
For more information, see [Monitor message backlog](https://docs.cloud.google.com/pubsub/docs/monitoring#monitoring_the_backlog).
#### Drain the backup Dataflow job
After you have resolved the errors, and the messages in the dead-letter topic
have returned to the log-forwarding pipeline, follow these steps to stop running
the Pub/Sub to Pub/Sub template.
Draining the backup Dataflow job ensures that the
Dataflow service finishes processing the buffered data while also
blocking the ingestion of new data.
1. In the Google Cloud console, go to the
**Dataflow jobs** page.
[Go to Dataflow jobs](https://console.cloud.google.com/dataflow/jobs)
2. Select the job that you want to stop. The **Stop Jobs** window appears.
To stop a job, the status of the job must be **running**.
3. Select **Drain**.
4. Click **Stop job**.
## Clean up
If you don't plan to continue using the Google Cloud and Datadog resources
deployed in this reference architecture, delete them to avoid incurring
additional costs. There are no Datadog resources for you to delete.
### Delete the project
> [!CAUTION]
> **Caution** : Deleting a project has the following effects:
>
> - **Everything in the project is deleted.** If you used an existing project for the tasks in this document, when you delete it, you also delete any other work you've done in the project.
> - **Custom project IDs are lost.** When you created this project, you might have created a custom project ID that you want to use in the future. To preserve the URLs that use the project ID, such as an `appspot.com` URL, delete selected resources inside the project instead of deleting the whole project.
>
>
> If you plan to explore multiple architectures, tutorials, or quickstarts, reusing projects
> can help you avoid exceeding project quota limits.
1. In the Google Cloud console, go to the **Manage resources** page.
[Go to Manage resources](https://console.cloud.google.com/iam-admin/projects)
2. In the project list, select the project that you want to delete, and then click **Delete**.
3. In the dialog, type the project ID, and then click **Shut down** to delete the project.
## What's next
- To learn more about the benefits of the Pub/Sub to Datadog Dataflow template, read the [Stream your Google Cloud logs to Datadog with
Dataflow](https://www.datadoghq.com/blog/stream-logs-datadog-dataflow-template/) blog post.
- For more information about Cloud Logging, see [Cloud Logging](https://docs.cloud.google.com/logging).
- To learn more about Datadog log management, see [Best Practices for Log Management](https://docs.datadoghq.com/logs/guide/best-practices-for-log-management/).
- For more information about Dataflow, see [Dataflow](https://docs.cloud.google.com/dataflow).
- For more reference architectures, diagrams, and best practices, explore the [Cloud Architecture Center](https://docs.cloud.google.com/architecture).
## Contributors
Authors:
- [Ashraf Hanafy](https://www.linkedin.com/in/ashraf-hanafy-24660442) \| Senior Software Engineer for Google Cloud Integrations, Datadog
- [Daniel Trujillo](https://www.linkedin.com/in/dtrupenn) \| Engineering Manager, Google Cloud Integrations, Datadog
- [Bryce Eadie](https://www.linkedin.com/in/bryce-eadie-432559102) \| Technical Writer, Datadog
- [Sriram Raman](https://www.linkedin.com/in/sriram-raman-79a6703) \| Senior Product Manager, Google Cloud Integrations, Datadog
Other contributors:
- [Maruti C](https://www.linkedin.com/in/maruti-c) \| Global Partner Engineer
- [Chirag Shankar](https://www.linkedin.com/in/chirag-shankar) \| Data Engineer
- [Kevin Winters](https://www.linkedin.com/in/kevin-winters-307a72) \| Key Enterprise Architect
- [Leonid Yankulin](https://www.linkedin.com/in/minherz) \| Developer Relations Engineer
- [Mohamed Ali](https://www.linkedin.com/in/mohamed1ali) \| Cloud Technical Solutions Developer