This deployment shows how to combine
[Cloud Service Mesh](https://docs.cloud.google.com/service-mesh/docs/overview)
with
[Cloud Load Balancing](https://docs.cloud.google.com/load-balancing/docs/load-balancing-overview)
to expose applications in a service mesh to internet clients.
You can expose an application to clients in many ways, depending on where the
client is. This deployment shows you how to expose an application to clients by
combining Cloud Load Balancing with Cloud Service Mesh to
integrate load balancers with a service mesh. This deployment is intended for
advanced practitioners who run Cloud Service Mesh, but it works for
Istio on Google Kubernetes Engine too.
## Architecture
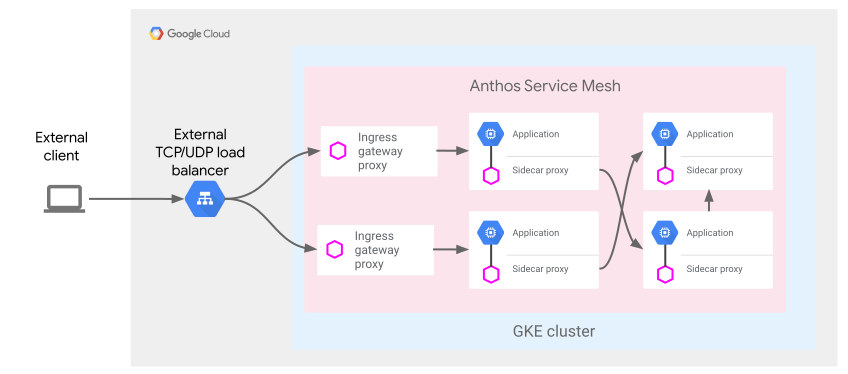
The following diagram shows how you can use mesh ingress gateways to integrate
load balancers with a service mesh:
> [!NOTE]
> **Note:** For applications in Cloud Service Mesh, deployment of the external TCP/UDP load balancer is the default exposure type. You deploy the load balancer through the Kubernetes Service, which selects the Pods of the mesh ingress proxies.

In the topology of the preceding diagram, the cloud ingress layer, which is programed through GKE Gateway, sources
traffic from outside of the service mesh and directs that traffic to the mesh
ingress layer. The mesh ingress layer then directs traffic to the mesh-hosted
application backends.

The preceding topology has the following considerations:
- **Cloud ingress:** In this reference architecture, you configure the Google Cloud load balancer through GKE Gateway to check the health of the mesh ingress proxies on their exposed health-check ports.
- **Mesh ingress:** In the mesh application, you perform health checks on the backends directly so that you can run load balancing and traffic management locally.
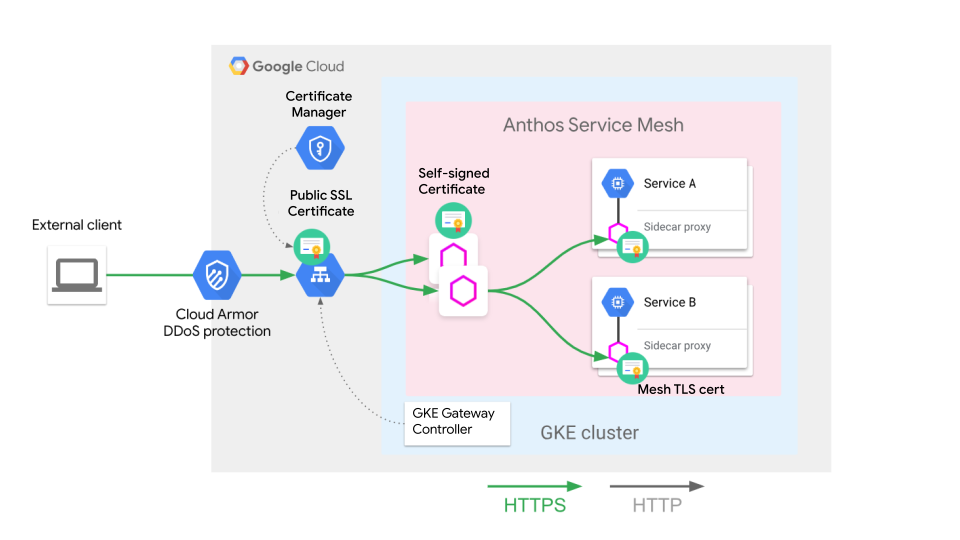
The preceding diagram illustrates HTTPS encryption from
the client to the Google Cloud load balancer, from the load balancer to the mesh
ingress proxy, and from the ingress proxy to the sidecar proxy.
## Objectives
- Deploy a Google Kubernetes Engine (GKE) cluster on Google Cloud.
- Deploy an Istio-based Cloud Service Mesh on your GKE cluster.
- Configure GKE Gateway to terminate public HTTPS traffic and direct that traffic to service mesh-hosted applications.
- Deploy the Online Boutique application on the GKE cluster that you expose to clients on the internet.
## Cost optimization
In this document, you use the following billable components of Google Cloud:
- [Google Kubernetes Engine](https://cloud.google.com/kubernetes-engine/pricing)
- [Compute Engine](https://cloud.google.com/compute/all-pricing)
- [Cloud Load Balancing](https://docs.cloud.google.com/vpc/network-pricing#lb)
- [Certificate Manager](https://cloud.google.com/certificate-manager/pricing)
- [Cloud Service Mesh](https://cloud.google.com/service-mesh/pricing)
- [Google Cloud Armor](https://cloud.google.com/armor/pricing)
- [Cloud Endpoints](https://cloud.google.com/endpoints/pricing)
To generate a cost estimate based on your projected usage,
use the [pricing calculator](https://docs.cloud.google.com/products/calculator).
New Google Cloud users might be eligible for a [free trial](https://docs.cloud.google.com/free).
When you finish the tasks that are described in this document, you can avoid
continued billing by deleting the resources that you created. For more information, see
[Clean up](https://docs.cloud.google.com/architecture/exposing-service-mesh-apps-through-gke-ingress/deployment#clean-up).
## Before you begin
1. In the Google Cloud console, on the project selector page,
select or create a Google Cloud project.
**Roles required to select or create a project**
- **Select a project**: Selecting a project doesn't require a specific IAM role---you can select any project that you've been granted a role on.
- **Create a project** : To create a project, you need the Project Creator role (`roles/resourcemanager.projectCreator`), which contains the `resourcemanager.projects.create` permission. [Learn how to grant
roles](https://docs.cloud.google.com/iam/docs/granting-changing-revoking-access).
> [!NOTE]
> **Note**: If you don't plan to keep the resources that you create in this procedure, create a project instead of selecting an existing project. After you finish these steps, you can delete the project, removing all resources associated with the project.
[Go to project selector](https://console.cloud.google.com/projectselector2/home/dashboard)
2.
[Verify that billing is enabled for your Google Cloud project](https://docs.cloud.google.com/billing/docs/how-to/verify-billing-enabled#confirm_billing_is_enabled_on_a_project).
3. In the Google Cloud console, activate Cloud Shell.
[Activate Cloud Shell](https://console.cloud.google.com/?cloudshell=true)
You run all of the terminal commands for this deployment from Cloud Shell.
4. Upgrade to the latest version of the Google Cloud CLI:
gcloud components update
5. Set your default Google Cloud project:
export PROJECT=PROJECT
export PROJECT_NUMBER=$(gcloud projects describe ${PROJECT} --format="value(projectNumber)")
gcloud config set project ${PROJECT}
Replace `PROJECT` with the project ID that you want to
use for this deployment.
6. Create a working directory:
mkdir -p ${HOME}/edge-to-mesh
cd ${HOME}/edge-to-mesh
export WORKDIR=`pwd`
After you finish this deployment, you can delete the working directory.
## Create GKE cluster
The features that are described in this deployment require a
GKE cluster version 1.30 or later.
1. In Cloud Shell, create a new `kubeconfig` file. This step
ensures that you don't create a conflict with your existing (default)
`kubeconfig` file.
touch edge2mesh_kubeconfig
export KUBECONFIG=${WORKDIR}/edge2mesh_kubeconfig
2. Define environment variables for the GKE cluster:
export CLUSTER_NAME=edge-to-mesh
export CLUSTER_LOCATION=us-central1
3. Enable the Kubernetes Engine API:
gcloud services enable container.googleapis.com
4. Create a GKE
[Autopilot cluster](https://docs.cloud.google.com/kubernetes-engine/docs/concepts/autopilot-overview):
gcloud container --project ${PROJECT} clusters create-auto \
${CLUSTER_NAME} --region ${CLUSTER_LOCATION} --release-channel rapid
5. Ensure that the cluster is running:
gcloud container clusters list
The output is similar to the following:
```
NAME LOCATION MASTER_VERSION MASTER_IP MACHINE_TYPE NODE_VERSION NUM_NODES STATUS
edge-to-mesh us-central1 1.35.3-gke.1993000 34.122.84.52 e2-medium 1.35.3-gke.1993000 3 RUNNING
```
## Install a service mesh
In this section, you configure the [managed Cloud Service Mesh with fleet API](https://docs.cloud.google.com/service-mesh/docs/managed/auto-control-plane-with-fleet).
1. In Cloud Shell, enable the required APIs:
gcloud services enable mesh.googleapis.com
2. Enable Cloud Service Mesh on the fleet:
gcloud container fleet mesh enable
3. Register the cluster to the fleet:
gcloud container fleet memberships register ${CLUSTER_NAME} \
--gke-cluster ${CLUSTER_LOCATION}/${CLUSTER_NAME}
4. Enable automatic control plane management and managed data plane:
gcloud container fleet mesh update \
--management automatic \
--memberships ${CLUSTER_NAME}
5. After a few minutes, verify that the control plane status is `ACTIVE`:
gcloud container fleet mesh describe
The output is similar to the following:
```
...
membershipSpecs:
projects/129729647315/locations/us-central1/memberships/edge-to-mesh:
mesh:
management: MANAGEMENT_AUTOMATIC
membershipStates:
projects/129729647315/locations/us-central1/memberships/edge-to-mesh:
servicemesh:
conditions:
- code: VPCSC_GA_SUPPORTED
details: This control plane supports VPC-SC GA.
documentationLink: http://cloud.google.com/service-mesh/docs/managed/vpc-sc
severity: INFO
controlPlaneManagement:
details:
- code: REVISION_READY
details: 'Ready: asm-managed-rapid'
implementation: TRAFFIC_DIRECTOR
state: ACTIVE
dataPlaneManagement:
details:
- code: OK
details: Service is running.
state: ACTIVE
state:
code: OK
description: |-
Revision ready for use: asm-managed-rapid.
All Canonical Services have been reconciled successfully.
updateTime: '2026-05-29T15:54:42.135357434Z'
name: projects/e2m-api-update-may-26/locations/global/features/servicemesh
resourceState:
state: ACTIVE
...
```
## Deploy GKE Gateway
In the following steps, you deploy the external Application Load Balancer through the
GKE Gateway controller. The GKE Gateway resource
automates the provisioning of the load balancer and backend health checking.
Additionally, you use Certificate Manager to provision and manage
a TLS certificate, and Endpoints to automatically provision a
public DNS name for the application.
### Install a service mesh ingress gateway
As a security best practice, we recommend that you deploy the ingress gateway in
a different namespace from the control plane.
1. In Cloud Shell, create a dedicated `ingress-gateway` namespace:
kubectl create namespace ingress-gateway
2. Add a namespace label to the `ingress-gateway` namespace:
kubectl label namespace ingress-gateway istio-injection=enabled
The output is similar to the following:
```
namespace/ingress-gateway labeled
```
Labeling the `ingress-gateway` namespace with `istio-injection=enabled`
instructs Cloud Service Mesh to automatically inject Envoy sidecar proxies
when an application is deployed.
3. Create a self-signed certificate used by the ingress gateway to
terminate TLS connections between the Google Cloud load balancer (to be
configured later through the GKE Gateway controller)
and the ingress gateway, and store the self-signed certificate as a
Kubernetes secret:
openssl req -new -newkey rsa:4096 -days 365 -nodes -x509 \
-subj "/CN=frontend.endpoints.${PROJECT}.cloud.goog/O=Edge2Mesh Inc" \
-keyout frontend.endpoints.${PROJECT}.cloud.goog.key \
-out frontend.endpoints.${PROJECT}.cloud.goog.crt
kubectl -n ingress-gateway create secret tls edge2mesh-credential \
--key=frontend.endpoints.${PROJECT}.cloud.goog.key \
--cert=frontend.endpoints.${PROJECT}.cloud.goog.crt
For more details about the requirements for the ingress gateway certificate,
see the
[secure backend protocol considerations guide](https://docs.cloud.google.com/load-balancing/docs/ssl-certificates/encryption-to-the-backends#secure_backend_protocol_considerations).
If you want to use HTTP/2 for the GFE-to-mesh connection but you don't need your
own encryption, then you can use [H2C](https://docs.cloud.google.com/load-balancing/docs/https#protocol-to-backends).
4. Run the following commands to create the ingress gateway resource YAML:
mkdir -p ${WORKDIR}/ingress-gateway/base
cat < ${WORKDIR}/ingress-gateway/base/kustomization.yaml
resources:
- github.com/GoogleCloudPlatform/anthos-service-mesh-samples/docs/ingress-gateway-asm-manifests/base
EOF
mkdir ${WORKDIR}/ingress-gateway/variant
cat < ${WORKDIR}/ingress-gateway/variant/role.yaml
apiVersion: rbac.authorization.k8s.io/v1
kind: Role
metadata:
name: asm-ingressgateway
rules:
- apiGroups: [""]
resources: ["secrets"]
verbs: ["get", "watch", "list"]
EOF
cat < ${WORKDIR}/ingress-gateway/variant/rolebinding.yaml
apiVersion: rbac.authorization.k8s.io/v1
kind: RoleBinding
metadata:
name: asm-ingressgateway
roleRef:
apiGroup: rbac.authorization.k8s.io
kind: Role
name: asm-ingressgateway
subjects:
- kind: ServiceAccount
name: asm-ingressgateway
EOF
cat < ${WORKDIR}/ingress-gateway/variant/service-proto-type.yaml
apiVersion: v1
kind: Service
metadata:
name: asm-ingressgateway
spec:
ports:
- name: status-port
port: 15021
protocol: TCP
targetPort: 15021
- name: http
port: 80
targetPort: 8080
- name: https
port: 443
targetPort: 8443
appProtocol: HTTP2
type: ClusterIP
EOF
cat < ${WORKDIR}/ingress-gateway/variant/gateway.yaml
apiVersion: networking.istio.io/v1beta1
kind: Gateway
metadata:
name: asm-ingressgateway
spec:
servers:
- port:
number: 443
name: https
protocol: HTTPS
hosts:
- "*" # IMPORTANT: Must use wildcard here when using SSL, as SNI isn't passed from GFE
tls:
mode: SIMPLE
credentialName: edge2mesh-credential
EOF
cat < ${WORKDIR}/ingress-gateway/variant/kustomization.yaml
namespace: ingress-gateway
resources:
- ../base
- role.yaml
- rolebinding.yaml
patches:
- path: service-proto-type.yaml
target:
kind: Service
- path: gateway.yaml
target:
kind: Gateway
EOF
5. Apply the ingress gateway CRDs:
kubectl apply -k ${WORKDIR}/ingress-gateway/variant
6. Ensure that all deployments are up and running:
kubectl wait --for=condition=available --timeout=600s deployment --all -n ingress-gateway
The output is similar to the following:
```
deployment.apps/asm-ingressgateway condition met
```
### Apply a service mesh ingress gateway health check
When integrating a service mesh ingress gateway to a Google Cloud application
load balancer, the application load balancer must be configured to perform
health checks against the ingress gateway Pods. The `HealthCheckPolicy` CRD
provides an API to configure that health check.
1. In Cloud Shell, create the `HealthCheckPolicy.yaml` file:
cat <${WORKDIR}/ingress-gateway-healthcheck.yaml
apiVersion: networking.gke.io/v1
kind: HealthCheckPolicy
metadata:
name: ingress-gateway-healthcheck
namespace: ingress-gateway
spec:
default:
checkIntervalSec: 20
timeoutSec: 5
#healthyThreshold: HEALTHY_THRESHOLD
#unhealthyThreshold: UNHEALTHY_THRESHOLD
logConfig:
enabled: True
config:
type: HTTP
httpHealthCheck:
#portSpecification: USE_NAMED_PORT
port: 15021
portName: status-port
#host: HOST
requestPath: /healthz/ready
#response: RESPONSE
#proxyHeader: PROXY_HEADER
#requestPath: /healthz/ready
#port: 15021
targetRef:
group: ""
kind: Service
name: asm-ingressgateway
EOF
2. Apply the `HealthCheckPolicy:`
kubectl apply -f ${WORKDIR}/ingress-gateway-healthcheck.yaml
### Define security policies
[Cloud Armor](https://docs.cloud.google.com/armor)
provides DDoS defense and
[customizable security policies](https://docs.cloud.google.com/armor/docs/configure-security-policies)
that you can attach to a load balancer through Ingress resources. In the
following steps, you create a security policy that uses
[preconfigured rules](https://docs.cloud.google.com/armor/docs/rule-tuning#preconfigured_rules)
to block cross-site scripting (XSS) attacks. This rule helps block traffic that
matches known attack signatures but allows all other traffic. Your environment
might use different rules depending on your workload.
1. In Cloud Shell, create a security policy that is called
`edge-fw-policy`:
gcloud compute security-policies create edge-fw-policy \
--description "Block XSS attacks"
2. Create a security policy rule that uses the preconfigured XSS filters:
gcloud compute security-policies rules create 1000 \
--security-policy edge-fw-policy \
--expression "evaluatePreconfiguredExpr('xss-stable')" \
--action "deny-403" \
--description "XSS attack filtering"
3. Create the `GCPBackendPolicy.yaml` file to attach to the ingress
gateway service:
cat < ${WORKDIR}/cloud-armor-backendpolicy.yaml
apiVersion: networking.gke.io/v1
kind: GCPBackendPolicy
metadata:
name: cloud-armor-backendpolicy
namespace: ingress-gateway
spec:
default:
securityPolicy: edge-fw-policy
targetRef:
group: ""
kind: Service
name: asm-ingressgateway
EOF
4. Apply the `GCPBackendPolicy.yaml` file:
kubectl apply -f ${WORKDIR}/cloud-armor-backendpolicy.yaml
### Configure IP addressing and DNS
1. In Cloud Shell, create a global static IP address for the
Google Cloud load balancer:
gcloud compute addresses create e2m-gclb-ip --global
This static IP address is used by the GKE Gateway resource and allows the IP
address to remain the same, even if the external load balancer changes.
2. Get the static IP address:
export GCLB_IP=$(gcloud compute addresses describe e2m-gclb-ip \
--global --format "value(address)")
echo ${GCLB_IP}
To create a stable, human-friendly mapping to the static IP address of your
application load balancer, you must have a public DNS record.
You can use any DNS provider and automation that you want.
This deployment uses
[Endpoints](https://docs.cloud.google.com/endpoints/docs)
instead of creating a managed DNS zone. Endpoints provides a
free
[Google-managed DNS record](https://docs.cloud.google.com/endpoints/docs/openapi/cloud-goog-dns-configure)
for a public IP address.
3. Run the following command to create the YAML specification file named
`dns-spec.yaml`:
cat < ${WORKDIR}/dns-spec.yaml
swagger: "2.0"
info:
description: "Cloud Endpoints DNS"
title: "Cloud Endpoints DNS"
version: "1.0.0"
paths: {}
host: "frontend.endpoints.${PROJECT}.cloud.goog"
x-google-endpoints:
- name: "frontend.endpoints.${PROJECT}.cloud.goog"
target: "${GCLB_IP}"
EOF
The YAML specification defines the public DNS record in the form of
`frontend.endpoints.${PROJECT}.cloud.goog`, where `${PROJECT}` is your
unique project identifier.
4. Deploy the `dns-spec.yaml` file in your Google Cloud project:
gcloud endpoints services deploy ${WORKDIR}/dns-spec.yaml
The output is similar to the following:
```
project [e2m-doc-01]...
Operation "operations/acat.p2-892585880385-fb4a01ad-821d-4e22-bfa1-a0df6e0bf589" finished successfully.
Service Configuration [2023-08-04r0] uploaded for service [frontend.endpoints.e2m-doc-01.cloud.goog]
```
Now that the IP address and DNS are configured, you can generate a public
certificate to secure the frontend. To integrate with
GKE Gateway, you use
[Certificate Manager](https://docs.cloud.google.com/certificate-manager/docs/overview)
TLS certificates.
### Provision a TLS certificate
In this section, you create a TLS certificate using
[Certificate Manager](https://docs.cloud.google.com/certificate-manager/docs/overview),
and associate it with a
[certificate map](https://docs.cloud.google.com/certificate-manager/docs/how-it-works)
through a certificate map entry. The application load balancer, configured
through GKE Gateway, uses the certificate to provide secure
communications between the client and Google Cloud. After it's created, the
certificate map entry is referenced by the GKE Gateway
resource.
1. In Cloud Shell, enable the Certificate Manager API:
gcloud services enable certificatemanager.googleapis.com --project=${PROJECT}
2. Create the TLS certificate:
gcloud --project=${PROJECT} certificate-manager certificates create edge2mesh-cert \
--domains="frontend.endpoints.${PROJECT}.cloud.goog"
3. Create the certificate map:
gcloud --project=${PROJECT} certificate-manager maps create edge2mesh-cert-map
4. Attach the certificate to the certificate map with a certificate map entry:
gcloud --project=${PROJECT} certificate-manager maps entries create edge2mesh-cert-map-entry \
--map="edge2mesh-cert-map" \
--certificates="edge2mesh-cert" \
--hostname="frontend.endpoints.${PROJECT}.cloud.goog"
### Deploy the GKE Gateway and `HTTPRoute` resources
In this section, you configure the GKE Gateway resource
that provisions the Google Cloud application load balancer using the
`gke-l7-global-external-managed`
[`gatewayClass`](https://docs.cloud.google.com/kubernetes-engine/docs/concepts/gateway-api#gatewayclass).
Additionally, you
configure [`HTTPRoute`](https://docs.cloud.google.com/kubernetes-engine/docs/concepts/gateway-api#httproute)
resources that both route requests to the application and perform HTTP to
HTTP(S) redirects.
1. In Cloud Shell, run the following command to create the `Gateway`
manifest as `gke-gateway.yaml`:
cat < ${WORKDIR}/gke-gateway.yaml
kind: Gateway
apiVersion: gateway.networking.k8s.io/v1
metadata:
name: external-http
namespace: ingress-gateway
annotations:
networking.gke.io/certmap: edge2mesh-cert-map
spec:
gatewayClassName: gke-l7-global-external-managed # gke-l7-gxlb
listeners:
- name: http # list the port only so we can redirect any incoming http requests to https
protocol: HTTP
port: 80
- name: https
protocol: HTTPS
port: 443
addresses:
- type: NamedAddress
value: e2m-gclb-ip # reference the static IP created earlier
EOF
2. Apply the `Gateway` manifest to create a `Gateway`called `external-http`:
kubectl apply -f ${WORKDIR}/gke-gateway.yaml
3. Create the default `HTTPRoute.yaml` file:
cat << EOF > ${WORKDIR}/default-httproute.yaml
apiVersion: gateway.networking.k8s.io/v1
kind: HTTPRoute
metadata:
name: default-httproute
namespace: ingress-gateway
spec:
parentRefs:
- name: external-http
namespace: ingress-gateway
sectionName: https
rules:
- matches:
- path:
value: /
backendRefs:
- name: asm-ingressgateway
port: 443
EOF
4. Apply the default `HTTPRoute`:
kubectl apply -f ${WORKDIR}/default-httproute.yaml
5. Create an additional `HTTPRoute.yaml` file to perform HTTP to HTTP(S)
redirects:
cat << EOF > ${WORKDIR}/default-httproute-redirect.yaml
kind: HTTPRoute
apiVersion: gateway.networking.k8s.io/v1
metadata:
name: http-to-https-redirect-httproute
namespace: ingress-gateway
spec:
parentRefs:
- name: external-http
namespace: ingress-gateway
sectionName: http
rules:
- filters:
- type: RequestRedirect
requestRedirect:
scheme: https
statusCode: 301
EOF
6. Apply the redirect `HTTPRoute`:
kubectl apply -f ${WORKDIR}/default-httproute-redirect.yaml
Reconciliation takes time. Use the following command until
`programmed=true`:
kubectl get gateway external-http -n ingress-gateway -w
## Install the Online Boutique sample app
1. In Cloud Shell, create a dedicated `onlineboutique` namespace:
kubectl create namespace onlineboutique
2. Add a label to the `onlineboutique` namespace:
kubectl label namespace onlineboutique istio-injection=enabled
Labeling the `onlineboutique` namespace with `istio-injection=enabled`
instructs Cloud Service Mesh to automatically inject Envoy sidecar proxies when
an application is deployed.
3. Download the Kubernetes YAML files for the Online Boutique sample app:
curl -LO \
https://raw.githubusercontent.com/GoogleCloudPlatform/microservices-demo/main/release/kubernetes-manifests.yaml
4. Deploy the Online Boutique app:
kubectl apply -f kubernetes-manifests.yaml -n onlineboutique
The output is similar to the following (including warnings about
GKE Autopilot
[setting default resource requests and limits](https://docs.cloud.google.com/kubernetes-engine/docs/concepts/autopilot-resource-requests#defaults)):
Warning: autopilot-default-resources-mutator:Autopilot updated Deployment onlineboutique/emailservice: adjusted resources to meet requirements for containers [server] (see http://g.co/gke/autopilot-resources)
deployment.apps/emailservice created
service/emailservice created
Warning: autopilot-default-resources-mutator:Autopilot updated Deployment onlineboutique/checkoutservice: adjusted resources to meet requirements for containers [server] (see http://g.co/gke/autopilot-resources)
deployment.apps/checkoutservice created
service/checkoutservice created
Warning: autopilot-default-resources-mutator:Autopilot updated Deployment onlineboutique/recommendationservice: adjusted resources to meet requirements for containers [server] (see http://g.co/gke/autopilot-resources)
deployment.apps/recommendationservice created
service/recommendationservice created
...
5. Ensure that all deployments are up and running:
kubectl get pods -n onlineboutique
The output is similar to the following:
NAME READY STATUS RESTARTS AGE
adservice-64d8dbcf59-krrj9 2/2 Running 0 2m59s
cartservice-6b77b89c9b-9qptn 2/2 Running 0 2m59s
checkoutservice-7668b7fc99-5bnd9 2/2 Running 0 2m58s
...
Wait a few minutes for the GKE Autopilot cluster to
provision the necessary compute infrastructure to support the application.
6. Run the following command to create the `VirtualService` manifest as
`frontend-virtualservice.yaml`:
cat < frontend-virtualservice.yaml
apiVersion: networking.istio.io/v1beta1
kind: VirtualService
metadata:
name: frontend-ingress
namespace: onlineboutique
spec:
hosts:
- "frontend.endpoints.${PROJECT}.cloud.goog"
gateways:
- ingress-gateway/asm-ingressgateway
http:
- route:
- destination:
host: frontend
port:
number: 80
EOF
`VirtualService` is created in the application namespace
(`onlineboutique`). Typically, the application owner decides and configures
how and what traffic gets routed to the `frontend` application, so
`VirtualService` is deployed by the app owner.
7. Deploy `frontend-virtualservice.yaml` in your cluster:
kubectl apply -f frontend-virtualservice.yaml
8. Access the following link:
echo "https://frontend.endpoints.${PROJECT}.cloud.goog"
Your Online Boutique frontend is displayed.

> [!NOTE]
> **Note:** You might get an `ERR_SSL_VERSION_OR_CIPHER_MISMATCH` error. This error occurs when certificates have not yet propagated to all of the Google Front Ends (GFEs) globally. Wait a few minutes, and then try the link again.
9. To display the details of your certificate, click
**View site information** in your browser's address bar, and then click
**Certificate (Valid)**.
The certificate viewer displays details for the managed certificate,
including the expiration date and who issued the certificate.
You now have a global HTTPS load balancer serving as a frontend to your service
mesh-hosted application.
## Clean up
After you've finished the deployment, you can clean up the resources you created
on Google Cloud so you won't be billed for them in the future. You can
either delete the project entirely or delete cluster resources and then delete
the cluster.
### Delete the project
> [!CAUTION]
> **Caution** : Deleting a project has the following effects:
>
> - **Everything in the project is deleted.** If you used an existing project for the tasks in this document, when you delete it, you also delete any other work you've done in the project.
> - **Custom project IDs are lost.** When you created this project, you might have created a custom project ID that you want to use in the future. To preserve the URLs that use the project ID, such as an `appspot.com` URL, delete selected resources inside the project instead of deleting the whole project.
1. In the Google Cloud console, go to the **Manage resources** page.
[Go to Manage resources](https://console.cloud.google.com/iam-admin/projects)
2. In the project list, select the project that you want to delete, and then click **Delete**.
3. In the dialog, type the project ID, and then click **Shut down** to delete the project.
### Delete the individual resources
If you want to keep the Google Cloud project you used in this deployment,
delete the individual resources:
1. In Cloud Shell, delete the `HTTPRoute` resources:
kubectl delete -f ${WORKDIR}/default-httproute-redirect.yaml
kubectl delete -f ${WORKDIR}/default-httproute.yaml
2. Delete the GKE Gateway resource:
kubectl delete -f ${WORKDIR}/gke-gateway.yaml
3. Delete the TLS certificate resources (including the certificate map entry
and its parent certificate map):
gcloud --project=${PROJECT} certificate-manager maps entries delete edge2mesh-cert-map-entry --map="edge2mesh-cert-map" --quiet
gcloud --project=${PROJECT} certificate-manager maps delete edge2mesh-cert-map --quiet
gcloud --project=${PROJECT} certificate-manager certificates delete edge2mesh-cert --quiet
4. Delete the Endpoints DNS entry:
gcloud endpoints services delete "frontend.endpoints.${PROJECT}.cloud.goog"
The output is similar to the following:
```
Are you sure? This will set the service configuration to be deleted, along
with all of the associated consumer information. Note: This does not
immediately delete the service configuration or data and can be undone using
the undelete command for 30 days. Only after 30 days will the service be
purged from the system.
```
5. When you are prompted to continue, enter Y.
The output is similar to the following:
```
Waiting for async operation operations/services.frontend.endpoints.edge2mesh.cloud.goog-5 to complete...
Operation finished successfully. The following command can describe the Operation details:
gcloud endpoints operations describe operations/services.frontend.endpoints.edge2mesh.cloud.goog-5
```
6. Delete the static IP address:
gcloud compute addresses delete ingress-ip --global
The output is similar to the following:
```
The following global addresses will be deleted:
- [ingress-ip]
```
7. When you are prompted to continue, enter Y.
The output is similar to the following:
```
Deleted
[https://www.googleapis.com/compute/v1/projects/edge2mesh/global/addresses/ingress-ip].
```
8. Delete the GKE cluster:
gcloud container clusters delete $CLUSTER_NAME --zone $CLUSTER_LOCATION
The output is similar to the following:
The following clusters will be deleted.
- [edge-to-mesh] in [us-central1]
9. When you are prompted to continue, enter Y.
After a few minutes, the output is similar to the following:
Deleting cluster edge-to-mesh...done.
Deleted
[https://container.googleapis.com/v1/projects/e2m-doc-01/zones/us-central1/clusters/edge-to-mesh].
## What's next
- Learn about [more features offered by GKE Ingress that you can use with your service mesh](https://docs.cloud.google.com/kubernetes-engine/docs/how-to/ingress-configuration).
- Learn about [the different types of cloud load balancing available for GKE](https://cloud.google.com/blog/products/containers-kubernetes/exposing-services-on-gke).
- Learn about [the features and functionality offered by Cloud Service Mesh](https://docs.cloud.google.com/service-mesh/docs/overview).
- See how to [deploy Ingress across multiple GKE clusters for multi-regional load balancing](https://docs.cloud.google.com/kubernetes-engine/docs/concepts/ingress-for-anthos).
- For more reference architectures, diagrams, and best practices, explore the [Cloud Architecture Center](https://docs.cloud.google.com/architecture).