This document describes how you deploy [Apache Guacamole on GKE and Cloud SQL](https://docs.cloud.google.com/architecture/deploy-guacamole-gke).
These instructions are intended for server administrators and engineers who want
to host Guacamole on GKE and Cloud SQL. The document
assumes you are familiar with deploying workloads to Kubernetes
and Cloud SQL for MySQL. We recommend that you be familiar with Identity and Access Management and
Google Compute Engine as well.
## Architecture
The following diagram shows how a Google Cloud load balancer is
configured with IAP, to protect an instance of the Guacamole
client running in GKE:
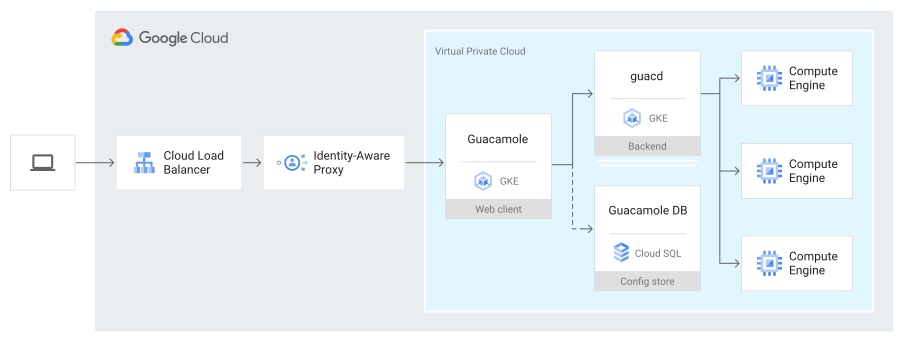
The Guacamole client connects to the guacd backend service, which brokers remote
desktop connections to one or more Compute Engine VMs. The scripts also
deploy a Cloud SQL instance to manage configuration data for Guacamole.
For details, see [Apache Guacamole on GKE and Cloud SQL](https://docs.cloud.google.com/architecture/deploy-guacamole-gke).
## Objectives
- Deploy the infrastructure by using Terraform.
- Create a Guacamole database in Cloud SQL.
- Deploy Guacamole to a GKE Cluster by using Skaffold.
- Test a connection to a VM through Guacamole.
## Costs
In this document, you use the following billable components of Google Cloud:
- [Compute Engine](https://cloud.google.com/compute/all-pricing)
- [GKE](https://cloud.google.com/kubernetes-engine/pricing)
- [Cloud SQL](https://cloud.google.com/sql/pricing)
- [Artifact Registry](https://cloud.google.com/artifact-registry/pricing)
To generate a cost estimate based on your projected usage,
use the [pricing calculator](https://docs.cloud.google.com/products/calculator).
New Google Cloud users might be eligible for a [free trial](https://docs.cloud.google.com/free).
When you finish the tasks that are described in this document, you can avoid
continued billing by deleting the resources that you created. For more information, see
[Clean up](https://docs.cloud.google.com/architecture/deploy-guacamole-gke/deployment#clean-up).
## Before you begin
1. In the Google Cloud console, on the project selector page,
select or create a Google Cloud project.
**Roles required to select or create a project**
- **Select a project**: Selecting a project doesn't require a specific IAM role---you can select any project that you've been granted a role on.
- **Create a project** : To create a project, you need the Project Creator role (`roles/resourcemanager.projectCreator`), which contains the `resourcemanager.projects.create` permission. [Learn how to grant
roles](https://docs.cloud.google.com/iam/docs/granting-changing-revoking-access).
> [!NOTE]
> **Note**: If you don't plan to keep the resources that you create in this procedure, create a project instead of selecting an existing project. After you finish these steps, you can delete the project, removing all resources associated with the project.
[Go to project selector](https://console.cloud.google.com/projectselector2/home/dashboard)
2.
[Verify that billing is enabled for your Google Cloud project](https://docs.cloud.google.com/billing/docs/how-to/verify-billing-enabled#confirm_billing_is_enabled_on_a_project).
3.
Enable the Resource Manager, Service Usage, Artifact Registry, and Compute Engine APIs, if any are not already enabled.
**Roles required to enable APIs**
To enable APIs, you need the `serviceusage.services.enable` permission. If you
created the project, then you likely already have this permission through the
Owner role (`roles/owner`). Otherwise, you can get this permission through the
Service Usage Admin role (`roles/serviceusage.serviceUsageAdmin`).
[Learn how to grant roles](https://docs.cloud.google.com/iam/docs/granting-changing-revoking-access).
[Enable the APIs](https://console.cloud.google.com/apis/enableflow?apiid=cloudresourcemanager.googleapis.com,serviceusage.googleapis.com,compute.googleapis.com,artifactregistry.googleapis.com)
4. In the Google Cloud console, activate Cloud Shell.
[Activate Cloud Shell](https://console.cloud.google.com/?cloudshell=true)
## Deploy the infrastructure
In this section, you use Terraform to deploy the following resources:
- Virtual Private Cloud
- A firewall rule
- A GKE cluster
- An Artifact Registry repository
- Cloud SQL for MySQL
- A VM for managing the MySQL database
- Service accounts
The Terraform configuration also enables
the use of IAP in your project.
1. In Cloud Shell, clone the GitHub repository:
git clone https://github.com/GoogleCloudPlatform/guacamole-on-gcp.git
2. Deploy the required infrastructure by using Terraform:
cd guacamole-on-gcp/tf-infra
unset GOOGLE_CLOUD_QUOTA_PROJECT
terraform init -upgrade
terraform apply
3. Follow the instructions to enter your Google Cloud project ID.
4. To approve Terraform's request to deploy resources to your project,
enter `yes`.
Deploying all resources takes several minutes to complete.
## Deploy the Guacamole database
In this section, you create the Guacamole database and tables in
Cloud SQL for MySQL, and populate the database with the administrator user
information.
1. In Cloud Shell, set environment variables and find the
database root password:
cd ..
source bin/read-tf-output.sh
Make a note of the database root password; you need it in the following
steps.
The script reads output variables from the Terraform run and sets the
following environment variables, which are used throughout this procedure:
CLOUD_SQL_INSTANCE
ZONE
REGION
DB_MGMT_VM
PROJECT_ID
GKE_CLUSTER
GUACAMOLE_URL
SUBNET
2. Copy the `create-schema.sql` and `insert-admin-user.sql` script files
to the database management VM, and then connect to the VM:
gcloud compute scp \
--tunnel-through-iap \
--zone=$ZONE \
create-schema.sql \
insert-admin-user.sql \
$DB_MGMT_VM:
gcloud compute ssh $DB_MGMT_VM \
--zone=$ZONE \
--tunnel-through-iap
A console session to the Database Management VM through Cloud Shell
is now established.
3. Install MySQL client tools:
sudo apt-get update
sudo apt-get install -y mariadb-client
4. Connect to Cloud SQL and create the database. When prompted
for a password, use the root password you noted earlier in this section.
export CLOUD_SQL_PRIVATE_IP=$(curl http://metadata.google.internal/computeMetadata/v1/instance/attributes/cloud_sql_ip -H "Metadata-Flavor: Google")
mysql -h $CLOUD_SQL_PRIVATE_IP -u root -p
5. Grant the database user permissions over the newly created database:
CREATE DATABASE guacamole;
USE guacamole;
GRANT SELECT,INSERT,UPDATE,DELETE ON guacamole.* TO 'guac-db-user';
FLUSH PRIVILEGES;
SOURCE create-schema.sql;
SOURCE insert-admin-user.sql;
quit
6. After the MySQL commands finish running, exit the VM SSH session:
exit
## Deploy Guacamole to GKE by using Skaffold
In this section, you deploy the Guacamole application to
the GKE cluster, by using
[Skaffold](https://skaffold.dev/).
Skaffold handles the workflow for building, pushing, and deploying the Guacamole
images to the GKE clusters.
1. In Cloud Shell, deploy the GKE configuration
by using terraform:
cd tf-k8s
terraform init -upgrade
terraform apply -parallelism=1
2. Get credentials for the GKE cluster:
gcloud container clusters get-credentials \
--region $REGION $GKE_CLUSTER
3. Run Skaffold from the root of the cloned git repository:
cd ..
skaffold --default-repo $REGION-docker.pkg.dev/$PROJECT_ID/guac-repo run
The Skaffold tool builds container images for Guacamole through [Google Cloud Build](https://skaffold.dev/docs/builders/build-environments/cloud-build/)
(the command line includes a flag that specifies which repository to push the
images to). The tool also runs a [kustomize](https://kustomize.io/)
step to generate Kubernetes ConfigMaps and Secrets based on the output of
the Terraform run.
4. Verify that the certificate was provisioned:
kubectl get -w managedcertificates/guacamole-client-cert \
-n guacamole \
-o jsonpath="{.spec.domains[0]} is {.status.domainStatus[0].status}"
Provisioning the certificate can take up to 60 minutes to complete.
5. Once the certificate is provisioned, you can visit your URL in a browser.
1. View the URL from the terraform output:
echo $GUACAMOLE_URL
2. In a browser window, enter the URL that you got in the previous step.
3. When IAP prompts you, sign in with your Google
credentials.
After you sign in, you are logged into Guacamole with administrative
privileges, based on the `insert-admin-user.sql` script you ran previously
in this procedure.
> [!NOTE]
> **Note:** The OAuth configuration created by this procedure is set to [internal](https://support.google.com/cloud/answer/6158849). This means you must use a Google Account in the same organization as the one you used to deploy Guacamole in this procedure; otherwise, you receive an `HTTP/403 org_internal` error. If your browser session is already signed into a different Google Account, try connecting to the URL in an incognito mode tab.
You can now add additional users based on their email address through the
Guacamole user interface. For details, see
[Administration in the Guacamole documentation](https://guacamole.apache.org/doc/gug/administration.html).
These additional users also require permissions through Google
IAM, with the `IAP-secured Web App User` role.
## Test a connection to a VM
After you deploy, configure, and successfully sign in to Guacamole, you can
create a Windows VM and connect to the newly created VM through Guacamole.
### Create a VM
1. In Cloud Shell, create a Windows VM to test connections to:
export TEST_VM=windows-vm
gcloud compute instances create $TEST_VM \
--project=$PROJECT_ID \
--zone=$ZONE \
--machine-type=n1-standard-1 \
--subnet=$SUBNET \
--no-address \
--image-family=windows-2019 \
--image-project=windows-cloud \
--boot-disk-size=50GB \
--boot-disk-type=pd-standard \
---shielded-secure-boot
After running the command, you may need to wait a few minutes for Windows to
finish initializing, before you proceed to the next step.
2. Reset the Windows password for the VM you just created:
gcloud compute reset-windows-password $TEST_VM \
--user=admin \
--zone=$ZONE
### Add a new connection to the VM
1. In a browser window, enter the Guacamole instance URL from [Deploy Guacamole to GKE using Skaffold](https://docs.cloud.google.com/architecture/deploy-guacamole-gke/deployment#deploy-guacamole-to-gke-by-using-skaffold), and then sign in through IAP.
2. In the Guacamole UI, click your username, and then click **Settings**.
3. Under the **Connections** tab, click **New Connection** .
1. In the **Name** field, enter a name for the connection.
2. In the **Location** field, enter the location for the connection.
3. From the **Protocol** drop-down list, select **RDP**.
4. Under **Network** , in the **Hostname** field, enter the name of the VM
you created, `windows-vm`.
Your project DNS resolves this hostname to the instance's internal IP address.
> [!NOTE]
> **Note:** If you choose to create your VM in a different zone than your Guacamole GKE cluster, you need to fully qualify the VM name. For details, see [Internal DNS](https://docs.cloud.google.com/compute/docs/internal-dns).
5. In the **Authentication** section, set the following fields:
1. **Username:** `admin`
2. **Password:** the password you got when you reset the password for the VM
3. **Security mode:** `NLA` (Network Level Authentication)
4. **Ignore server certificate:** select the checkbox
Compute Engine Windows VMs are provisioned with a self-signed
certificate for Remote Desktop Services, so you need to instruct
Guacamole to ignore certificate validation issues.
6. Click **Save**.
7. Click your username, and select **Home**.
8. Click the connection you just created to test connectivity.
After a few seconds, you should see the desktop of the VM instance.
For more details on configuring Guacamole, see the
[Apache Guacamole Manual](https://guacamole.apache.org/doc/gug/).
## Clean up
To avoid incurring charges to your Google Cloud account for the resources used
in this procedure, either delete the project that contains the resources, or keep
the project and delete the individual resources.
### Delete the project
> [!CAUTION]
> **Caution** : Deleting a project has the following effects:
>
> - **Everything in the project is deleted.** If you used an existing project for the tasks in this document, when you delete it, you also delete any other work you've done in the project.
> - **Custom project IDs are lost.** When you created this project, you might have created a custom project ID that you want to use in the future. To preserve the URLs that use the project ID, such as an `appspot.com` URL, delete selected resources inside the project instead of deleting the whole project.
>
>
> If you plan to explore multiple architectures, tutorials, or quickstarts, reusing projects
> can help you avoid exceeding project quota limits.
1. In the Google Cloud console, go to the **Manage resources** page.
[Go to Manage resources](https://console.cloud.google.com/iam-admin/projects)
2. In the project list, select the project that you want to delete, and then click **Delete**.
3. In the dialog, type the project ID, and then click **Shut down** to delete the project.
### Delete the new resources
As an alternative to deleting the entire project, you can delete the individual
resources created during this procedure. Note that the OAuth Consent Screen
configuration cannot be removed from a project, only modified.
- In Cloud Shell, use terraform to delete the resources:
cd ~/guacamole-on-gcp/tf-k8s
terraform destroy
cd ~/guacamole-on-gcp/tf-infra
terraform destroy
gcloud compute instances delete $TEST_VM ---zone=$ZONE
## What's next
- Review the GKE guidance on [Hardening your cluster's security](https://docs.cloud.google.com/kubernetes-engine/docs/how-to/hardening-your-cluster).
- Review [Encrypt secrets at the application layer](https://docs.cloud.google.com/kubernetes-engine/docs/how-to/encrypting-secrets) to learn how to boost security for secrets, such as database credentials and OAuth credentials.
- Review [IAM Conditions](https://docs.cloud.google.com/iam/docs/conditions-overview) to learn how to provide more granular control over user access to Guacamole.
- Understand more about how IAP integration works by reviewing the custom authentication provider in the [GitHub repository](https://github.com/GoogleCloudPlatform/guacamole-on-gcp).
- For more reference architectures, diagrams, and best practices, explore the [Cloud Architecture Center](https://docs.cloud.google.com/architecture).
## Contributors
Author: [Richard Grime](https://www.linkedin.com/in/richard-grime-53777880) \| Principal Architect, UK Public Sector
Other contributors:
- [Aaron Lind](https://www.linkedin.com/in/the-aaron-lind/) \| Solution Engineer, Application Innovation
- [Eyal Ben Ivri](https://www.linkedin.com/in/eyalbenivri) \| Cloud Solutions Architect
- [Ido Flatow](https://www.linkedin.com/in/idoflatow) \| Cloud Solutions Architect