This document shows you how to configure Active Directory and
[Compute Engine](https://docs.cloud.google.com/compute)
so that Windows virtual machine (VM) instances can automatically join an Active
Directory domain.
Automating the process of joining Windows VMs to Active Directory helps you
simplify the process of provisioning Windows servers. The approach also lets you
take advantage of
[autoscaling](https://docs.cloud.google.com/compute/docs/autoscaler)
without sacrificing the benefits of using Active Directory to manage access and
configuration.
This document is intended for system administrators and assumes that you are familiar
with Active Directory and Google Cloud networking.
The configuration that you create by following the procedure in this document
can be the basis of additional work that you do with Windows Servers in Google Cloud.
For example, after you've finished this procedure, you can deploy
ASP.NET applications with Windows Authentication in Windows containers.
If you're using Managed Microsoft AD and don't require [automatic cleanup
of stale computer
accounts](https://docs.cloud.google.com/architecture/configuring-active-directory-for-vms-to-automatically-join-the-domain#scheduling_cleanup_of_stale_computer_accounts),
consider joining the Windows VMs using the automated domain join feature. For
more information, see [Join a Windows VM automatically to a
domain](https://docs.cloud.google.com/managed-microsoft-ad/docs/seamless-domain-join-gce).
## Objectives
- Deploy a Cloud Run app that enables VM instances from selected projects to automatically join your Active Directory domain.
- Create a Cloud Scheduler job that periodically scans your Active Directory domain for stale computer accounts and removes them.
- Test the setup by creating an autoscaled [managed instance group (MIGs)](https://docs.cloud.google.com/compute/docs/instance-groups#managed_instance_groups) of domain-joined VM instances.
## Costs
In this document, you use the following billable components of Google Cloud:
- [Compute Engine](https://cloud.google.com/compute/all-pricing)
- [Serverless VPC Access](https://cloud.google.com/vpc/pricing#serverless-vpc-pricing)
- [Cloud Run](https://cloud.google.com/run/pricing)
- [Artifact Registry](https://cloud.google.com/artifact-registry/pricing)
- [Secret Manager](https://cloud.google.com/secret-manager/pricing)
- [Cloud Scheduler](https://cloud.google.com/scheduler/pricing)
The instructions in this document are designed to keep your resource usage within
the limits of Google Cloud's [Always Free](https://docs.cloud.google.com/free/docs/frequently-asked-questions#always-free)
tier.
To generate a cost estimate based on your projected usage,
use the [pricing calculator](https://docs.cloud.google.com/products/calculator).
New Google Cloud users might be eligible for a [free trial](https://docs.cloud.google.com/free).
When you finish this document, you can avoid continued billing by deleting the
resources you created. For more information, see [Clean up](https://docs.cloud.google.com/architecture/configuring-active-directory-for-vms-to-automatically-join-the-domain#clean-up).
## Before you begin
This document assumes that you've already deployed Active Directory
on Google Cloud by using
[Managed Service for Microsoft Active Directory (Managed Microsoft AD)](https://docs.cloud.google.com/managed-microsoft-ad/docs/overview)
or by deploying self-managed domain controllers on Google Cloud.
To complete the procedures, ensure that you have the following:
- Administrative access to your Active Directory domain, including the ability to create users, groups, and organizational units (OUs).
- An unused /28 CIDR IP range in the VPC that your Active Directory domain controllers are deployed in. You use this IP range to configure Serverless VPC Access.
- A subnet into which you deploy Windows instances. The subnet must be configured to use [Private Google Access](https://docs.cloud.google.com/vpc/docs/private-google-access).
> [!NOTE]
> **Note:** Private Google Access is required so that all VM instances in the subnet can access Cloud Run. If you don't enable Private Google Access, only VM instances with internet access will be able to automatically join your Active Directory domain.
If you use a self-managed domain controller, you also need the following:
- A private DNS forwarding zone that [forwards DNS queries to your Active Directory domain controllers](https://docs.cloud.google.com/compute/docs/instances/windows/best-practices#use_cloud_dns_private_forwarding_zones).
## Implementing this approach
In an on-premises environment, you might rely on
[answer files](https://docs.microsoft.com/en-us/windows-hardware/manufacture/desktop/update-windows-settings-and-scripts-create-your-own-answer-file-sxs)
(`unattend.xml`) and the
[`JoinDomain` customization](https://docs.microsoft.com/en-us/windows-hardware/customize/desktop/unattend/microsoft-windows-unattendedjoin-identification-joindomain)
to automatically join new computers to a domain. Although you can use the same
process in Google Cloud, this approach has several limitations:
- Using a customized `unattend.xml` file requires that you maintain a custom [Compute Engine image](https://docs.cloud.google.com/compute/docs/images). Keeping a custom image current using Windows Updates requires either ongoing maintenance or initial work to set up automation. Unless you need to maintain a custom image for other reasons, this extra effort might not be justified.
- Using the `JoinDomain` customization ties an image to a single Active Directory domain because the domain name must be specified in `unattend.xml`. If you maintain multiple Active Directory domains or forests (for example, for separate testing and production environments), then you might need to maintain multiple custom images for each domain.
- Joining a Windows computer to a domain requires user credentials that have permissions to create a computer object in the directory. If you use the `JoinDomain` customization in `unattend.xml`, you must embed these credentials as plaintext in `unattend.xml`. These embedded credentials can turn the image into a potential target for attackers. Although you can control access to the image by setting appropriate [Identity and Access Management (IAM) permissions](https://docs.cloud.google.com/compute/docs/images/managing-access-custom-images), managing access to a custom image adds unnecessary complexity.
The approach in this document doesn't use answer files and therefore
does not require specially prepared images. Instead, you use the following
[sysprep specialize scriptlet](https://docs.cloud.google.com/compute/docs/startupscript#providing_a_startup_script_for_windows_instances)
when you create a VM instance:
```
iex((New-Object System.Net.WebClient).DownloadString('https://DOMAIN'))
```
This sysprep specialize scriptlet initiates a process that the following diagram
illustrates.
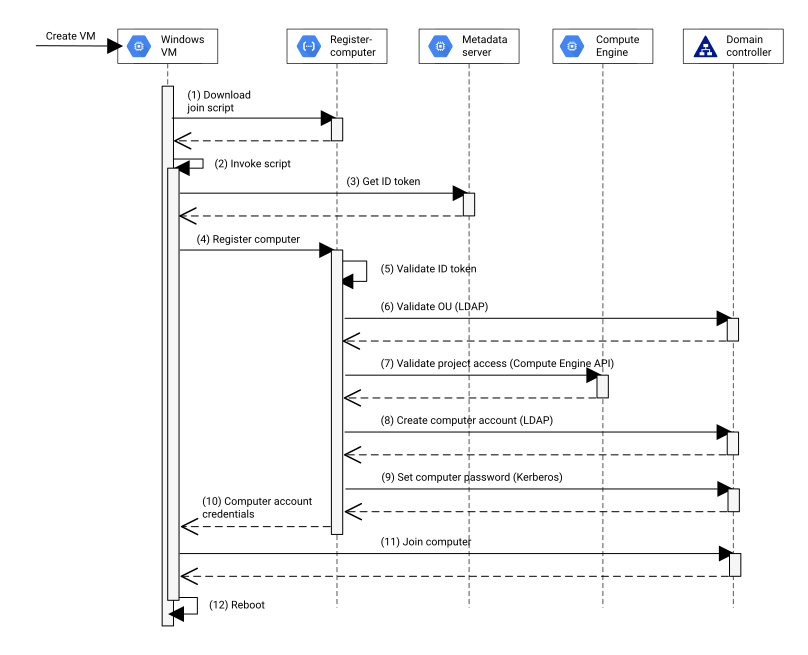
The process works as follows:
1. After a VM instance is created, Windows boots for the first time. As part of the [specialize configuration pass](https://docs.microsoft.com/en-us/windows-hardware/manufacture/desktop/specialize), Windows runs the sysprep specialize scriptlet. The specialize scriptlet invokes the `register-computer` Cloud Run app and downloads a PowerShell script that controls the domain joining process.
2. Windows invokes the downloaded PowerShell script.
3. The PowerShell script calls the metadata server to obtain an ID token that [securely identifies the VM instance](https://docs.cloud.google.com/compute/docs/instances/verifying-instance-identity).
4. The script calls the `register-computer` app again, passing the ID token to authenticate itself.
5. The app validates the ID token and extracts the name, zone, and Google Cloud project ID of the VM instance.
6. The app verifies that the Active Directory domain is configured to permit VM instances from the given project to join the domain. To complete this verification, the app locates and connects to an Active Directory domain controller to check for an organizational unit (OU) whose name matches the Google Cloud project ID from the ID token. If a matching OU is found, then VM instances of the project are authorized to join the Active Directory domain in the given OU.
7. The app verifies that the Google Cloud project is configured to allow VM instances to join Active Directory. To complete this verification, the app checks whether it can access the VM instance by using the Compute Engine API.
8. If all checks pass successfully, the app prestages a computer account in Active Directory. The app saves the VM instance's name, zone, and ID as attributes in the computer account object so that it can be associated with the VM instance.
9. Using the [Kerberos set password protocol](https://support.microsoft.com/en-us/help/264480/description-of-password-change-protocols-in-windows), the app then assigns a random password to the computer account.
10. The computer name and password are returned to the Windows instance over a TLS-secured channel.
11. Using the prestaged computer account, the PowerShell script joins the computer to the domain.
12. After the specialize configuration pass is complete, the machine reboots itself.
The remainder of this procedure walks you through the steps that are required to
set up automated domain joining.
## Preparing the Active Directory domain
First, you prepare your Active Directory domain. To complete this step, you need a machine that
has administrative access to your Active Directory domain.
### Optional: Limit who can join computers to the domain
You might want to restrict who can join computers to the domain. By default, the
Group Policy Object (GPO) configuration for the Default Domain Controller Policy
grants the
[`Add workstations to domain` user right](https://docs.microsoft.com/en-us/windows/security/threat-protection/security-policy-settings/add-workstations-to-domain)
to all authenticated users.
Anyone with that user right can join computers to the domain. Because you are
automating the process of joining computers to your Active Directory domain,
universally granting this level of access is an unnecessary security risk.
> [!NOTE]
> **Note:** If you use Managed Microsoft AD, only members of the [`Cloud Service Domain Join Accounts`](https://docs.cloud.google.com/managed-microsoft-ad/docs/objects) group are allowed to join computers to your domain by default.
To limit who can join computers to your Active Directory domain, change the
default configuration of the Default Domain Controller Policy GPO:
1. [Using an RDP client](https://docs.cloud.google.com/compute/docs/instances/connecting-to-windows), sign in to a machine that has administrative access to your Active Directory domain.
2. Open the Group Policy Management Console (GPMC).
3. Go to **Forest** \> **Domains** \> **domain-name** \> **Group Policy Objects** , where domain-name is the name of your Active Directory domain.
4. Right-click **Default Domain Controller Policy** and click **Edit**.
5. In the Group Policy Management Editor console, go to **Computer Configuration** \> **Policies** \> **Windows Settings** \> **Security Settings** \> **Local Policies** \> **User Rights Assignment**.
6. Double-click **Add workstations to domain**.
7. In **Properties** , remove **Authenticated Users** from the list.
8. To let administrators join the domain manually (optional), click **Add user
or group**, and then add an administrative group to the list.
9. Click **OK**.
You can now close the Group Policy Management Editor console and GPMC.
### Initialize a directory structure
You now create an OU that serves as a container for all project-specific OUs:
1. [Using an RDP client](https://docs.cloud.google.com/compute/docs/instances/connecting-to-windows), sign in to a machine that has administrative access to your Active Directory domain.
2. Open an elevated PowerShell session.
3. Create a new organizational unit:
```
$ParentOrgUnitPath = (Get-ADDomain).ComputersContainer
$ProjectsOrgUnitPath = New-ADOrganizationalUnit `
-Name 'Projects' `
-Path $ParentOrgUnitPath `
-PassThru
```
> [!NOTE]
> **Note:** Adjust the value of `$ParentOrgUnitPath` to create the OU in a location other than the default container.
### Create an Active Directory user account
To access Active Directory and prestage computer accounts, the `register-computer`
app needs an Active Directory user account:
1. Create an Active Directory user account named `register-computer`, assign it a
random password, and then place it in the `Projects` OU:
```
# Generate a random password
Add-Type -AssemblyName System.Web
$Password = [System.Web.Security.Membership]::GeneratePassword(64, 3)
# Create user
$UpnSuffix = (Get-ADDomain).DNSRoot
$RegisterComputerUser = New-ADUser `
-Name "register-computer Cloud Run app" `
-GivenName "Register" `
-Surname "Computer" `
-Path $ProjectsOrgUnitPath `
-SamAccountName "register-computer" `
-UserPrincipalName "register-computer@$UpnSuffix" `
-AccountPassword (ConvertTo-SecureString "$Password" -AsPlainText -Force) `
-PasswordNeverExpires $True `
-Enabled $True `
-PassThru
```
2. Grant the `register-computer` account the minimum set of permissions needed to
manage computer accounts and groups in the `Projects` OU and sub-OUs:
```
$AcesForContainerAndDescendents = @(
"CCDC;Computer", # Create/delete computers
"CCDC;Group" # Create/delete users
)
$AcesForDescendents = @(
"LC;;Computer" , # List child objects
"RC;;Computer" , # Read security information
"WD;;Computer" , # Change security information
"WP;;Computer" , # Write properties
"RP;;Computer" , # Read properties
"CA;Reset Password;Computer", # ...
"CA;Change Password;Computer", # ...
"WS;Validated write to service principal name;Computer",
"WS;Validated write to DNS host name;Computer",
"LC;;Group", # List child objects
"RC;;Group", # Read security information
"WD;;Group", # Change security information
"WP;;Group", # Write properties
"RP;;Group" # Read properties
)
$AcesForContainerAndDescendents | % { dsacls.exe $ProjectsOrgUnitPath /G "${RegisterComputerUser}:${_}" /I:T | Out-Null }
$AcesForDescendents | % { dsacls.exe $ProjectsOrgUnitPath /G "${RegisterComputerUser}:${_}" /I:S | Out-Null }
```
The command might take a few minutes to complete.
3. Grant the `register-computer` account permission to delete DNS records:
### Managed Microsoft AD
```
Add-ADGroupMember -Identity "Cloud Service DNS Administrators" -Members ${RegisterComputerUser}
```
### Self-managed domain
```
$DnsPartition=(Get-ADDomain).SubordinateReferences | Where-Object {$_.StartsWith('DC=DomainDnsZones')}
$DnsContainer="DC=$((Get-ADDomain).DNSRoot),CN=MicrosoftDNS,$DnsPartition"
dsacls $DnsContainer /G "${RegisterComputerUser}:SD" /I:S
```
4. Reveal the `Projects` OU path and the generated password of the
`register-computer` Active Directory user account. Note the values because
you will need them later.
```
Write-Host "Password: $Password"
Write-Host "Projects OU: $ProjectsOrgUnitPath"
```
## Preparing the Google Cloud project
You now configure your domain project:
- If you use Managed Microsoft AD, your domain project is the project in which you deployed Managed Microsoft AD.
- If you use self-managed Active Directory, your domain project is the project that runs your Active Directory domain controllers. In the case of a Shared VPC, this project must be the same as the VPC host project.
You use this domain project to do the following:
- Create a Secret Manager secret that contains the password of the `register-computer` Active Directory user account.
- Deploy the `register-computer` app.
- Configure Cloud Scheduler so that it triggers cleanups of stale computer accounts.
We recommend that you grant access to the domain project on a least-privilege
basis.
### Create a Secret Manager secret
1. In the Google Cloud console, open Cloud Shell.
[Open Cloud Shell](https://console.cloud.google.com/?cloudshell=true)
2. Launch PowerShell:
```
pwsh
```
3. Initialize the following variable, replacing
`domain-project-id` with the ID of your domain project:
$DomainProjectId = "domain-project-id"
4. Set the domain project as the default project:
```
& gcloud config set project $DomainProjectId
```
5. Enable the Secret Manager API:
```
& gcloud services enable secretmanager.googleapis.com
```
6. Enter the password of the `register-computer` Active Directory user account
and store it in a Secret Manager secret:
```
$RegisterComputerCredential = (Get-Credential -Credential 'register-computer')
$TempFile = New-TemporaryFile
Set-Content $TempFile $($RegisterComputerCredential.GetNetworkCredential().Password) -NoNewLine
& gcloud secrets create ad-password --data-file $TempFile
Remove-Item $TempFile
```
### Grant access to Kerberos and LDAP
To manage domain joins, the `register-computer` app accesses your domain
controllers by using the following protocols:
- LDAP (TCP/389) or LDAPS (TCP/636)
- Kerberos (UDP/88, TCP/88)
- Kerberos password change (UDP/464, TCP/464)
### Managed Microsoft AD
You don't need to configure any firewall rules.
### Self-managed domain
Create a firewall rule that allows access to your domain controllers.
You can apply the rule based on a
[network tag](https://docs.cloud.google.com/vpc/docs/add-remove-network-tags)
that you have assigned to your domain controllers, or you can apply it by using
a service account.
### By network tag
```
& gcloud compute firewall-rules create allow-adkrb-from-serverless-to-dc `
--direction INGRESS `
--action allow `
--rules udp:88,tcp:88,tcp:389,tcp:636,udp:464,tcp:464 `
--source-ranges $ServerlessIpRange `
--target-tags dc-tag `
--network $VpcName `
--project vpc-project-id `
--priority 10000
```
Replace the following:
- `dc-tag`: The network tag assigned to your domain controller VMs.
- `vpc-project-id`: The ID of the project the VPC is defined in. If you use a [Shared VPC](https://docs.cloud.google.com/vpc/docs/shared-vpc), use the VPC host project; otherwise, use the ID of the domain project.
### By service account
```
& gcloud compute firewall-rules create allow-adkrb-from-serverless-to-dc `
--direction INGRESS `
--action allow `
--rules udp:88,tcp:88,tcp:389,tcp:636,udp:464,tcp:464 `
--source-ranges $ServerlessIpRange `
--target-service-accounts dc-sa `
--network $VpcName `
--project vpc-project-id `
--priority 10000
```
Replace the following:
- `dc-sa`: The email address of the service account that your domain controller VMs use.
- `vpc-project-id`: The ID of the project the VPC is defined in. If you use a [Shared VPC](https://docs.cloud.google.com/vpc/docs/shared-vpc), use the VPC host project; otherwise, use the ID of the domain project.
### Deploy the Cloud Run app
You now set up Cloud Build to deploy the `register-computer` app
to Cloud Run:
1. In Cloud Shell, clone the GitHub repository:
```
& git clone https://github.com/GoogleCloudPlatform/gce-automated-ad-join.git
cd gce-automated-ad-join/ad-joining
```
2. Initialize the following variables:
$ServerlessRegion = "serverless-region"
$VpcName = "vpc-name"
$VpcSubnet = "subnet-name"
$AdDomain = "dns-domain-name"
$AdNetbiosDomain = "netbios-domain-name"
$ProjectsOrgUnitPath = "projects-ou-distinguished-name"
Replace the following:
- `serverless-region`: The [region](https://docs.cloud.google.com/docs/geography-and-regions#regions_and_zones) to deploy the `register-computer` app in. The region does not have to be the same region as the one you plan to deploy VM instances in.
- `vpc-name`: The name of the VPC network that contains your Active Directory domain controllers.
- `subnet-name`: The subnet of `vpc-name` to use for [direct VPC access](https://docs.cloud.google.com/run/docs/configuring/vpc-direct-vpc). The subnet must be in the same region as `serverless-region`.
- `dns-domain-name`: The DNS domain name of your Active Directory domain.
- `netbios-domain-name`: The NetBIOS name of your Active Directory domain.
- `projects-ou-distinguished-name`: The distinguished name of your `Projects` OU.
3. Enable the Cloud Run and Cloud Build APIs:
```
& gcloud services enable run.googleapis.com cloudbuild.googleapis.com
```
4. Create a service account `register-computer-app` for the Cloud Run app:
```
& gcloud iam service-accounts create register-computer-app `
--display-name="register computer Cloud Run app"
```
5. Create a service account `build-service` for running Cloud Build triggers:
```
& gcloud iam service-accounts create build-service `
--display-name="Cloud Build build agent"
```
6. Allow the Cloud Run service account to read the secret
that contains the Active Directory password:
```
& gcloud secrets add-iam-policy-binding ad-password `
--member "serviceAccount:register-computer-app@$DomainProjectId.iam.gserviceaccount.com" `
--role "roles/secretmanager.secretAccessor"
```
7. Grant Cloud Build the [necessary permissions](https://docs.cloud.google.com/run/docs/reference/iam/roles#additional-configuration)
to deploy to Cloud Run:
```
$DomainProjectNumber = (gcloud projects describe $DomainProjectId --format='value(projectNumber)')
& gcloud iam service-accounts add-iam-policy-binding register-computer-app@$DomainProjectId.iam.gserviceaccount.com `
--member "serviceAccount:build-service@$DomainProjectId.iam.gserviceaccount.com" `
--role "roles/iam.serviceAccountUser"
& gcloud projects add-iam-policy-binding $DomainProjectId `
--member "serviceAccount:build-service@$DomainProjectId.iam.gserviceaccount.com" `
--role roles/cloudbuild.builds.builder
& gcloud projects add-iam-policy-binding $DomainProjectId `
--member "serviceAccount:build-service@$DomainProjectId.iam.gserviceaccount.com" `
--role roles/run.admin
```
8. Use the file `cloudbuild.yaml` as a template to create a custom
Cloud Run build config that matches your environment:
```
$Build = (Get-Content cloudbuild.yaml)
$Build = $Build.Replace('__SERVERLESS_REGION__', "$ServerlessRegion")
$Build = $Build.Replace('__PROJECTS_DN__', "$ProjectsOrgUnitPath")
$Build = $Build.Replace('__AD_DOMAIN__', "$AdDomain")
$Build = $Build.Replace('__AD_NETBIOS_DOMAIN__', "$AdNetbiosDomain")
$Build = $Build.Replace('__SERVICE_ACCOUNT_EMAIL__', "register-computer-app@$DomainProjectId.iam.gserviceaccount.com")
$Build = $Build.Replace('__SERVERLESS_NETWORK__', "$VpcName")
$Build = $Build.Replace('__SERVERLESS_SUBNET__', "$VpcSubnet")
$Build | Set-Content .\cloudbuild.hydrated.yaml
```
> [!NOTE]
> **Note:** The app provides additional configurable settings, such as using LDAPS instead of LDAP. For more information, see the app's [README.md](https://github.com/GoogleCloudPlatform/gce-automated-ad-join/blob/master/ad-joining/README.md) file. To apply additional configurations, edit the `cloudbuild.yaml` file and add the required environment variables to the `cloud-sdk` step arguments.
9. Build the app and deploy it to Cloud Run:
```
& gcloud builds submit . `
--config cloudbuild.hydrated.yaml `
--substitutions _IMAGE_TAG=$(git rev-parse --short HEAD) `
--service-account "projects/$DomainProjectId/serviceAccounts/build-service@$DomainProjectId.iam.gserviceaccount.com" `
--default-buckets-behavior regional-user-owned-bucket
```
The deployment can take a couple of minutes to complete.
> [!NOTE]
> **Note:** If you keep the file `cloudbuild.hydrated.yaml`, you can later redeploy the app by re-running the preceding command.
10. Determine the URL of the Cloud Run app:
```
$RegisterUrl = (gcloud run services describe register-computer `
--platform managed `
--region $ServerlessRegion `
--format=value`(status.url`))
Write-Host $RegisterUrl
```
Note the URL. You will need it whenever you create a VM instance
that should be joined to Active Directory.
11. Invoke the Cloud Run app to verify that the deployment worked:
```
Invoke-RestMethod $RegisterUrl
```
A PowerShell script displays. The VM runs this script during the specialize
phase that joins it to the domain.
## Enabling a project for automatic domain joining
The `register-computer` app does not allow VM instances to
join an Active Directory domain unless the VM's project is enabled for automatic
domain joining. This security measure helps prevent VMs that are connected to
unauthorized projects from accessing your domain.
> [!NOTE]
> **Note:** If you deployed Active Directory into a Shared VPC, we recommend that you [create a project](https://docs.cloud.google.com/resource-manager/docs/creating-managing-projects) for testing purposes and [attach the project to the Shared VPC](https://docs.cloud.google.com/vpc/docs/provisioning-shared-vpc#create-shared).
>
> Deploying Serverless VPC Access creates a subnet in your VPC. You don't need to share this subnet when you attach service projects to the VPC host project.
To enable a project for automatic domain joining, you must do the following:
- Create an OU in Active Directory whose name matches your Google Cloud project ID.
- Grant the `register-computer` app access to the Google Cloud project.
First, create the OU:
1. Using an RDP client, sign in to a machine that has administrative access to your Active Directory domain.
2. In the Active Directory Users and Computers MMC snap-in, go to the `Projects` OU.
3. Right-click the OU and select **New** \> **Organizational Unit**.
4. In the **New Object** dialog, enter the ID for the Google Cloud project to deploy your VMs in.
5. Click **OK**.
Next, grant the `register-computer` app access to the
Google Cloud project:
1. In Cloud Shell, launch PowerShell:
```
pwsh
```
2. Initialize the following variables:
$ProjectId = "project-id"
$DomainProjectId = "domain-project-id"
Replace
- `project-id` with the ID of the Google Cloud project to deploy your VMs in
- `domain-project-id` with the ID of your domain project
3. Grant the `register-computer-app` service account the `Compute Viewer` role on
the project:
```
& gcloud projects add-iam-policy-binding $ProjectId `
--member "serviceAccount:register-computer-app@$DomainProjectId.iam.gserviceaccount.com" `
--role "roles/compute.viewer"
```
Your project is now ready to support automatic domain joining.
## Testing domain joining
You can now verify that the setup is working correctly by:
- Creating a single VM instance that automatically joins the Active Directory domain
- Creating a managed instance group of VM instances that automatically join the Active Directory domain
### Create and join a single VM instance
Create a VM instance that automatically joins the Active Directory domain:
1. Return to the PowerShell session in Cloud Shell and initialize
the following variables:
$Region = "vpc-region-to-deploy-vm"
$Zone = "zone-to-deploy-vm"
$Subnet = "vpc-subnet-to-deploy-vm"
$ServerlessRegion = "serverless-region"
Replace the following:
- `vpc-region-to-deploy-vm`: The region to deploy the VM instance in.
- `vpc-subnet-to-deploy-vm`: The subnet to deploy the VM instance in.
- `zone-to-deploy-vm`: The zone to deploy the VM instance in.
- `serverless-region`: The region you deployed the Cloud Run app in.
2. Set the default project and zone:
```
& gcloud config set project $ProjectId
& gcloud config set compute/zone $Zone
```
3. Lookup the URL of the Cloud Run app again:
```
$RegisterUrl = (gcloud run services describe register-computer `
--platform managed `
--region $ServerlessRegion `
--format value`(status.url`) `
--project $DomainProjectId)
```
4. Create an instance by passing the specialize scriptlet that
causes the VM to join the domain:
### Shared VPC
```
$VpchostProjectId = (gcloud compute shared-vpc get-host-project $ProjectId --format=value`(name`))
& gcloud compute instances create join-01 `
--image-family windows-2025-core `
--image-project windows-cloud `
--machine-type n2-standard-2 `
--no-address `
--subnet projects/$VpchostProjectId/regions/$Region/subnetworks/$Subnet `
--metadata "sysprep-specialize-script-ps1=iex((New-Object System.Net.WebClient).DownloadString('$RegisterUrl'))"
```
### Standalone VPC
```
& gcloud compute instances create join-01 `
--image-family=windows-2025-core `
--image-project=windows-cloud `
--machine-type=n2-standard-2 `
--no-address `
--subnet $Subnet `
--metadata "sysprep-specialize-script-ps1=iex((New-Object System.Net.WebClient).DownloadString('$RegisterUrl'))"
```
If you want to use a custom hostname, add a `--hostname` parameter to the
command.
If you use a Windows Server version prior to
Windows Server 2019, [TLS 1.2 might be disabled by default](https://docs.microsoft.com/en-us/dotnet/framework/network-programming/tls#support-for-tls-12),
which can cause the specialize scriptlet to fail. To enable TLS 1.2, use the
following scriptlet instead:
```
[Net.ServicePointManager]::SecurityProtocol=[Net.SecurityProtocolType]::Tls12;iex((New-Object System.Net.WebClient).DownloadString('$RegisterUrl'))
```
> [!NOTE]
> **Note:** NetBIOS only supports computer names of [up to 15 characters](https://support.microsoft.com/en-gb/help/909264/naming-conventions-in-active-directory-for-computers-domains-sites-and). If the hostname of a VM instance exceeds this maximum length, the specialize scriptlet automatically changes the computer name to a name that is unique and has less than 15 characters.
>
> When you create additional VM instances, make sure to keep the instance name under this character limit; otherwise, joining a VM instance to your domain is likely to fail.
5. Monitor the boot process:
```
& gcloud compute instances tail-serial-port-output join-01
```
After about one minute, the machine is joined to your Active Directory
domain. The output is similar to the following:
```
Domain : corp.example.com
DomainController : dc-01.corp.example.com.
OrgUnitPath : OU=test-project-123,OU=Projects,DC=corp,DC=example,DC=com
WARNING: The changes will take effect after you restart the computer
Computer successfully joined to domain
```
To stop observing the boot process, press `CTRL+C`.
#### Verify that the VM is joined to Active Directory
1. Using an RDP client, sign in to a machine that has administrative access to your Active Directory domain.
2. Open the Active Directory Users and Computers MMC snap-in.
3. In the menu, ensure that **View** \> **Advanced Features** is enabled.
4. Go to the OU named after the Google Cloud project ID that you created a VM instance in.
5. Double-click the `join-01` account.
6. In the **Properties** dialog, click the **Attribute Editor** tab.
The computer account is annotated with additional LDAP attributes. These
attributes let you track the association between the computer object and
the Compute Engine instance.
Verify that the list contains the following LDAP attributes and values.
| LDAP attribute | Value |
|---|---|
| `msDS-cloudExtensionAttribute1` | Google Cloud project ID |
| `msDS-cloudExtensionAttribute2` | Compute Engine zone |
| `msDS-cloudExtensionAttribute3` | Compute Engine instance name |
The `msDS-cloudExtensionAttribute` attributes are
[general-purpose attributes](https://docs.microsoft.com/en-us/openspecs/windows_protocols/ms-ada2/cc15b421-7a75-44b1-8fcc-eab98ee41d7a)
and are not used by Active Directory itself.
#### Diagnose errors
If your VM instance failed to join the domain, check the log of the
`register-computer` app:
1. In the Google Cloud console, go to Cloud Run.
[Go to Cloud Run](https://console.cloud.google.com/run)
2. Click the `register-computer` app.
3. In the menu, click **Logs**.
#### Delete the instance
After you verify that the VM instance is joined to the Active Directory domain,
you delete the instance.
- Delete the instance:
```
& gcloud compute instances delete join-01 --quiet
```
### Create and join a managed instance group
You can also verify that instances from a MIG can automatically join your
domain.
1. Create an instance template by passing the specialize script that
causes the VM to join the domain:
### Shared VPC
```
$VpchostProjectId = (gcloud compute shared-vpc get-host-project $ProjectId --format=value`(name`))
& gcloud compute instance-templates create ad-2019core-n2-std-2 `
--image-family windows-2025-core `
--image-project windows-cloud `
--no-address `
--machine-type n2-standard-2 `
--subnet projects/$VpchostProjectId/regions/$Region/subnetworks/$Subnet `
--metadata "sysprep-specialize-script-ps1=iex((New-Object System.Net.WebClient).DownloadString('$RegisterUrl'))"
```
### Standalone VPC
```
& gcloud compute instance-templates create ad-2019core-n2-std-2 `
--image-family windows-2025-core `
--image-project windows-cloud `
--no-address `
--machine-type n2-standard-2 `
--subnet projects/$ProjectId/regions/$Region/subnetworks/$Subnet `
--metadata "sysprep-specialize-script-ps1=iex((New-Object System.Net.WebClient).DownloadString('$RegisterUrl'))"
```
2. Create a managed instance group that uses the instance template:
```
& gcloud compute instance-groups managed create group-01 `
--template ad-2019core-n2-std-2 `
--size=3
```
Wait a few minutes, and then use the Active Directory Users and Computers MMC
snap-in to verify that four new objects have been created in Active Directory:
- 3 computer accounts corresponding to the 3 VM instances of the managed instance group.
- 1 group named `group-01` that contains the 3 computer accounts. If you plan to use [group managed service accounts](https://docs.microsoft.com/en-us/windows-server/security/group-managed-service-accounts/group-managed-service-accounts-overview) (gMSA), you can use this group to grant access to the gMSA.
> [!NOTE]
> **Note:** NetBIOS only supports computer names of [up to 15 characters](https://support.microsoft.com/en-gb/help/909264/naming-conventions-in-active-directory-for-computers-domains-sites-and). If the hostname of a VM instance exceeds this maximum length, the specialize scriptlet automatically changes the computer name to a name that is unique and has less than 15 characters. Make sure to use short names for managed instance groups so that the names of VM instances don't exceed 15 characters.
After you verify that the VM instances from your MIGs can join your Active
Directory domain, you can delete the managed group and instance template by
following these steps:
1. In Cloud Shell, delete the instance group:
```
& gcloud compute instance-groups managed delete group-01 --quiet
```
2. Delete the instance template:
```
& gcloud compute instance-templates delete ad-2019core-n2-std-2 --quiet
```
## Scheduling cleanup of stale computer accounts
Automating the process of joining computers to the domain reduces the effort to
set up new servers and lets you use domain-joined servers in managed
instance groups. Over time, however, stale computer accounts can accumulate in
the domain.
To prevent this accumulation, we recommend that you set up the
`register-computer` app to periodically scan your
Active Directory domain to find and automatically remove stale accounts
and their associated DNS records.
The `register-computer` app can use the
`msDS-cloudExtensionAttribute` attributes of computer accounts to identify which
computer accounts are stale. These attributes contain the project, zone, and
instance name of the corresponding VM instance in Compute Engine. For
each computer account, the app can check if the corresponding VM instance
is still available. If it is not, then the computer account is considered stale
and removed.
To trigger a computer account cleanup, you invoke the `/cleanup`
endpoint of the Cloud Run app. To prevent unauthorized users from
triggering a cleanup, this request must be authenticated by using the
`register-computer-app` service account.
### Configure Cloud Scheduler
The following steps show you how to set up
[Cloud Scheduler](https://docs.cloud.google.com/scheduler)
in conjunction with
[Pub/Sub](https://docs.cloud.google.com/pubsub)
to automatically trigger a cleanup once every 24 hours:
1. In Cloud Shell, enable the Cloud Scheduler API in your domain
project:
```
& gcloud services enable cloudscheduler.googleapis.com
```
2. Set `AppEngineLocation` to a valid
[App Engine location](https://docs.cloud.google.com/appengine/docs/locations)
in which to deploy Cloud Scheduler:
$AppEngineLocation = "location"
Replace `location` with the App Engine region
that you selected for your VPC resources, for example, `us-central`. If that
region is not available as an App Engine location, choose a
location that is geographically close to you. For more information, see
[Regions and zones](https://docs.cloud.google.com/compute/docs/regions-zones).
3. Initialize App Engine:
```
& gcloud app create --region $AppEngineLocation --project $DomainProjectId
```
4. Create a Cloud Scheduler job:
```
& gcloud scheduler jobs create http cleanup-computer-accounts `
--schedule "every 24 hours" `
--uri "$RegisterUrl/cleanup" `
--oidc-service-account-email register-computer-app@$DomainProjectId.iam.gserviceaccount.com `
--oidc-token-audience "$RegisterUrl/" `
--project $DomainProjectId
```
This job calls the `register-computer` app once every
24 hours and uses the `register-computer-app` service account for
authentication.
### Trigger a cleanup
To verify your configuration for cleaning up stale computer accounts, you can
trigger the Cloud Scheduler job manually.
1. In the Google Cloud console, go to Cloud Scheduler.
[Go to Cloud Scheduler](https://console.cloud.google.com/cloudscheduler)
2. For the `cleanup-computer-accounts` job that you created, click **Run Now**.
After a few seconds, the **Result** column displays **Success** ,
indicating that the cleanup completed successfully. If the result column
does not update automatically within a few seconds, click the **Refresh**
button.
For more details about which accounts were cleaned up, check the logs of the
`register-computer` app.
1. In the Google Cloud console, go to Cloud Run.
[Go to Cloud Run](https://console.cloud.google.com/run)
2. Click the `register-computer` app.
3. In the menu, click **Logs**.
Log entries indicate that the computer accounts of the VM instances you used
to test domain joining were identified as stale and removed.
## Clean up
If you are using this document as a baseline for other reference architectures and
deployments, read the other documents about when to run the cleanup steps.
If you don't want to keep the Google Cloud setup used in this
document, you can revert this setup by doing the following:
1. In Cloud Shell, delete the Cloud Scheduler job:
```
& gcloud scheduler jobs delete cleanup-computer-accounts `
--project $DomainProjectId
```
2. Delete the Cloud Run app:
```
& gcloud run services delete register-computer `
--platform managed `
--project $DomainProjectId `
--region $ServerlessRegion
```
3. Delete the Secret Manager secret:
```
gcloud secrets delete ad-password --project $DomainProjectId
```
4. Delete the firewall rule for LDAP and Kerberos access:
gcloud compute firewall-rules delete allow-adkrb-from-serverless-to-dc --project=vpc-project-id
Replace `vpc-project-id` with the ID of the project
the VPC is defined in. If you use a
[Shared VPC](https://docs.cloud.google.com/vpc/docs/shared-vpc),
use the VPC host project; otherwise, use the ID of the domain project.
### Revert Active Directory changes
1. Using an RDP client, sign in to a machine that has administrative access to your Active Directory domain.
2. In the Active Directory Users and Computers MMC snap-in, go to the `Projects` OU.
3. Delete the `register-computer` Active Directory user account.
4. Delete the OU that you created for testing automated domain joining.
## What's next
- To join Windows VMs to a Managed Microsoft AD domain using automated domain join, see [Join a Windows VM automatically to a domain](https://docs.cloud.google.com/managed-microsoft-ad/docs/seamless-domain-join-gce).
- Review our [best practices for deploying an Active Directory resource forest on Google Cloud](https://docs.cloud.google.com/compute/docs/instances/windows/best-practices).
- For more reference architectures, diagrams, and best practices, explore the [Cloud Architecture Center](https://docs.cloud.google.com/architecture).