This deployment guide describes how to set up and use a development,
continuous integration (CI), and continuous delivery (CD) system using an
integrated set of Google Cloud tools. You can use
this system to develop and deploy applications to
[Google Kubernetes Engine](https://docs.cloud.google.com/kubernetes-engine)
(GKE).
This guide shows you how to create the
architecture that's described in
[Deployment pipeline for developing and delivering containerized apps](https://docs.cloud.google.com/architecture/app-development-and-delivery-with-cloud-code-gcb-cd-and-gke).
This deployment guide is intended for both software developers and operators,
and you play the following roles as you complete it:
- First you act as the operator to set up the CI/CD pipeline. The main components of this pipeline are [Cloud Build](https://docs.cloud.google.com/build), [Artifact Registry](https://docs.cloud.google.com/artifact-registry), and [Cloud Deploy](https://docs.cloud.google.com/deploy).
- Then you act as a developer to change an application using [Cloud Code](https://docs.cloud.google.com/code). When you act as a developer, you see the integrated experience that this pipeline provides.
- Finally, you act as an operator and go through the steps to deploy an application into production.
This deployment guide assumes you're familiar with running `gcloud` commands on
Google Cloud and with deploying application containers to
GKE.
## Architecture
The following diagram shows the resources used in this deployment guide:
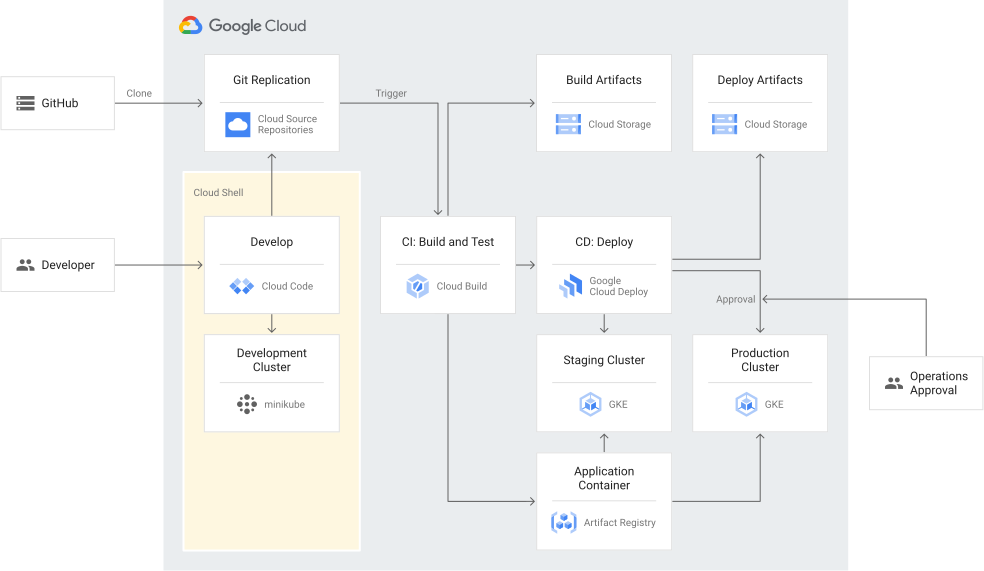
For details about the components that are used in this architecture,
see
[Deployment pipeline for developing and delivering containerized apps](https://docs.cloud.google.com/architecture/app-development-and-delivery-with-cloud-code-gcb-cd-and-gke#architecture).
## Objectives
Acting as an operator, you do the following:
- Set up the CI pipeline and CD pipeline. This setup includes the following:
- Set up the required permissions.
- Create the GKE clusters for the staging and production environments.
- Create a repository in Cloud Source Repositories for the source code.
- Create a repository in Artifact Registry for the application container.
- Create a Cloud Build trigger on the main GitHub repository.
- Create a Cloud Deploy delivery pipeline and targets. The targets are the staging and production environment.
- Start the CI/CD process to deploy to staging and then promote to production.
Acting as a developer, you make a change to the application. To do so, you do
the following:
- Clone the repository to work with a pre-configured development environment.
- Make a change to the application within your developer workspace.
- Build and test the change. The tests include a validation test for governance.
- View and validate the change in a dev cluster. This cluster runs on minikube.
- Commit the change into the main repository.
## Costs
In this document, you use the following billable components of Google Cloud:
- [Cloud Build](https://cloud.google.com/build/pricing)
- [Cloud Deploy](https://cloud.google.com/deploy/pricing)
- [Artifact Registry](https://cloud.google.com/artifact-registry/pricing)
- [Google Kubernetes Engine](https://cloud.google.com/kubernetes-engine/pricing)
- [Cloud Source Repositories](https://cloud.google.com/source-repositories/pricing)
- [Cloud Storage](https://cloud.google.com/storage/pricing)
To generate a cost estimate based on your projected usage,
use the [pricing calculator](https://docs.cloud.google.com/products/calculator).
New Google Cloud users might be eligible for a [free trial](https://docs.cloud.google.com/free).
When you finish the tasks that are described in this document, you can avoid
continued billing by deleting the resources that you created. For more information, see
[Clean up](https://docs.cloud.google.com/architecture/app-development-and-delivery-with-cloud-code-gcb-cd-and-gke/deployment#clean-up).
## Before you begin
1. In the Google Cloud console, on the project selector page,
select or create a Google Cloud project.
**Roles required to select or create a project**
- **Select a project**: Selecting a project doesn't require a specific IAM role---you can select any project that you've been granted a role on.
- **Create a project** : To create a project, you need the Project Creator role (`roles/resourcemanager.projectCreator`), which contains the `resourcemanager.projects.create` permission. [Learn how to grant
roles](https://docs.cloud.google.com/iam/docs/granting-changing-revoking-access).
> [!NOTE]
> **Note**: If you don't plan to keep the resources that you create in this procedure, create a project instead of selecting an existing project. After you finish these steps, you can delete the project, removing all resources associated with the project.
[Go to project selector](https://console.cloud.google.com/projectselector2/home/dashboard)
2.
[Verify that billing is enabled for your Google Cloud project](https://docs.cloud.google.com/billing/docs/how-to/verify-billing-enabled#confirm_billing_is_enabled_on_a_project).
3.
Enable the Artifact Registry, Cloud Build, Cloud Deploy, Cloud Source Repositories, Google Kubernetes Engine, Resource Manager, and Service Networking APIs, if any are not already enabled.
**Roles required to enable APIs**
To enable APIs, you need the `serviceusage.services.enable` permission. If you
created the project, then you likely already have this permission through the
Owner role (`roles/owner`). Otherwise, you can get this permission through the
Service Usage Admin role (`roles/serviceusage.serviceUsageAdmin`).
[Learn how to grant roles](https://docs.cloud.google.com/iam/docs/granting-changing-revoking-access).
[Enable the APIs](https://console.cloud.google.com/apis/enableflow?apiid=artifactregistry.googleapis.com,cloudbuild.googleapis.com,clouddeploy.googleapis.com,sourcerepo.googleapis.com,container.googleapis.com,cloudresourcemanager.googleapis.com,servicenetworking.googleapis.com&redirect=https://console.cloud.google.com)
4. In the Google Cloud console, activate Cloud Shell.
[Activate Cloud Shell](https://console.cloud.google.com/?cloudshell=true)
At the bottom of the Google Cloud console, a
[Cloud Shell](https://docs.cloud.google.com/shell/docs/how-cloud-shell-works)
session starts and displays a command-line prompt. Cloud Shell is a shell environment
with the Google Cloud CLI
already installed and with values already set for
your current project. It can take a few seconds for the session to initialize.
## Prepare your environment
In this section, you act as the application operator and do the following:
- Set up the required permissions.
- Create the GKE clusters for the staging and production environments.
- Clone the source repository.
- Create a repository in Cloud Source Repositories for the source code.
- Create a repository in Artifact Registry for the container application.
### Set up permissions
In this section, you grant the permissions that are needed to set up the
CI/CD pipeline.
1. If you're working in a new instance of Cloud Shell Editor,
specify the project to use for this deployment guide:
gcloud config set project PROJECT_ID
Replace PROJECT_ID with the ID of the project you
selected or created for this deployment guide.
If a dialog is displayed, click **Authorize**.
2. Make sure the default Compute Engine service account has sufficient
permissions to run jobs in Cloud Deploy and pull containers
from Artifact Registry. Cloud Build and
Cloud Deploy use this default service account.
This service account might already have the necessary permissions.
This step ensures the necessary permissions are granted for projects that
disable automatic role grants for default service accounts.
gcloud projects add-iam-policy-binding PROJECT_ID \
--member=serviceAccount:$(gcloud projects describe PROJECT_ID \
--format="value(projectNumber)")-compute@developer.gserviceaccount.com \
--role="roles/clouddeploy.jobRunner"
gcloud projects add-iam-policy-binding PROJECT_ID \
--member=serviceAccount:$(gcloud projects describe PROJECT_ID \
--format="value(projectNumber)")-compute@developer.gserviceaccount.com \
--role="roles/artifactregistry.reader"
3. Grant the Cloud Build service account privilege to invoke
deployments with Cloud Deploy and to update the delivery
pipeline and the target definitions:
gcloud projects add-iam-policy-binding PROJECT_ID \
--member=serviceAccount:$(gcloud projects describe PROJECT_ID \
--format="value(projectNumber)")@cloudbuild.gserviceaccount.com \
--role="roles/clouddeploy.operator"
For more information about this IAM role, see the
[clouddeploy.operator](https://docs.cloud.google.com/deploy/docs/iam-roles-permissions#predefined_roles)
role.
4. Grant the Cloud Build and Cloud Deploy service
account privilege to deploy to GKE:
gcloud projects add-iam-policy-binding PROJECT_ID \
--member=serviceAccount:$(gcloud projects describe PROJECT_ID \
--format="value(projectNumber)")-compute@developer.gserviceaccount.com \
--role="roles/container.admin"
for more details about this IAM role, see the
[container.admin role](https://docs.cloud.google.com/iam/docs/roles-permissions/container)
role.
5. Grant the Cloud Build service account the permissions needed to
invoke Cloud Deploy operations:
gcloud projects add-iam-policy-binding PROJECT_ID \
--member=serviceAccount:$(gcloud projects describe PROJECT_ID \
--format="value(projectNumber)")@cloudbuild.gserviceaccount.com \
--role="roles/iam.serviceAccountUser"
When Cloud Build invokes Cloud Deploy it uses a
Compute Engine service account to create a release, which is why
this permission is needed.
For more details about this IAM role, see the
[iam.serviceAccountUser role](https://docs.cloud.google.com/compute/docs/access/iam#the_serviceaccountuser_role)
role.
You have now granted the permissions that are needed for the CI/CD pipeline.
### Create the GKE clusters
In this section, you create the staging and production environments, which are
both GKE clusters. (You don't need to set up the
development cluster here, because it uses minikube.)
1. Create the staging and production GKE clusters:
gcloud container clusters create-auto staging \
--region us-central1 \
--project=$(gcloud config get-value project) \
--async
gcloud container clusters create-auto prod \
--region us-central1 \
--project=$(gcloud config get-value project) \
--async
The staging cluster is where you test changes to your code. After you
verify that the deployment in staging did not negatively affect
the application, you deploy to production.
2. Run the following command and ensure the output has `STATUS: RUNNING`
for both the staging and production clusters:
gcloud container clusters list
3. Retrieve the credentials to your `kubeconfig` files for the staging and
production clusters.
gcloud container clusters get-credentials staging --region us-central1
gcloud container clusters get-credentials prod --region us-central1
You use these credentials to interact with the GKE
clusters---for example, to check that an application is running properly.
You have now created the GKE clusters for the staging
and production environment.
### Open the IDE and clone the repository
To clone the repository and view the application in your development
environment, do the following:
1. Clone the GitHub repository to Cloud Shell.
[](https://ssh.cloud.google.com/cloudshell/editor?cloudshell_git_repo=https://github.com/google/golden-path-for-app-delivery&cloudshell_git_branch=main&cloudshell_open_in_editor=README.md&cloudshell_workspace)
2. Click **Confirm**.
Cloud Shell Editor opens and clones the sample repository.
You can now view the application's code in your Cloud Shell Editor.
3. Specify the project to use for this deployment guide:
gcloud config set project PROJECT_ID
If a dialog is displayed, click **Authorize**.
You now have the source code for the application in your
development environment.
This source repository includes the
Cloud Build and Cloud Deploy files needed for
the CI/CD pipeline.
### Create repositories for the source code and for the containers
In this section you set up a repository in Cloud Source Repositories for the
source code, and a repository in Artifact Registry to store the containers
built by the CI/CD pipeline.
1. Create a repository in Cloud Source Repositories to store the source
code and link it with the CI/CD process:
gcloud source repos create cicd-sample
2. Ensure the Cloud Deploy configurations target the correct project:
sed -i s/project-id-placeholder/$(gcloud config get-value project)/g deploy/*
git config --global credential.https://source.developers.google.com.helper gcloud.sh
git remote add google https://source.developers.google.com/p/$(gcloud config get-value project)/r/cicd-sample
3. Push your source code to the repository:
git push --all google
4. Create an image repository in Artifact Registry:
gcloud artifacts repositories create cicd-sample-repo \
--repository-format=Docker \
--location us-central1
You now have a repository for source code in Cloud Source Repositories and one
for the application container in Artifact Registry. The Cloud Source Repositories
repository allows you to clone the source code and connect it to the CI/CD
pipeline.
## Configure the CI/CD pipeline
In this section, you act as the application operator and configure
the CI/CD pipeline. The pipeline uses Cloud Build for CI
and Cloud Deploy for CD. The steps of the pipeline are defined in
the Cloud Build trigger.
1. Create a Cloud Storage bucket for Cloud Build
to store the `artifacts.json` file (which tracks the artifacts generated by
Skaffold for each build):
gcloud storage buckets create gs://$(gcloud config get-value project)-gceme-artifacts/
Storing each build's `artifacts.json` file in a central place is a good
practice because it provides traceability, which makes troubleshooting easier.
2. Review the `cloudbuild.yaml` file, which defines the Cloud Build
trigger and is already configured in the source repository that you cloned.
This file defines the trigger invoked whenever there is a new push to the
main branch of the source-code repository.
The following steps for the CI/CD pipeline are defined in the
`cloudbuild.yaml` file:
- Cloud Build uses Skaffold to build the application
container.
- Cloud Build places the build's `artifacts.json` file in the
Cloud Storage bucket.
- Cloud Build places the application container in
Artifact Registry.
- Cloud Build runs tests on the application container.
- The `gcloud deploy apply` command registers the
following files with the Cloud Deploy service:
- `deploy/pipeline.yaml`, which is the delivery pipeline
- `deploy/staging.yaml` and `deploy/prod.yaml`, which are the target files
When the files are registered, Cloud Deploy creates the
pipeline and targets if they do not yet exist, or re-creates them if
the configuration changed. The targets are the staging and production
environments.
- Cloud Deploy creates a new release for the delivery pipeline.
This release references the application container that was built and
tested in the CI process.
- Cloud Deploy deploys the release to the staging environment.
The delivery pipeline and targets are managed by Cloud Deploy and
are decoupled from the source code. This decoupling means that you don't
need to update the delivery pipeline and target files when a change is
made to the application's source code.
3. Create the Cloud Build trigger:
gcloud beta builds triggers create cloud-source-repositories \
--name="cicd-sample-main" \
--repo="cicd-sample" \
--branch-pattern="main" \
--build-config="cloudbuild.yaml"
This trigger tells Cloud Build to watch the source repository and
to use the `cloudbuild.yaml` file to react to any changes to the repository.
This trigger is invoked whenever there is a new push to the main branch.
4. Go to the Cloud Build page in the Google Cloud console.
[Go to Cloud Build](https://console.cloud.google.com/cloud-build/dashboard)
Notice that there are no builds for your application.
You have now set up the CI and CD pipelines, and created a trigger on the
main branch of the repository.
## Make a change to your application within your developer workspace
In this section, you act as the application developer.
As you develop your application, you make and verify iterative changes to the
application using Cloud Code as your development workspace:
- Make a change to the application.
- Build and test the new code.
- Deploy the application to the minikube cluster and verify the user-facing changes.
- Submit the change to the main repository.
When this change is committed into the main repository, the
Cloud Build trigger starts the CI/CD pipeline.
### Build, test, and run the application
In this section, you build, test, deploy, and access your application.
Use the same instance of Cloud Shell Editor that you used in the
preceding section. If you closed the editor, then in your browser open
Cloud Shell Editor by going to
[ide.cloud.google.com](https://ide.cloud.google.com).
1. In the terminal, start minikube:
minikube start
minikube sets up a local Kubernetes cluster in your Cloud Shell.
This setup takes a few minutes to run. After it's completed, the minikube
process runs in the background on the Cloud Shell instance.
2. In the pane at the bottom of Cloud Shell Editor, select
**Cloud Code**.
3. In the thin panel that appears between the terminal and the editor, select
**Run on Kubernetes**.
If you see a prompt that says `Use current context (minikube) to run the
app?`, click **Yes**.
This command builds the source code and runs tests. This can take a few
minutes. The tests include unit tests and a pre-configured validation step
that checks the rules set for the deployment environment. This ensures that
you are warned about deployment issues even while you're still working in your
development environment.
The **Output** tab shows the Skaffold progress as it builds and deploys your
application.
*Keep this tab open throughout this section*.
When the build and tests finish, the **Output** tab says `Update succeeded`,
and shows two URLs.
As you build and test your app, Cloud Code streams back the
logs and URLs in the **Output** tab. As you make changes and run tests
in your development environment, you can see your development environment's
version of the app and verify that it's working correctly.
The output also says `Watching for changes...`, which means that watch
mode is enabled. While Cloud Code is in watch mode,
the service detects any saved changes in your repository and
automatically rebuilds and redeploys the app with the latest changes.
4. In the Cloud Code terminal, hold the pointer over the first URL in the
output (`http://localhost:8080`).
5. In the tool tip that appears, select **Open Web Preview**.
In the background, Cloud Code is automatically port-forwarding
traffic to the `cicd-sample` service running on minikube.
6. In your browser, refresh the page.
The number next to **Counter** increases, showing that the app is
responding to your refresh.
In your browser, keep this page open so that you can view the
application as you make any changes in your local environment.
You have now built and tested your application in the development environment.
You have deployed the application into the development cluster running on
minikube, and viewed the user-facing behavior of the application.
### Make a change
In this section, you make a change to the application and view
the change as the app runs in the development cluster.
1. In Cloud Shell Editor, open the `index.html` file.
2. Search for the string `Sample App Info`, and change it to `sample app info`,
so that the title now uses lowercase letters.
The file is automatically saved, triggering a rebuild of the application
container.
Cloud Code detects the change and redeploys it automatically. The
**Output** tab shows `Update initiated`. This redeployment takes a few
minutes to run.
This automatic redeploy feature is available for any application running on
a Kubernetes cluster.
3. When the build is done, go to your browser where you have the app
open and refresh the page.
When you refresh, see that the text now uses lowercase letters.
This setup gives you automatic reloading for any architecture, with any
components. When you use Cloud Code and minikube, anything that is
running in Kubernetes has this hot code reloading functionality.
You can debug applications that are deployed to a Kubernetes cluster
in Cloud Code. These steps aren't covered in this deployment guide, but
for details, see
[Debugging a Kubernetes application](https://docs.cloud.google.com/code/docs/shell/debug).
### Commit the code
Now that you've made a change to the application, you can commit the code.
1. Configure your git identity:
git config --global user.email "YOU@EXAMPLE.COM"
git config --global user.name "NAME"
Replace the following:
- YOU@EXAMPLE.COM: the email address that's connected to your GitHub account.
- NAME: the name that's connected to your GitHub account.
2. From the terminal, commit the code:
git add .
git commit -m "use lowercase for: sample app info"
You don't need to run the `git push` command here. That comes later.
Working in the development environment, you have now made a change to the
application, built and tested the change, and verified the user-facing
behavior of these changes. The tests in the development environment include
governance checks, which let you fix issues that cause problems in the
production environment.
In this deployment guide, when you commit the code into the main repository, you
don't go through a code review. However, a code review or change approval
is a recommended process for software development.
For more information about change approval best practices, see
[Streamlining change approval](https://dora.dev/devops-capabilities/process/streamlining-change-approval/).
## Deploy a change into production
In this section, you act as the application operator and do the following:
- Trigger the CI/CD pipeline, which deploys the release to the staging environment.
- Promote and approve the release to production.
### Start the CI/CD pipeline and deploy into staging
In this section, you start the CI/CD pipeline by invoking the
Cloud Build trigger. This trigger is invoked whenever a change
is committed to the main repository. You can also initiate the CI system with a
manual trigger.
1. In the Cloud Shell Editor, run the following command
to trigger a build:
git push google
This build includes the change you made to `cicd-sample`.
2. Return to the
[Cloud Build dashboard](https://console.cloud.google.com/cloud-build/dashboard)
and see that a build is created.
3. Click **Running: cicd-sample - cicd-sample-main** in the build log
on the right, and look for the blue text denoting the start and end of each step.
**Step 0** shows the output of the `skaffold build` and `skaffold test`
instructions from the `cloudbuild.yaml` file. The build and test tasks in
**Step 0** (the CI part of the pipeline) passed, so the deployment
tasks of **Step 1** (the CD part of the pipeline) now run.
This step finishes with the following message:
`Created Cloud Deploy rollout ROLLOUT_NAME in target staging`
4. Open the
[Cloud Deploy delivery pipelines page](https://console.cloud.google.com/deploy/delivery-pipelines)
and click the `cicd-sample delivery` pipeline.
The application is deployed in staging, but not in production.
5. Verify that the application is working successfully in staging:
kubectl proxy --port 8001 --context gke_$(gcloud config get-value project)_us-central1_staging
This command sets up a kubectl proxy to access the application.
6. Access the application from Cloud Shell:
1. In Cloud Shell Editor, open a new terminal tab.
2. Send a request to `localhost` to increment a counter:
curl -s http://localhost:8001/api/v1/namespaces/default/services/cicd-sample:8080/proxy/ | grep -A 1 Counter
You can run this command multiple times and watch the
counter value increment each time.
As you view the app, notice that the text that you changed
is in the version of the application you deployed on staging.
3. Close this second tab.
4. In the first tab, press `Control+C` to stop the proxy.
You have now invoked the Cloud Build trigger to
start the CI process, which includes building the application, deploying
it to the staging environment, and running tests to verify the application is
working in staging.
The CI process is successful when the code builds and tests pass in the
staging environment. The success of the CI process then initiates the CD
system in Cloud Deploy.
### Promote the release to production
In this section, you promote the release from staging to production. The
production target comes pre-configured to require approval, so you manually
approve it.
For your own CI/CD pipeline, you might want to use a deployment strategy that
launches the deployment gradually before you do a full deployment into
production. Launching the deployment gradually can make it easier to detect
issues and, if needed, to restore a previous release.
To promote the release to production, do the following:
1. Open the
[Cloud Deploy
delivery pipelines overview](https://console.cloud.google.com/deploy/delivery-pipelines)) and select the **cicd-sample** pipeline.
2. Promote the deployment from staging to production. To do so, do the
following:
1. In the pipeline diagram at the top of the page, click the blue
**Promote** button in the staging box.
2. In the window that opens, click the **Promote** button at the bottom.
The deployment is not yet running in production. It's waiting for the
required manual approval.
3. Manually approve the deployment:
1. In the pipeline visualization, click the **Review** button between the
staging and production boxes.
2. In the window that opens, click the **Review** button.
3. In the next window, click **Approve**.
4. Return to the
[Cloud Deploy delivery pipelines overview](https://console.cloud.google.com/deploy/delivery-pipelines)
and select the **cicd-sample** pipeline.
4. After the pipeline visualization shows the prod box as green (meaning a
successful rollout), verify that the application is working in production by
setting up a kubectl proxy that you use to access the application:
kubectl proxy --port 8002 --context gke_$(gcloud config get-value project)_us-central1_prod
5. Access the application from Cloud Shell:
1. In Cloud Shell Editor, open a new terminal tab.
2. Increment the counter:
curl -s http://localhost:8002/api/v1/namespaces/default/services/cicd-sample:8080/proxy/ | grep -A 1 Counter
You can run this command multiple times and watch the counter
value increment each time.
3. Close this second terminal tab.
4. In the first tab, press `Control+C` to stop the proxy.
You've now promoted and approved the production deployment. The application
with your recent change is now running in production.
## Clean up
To avoid incurring charges to your Google Cloud account for the resources used
in this deployment guide, either delete the project that contains the resources,
or keep the project and delete the individual resources.
### Option 1: delete the project
> [!CAUTION]
> **Caution** : Deleting a project has the following effects:
>
> - **Everything in the project is deleted.** If you used an existing project for the tasks in this document, when you delete it, you also delete any other work you've done in the project.
> - **Custom project IDs are lost.** When you created this project, you might have created a custom project ID that you want to use in the future. To preserve the URLs that use the project ID, such as an `appspot.com` URL, delete selected resources inside the project instead of deleting the whole project.
>
>
> If you plan to explore multiple architectures, tutorials, or quickstarts, reusing projects
> can help you avoid exceeding project quota limits.
1. In the Google Cloud console, go to the **Manage resources** page.
[Go to Manage resources](https://console.cloud.google.com/iam-admin/projects)
2. In the project list, select the project that you want to delete, and then click **Delete**.
3. In the dialog, type the project ID, and then click **Shut down** to delete the project.
### Option 2: delete the individual resources
1. Delete the Cloud Deploy pipeline:
gcloud deploy delivery-pipelines delete cicd-sample --region=us-central1 --force
2. Delete the Cloud Build trigger:
gcloud beta builds triggers delete cicd-sample-main
3. Delete the staging and production clusters:
gcloud container clusters delete staging
gcloud container clusters delete prod
4. Delete the repository in Cloud Source Repositories:
gcloud source repos delete cicd-sample
5. Delete the Cloud Storage buckets:
gcloud storage rm -r gs://$(gcloud config get-value project)-gceme-artifacts/
gcloud storage rm -r gs://$(gcloud config get-value project)_clouddeploy/
6. Delete the repository in Artifact Registry:
gcloud artifacts repositories delete cicd-sample-repo \
--location us-central1
## What's next
- To learn how to deploy into a private GKE instance, see [Deploying to a private cluster on a Virtual Private Cloud network](https://docs.cloud.google.com/deploy/docs/execution-environment#deploying_to_a_private_cluster_on_a_network).
- For information about how to implement, improve, and measure deployment automation, see [Deployment automation](https://dora.dev/devops-capabilities/technical/deployment-automation/).
- For more reference architectures, diagrams, and best practices, explore the [Cloud Architecture Center](https://docs.cloud.google.com/architecture).