When an app that is running in the Python 2 runtime sends a request to another
App Engine app, it can use the App Engine
[App Identity API](https://docs.cloud.google.com/appengine/docs/standard/services/appidentity)
to assert its identity. The app that receives the request can use this identity
to determine if it should process the request.
If your
Python 3 apps need to assert their identity when sending requests to other
App Engine apps, you can use
[OpenID Connect](https://developers.google.com/identity/openid-connect/openid-connect)
(OIDC) ID tokens that are issued and decoded by Google's OAuth 2.0 APIs.
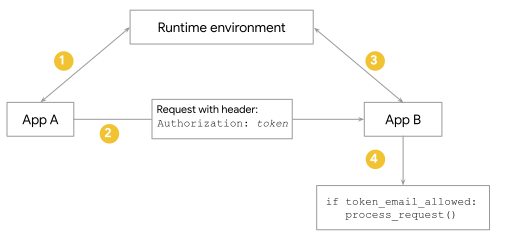
Here's an overview of using OIDC ID tokens to assert and verify identity:
1. An App Engine app named "App A" retrieves an ID token from the Google Cloud runtime environment.
2. App A adds this token to a request header just before sending the request to App B, which is another App Engine app.
3. App B uses Google's OAuth 2.0 APIs to verify the token payload. The decoded payload contains the verified identity of App A in the form of the email address of App A's default service account.
4. App B compares the identity in the payload to a list of identities that it is allowed to respond to. If the request came from an allowed app, App B processes the request and responds.
This guide describes how to update your App Engine apps to use
[OpenID Connect](https://docs.cloud.google.com/identity/protocols/oauth2/openid-connect) (OIDC) ID tokens
to assert identity, and update your other App Engine apps to use
ID tokens to verify identity before processing a request.
## Key differences between the App Identity and OIDC APIs
- Apps in the Python 2 runtime don't need to explicitly assert identity. When
an app uses the `httplib`, `urllib`, or `urllib2` Python libraries or the
App Engine URL Fetch service to send outbound requests, the runtime uses
the App Engine URL Fetch service to make the request. If the request
is being sent to the `appspot.com` domain, URL Fetch automatically asserts
the identity of the requesting app by adding the `X-Appengine-Inbound-Appid`
header to the request. That header contains the app's application ID (also
called the project ID).
Apps in the Python 3 runtime do need to explicitly assert identity by retrieving
an OIDC ID token from the Google Cloud runtime environment and adding it to
the request header. **You will need to update all of the code that sends
requests to other App Engine apps so that the requests contain an OIDC
ID token.**
- The `X-Appengine-Inbound-Appid` header in a request contains the project ID of
the app that sent the request.
The payload of Google's OIDC ID token does not directly identify the project
ID of the app itself. Instead, the token identifies the service account
that the app is running under, by providing that service account's email
address. **You will need to add some code to extract the username from the
token payload.**
If that service account is the [app-level default App Engine service
account](https://docs.cloud.google.com/appengine/docs/standard/configure-service-accounts) for the project,
then the project ID can be found in the service account's email address. The
username portion of the address is the same as the project ID. In this
case, your receiving app code can look this up in the list of project IDs
it will allow requests from.
However, if the requesting app is [using a user-managed service
account](https://docs.cloud.google.com/iam/docs/service-account-types#user-created) instead
of **the default App Engine service account**
then the receiving app can only verify the identity of that service
account, which will not necessarily define the requesting app's project ID.
In that case, the receiving app will have to maintain a list of allowed
service account emails instead of a list of allowed project IDs.
- The [quotas for URL Fetch API calls](https://docs.cloud.google.com/appengine/docs/standard/quotas#UrlFetch) are different
from Google's OAuth 2.0 APIs quotas for granting tokens. You can see the
maximum number of tokens you can grant per day in the
[Google Cloud console OAuth consent screen](https://console.cloud.google.com/apis/credentials/consent). Neither URL Fetch, the App Identity API,
nor Google's OAuth 2.0 APIs incur billing.
## Overview of the migration process
To migrate your Python apps to use OIDC APIs to assert and verify identity:
1. In apps that need to assert identity when sending requests to other
App Engine apps:
1. Wait until your app is running in a Python 3 environment to migrate to
ID tokens.
While it is possible to use ID tokens in the Python 2 runtime, the steps in
Python 2 are complex and are needed only temporarily until you update your
app to run in the Python 3 runtime.
2. Once your app is running in Python 3, [update the app](https://docs.cloud.google.com/appengine/migration-center/standard/python/migrate-app-identity#asserting) to
request an ID token and add the token to a request header.
2. In apps that need to verify identity before processing a request:
1. Start by upgrading your Python 2 apps to [support both ID tokens and the
App Identity API identities](https://docs.cloud.google.com/appengine/migration-center/standard/python/migrate-app-identity#verifying). This will enable your apps to
verify and process requests from either Python 2 apps that use the
App Identity API or Python 3 apps that use ID tokens.
2. Once your upgraded Python 2 apps are stable, migrate them to the Python 3
runtime. Keep supporting both ID tokens and the App Identity API identities
until you are certain that the apps no longer need to support requests from
[legacy apps](https://docs.cloud.google.com/appengine/docs/standard/long-term-support).
3. When you no longer need to process requests from legacy App Engine
apps, remove the code that verifies App Identity API identities.
3. After testing your apps, [deploy](https://docs.cloud.google.com/appengine/migration-center/standard/python/migrate-app-identity#deploying) the app that processes requests
first. Then deploy your updated Python 3 app that uses ID tokens to assert
identity.
## Asserting identity
[Wait](https://docs.cloud.google.com/appengine/migration-center/standard/python/migrate-app-identity#overview) until your app is running in a Python 3 environment, then
follow these steps to upgrade the app to assert identity with ID tokens:
1. [Install](https://docs.cloud.google.com/appengine/migration-center/standard/python/migrate-app-identity#install_asserting) the `google-auth` client library.
2. [Add code](https://docs.cloud.google.com/appengine/migration-center/standard/python/migrate-app-identity#update_asserting) to request an ID token from Google's
OAuth 2.0 APIs and add the token to a request header before sending a request.
3. [Test](https://docs.cloud.google.com/appengine/migration-center/standard/python/migrate-app-identity#test_asserting) your updates.
### Installing the `google-auth` client library for Python 3 apps
To make the `google-auth` client library available to your Python3 app,
create a [`requirements.txt`](https://pip.pypa.io/en/latest/user_guide/#requirements-files) file in the same folder as your `app.yaml`
file and add the following line:
google-auth
When you deploy your app, App Engine will download all of the
dependencies that are defined in the `requirements.txt` file.
For local development, we recommend that you install dependencies in a virtual
environment such as [venv](https://docs.python.org/3/library/venv.html).
### Adding code to assert identity
Search through your code and find all instances of sending requests to other
App Engine apps. Update those instances to do the following before
sending the request:
1. Add the following imports:
from google.auth.transport import requests as reqs
from google.oauth2 import id_token
2. Use
[`google.oauth2.id_token.fetch_id_token(request, audience)`](https://googleapis.dev/python/google-auth/1.13.0/reference/google.oauth2.id_token.html#google.oauth2.id_token.fetch_id_token)
to retrieve an ID token. Include the following parameters in the method call:
- `request`: Pass the request object you're getting ready to send.
- `audience`: Pass the URL of the app that you're sending the request to.
This binds the token to the request and prevents the token from being used
by another app.
For clarity and specificity, we recommend that you pass the `appspot.com`
URL that App Engine created for the specific service that is
receiving the request, even if you use a custom domain for the app.
3. In your request object, set the following header:
'Authorization': 'ID {}'.format(token)
For example:
# Copyright 2020 Google LLC
#
# Licensed under the Apache License, Version 2.0 (the "License");
# you may not use this file except in compliance with the License.
# You may obtain a copy of the License at
#
# http://www.apache.org/licenses/LICENSE-2.0
#
# Unless required by applicable law or agreed to in writing, software
# distributed under the License is distributed on an "AS IS" BASIS,
# WITHOUT WARRANTIES OR CONDITIONS OF ANY KIND, either express or implied.
# See the License for the specific language governing permissions and
# limitations under the License.
from flask import Flask, render_template, request
from google.auth.transport import requests as reqs
from google.oauth2 import id_token
import requests
app = Flask(__name__)
@app.route("/", methods=["GET"])
def index():
return render_template("index.html")
@app.route("/", methods=["POST"])
def make_request():
url = request.form["url"]
token = id_token.fetch_id_token(reqs.Request(), url)
resp = requests.get(url, headers={"Authorization": f"Bearer {token}"})
message = f"Response when calling {url}:\n\n"
message += resp.text
return message, 200, {"Content-type": "text/plain"}
### Testing updates for asserting identity
To run your app locally and test if the app can successfully send ID tokens:
1. Follow these steps to make the credentials of the default App Engine
service account available in your local environment (the Google OAuth APIs
require these credentials to generate an ID token):
1. Enter the following `gcloud` command to [retrieve the
service account key](https://docs.cloud.google.com/iam/docs/creating-managing-service-account-keys)
for your project's default App Engine account:
`gcloud iam service-accounts keys create ~/key.json --iam-account project-ID@appspot.gserviceaccount.com`
Replace project-ID with the [ID of your
Google Cloud project](https://support.google.com/googleapi/answer/7014113).
The service account key file is now downloaded to your machine. You can
move and rename this file however you would like. Make sure you store this
file securely, because it can be used to authenticate as your service
account. If you lose the file, or if the file is exposed to unauthorized
users,
[delete the service account key](https://docs.cloud.google.com/iam/docs/keys-create-delete#deleting)
and [create a new one](https://docs.cloud.google.com/iam/docs/creating-managing-service-account-keys).
2. Enter the following command:
export GOOGLE_APPLICATION_CREDENTIALS=service-account-key
Replace service-account-key with the absolute pathname of the file
that contains the service account key you downloaded.
2. In the same shell in which you exported the `GOOGLE_APPLICATION_CREDENTIALS`
environment variable, [start your Python app](https://docs.cloud.google.com/appengine/docs/standard/testing-and-deploying-your-app#running_locally).
3. Send a request from the app and confirm that it succeeds. If you don't
already have an app that can receive requests and use ID tokens to verify
identities:
1. Download the [sample "incoming" app](https://github.com/GoogleCloudPlatform/python-docs-samples/tree/master/appengine/standard/migration/incoming).
2. In the sample's `main.py` file, add the ID of your Google Cloud project
to the `allowed_app_ids`. For example:
allowed_app_ids = [
'',
'',
'my-project-id'
]
3. Run the updated sample in the Python 2
[local development server](https://docs.cloud.google.com/appengine/docs/standard/tools/using-local-server).
## Verifying and processing requests
To upgrade your Python 2 apps to use either ID tokens or App Identity API
identities before processing requests:
1. [Install](https://docs.cloud.google.com/appengine/migration-center/standard/python/migrate-app-identity#install_verifying) the google-auth client library.
2. [Update](https://docs.cloud.google.com/appengine/migration-center/standard/python/migrate-app-identity#update_verifying) your code to do the following:
1. If the request contains the `X-Appengine-Inbound-Appid` header, use that
header to verify identity. Apps running in a
[legacy runtime](https://docs.cloud.google.com/appengine/docs/standard/long-term-support) such as
Python 2 will contain this header.
2. If the request does not contain the `X-Appengine-Inbound-Appid` header,
check for an OIDC ID token. If the token exists, [verify the token payload
and check the identity of the sender](https://docs.cloud.google.com/appengine/migration-center/standard/python/migrate-app-identity#payload).
3. [Test](https://docs.cloud.google.com/appengine/migration-center/standard/python/migrate-app-identity#test_verifying) your updates.
### Installing the google-auth client library for Python 2 apps
To make the `google-auth` client library available to your Python 2 app:
1. Create a [`requirements.txt`](https://pip.pypa.io/en/latest/user_guide/#requirements-files) file in the same folder as your `app.yaml`
file and add the following line:
google-auth==1.19.2
We recommend you use the 1.19.2 version of the Cloud Logging client library
since it supports Python 2.7 apps.
2. In your app's
[`app.yaml`](https://docs.cloud.google.com/appengine/docs/standard/reference/app-yaml) file,
specify the SSL library in the `libraries` section if it isn't already
specified:
libraries:
- name: ssl
version: latest
3. Create a directory to store your third-party libraries, such as `lib/`.
Then use `pip install` to install the libraries into the directory.
For example:
```bash
pip install -t lib -r requirements.txt
```
4. Create an `appengine_config.py` file in the same folder as your
`app.yaml` file. Add the following to your `appengine_config.py` file:
```python
# appengine_config.py
import pkg_resources
from google.appengine.ext import vendor
# Set path to your libraries folder.
path = 'lib'
# Add libraries installed in the path folder.
vendor.add(path)
# Add libraries to pkg_resources working set to find the distribution.
pkg_resources.working_set.add_entry(path)
```
The `appengine_config.py` file in the preceding example assumes that the
the `lib` folder is located in the current working directory. If you can't
guarantee that `lib` will always be in the current working directory,
specify the full path to the `lib` folder. For example:
```python
import os
path = os.path.join(os.path.dirname(os.path.realpath(__file__)), 'lib')
```
For local development, we recommend that you install dependencies in a virtual
environment such as [virtualenv](https://packaging.python.org/key_projects/#virtualenv) for Python 2.
### Updating code for verifying requests
Search through your code and find all instances of getting the value of the
`X-Appengine-Inbound-Appid` header. Update those instances to do the following:
1. Add the following imports:
from google.auth.transport import requests as reqs
from google.oauth2 import id_token
2. If the incoming request doesn't contain the `X-Appengine-Inbound-Appid` header,
look for the `Authorization` header and retrieve its value.
The header value is formatted as "ID: *token*".
3. Use [`google.oauth2.id_token.verify_oauth2_token(token, request, audience)`](https://googleapis.dev/python/google-auth/1.13.0/reference/google.oauth2.id_token.html#google.oauth2.id_token.verify_oauth2_token)
to verify and retrieve the decoded token payload. Include the following
parameters in the method call:
- `token`: Pass the token you extracted from the incoming request.
- `request`: Pass a new `google.auth.transport.Request` object.
- `audience`: Pass the URL of the current app (the app that is sending
the verification request). Google's authorization server will compare this
URL to the URL that was provided when the token was originally generated.
If the URLs don't match, the token will not be verified and the
authorization server will return an error.
4. The `verify_oauth2_token` method returns the decoded token payload, which
contains [several name/value
pairs](https://developers.google.com/identity/protocols/oauth2/openid-connect#obtainuserinfo), including the email address of the default
service account for the app that generated the token.
5. Extract the username from the email address in the token payload.
The username is the same as the project ID of that app that sent the
request. This is the same value that was previously returned in the
`X-Appengine-Inbound-Appid` header.
6. If the username/project ID is in the list of allowed project IDs, process
the request.
For example:
# Copyright 2020 Google LLC
#
# Licensed under the Apache License, Version 2.0 (the "License");
# you may not use this file except in compliance with the License.
# You may obtain a copy of the License at
#
# http://www.apache.org/licenses/LICENSE-2.0
#
# Unless required by applicable law or agreed to in writing, software
# distributed under the License is distributed on an "AS IS" BASIS,
# WITHOUT WARRANTIES OR CONDITIONS OF ANY KIND, either express or implied.
# See the License for the specific language governing permissions and
# limitations under the License.
"""
Authenticate requests coming from other App Engine instances.
"""
import logging
from google.auth.transport import requests
from google.oauth2 import id_token
import webapp2
def get_app_id(request):
# Requests from App Engine Standard for Python 2.7 will include a
# trustworthy X-Appengine-Inbound-Appid. Other requests won't have
# that header, as the App Engine runtime will strip it out
incoming_app_id = request.headers.get("X-Appengine-Inbound-Appid", None)
if incoming_app_id is not None:
return incoming_app_id
# Other App Engine apps can get an ID token for the App Engine default
# service account, which will identify the application ID. They will
# have to include at token in an Authorization header to be recognized
# by this method.
auth_header = request.headers.get("Authorization", None)
if auth_header is None:
return None
# The auth_header must be in the form Authorization: Bearer token.
bearer, token = auth_header.split()
if bearer.lower() != "bearer":
return None
try:
info = id_token.verify_oauth2_token(token, requests.Request())
service_account_email = info["email"]
incoming_app_id, domain = service_account_email.split("@")
if domain != "appspot.gserviceaccount.com": # Not App Engine svc acct
return None
else:
return incoming_app_id
except Exception as e:
# report or log if desired, as here:
logging.warning("Request has bad OAuth2 id token: {}".format(e))
return None
class MainPage(webapp2.RequestHandler):
allowed_app_ids = ["other-app-id", "other-app-id-2"]
def get(self):
incoming_app_id = get_app_id(self.request)
if incoming_app_id is None:
self.abort(403)
if incoming_app_id not in self.allowed_app_ids:
self.abort(403)
self.response.write("This is a protected page.")
app = webapp2.WSGIApplication([("/", MainPage)], debug=True)
### Testing updates for verifying identity
To test that your app can use either an ID token or
the `X-Appengine-Inbound-Appid` header to verify requests, run the app in
the Python 2
[local development server](https://docs.cloud.google.com/appengine/docs/standard/tools/using-local-server)
and send requests from Python 2 apps (which will use the App Identity API) and
from Python 3 apps that send ID tokens.
If you haven't updated your apps to send ID tokens:
1. Download the
[sample "requesting" app](https://github.com/GoogleCloudPlatform/python-docs-samples/tree/master/appengine/standard_python3/migration/urlfetch).
2. Add service account credentials to your local environment as described in
[Testing updates for asserting apps](https://docs.cloud.google.com/appengine/migration-center/standard/python/migrate-app-identity#test_verifying).
3. Use standard Python 3 commands to [start the Python 3 sample app](https://docs.cloud.google.com/appengine/docs/standard/testing-and-deploying-your-app#running_locally).
4. Send a request from the sample app and confirm that it succeeds.
## Deploying your apps
Once you are ready to deploy your apps, you should:
1. [Test the apps on
App Engine](https://docs.cloud.google.com/appengine/docs/standard/testing-and-deploying-your-app#testing-on-app-engine).
2. If the apps run without errors, [use traffic
splitting](https://docs.cloud.google.com/appengine/docs/standard/splitting-traffic) to slowly
ramp up traffic for your updated apps. Monitor the apps closely for any
issues before routing more traffic to the updated apps.
## Using a different service account for asserting identity
When you request an ID token, the request uses the identity of the
App Engine default service account by default. When you verify the
token, the token payload contains the email address of the default service
account, which maps to the project ID of your app.
The [App Engine default service account](https://docs.cloud.google.com/appengine/docs/standard/default-service-account)
has a very high level of permission by default. It can view and edit your entire
Google Cloud project, so in most cases this account is not appropriate to use
when your app needs to authenticate with Cloud services.
However, the default service account is safe to use when asserting app identity
because you are only using the ID token to verify the **identity** of the app
that sent a request. The actual **permissions** that have been granted to the
service account are not considered or needed during this process.
If you still prefer to use a different service account for your ID token requests,
do the following:
1. Set an environment variable named `GOOGLE_APPLICATION_CREDENTIALS` to the path
of a JSON file that contains the credentials of the service account. See our
recommendations for [safely storing
these credentials](https://docs.cloud.google.com/appengine/docs/standard/access-control#store_credentials).
2. Use
[`google.oauth2.id_token.fetch_id_token(request, audience)`](https://googleapis.dev/python/google-auth/1.13.0/reference/google.oauth2.id_token.html#google.oauth2.id_token.fetch_id_token)
to retrieve an ID token.
3. When you verify this token, the token payload will contain the email address
of the new service account.