> [!CAUTION]
> You are currently viewing version 1.4 of the Apigee hybrid documentation. **This version is end of life.** You should upgrade to a newer version. For more information, see [Supported versions](https://docs.cloud.google.com/apigee/docs/hybrid/supported-platforms.md.txt#supported-versions).
- Supported versions:
- [v1.17 (latest)](https://docs.cloud.google.com/apigee/docs/hybrid/v1.17/multi-region-aks.html)
- [v1.16](https://docs.cloud.google.com/apigee/docs/hybrid/v1.16/multi-region-aks.html)
- [v1.15](https://docs.cloud.google.com/apigee/docs/hybrid/v1.15/multi-region-aks.html)
- [v1.14](https://docs.cloud.google.com/apigee/docs/hybrid/v1.14/multi-region-aks.html)
- [List of supported versions](https://docs.cloud.google.com/apigee/docs/hybrid/supported-platforms.md.txt#supported-versions)
- Unsupported versions:
- [v1.13](https://docs.cloud.google.com/apigee/docs/hybrid/v1.13/multi-region-aks.html)
- [v1.12](https://docs.cloud.google.com/apigee/docs/hybrid/v1.12/multi-region-aks.html)
- [v1.11](https://docs.cloud.google.com/apigee/docs/hybrid/v1.11/multi-region-aks.html)
- [v1.10](https://docs.cloud.google.com/apigee/docs/hybrid/v1.10/multi-region-aks.html)
- [v1.9](https://docs.cloud.google.com/apigee/docs/hybrid/v1.9/multi-region-aks.html)
- [v1.8](https://docs.cloud.google.com/apigee/docs/hybrid/v1.8/multi-region-aks.html)
- [v1.7](https://docs.cloud.google.com/apigee/docs/hybrid/v1.7/multi-region-aks.html)
- [v1.6](https://docs.cloud.google.com/apigee/docs/hybrid/v1.6/multi-region-aks.html)
- [v1.5](https://docs.cloud.google.com/apigee/docs/hybrid/v1.5/multi-region-aks.md.txt)
- [v1.4](https://docs.cloud.google.com/apigee/docs/hybrid/v1.4/multi-region-aks.md.txt)
- [v1.3](https://docs.cloud.google.com/apigee/docs/hybrid/v1.3/multi-region-aks.md.txt)
- [v1.2](https://docs.cloud.google.com/apigee/docs/hybrid/v1.2/multi-region-aks.md.txt)
- [v1.1](https://docs.cloud.google.com/apigee/docs/hybrid/v1.1/multi-region-aks.md.txt)
This topic explains how to set up a multi-region deployment for Apigee hybrid on Microsoft®
Azure Kubernetes Service (AKS).
Topologies for multi-region deployment include the following:
- **Active-Active**: When you have applications deployed in multiple geographic locations and you require low latency API response for your deployments. You have the option to deploy hybrid in multiple geographic locations nearest to your clients. For example: US West Coast, US East Coast, Europe, APAC.
- **Active-Passive**: When you have a primary region and a failover or disaster recovery region.
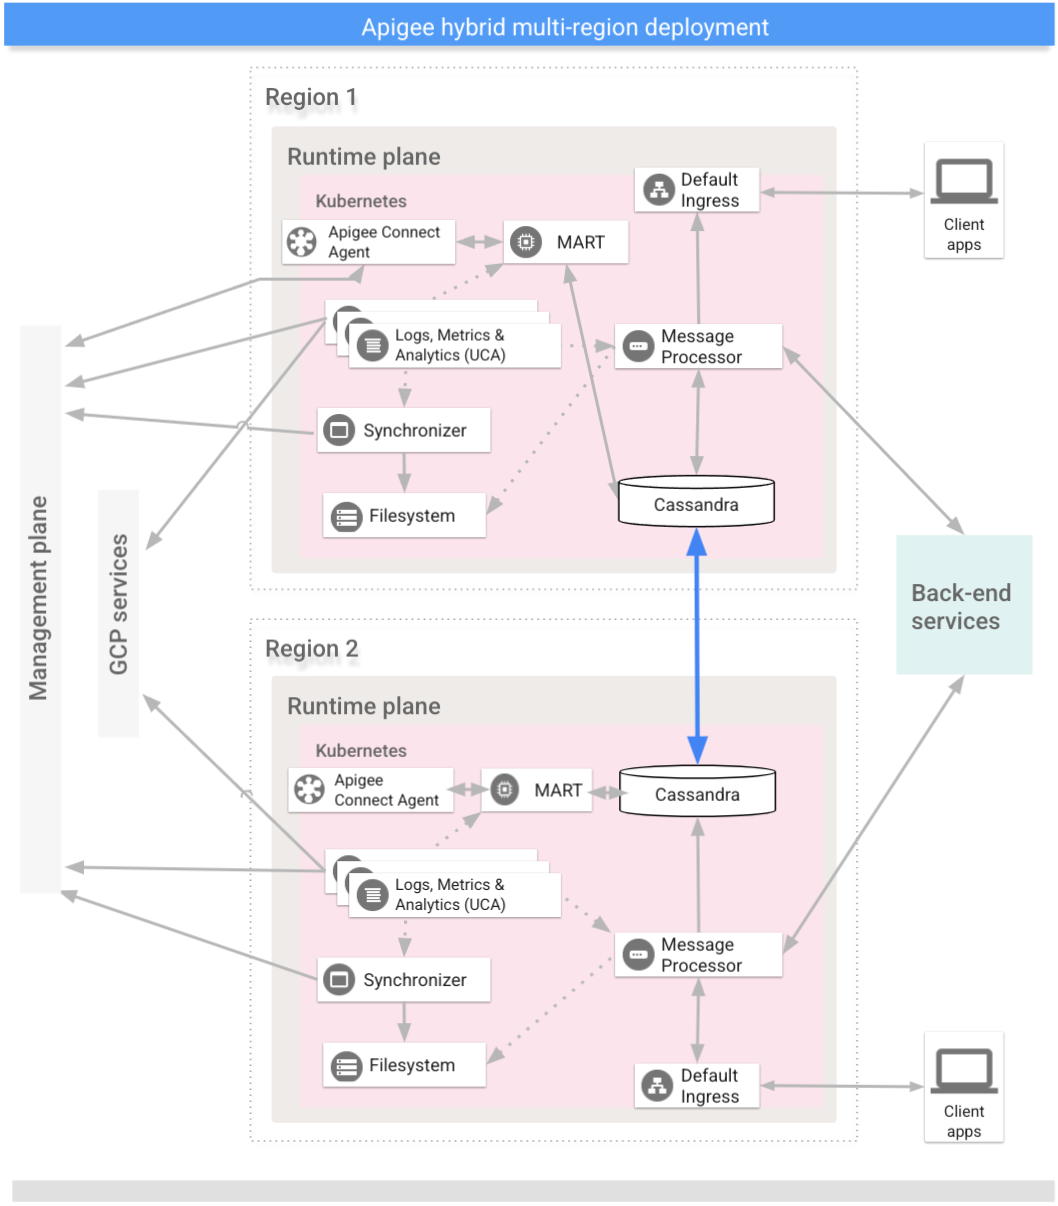
The regions in a multi-region hybrid deployment communicate via Cassandra, as the following image
shows:
## Prerequisites
Before configuring hybrid for multiple regions, you must complete the following prerequisites:
- Follow the [hybrid installation
guide](https://docs.cloud.google.com/apigee/docs/hybrid/v1.4/precog-overview) for any prerequisites like GCP and org configuration before moving to cluster setup steps.
For detailed information, see [Kubernetes](https://kubernetes.io) documentation.
> [!NOTE]
> **NOTE:** Apigee recommends that you ensure that your servers' times are synchronized.
>
> Several features such as expiration and token revocation
> rely on accurate system times. If you host the runtime components in different datacenters,
> then be sure that the system times synchronized.
>
> You can use a tool such as `ntpdate` to verify that server times are
> synchronized.
## Create a virtual network in each region
Create a virtual network for the multi-region deployment. For example, the
following example commands create networks in the Central US and Eastern US regions.
> [!NOTE]
> **NOTE:**The steps in this section are provided as examples only. Adapt them as needed to suit your requirements.
Execute this command to create a virtual network in the Eastern US region, with the
name `my-hybrid-rg-vnet`:
```
az network vnet create \
--name my-hybrid-rg-vnet \
--location eastus \
--resource-group my-hybrid-rg \
--address-prefixes 120.38.1.0/24 \
--subnet-name my-hybrid-rg-vnet-subnet \
--subnet-prefix 120.38.1.0/26
```
Execute this command to create a virtual network in the Central US region, with the
name `my-hybrid-rg-vnet-ext01`:
```
az network vnet create \
--name my-hybrid-rg-vnet-ext01 \
--location centralus \
--resource-group my-hybrid-rg \
--address-prefixes 192.138.0.0/24 \
--subnet-name my-hybrid-rg-vnet-ext01-subnet \
--subnet-prefix 192.138.0.0/26
```
## Create network peering
Create a network peering between the virtual networks.
> [!NOTE]
> **NOTE:**The steps in this section are provided as examples only. Adapt them as needed to suit your requirements.
### Get the virtual network IDs
Peerings are established between virtual network IDs. Get the ID of
each virtual network with the [az network vnet show](https://docs.microsoft.com/en-us/cli/azure/network/vnet) command and store the ID in a variable.
Get the ID of the first virtual network, the one named `my-hybrid-rg-vnet`:
```
vNet1Id=$(az network vnet show \
--resource-group my-hybrid-rg \
--name my-hybrid-rg-vnet \
--query id --out tsv)
```
Get the ID of the second virtual network, the one named `my-hybrid-rg-vnet-ext01`:
```
vNet2Id=$(az network vnet show \
--resource-group my-hybrid-rg \
--name my-hybrid-rg-vnet-ext01 \
--query id \
--out tsv)
```
### Create peering from the first to the second virtual network
With the virtual network IDs, you can create a peering from the first virtual
network (`my-hybrid-rg-vnet`) to the second (`my-hybrid-rg-vnet-ext01`),
as shown in the following examples:
> [!NOTE]
> If you do not specify the `--allow-vnet-access` parameter, a peering is established, but no communication can flow through it.
```
az network vnet peering create \
--name my-hybrid-rg-vnet1-peering \ # The name of the virtual network peering.
--resource-group my-hybrid-rg \
--vnet-name my-hybrid-rg-vnet \ # The virtual network name.
--remote-vnet $vNet2Id \ # Resource ID of the remote virtual network.
--allow-vnet-access
```
In the command's output, note that the `peeringState` is *Initiated*.
The peering remains in the Initiated state until you create the peering from the second
virtual network back to the first.
```
{
...
"peeringState": "Initiated",
...
}
```
### Create a peering from the second virtual network to the first
Example command:
```
az network vnet peering create \
--name my-hybrid-rg-vnet2-peering \ # The name of the virtual network peering.
--resource-group my-hybrid-rg \
--vnet-name my-hybrid-rg-vnet-ext01 \ # The virtual network name.
--remote-vnet $vNet1Id \ # Resource ID of the remote virtual network.
--allow-vnet-access
```
In the command's output, note that `peeringState` is *Connected* . Azure
also changes the
peering state of the first to second virtual network peering to *Connected*.
```
{
...
"peeringState": "Connected",
...
}
```
You can also confirm that the peering state for the `my-hybrid-rg-vnet1-peering` to
`my-hybrid-rg-vnet2-peering`:
peering changed to Connected with the following command:
```
az network vnet peering show \
--name my-hybrid-rg-vnet1-peering \
--resource-group my-hybrid-rg \
--vnet-name my-hybrid-rg-vnet \
--query peeringState
```
Expected output:
```
Connected
```
## Create multi-regional clusters
Set up Kubernetes clusters in multiple regions with different blocks. See
also the [Step 1: Create a cluster](https://docs.cloud.google.com/apigee/docs/hybrid/v1.4/install-create-cluster-aks). Use the
locations and virtual network names you created previously.
Open Cassandra ports 7000 and 7001 between Kubernetes clusters across all regions (7000
may be used as a backup option during troubleshooting)
## Configure the multi-region seed host
This section describes how to expand the existing Cassandra cluster to a new region.
This setup allows the new region to bootstrap the cluster and join the existing
data center. Without this configuration, the multi-region Kubernetes clusters
would not know about each other.
1. Set the kubectl context to the original cluster before retrieving the seed name:
```
kubectl config use-context original-cluster-name
```
2. Run the following [`kubectl`](https://kubernetes.io/docs/reference/kubectl/overview/) command to identify a seed host address for Cassandra in
the current region.
A *seed host address* allows a new regional instance to find the
original cluster on the very first startup to learn the topology of the cluster.
The seed host address is designated as the contact point in the cluster.
```
kubectl get pods -o wide -n apigee | grep apigee-cassandra
apigee-cassandra-default-0 1/1 Running 0 4d17h 120.38.1.9 aks-agentpool-21207753-vmss000000
```
3. Decide which of the IPs returned from the previous command will be the multi-region seed host. In this example, where only a single node cassandra cluster is running, the seed host is `120.38.1.9`.
4. In data center 2, copy your overrides file to a new file whose name includes the cluster name. For example, `overrides_your_cluster_name.yaml`.
5. In data center 2, configure `cassandra.multiRegionSeedHost` and `cassandra.datacenter` in `overrides_your_cluster_name.yaml`, where `multiRegionSeedHost` is one of the IPs returned by the previous command:
```
cassandra:
multiRegionSeedHost: seed_host_IP
datacenter: data_center_name
rack: rack_name
```
For example:
```
cassandra:
multiRegionSeedHost: 120.38.1.9
datacenter: "centralus"
rack: "ra-1"
```
6. In the new data center/region, before you install hybrid, set the same TLS certificates and credentials in `overrides_your_cluster_name.yaml` as you set in the first region.
> [!NOTE]
> NOTE: Be sure to use the same Cassandra TLS certificates and credentials in the second data center as you provided in the original data center. The credentials you set in the overrides file in the first data center must match the ones you specify in the overrides file in the second data center. For details see [Configuring TLS for Cassandra](https://docs.cloud.google.com/apigee/docs/hybrid/v1.4/cassandra-tls.md.txt).
## Set up the new region
After you configure the seed host, you can set up the new region.
**To set up the new region:**
1. Copy your certificate from the existing cluster to the new cluster. The new CA root is used by Cassandra and other hybrid components for mTLS. Therefore, it is essential to have consistent certificates across the cluster.
1. Set the context to the original namespace:
```
kubectl config use-context original-cluster-name
```
2. Export the current namespace configuration to a file:
```
$ kubectl get namespace namespace -o yaml > apigee-namespace.yaml
```
3. Export the `apigee-ca` secret to a file:
```
kubectl -n cert-manager get secret apigee-ca -o yaml > apigee-ca.yaml
```
4. Set the context to the new region's cluster name:
```
kubectl config use-context new-cluster-name
```
5. Import the namespace configuration to the new cluster. Be sure to update the "namespace" in the file if you're using a different namespace in the new region:
```
kubectl apply -f apigee-namespace.yaml
```
6. Import the secret to the new cluster:
```
kubectl -n cert-manager apply -f apigee-ca.yaml
```
2. Install hybrid in the new region. Be sure that the `overrides_your_cluster_name.yaml` file includes the same TLS certificates that are configured in the first region, as explained in the previous section.
Execute the following two commands to install hybrid in the new region:
```
apigeectl init -f overrides_your_cluster_name.yaml
```
```
apigeectl apply -f overrides_your_cluster_name.yaml
```
3. Run `nodetool rebuild` sequentially on all the nodes in the new data center. This may take a few minutes to a few hours depending on the data size.
```
kubectl exec apigee-cassandra-default-0 -n apigee -- nodetool -u JMX_user -pw JMX_password rebuild -- dc-1
```
Where JMX_user and JMX_password are the username and password for the
Cassandra JMX User.
4. Verify the rebuild processes from the logs. Also, verify the data size using the `nodetool status` command:
```
kubectl logs apigee-cassandra-default-0 -f -n apigee
```
```
kubectl exec apigee-cassandra-default-0 -n apigee -- nodetool -u JMX_user -pw JMX_password status
```
The following example shows example log entries:
```
INFO 01:42:24 rebuild from dc: dc-1, (All keyspaces), (All tokens)
INFO 01:42:24 [Stream #3a04e810-580d-11e9-a5aa-67071bf82889] Executing streaming plan for Rebuild
INFO 01:42:24 [Stream #3a04e810-580d-11e9-a5aa-67071bf82889] Starting streaming to /10.12.1.45
INFO 01:42:25 [Stream #3a04e810-580d-11e9-a5aa-67071bf82889, ID#0] Beginning stream session with /10.12.1.45
INFO 01:42:25 [Stream #3a04e810-580d-11e9-a5aa-67071bf82889] Starting streaming to /10.12.4.36
INFO 01:42:25 [Stream #3a04e810-580d-11e9-a5aa-67071bf82889 ID#0] Prepare completed. Receiving 1 files(0.432KiB), sending 0 files(0.000KiB)
INFO 01:42:25 [Stream #3a04e810-580d-11e9-a5aa-67071bf82889] Session with /10.12.1.45 is complete
INFO 01:42:25 [Stream #3a04e810-580d-11e9-a5aa-67071bf82889, ID#0] Beginning stream session with /10.12.4.36
INFO 01:42:25 [Stream #3a04e810-580d-11e9-a5aa-67071bf82889] Starting streaming to /10.12.5.22
INFO 01:42:26 [Stream #3a04e810-580d-11e9-a5aa-67071bf82889 ID#0] Prepare completed. Receiving 1 files(0.693KiB), sending 0 files(0.000KiB)
INFO 01:42:26 [Stream #3a04e810-580d-11e9-a5aa-67071bf82889] Session with /10.12.4.36 is complete
INFO 01:42:26 [Stream #3a04e810-580d-11e9-a5aa-67071bf82889, ID#0] Beginning stream session with /10.12.5.22
INFO 01:42:26 [Stream #3a04e810-580d-11e9-a5aa-67071bf82889 ID#0] Prepare completed. Receiving 3 files(0.720KiB), sending 0 files(0.000KiB)
INFO 01:42:26 [Stream #3a04e810-580d-11e9-a5aa-67071bf82889] Session with /10.12.5.22 is complete
INFO 01:42:26 [Stream #3a04e810-580d-11e9-a5aa-67071bf82889] All sessions completed
```
5. Update the seed hosts. Remove `multiRegionSeedHost: 10.0.0.11` from `overrides-DC_name.yaml` and reapply.
> [!NOTE]
> Seed hosts are local cluster members. To boot up a new region an external seed host is required. Once a region boots up you need to change the seed hosts back to their local clusters in `overrides.yaml` and then reapply the configuration.
```
apigeectl apply -f overrides-DC_name.yaml
```
*[CIDR]: Classless Inter-Domain Routing