*This page
applies to **Apigee** and **Apigee hybrid**.*
*View [Apigee Edge](https://docs.apigee.com/api-platform/get-started/what-apigee-edge) documentation.*

This tutorial shows how to secure an API proxy using an [OAuth 2.0 access token](https://docs.cloud.google.com/apigee/docs/api-platform/security/oauth/oauth-introduction).
## Before you begin
To complete this tutorial, you must have access to an Apigee organization where you
have [permission](https://docs.cloud.google.com/apigee/docs/api-platform/system-administration/apigee-roles) to:
- Create and deploy API proxies
- Create API products
- Create developer apps
You must also have a properly configured environment group hostname with which you can
make Apigee API proxy calls. If you are unsure about
which environment group hostname to use, see your Apigee administrator.
## Deploy the OAuth 2.0 proxy
We provide an API proxy on GitHub that is configured to generate OAuth 2.0 access tokens. Follow these steps to
download and deploy this API proxy to your environment:
[Download the `oauth` sample API proxy](https://github.com/apigee/api-platform-samples/blob/master/default-proxies/oauth/oauth.zip?raw=true) to a directory on your file
system.
1. In the Google Cloud console, go to the **Apigee \> Proxy development \> API proxies** page.
[Go to API proxies](https://console.cloud.google.com/apigee/proxies)
> [!NOTE]
> **Note:** Before you continue, look or search through your list of API proxies. If you already have one called **oauth**, click it and skip to the next section to make sure it's configured the same as what's described. If yours is different, either delete it and continue these steps, or modify it to match the configuration described.
2. In the **API Proxies** pane, click **+ Create**.
3. In the **Create a proxy** pane, under **Proxy template** , select **Upload proxy bundle**.
4. Choose the **oauth.zip** file you downloaded, and click **Next**.
5. Click **Next**.
6. **Deploy (optional)** :
- **Deployment environments** : Optional. Use the checkboxes to select one or more environments in which to deploy your proxy. If you prefer not to deploy the proxy at this point, leave the **Deployment environments** field empty. You can always deploy the proxy later.
- **Service Account**: Optional. Attach a service account to your deployment to enable your proxy to access Google Cloud services, as specified in the service account's role and permissions.
7. Click **Create**.
You've successfully downloaded and deployed an access token-generating API
proxy to your Apigee organization.
## View the OAuth 2.0 flow and policy
Take a few moments to examine the OAuth 2.0 policy configuration.
Next, you'll take a closer look at what the API proxy contains.
1. In the API proxy editor, click the **Develop** tab.
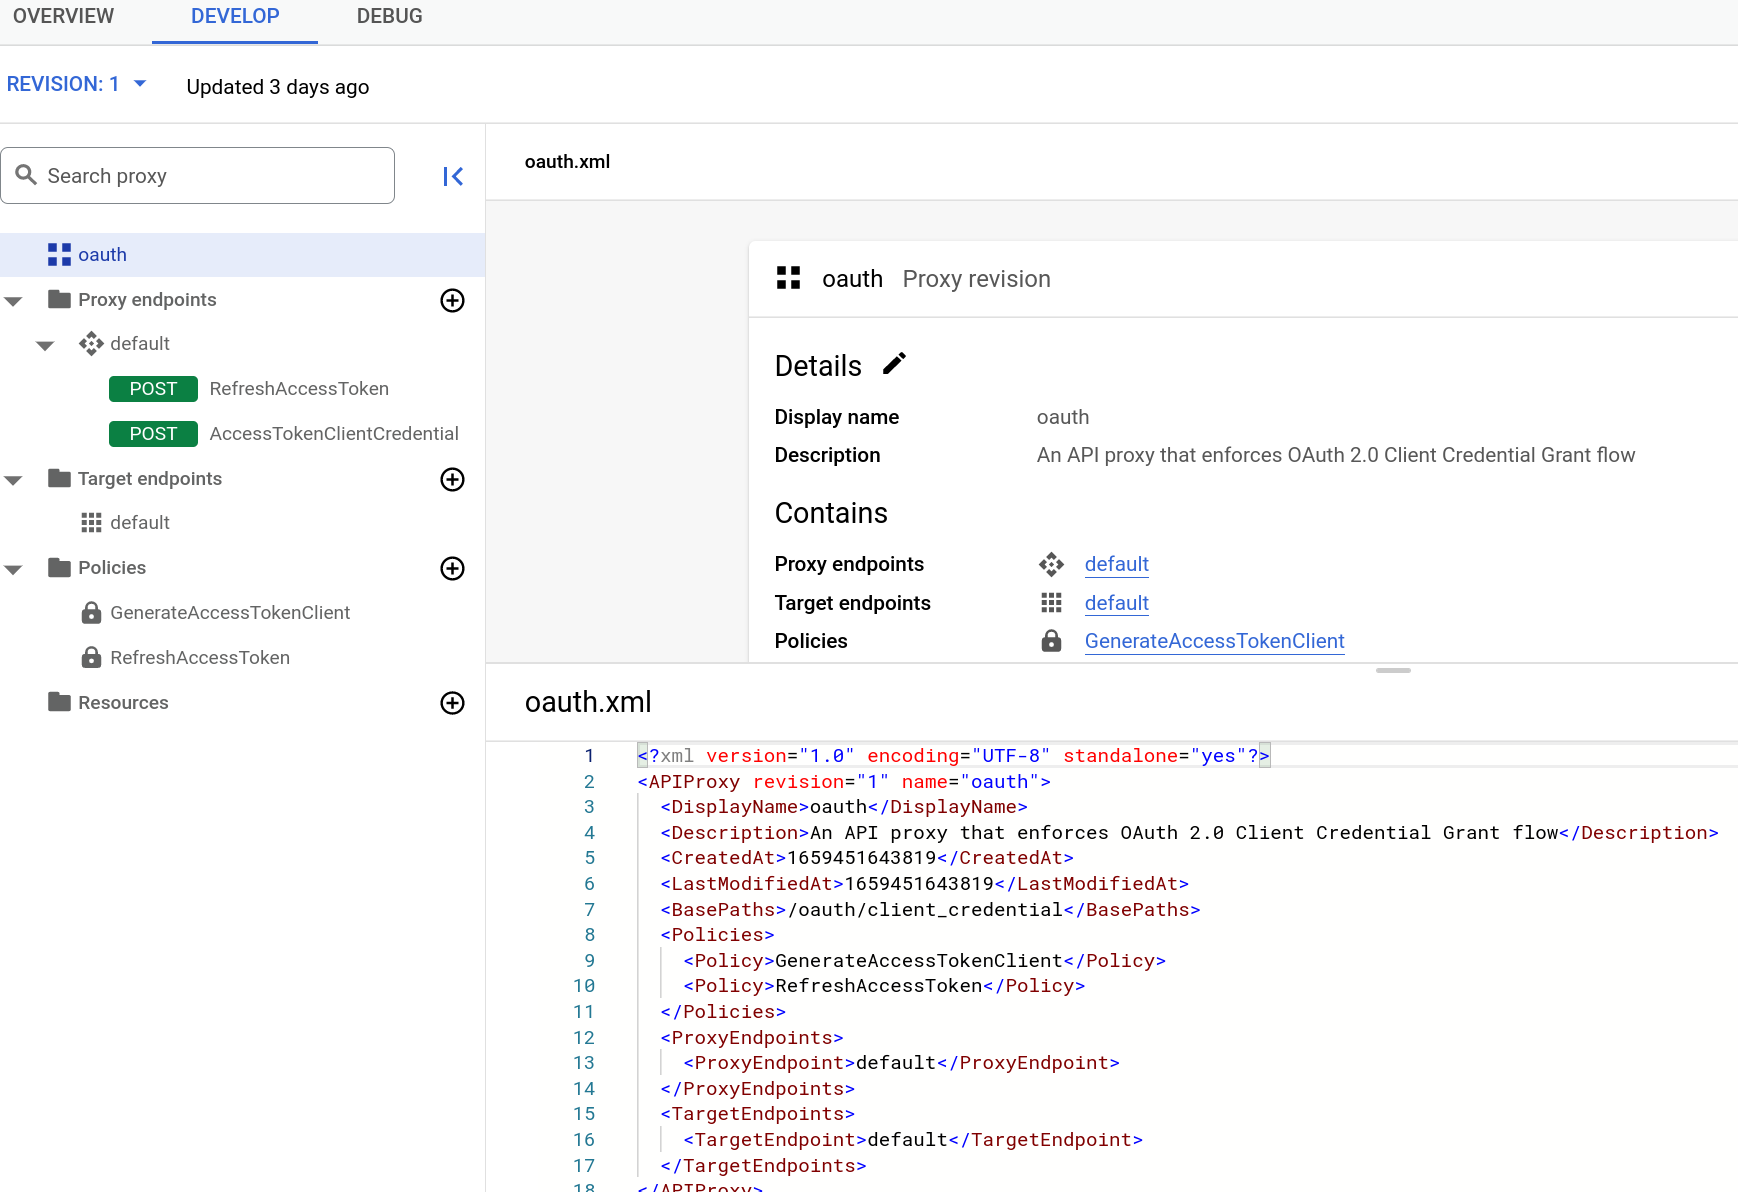
In the left-hand
pane, you'll see two policies. You'll also see two POST flows in the Proxy Endpoints
section.
2. Click **AccessTokenClientCredential** under **Proxy Endpoints** . The text editor displays the XML code for the **AccessTokenClientCredential** conditional flow:
```
GenerateAccessTokenClient
(proxy.pathsuffix MatchesPath "/accesstoken") and (request.verb = "POST")
```
A flow is a processing step in an API proxy. In this case, the flow is triggered when
a certain condition is met (it's called a "conditional flow"). The condition, defined in
the `` element, says that if the API proxy call is made to
the `/accesstoken` resource, and the request verb is `POST`, then
execute the `GenerateAccessTokenClient` policy, which generates the access
token.
3. Now let's look at the policy the conditional flow will trigger. Click the **GenerateAccessTokenClient** policy in the **Request** pane: 
The following XML configuration is displayed:
```
GenerateAccessToken
3600000
client_credentials
request.queryparam.grant_type
```
The configuration includes the following:
- The ``, which can be one of several predefined values, defines what the policy is going to do. In this case, it's going to generate an access token.
- The token will expire 1 hour (3600000 milliseconds) after being generated.
- In ``, the OAuth 2.0 `` expected to be used is `client_credentials` (exchanging a consumer key and secret for an OAuth 2.0 token).
- The second `` element tells the policy where to look in the API call for the grant type parameter, as required by the OAuth 2.0 specification. (You'll see this in the API call later). The grant type could also be sent in the HTTP header (`request.header.grant_type`) or as a form parameter (`request.formparam.grant_type`).
You don't need to do anything else with the API proxy at the moment. In later steps,
you'll use this API proxy to generate an OAuth 2.0 access token. But first, you need to do a few
more things:
- Create the API proxy you actually want to secure with OAuth 2.0.
- Create a few more artifacts that will result in the consumer key and consumer secret you need to exchange for an access token.
> [!NOTE]
> **Note:** The RefreshAccessToken flow and policy in the API proxy isn't used in this tutorial and isn't supported with the OAuth 2.0 client credentials grant type.
## Create a protected API proxy
Now you're going to create the API proxy you want to protect. This is the API call that
returns something you want. In this case, the API proxy will call Apigee's mocktarget service
to return your IP address. BUT, you'll get to see it only if you pass a valid OAuth 2.0 access
token with your API call.
The API proxy you create here will include a policy that checks for an OAuth 2.0 token in the
request.
1. In the Google Cloud console, go to the **Apigee \> Proxy development \> API proxies** page.
[Go to API proxies](https://console.cloud.google.com/apigee/proxies)
2. In the **API Proxies** pane, click **+ Create**.
3. In the **Create a proxy** pane, under **Proxy template** , select **Reverse proxy (most common)**.
4. Configure the proxy with the following:
| In this field | do this |
|---|---|
| **Proxy Name** | Enter: `helloworld_oauth2` |
| **Base Path** | Change to: `/hellooauth2` The Project Base Path is part of the URL used to make requests to the API proxy. |
| **Description** | Enter: `hello world protected by OAuth 2.0` |
| **Target (Existing API)** | Enter: `https://mocktarget.apigee.net/ip` This defines the target URL that Apigee invokes on a request to the API proxy. |
5. Click **Next**.
6. **Deploy (optional)** :
- **Deployment environments** : Optional. Use the checkboxes to select one or more environments in which to deploy your proxy. If you prefer not to deploy the proxy at this point, leave the **Deployment environments** field empty. You can always deploy the proxy later.
- **Service Account**: Optional. Attach a service account to your deployment to enable your proxy to access Google Cloud services, as specified in the service account's role and permissions.
7. Click **Create**.
8. Click the **Develop** tab of the **helloworld_oauth2** proxy.
9. In the **Policies** menu, Click **Add policy**.
10. In the **Create policy** pane, Select **OAuth 2.0**.
11. Click **Create**.
## View the policies
Let's take a closer look at what you've created.
1. In the API proxy editor, click the **Develop** tab. You'll see that two policies have been added to the request flow of the API proxy:
- **Verify OAuth v2.0 Access Token** -- Checks the API call to make sure a valid OAuth 2.0 token is present.
- **Remove Header Authorization** -- An Assign Message policy that removes the access token after it's checked, so that it doesn't get passed to the target service. (If the target service needed the OAuth 2.0 access token, you wouldn't use this policy).
2. Click the **Verify OAuth v2.0 Access Token** icon in the
right-hand pane and
look at the XML below it in the text editor.
```
Verify OAuth v2.0 Access Token
VerifyAccessToken
```
Notice that the `` is `VerifyAccessToken`. The
Operation defines what the policy is supposed to do. In this case, it's going to check
for a valid OAuth 2.0 token in the request.
## Add an API product
To obtain an OAuth 2.0 access token, you need to create three Apigee entities: an API product,
a developer, and a developer app.
1. Create the API product:
2. In the Google Cloud console, go to the **Apigee \> Distribution \> API products** page.
3. [Go to API products](https://console.cloud.google.com/apigee/apiproducts)
4. Click **+ Create**.
5. Enter the **Product details** for your API product.
| Field | Description |
|---|---|---|
| Name | Internal name of the API product. Do not specify special characters in the name. **Note:** You cannot edit the name once the API product is created. |
| Display name | Display name for the API product. The display name is used in the UI and you can edit it at any time. If not specified, the Name value will be used. This field is auto-filled using the Name value; you can edit or delete its contents. The display name can include special characters. |
| Description | Description of the API product. |
| Environment | Environments to which the API product will allow access. Select the environment to which you deployed the API proxy. | |
| Access | Select **Public**. |
| Automatically approve access requests | Enable automatic approval of key requests for this API product from any app. |
| Quota | Ignore for this tutorial. |
| Allowed OAuth 2.0 Scopes | Ignore for this tutorial. |
6. In the **Operations** section, click **Add An Operation**.
7. In the API Proxy field, select the API proxy you just created.
8. In the Path field, enter "/". Ignore the other fields.
9. Click **Save** to save the Operation.
10. Click **Save** to save the API product.
## Add a developer and app to your
organization
Next, you're going to simulate the workflow of a developer signing up to use your APIs.
Ideally, developers register themselves and their apps through your developer portal. In this
step, though, you'll add a developer and an app as an administrator.
A developer will have one or more apps that call your APIs, and each app gets a unique
consumer key and consumer secret. This key/secret-per-app also gives you, the API provider,
more granular control over access to your APIs and more granular analytics reporting on API
traffic, because Apigee knows which developer and app belong to which OAuth 2.0 token.
### Create a developer
Let's create a developer named Nigel Tufnel.
1. Open the **Developer** editor.
2. In the Google Cloud console, go to the **Apigee \> Distribution \> Developers** page.
[Go to Developers](https://console.cloud.google.com/apigee/developers)
3. Click **+ Create**.
4. Enter the following in the **Add Developer** window:
| In this field | Enter |
|---|---|
| **First Name** | `Nigel` |
| **Last Name** | `Tufnel` |
| **Email** | `nigel@example.com` |
| **Username** | `nigel` |
5. Click **Add**.
### Register an app
Let's create an app for Nigel.
1. In the Google Cloud console, go to **Apigee \> Distribution \> Apps** page.
[Go to Apps](https://console.cloud.google.com/apigee/apps)
2. Click **+ Create**.
3. Enter the following in the New App window:
| In this field | do this |
|---|---|
| **Name** and **Display Name** | Enter: `nigel_app` |
| **Developer** | Click **Developer** and select: `Nigel Tufnel (nigel@example.com)` |
| **Callback URL** and **Notes** | Leave blank |
4. Click **+ Add Credentials**.
5. Click **+ Add Products**.
6. Select the API product you just created.
7. Click **Add**.
8. Click **Create**.
### Get the
consumer key and consumer secret
Now you'll get the consumer key and consumer secret that will be exchanged for an OAuth 2.0
access token.
1. Open the **nigel_app** page.
1. Ensure that the **nigel_app** page is displayed. If not, go to the **Distribution \> Apps** page.
[Go to Apps](https://console.cloud.google.com/apigee/apps)
2. On the **nigel_app** page, click in the **Key** and **Secret** columns. Notice that the key/secret are associated with the API product that you created earlier.
2. Select and copy the **Key** and **Secret** values. Paste them in a temporary
text file. You'll use them in a later step, where you call the API proxy that will
exchange these credentials for an OAuth 2.0 access token.
## Try calling the API to get your IP address
(fail!)
Try calling the protected API proxy that you just created. Notice that you are
*not* passing an OAuth 2.0 access token in the call.
where `YOUR ENV_GROUP_HOSTNAME` is the environment group hostname. See
[Find the environment group hostname](https://docs.cloud.google.com/apigee/docs/api-platform/get-started/test-proxy#find-the-environment-group-hostname).
Because the API proxy has the **Verify OAuth v2.0 Access Token** policy
checking for a valid OAuth 2.0 token in the request, the call should fail with the following
message:
```
{"fault":{"faultstring":"Invalid access token","detail":{"errorcode":"oauth.v2.InvalidAccessToken"}}}
```
In this case, failure is good! It means your API proxy is much more secure. Only trusted
apps with a valid OAuth 2.0 access token can successfully call this API.
## Get an OAuth 2.0 access token
Next, you will use the key and secret you
copied and pasted into a text file and exchange them for an OAuth 2.0 access token. You're now
going to make an API call to the API sample proxy you imported, **oauth**, which
will generate an API access token.
Using that key and secret, make the following cURL call (note that the protocol is
`https`):
```
curl -X POST -H "Content-Type: application/x-www-form-urlencoded" \
"https://YOUR ENV_GROUP_HOSTNAME/oauth/client_credential/accesstoken?grant_type=client_credentials" \
-d "client_id=CLIENT_KEY&client_secret=CLIENT_SECRET"
```
Note that if you're using a client like Postman to make the call, the
`client_id` and `client_secret` go in the Body of the
request and must be `x-www-form-urlencoded`.
You should get a response like this:
```
{
"issued_at" : "1466025769306",
"application_name" : "716bbe61-f14a-4d85-9b56-a62ff8e0d347",
"scope" : "",
"status" : "approved",
"api_product_list" : "[helloworld_oauth2-Product]",
"expires_in" : "3599", //--in seconds
"developer.email" : "nigel@example.com",
"token_type" : "BearerToken",
"client_id" : "xNnREu1DNGfiwzQZ5HUN8IAUwZSW1GZW",
"access_token" : "GTPY9VUHCqKVMRB0cHxnmAp0RXc0",
"organization_name" : "myOrg",
"refresh_token_expires_in" : "0", //--in seconds
"refresh_count" : "0"
}
```
You got your OAuth 2.0 access token! Copy the `access_token` value (without the quote marks) and
paste it into your text file. You'll use it in a moment.
What just happened?
Remember previously when you looked at that "conditional flow" in the
**oauth** proxy, the one that said if the resource URI is
`/accesstoken` and the request verb is `POST`, to execute the
`GenerateAccessTokenClient` OAuth 2.0 policy that generates an access token? Your cURL
command met those conditions, so the OAuth 2.0 policy was executed. It verified your consumer key
and consumer secret and exchanged them for an OAuth 2.0 token that expires in 1 hour.
## Call the API with an access token (success!)
Now that you have an access token, you can use it to call the API proxy. Make the
following cURL call. Substitute your Apigee organization name and the access token.
```
curl https://YOUR ENV_GROUP_HOSTNAME/hellooauth2 -H "Authorization: Bearer TOKEN"
```
You should now get a successful call to the API proxy that returns your IP address. For
example:
```
{"ip":"::ffff:192.168.14.136"}
```
You can repeat that API call for close to an hour, after which time the access token will
expire. To make the call after an hour, you'll need to generate a new access token using the
previous steps.
Congratulations! You've created an API proxy and protected it by requiring that a valid
OAuth 2.0 access token be included in the call.
## Related topics
- [OAuth 2.0 home](https://docs.cloud.google.com/apigee/docs/api-platform/security/oauth/oauth-home)
- [OAuthV2 policy](https://docs.cloud.google.com/apigee/docs/api-platform/reference/policies/oauthv2-policy)
- [Download API proxies](https://docs.cloud.google.com/apigee/docs/api-platform/fundamentals/download-api-proxies) (which shows how to bundle an API proxy into a ZIP file like the one you downloaded)