*This page
applies to **Apigee** and **Apigee hybrid**.*
*View [Apigee Edge](https://docs.apigee.com/api-platform/get-started/what-apigee-edge) documentation.*

> [!WARNING]
> **Important:** Open a workspace before setting up the emulator(s). See [Manage the Apigee workspace](https://docs.cloud.google.com/apigee/docs/api-platform/local-development/vscode/manage-apigee-workspace).
Apigee Emulator lets you simulate an Apigee installation in your local
development environment, for testing
purposes. Apigee Emulator does not replace an Apigee installation for testing
and does not have identical functionality, but simplifies testing from within
the local development environment.
Apigee Emulator is available as a customized Docker image provided publicly to developers to
deploy and test API proxies in a local development environment. Docker images
are published regularly in [gcr](https://console.cloud.google.com/artifacts/docker/apigee-release/us/gcr.io/hybrid%2Fapigee-emulator).
When you are ready to deploy and test your first API proxy, you will need to use
the emulators section to view and manage your emulator versions and the
lifecycle of the emulators that are set up.
> [!NOTE]
> **Note:** The images and examples in this guide are for reference purposes and might not show the latest Apigee Emulator version. Always use the latest stable Apigee Emulator version that meets your needs. See [Choose the emulator version](https://docs.cloud.google.com/apigee/docs/api-platform/local-development/vscode/manage-apigee-emulator#choose_the_emulator_version) for information.
This section lets you:
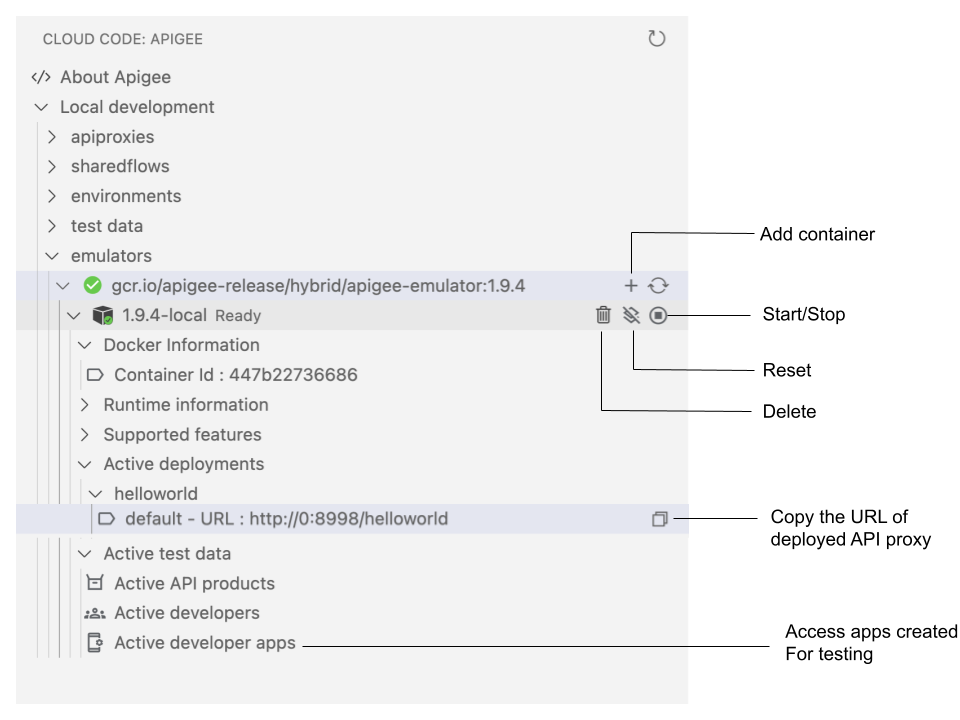
- View the different versions of the emulators that are installed, and the
containers created for each emulator version, including its Docker and
runtime information, and control and traffic ports.
- Add, delete, start, stop, reset, update, and refresh the view of the Apigee
Emulator containers, as described in [Manage the Apigee Emulator](https://docs.cloud.google.com/apigee/docs/api-platform/local-development/vscode/manage-apigee-emulator).
- View deployed applications (see [Deploying
environments](https://docs.cloud.google.com/apigee/docs/api-platform/local-development/vscode/deploy-environment)).
- View active test resources (see [Exporting test resources to the Apigee
Emulator](https://docs.cloud.google.com/apigee/docs/api-platform/local-development/vscode/build-test-resources#exporting_test_resources_to_the_apigee_emulator)).
# Manage the Apigee Emulator
Manage the Apigee Emulator as described in the following sections.
> [!NOTE]
> **Note:** Docker must be installed and running on your system in order for the Apigee Emulator to install and run.
## Choose the emulator version
By default, the **emulator** folder shows a version which is stable. However,
you can choose a different version based on your requirements.
1. View a list of Apigee Emulator versions in
[Google Artifact Registry](https://console.cloud.google.com/artifacts/docker/apigee-release/us/gcr.io/hybrid%2Fapigee-emulator) and note the **Tag** value. For more information, see the [Artifact Registry documentation](https://cloud.google.com/artifact-registry/docs).

2. To add an Apigee Emulator version to the Cloud Code extension, click
**Manage** \> **Settings** and then search for `apigee emulators`.
3. Click **Add item** . 
4. Enter the **Tag** value obtained in step 1. For example: `1.10.0` or
`gcr.io/apigee-release/hybrid/apigee-emulator:1.10.0`
5. Click **OK**.
6. The newly added emulator shows in the **emulator** folder.
## Install the Apigee Emulator
To install the Apigee Emulator:
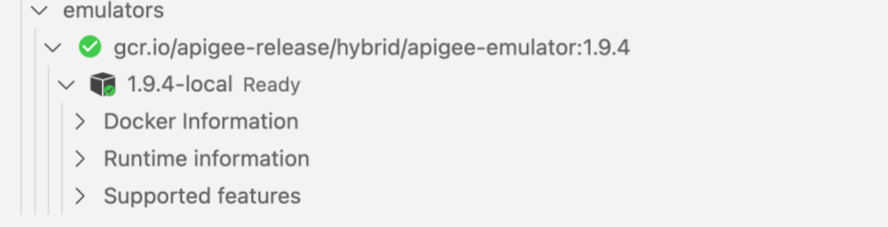
1. Expand the **emulators** folder in your workspace.
2. Position your cursor over the Apigee Emulator version to install.
3. Click .

4. Add a container following the instructions in
[Add a container for the Apigee Emulator](https://docs.cloud.google.com/apigee/docs/api-platform/local-development/vscode/manage-apigee-emulator#add-container).
The latest image of the selected Apigee Emulator version is installed. After the
installation completes, the message `Emulator installed successfully` displays,
and the Apigee Emulator container status changes to **Ready**.
## Add a container for the Apigee Emulator
To add a container for the Apigee Emulator using the UI:
1. Expand the **emulators** folder.
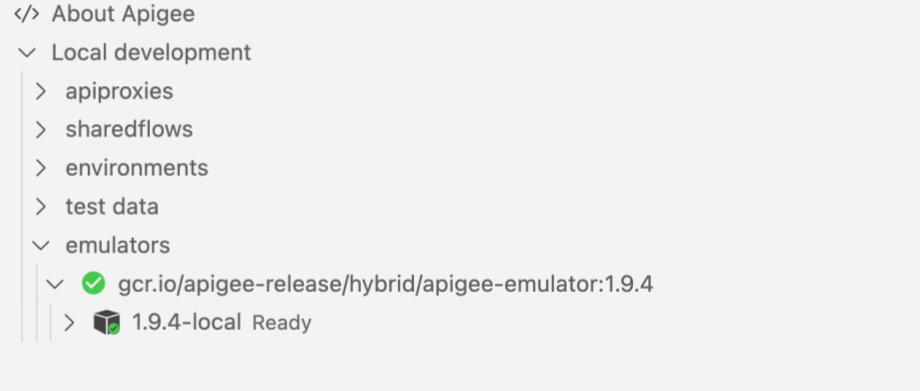
2. Position your cursor over the Apigee Emulator for which you want to add a
container.
3. Click **+**.
4. Enter a unique name for the Apigee Emulator container and press
**Enter**.
Enter alphanumeric characters, dashes (-), or underscores (_).
5. Enter the numeric value to use as the control port for the Apigee Emulator
container and press **Enter** . The control port must be unique
across containers. It defaults to `8080`.
> [!NOTE]
> **Important!** The control port must be unique and not in use by any other component.
6. Enter the numeric value to use as the traffic port for the Apigee Emulator
container and press **Enter** . The traffic port must be unique
across containers. It defaults to `8998`.
> [!NOTE]
> **Important!** The traffic port must be unique and not in use by any other component.
The container is added.
## View status information for the Apigee Emulator
View status information for the Apigee Emulator as described in the following
sections.
### Use the UI
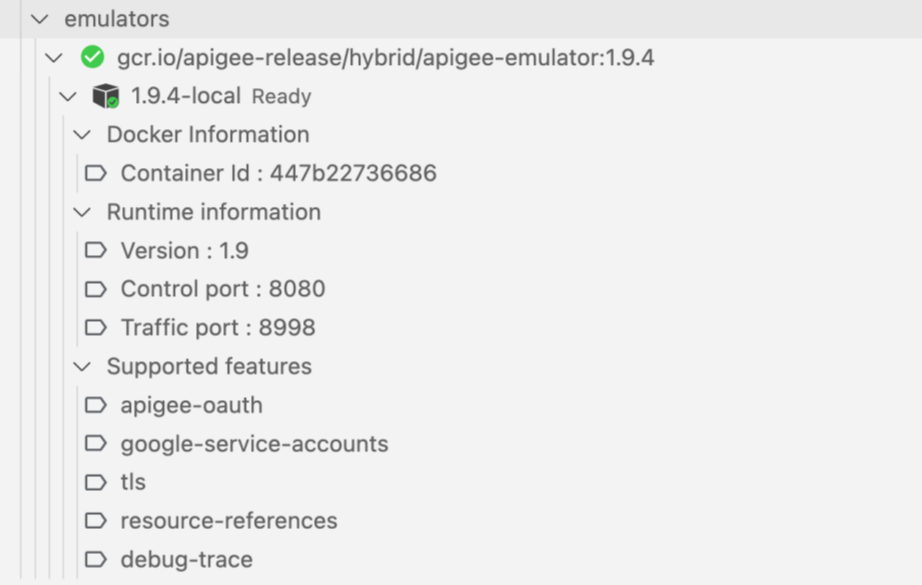
To view status information for the Apigee Emulator, including its Docker and
Runtime information, expand the container in the **emulators** section. The
information you see matches the Apigee Emulator version in use.
### Use the Docker CLI
To view container status information for the Apigee Emulator and its configured
ports, run `docker ps` in the **Terminal** tab. The following
provides an example response. The actual response you see depends on the Apigee
Emulator version in use:
```
CONTAINER ID IMAGE COMMAND CREATED STATUS PORTS NAMES
33756b8c5c5b ...apigee-emulator:1.11.0 "/usr/bin…" 10 hours ago Up 10 hours 7000-7001/tcp, 0.0.0.0:8080->8080/tcp... apigee-emulator
```
See also [Customize the Apigee runtime Docker
container](https://docs.cloud.google.com/apigee/docs/api-platform/local-development/vscode/manage-apigee-emulator#customize-options).
## Start the Apigee Emulator
Start the Apigee Emulator as described in the following sections.
### Use the UI
To start the Apigee Emulator, position your cursor over the container that you
want to start and click .
### Use the Docker CLI
To start the Apigee Emulator, run `docker start CONTAINER_NAME`
in the **Terminal** tab.
The status is set to `Ready`:

See also [Customize the Apigee runtime Docker
container](https://docs.cloud.google.com/apigee/docs/api-platform/local-development/vscode/manage-apigee-emulator#customize-options).
## Reset the Apigee Emulator
Reset the Apigee Emulator to remove all deployments and exported test resources
as described in the following sections.
### Use the UI
To reset the Apigee Emulator, position your cursor over the Apigee Emulator
container in the **emulators** section and click .
The Apigee Emulator is reset and the status is set to `Ready`:

The following information is displayed in the **Output** tab:
```
Resetting the Apigee Emulator
Reset completed
```
See also [Customize the Apigee runtime Docker
container](https://docs.cloud.google.com/apigee/docs/api-platform/local-development/vscode/manage-apigee-emulator#customize-options).
## Restart the Apigee Emulator
To restart the Apigee Emulator, run `docker restart CONTAINER_NAME` in the **Terminal** tab. For example: `docker restart MyContainer`
## Update the Apigee Emulator
If the Apigee Emulator is out of sync with the latest version, you can update
your installed version using the UI or Docker CLI, as described in the following
sections.
### Use the UI
To update the Apigee Emulator, position your cursor over the Apigee Emulator in
the **emulators** section and click
.
### Use the Docker CLI
To update the Apigee Emulator, run the following Docker commands in the
**Terminal** tab, *using the [latest appropriate version](https://docs.cloud.google.com/apigee/docs/api-platform/local-development/vscode/manage-apigee-emulator#choosing_the_emulator_version)*:
- Run `docker ps` to obtain the image name. Example: `gcr.io/apigee-release/hybrid/apigee-emulator:EMULATOR_VERSION`
- Run `docker pull IMAGE_NAME` to update the Apigee
Emulator installation image. Example: `docker pull gcr.io/apigee-release/hybrid/apigee-emulator:EMULATOR_VERSION`
The Apigee Emulator is updated and the following message is displayed: `Emulator version is up to date`
See also [Customize the Apigee runtime Docker container](https://docs.cloud.google.com/apigee/docs/api-platform/local-development/vscode/manage-apigee-emulator#customize-options).
## Stop the Apigee Emulator
Stop the Apigee Emulator using the UI or Docker CLI as described in the
following sections.
### Use the UI
To stop the Apigee Emulator, position your cursor over the Apigee Emulator
container in the **emulators** section and click .
### Use the Docker CLI
To stop the Apigee Emulator, run `docker stop CONTAINER_NAME` in the **Terminal** tab.
The Apigee Emulator is stopped and the status is changed to `Not
running`:

See also [Customize the Apigee runtime Docker
container](https://docs.cloud.google.com/apigee/docs/api-platform/local-development/vscode/manage-apigee-emulator#customize-options).
## Delete a container for the Apigee Emulator
Delete a container for the Apigee Emulator using the UI or Docker CL as
described in the following sections.
### Use the UI
To delete the Apigee Emulator, position your cursor over the Apigee Emulator
container in the **emulators** section and click .
### Use the Docker CLI
To delete a container for the Apigee Emulator, run the following Docker commands
in the **Terminal** tab:
- Run `docker stop CONTAINER_NAME` to stop the Apigee
Emulator installation image (if it's not already stopped). For example: `docker stop MyContainer`
- Run `docker rm CONTAINER_NAME` to stop the Apigee
Emulator installation image. For example: `docker rm MyContainer`
The container is deleted.
See also [Customize the Apigee runtime Docker
container](https://docs.cloud.google.com/apigee/docs/api-platform/local-development/vscode/manage-apigee-emulator#customize-options).
## Customize the Apigee runtime Docker container
You can customize the Docker command line that is used to control the Apigee
Emulator instances by using the following options.
> [!NOTE]
> **Note**: Customizing the Apigee runtime Docker container is not required; if not specified, the default option values are used. Any changes to the options are applicable only to the containers that are created after the options have been modified. If you want the options to be applied to existing containers, you need to recreate them.
| Option | Description |
|---|---|
| `additionalArguments` | Add one or more arguments. The arguments are added to the `docker run` command exactly as provided. Defaults to `""` (none). |
| `detached` | Controls whether the `--detached` option is used while running the container. Defaults to `true`. |
| `dns` | Controls the DNS service `-dns` flag, as described in [DNS services](https://docs.docker.com/config/containers/container-networking/#dns-services). Defaults to `8.8.8.8`. |
| `environmentVariables` | Add environment variables to the `docker run` command, as described in [Options](https://docs.docker.com/engine/reference/commandline/run/#options). The values, if provided, are added to the `docker run` command using `-e name=value`. Default list includes `"XTERM": "xterm-256color"`. |
| `labels` | Add one or more labels to be attached with the container. The labels are added to the `docker run` command using `-l label:value`. Defaults to `none`. |
| `privileged` | Controls whether `--privileged` option is used while running the container. Defaults to `true`. |
| `volumes` | Add one or more volumes to be mounted on the container. The volumes are added to the `docker run` command using `-v label:value`. Defaults to `none`. |
To customize the Apigee runtime Docker container:
1. This feature is available as part of the Insiders build (v1.21.0 and
higher). Install the Insiders build, as described in [Installing Insiders builds](https://docs.cloud.google.com/code/docs/vscode/insiders#get).
2. Click
**Manage** \> **Settings** and then search for `apigee docker`.
3. Under **Cloudcode \> Apigee: Docker Options** , click **Edit in
settings.json** . The customizable options are displayed in the
`settings.json` file, as shown:
"cloudcode.apigee.dockerOptions": {
"environmentVariables": {
"XTERM": "xterm-256-color"
},
"dns": "8.8.8.8",
"detached": true
"privileged": true,
"labels": {},
"volumes": {},
"additionalArguments":""
}
4. Edit the options and save the file.
## Customize the Apigee Emulator to support service account-based authentication
When testing the proxies that depend on Google Cloud service account-based
authentication, Apigee Emulator needs access to the [Google
service account key](https://docs.cloud.google.com/docs/authentication/set-up-adc-local-dev-environment#local-key).
Follow the steps to configure your Apigee Emulator to support service
account-based authentication.
### Create and download the service account key
Create a Google Cloud service account with the
**Service Account Token Creator** role, which is a requirement for the
Apigee Emulator to support service accounts. Create a key for the service
account, as described in
[Create a service account key](https://docs.cloud.google.com/iam/docs/keys-create-delete#creating).
Download the key to the local file system, so that it can be provided to the Apigee emulator.
> [!NOTE]
> **Note:** Service account keys are a security risk if not managed correctly. You are responsible for the security of the private key and for other operations described by [Best practices for managing service account keys](https://docs.cloud.google.com/iam/docs/best-practices-for-managing-service-account-keys). If you are prevented from creating a service account key, service account key creation might be disabled for your organization. For more information, see [Managing secure-by-default organization resources](https://docs.cloud.google.com/resource-manager/docs/secure-by-default-organizations).
>
>
> If you acquired the service account key from an external source, you must validate it before use.
> For more information, see [Security requirements for externally sourced credentials](https://docs.cloud.google.com/docs/authentication/external/externally-sourced-credentials).
### Configure the Apigee Emulator
> [!NOTE]
> The settings defined in this section only apply to the Docker container instances that are created after the settings are saved.
To configure the Apigee Emulator settings:
1. Open the Docker options, as described in
[Customizing the Apigee runtime Docker container](https://docs.cloud.google.com/apigee/docs/api-platform/local-development/vscode/manage-apigee-emulator#customize-options).
2. In the `volumes` section of the Docker options, add a new volume
so that the downloaded service account key path is available in the
container. Assuming the key was downloaded in the path
`/opt/apigee/keys/apigee-sa-key.json`, the following setting mounts the contents of `/opt/apigee/keys` in the path `/emulator/keys` within the container:
```
"volumes": {
"/opt/apigee/keys":"/emulator/keys"
}
```
3. In the `environmentVariables` section of the Docker options, add
the `GOOGLE_APPLICATION_CREDENTIALS` variable that points to the
file in the mounted path:
```
"environmentVariables": {
"GOOGLE_APPLICATION_CREDENTIALS":"/emulator/keys/apigee-sa-key.json"
}
```
4. Save the settings and create a new container instance which can be used for
testing.
The following example shows how to associate a Google service account key with
the Apigee Emulator.
"cloudcode.apigee.dockerOptions": {
"environmentVariables": {
"XTERM": "xterm-256-color",
"GOOGLE_APPLICATION_CREDENTIALS":"/emulator/keys/apigee-sa-key.json"
},
"dns": "8.8.8.8",
"detached": true
"privileged": true,
"labels": {},
"volumes": {
"/opt/apigee/keys":"/emulator/keys"
},
"additionalArguments":""
}
## Configure the Apigee Emulator to support HTTP forward proxy
> [!NOTE]
> The settings defined in this section only apply to emulator versions 1.11.0 and later.
Many times the backend targets associated with a proxy can only be reached using
an HTTP forward proxy. The Apigee emulator can be configured to use the forward
proxy while connecting to targets using an environment variable named
`FORWARD_PROXY`.
> [!NOTE]
> The settings defined in this section only apply to the Docker container instances that are created after the settings are saved.
To configure the Apigee Emulator settings:
1. Open the Docker options, as described in [Customizing the Apigee runtime Docker container](https://docs.cloud.google.com/apigee/docs/api-platform/local-development/vscode/manage-apigee-emulator#customize-options).
2. In the `environmentVariables` section of the Docker options, add
the `FORWARD_PROXY` variable that points to the forward proxy
address as an HTTP URL
```
"environmentVariables": {
"FORWARD_PROXY":"http://proxy_host:proxy_port"
}
```
3. Save the settings and create a new container instance for testing.