*This page
applies to **Apigee** and **Apigee hybrid**.*
*View [Apigee Edge](https://docs.apigee.com/api-platform/get-started/what-apigee-edge) documentation.*

This example demonstrates how to use Apigee Adapter for Envoy with an Apigee hybrid deployment.
## Prerequisites
| Before you begin: |
|---|
| Download and install the Apigee Adapter for Envoy Remote Service and CLI as explained in [Getting started](https://docs.cloud.google.com/apigee/docs/api-platform/envoy-adapter/v1.2.x/getting-started.md.txt). |
| Be sure you have the [Google Cloud SDK](https://cloud.google.com/sdk/install) installed. The SDK includes the `gcloud` command-line tool. |
| Be sure you have [`kubectl`](https://kubernetes.io/docs/tasks/tools/install-kubectl/) installed. |
## Overview
This example explains how to use Apigee Adapter for Envoy with [Apigee hybrid](https://docs.cloud.google.com/apigee/docs/hybrid/latest/what-is-hybrid). In this example, you will deploy a simple HTTP service in the same Kubernetes
cluster where Apigee hybrid is deployed. Then, you will configure the Apigee Adapter for Envoy
to manage API calls to this service with Apigee.
The following figure shows the basic architecture for the Apigee hybrid integration:
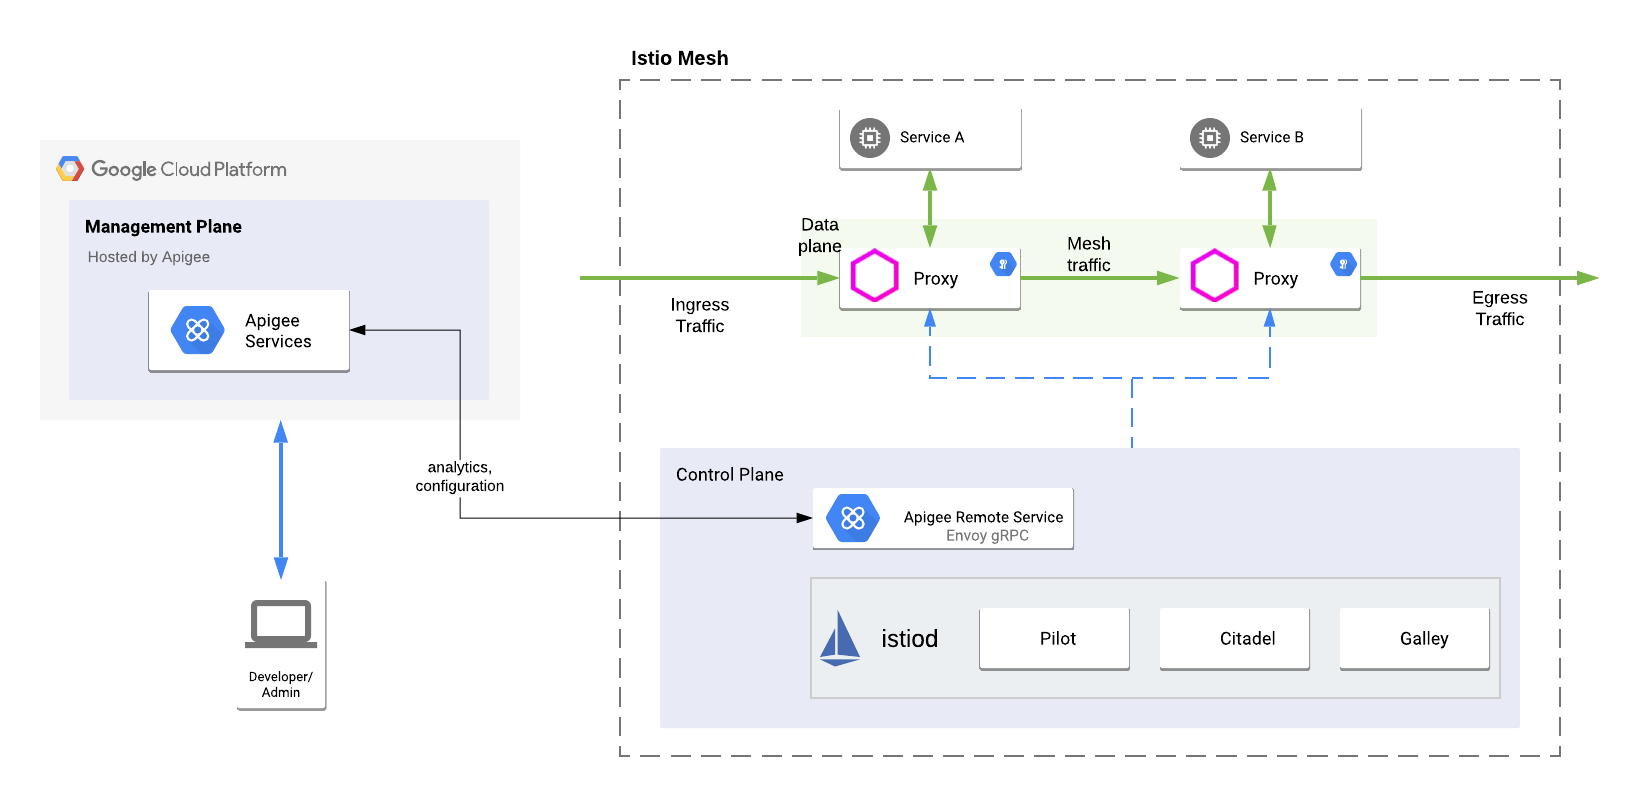
An
Envoy proxy is deployed with the target HTTP service as an Istio sidecar in the Istio service mesh.
The sidecar handles API traffic to and from the target service, and communicates with the
Remote Service. The Remote Service also communicates
with the hybrid management plane to retrieve API product and proxy information.
## Check your gcloud configuration
1. Check that your `gcloud` configuration is set to the GCP project associated with your hybrid organization.
To list the current settings:
```
gcloud config list
```
If necessary, set the correct GCP project ID with this command:
```
gcloud config set project project-id
```
2. You must be authenticated with Google Cloud SDK (gcloud) for your GCP project:
```
gcloud auth login
```
## Provision Apigee hybrid
In this step, you will use the Remote Service CLI to provision hybrid with the
`remote-service` API proxy. The provisioning command also sets up a certificate on
Apigee, and generates credentials the remote service will use to securely connect back to Apigee.
1. Go to the `$CLI_HOME` directory:
```
cd $CLI_HOME
```
2. If you are not an owner of the GCP project associated with the Apigee hybrid organization, be sure that your GCP user account includes the `Apigee Organization Admin` role. See [Granting,
changing, and revoking access to resources](https://cloud.google.com/iam/docs/granting-changing-revoking-access).
3. Execute this command to get an access token:
```
TOKEN=$(gcloud auth print-access-token);echo $TOKEN
```
4. Create the following environment variables. These variables will be used as parameters to the provisioning script:
export ORG=organization_name
export ENV=environment_name
export RUNTIME=host_alias_url
export NAMESPACE=hybrid_runtime_namespace
Where:
| Variable | Description |
|---|---|
| organization_name | The name of the Apigee organization for you Apigee hybrid installation. |
| environment_name | The name of an environment in your Apigee hybrid organization. |
| host_alias_url | A URL that includes the `hostAlias` for a virtual host defined in your hybrid configuration. The URL must start with `https://`. For example: `https://apitest.apigee-hybrid-docs.net` |
| hybrid_runtime_namepace | The namespace in which the Hybrid runtime components are deployed. Note: The default namespace for a hybrid deployment is `apigee`. |
5. Execute the following command to provision the remote service proxy to Apigee hybrid:
> [!WARNING]
> **NOTE:** If your hybrid runtime installation is configured using self-signed TLS certificates for the virtualhost, you must use the `--insecure` flag with the `provision` command shown below.
> [!NOTE]
> **NOTE:**The command output is redirected to a config file that you will use in a later step.
> [!WARNING]
> **IF YOU ARE UPGRADING:** If you are upgrading an existing Apigee Adapter for Envoy, you must add the `--force-proxy-install` flag to the `provision` command. This flag forces the Apigee proxy to be replaced with the latest proxy.
If you are not upgrading, use this command to provision Apigee:
```
./apigee-remote-service-cli provision --organization $ORG --environment $ENV \
--runtime $RUNTIME --namespace $NAMESPACE --token $TOKEN > config.yaml
```
If you are upgrading, use this command with the `--force-proxy-install` flag to provision Apigee:
```
./apigee-remote-service-cli provision --force-proxy-install --organization $ORG --environment $ENV \
--runtime $RUNTIME --namespace $NAMESPACE --token $TOKEN > config.yaml
```
6. Check the contents of the `config.yaml` file. It should look something like this:
```
# Configuration for apigee-remote-service-envoy
# generated by apigee-remote-service-cli provision on 2020-07-06 18:03:58
apiVersion: v1
kind: ConfigMap
metadata:
name: apigee-remote-service-envoy
namespace: apigee
data:
config.yaml: |
tenant:
remote_service_api: https://apitest.apigee-hybrid-docs.net/remote-service
org_name: hybrid-docs
env_name: envoy
allow_unverified_ssl_cert: true
analytics:
collection_interval: 10s
fluentd_endpoint: apigee-udca-hybrid-docs-envoy.apigee:20001
tls:
ca_file: /opt/apigee/tls/ca.crt
key_file: /opt/apigee/tls/tls.key
cert_file: /opt/apigee/tls/tls.crt
---
apiVersion: v1
kind: Secret
metadata:
name: hybrid-docs-envoy-policy-secret
namespace: apigee
type: Opaque
data:
remote-service.crt: eyJrZXlzIjpbeyJrdHkiOiJSU0EiLCJhbGci...
remote-service.key: LS0tLS1CRUdJTiBSU0EgUFJJVkFURS...
remote-service.properties: a2lkPTIwMjAtMDctMDZ...
```
7. Apply the service configuration (the file output by the provisioning command) to the cluster:
```
kubectl apply -f $CLI_HOME/config.yaml
```
8. Verify your proxy and certificate. The following should return valid JSON:
```
curl -i $RUNTIME/remote-service/certs
```
> [!NOTE]
> **Note:**It can take some time for the provisioning to complete. If this command fails, wait for a minute and try again.
The output looks something like this:
```
{
"keys": [
{
"alg": "RS256",
"e": "AQAB",
"kid": "2020-05-11T11:32:26-06:00",
"kty": "RSA",
"n": "0v-nbTQyAmtVZ-wZRP0ZPIbrVaX91YO9JZ9xCQPb4mOdOSS7yKfTDJGg0KM130sGVYBvR76alN8
fhrrSDEG5VXG8YYMqPXarwRC7MRJWocCQ_ECYrjDD0_Q018M2HyXZYSd8fhAogi9mVUYsEmCKqJH53Dh1
jqsHOQzBLKsX0iDO9hEZNFtjbX0UCbSxsUlmBCub7Uj2S-PahA6DEQOMhQjZM7bBMtkTMpFmaJ_RZTmow
BHP57qMna17R8wHD4kUsO2u_-3HHs5PSj1NrEYoVU2dwLQw0GlkB__ZWeFgXTqot81vb-PmoM9YxwoZrm
TcHdljugWy_s7xROPzTod0uw"
}
]
}
```
## Create sample configuration files
Use the `apigee-remote-service-cli samples create` command to generate
sample configuration files.
For this example, you need these generated files:
- `httpbin.yaml` - A deployment configuration for an HTTP service.
- `apigee-envoy-adapter.yaml` - A deployment configuration for the Remote Service for Envoy.
- `envoyfilter-sidecar.yaml` - A configuration that installs an EnvoyFilter. to the default namespace.
To generate the samples:
1. Go to the `$CLI_HOME` directory.
2.
Execute this command to generate the files:
```
./apigee-remote-service-cli samples create -c ./config.yaml
```
> [!NOTE]
> **Note:** By default, the command generates files using the Istio 1.6 template. For Istio 1.7, specify the flag `--template istio-1.7`
The following files are output the `./samples` directory:
```
ls samples
apigee-envoy-adapter.yaml envoyfilter-sidecar.yaml httpbin.yaml request-authentication.yaml
```
For more information, see [Samples command](https://docs.cloud.google.com/apigee/docs/api-platform/envoy-adapter/v1.2.x/reference.md.txt#samples-command).
## Deploy a test service to the cluster
In this step, you will deploy a simple HTTP request/response test service to the same cluster
where Apigee hybrid is deployed.
1. Enable Istio injection in the `default` namespace of the cluster. In a later step, you will deploy an Envoy sidecar to this same cluster. Enabling Istio injection makes the sidecar deployment possible. This example uses the `default` namespace, and all subsequent instructions assume this is the case.
```
kubectl label namespace default istio-injection=enabled
```
2. Apply the simple [`httpbin`](https://httpbin.org/) service to the cluster in the default namespace:
```
kubectl apply -f $CLI_HOME/samples/httpbin.yaml
```
3. Now, test the service. Start a `curl` service running in the cluster and open a terminal:
```
kubectl run -it curl --image=curlimages/curl --restart=Never -- sh
```
4. Test the service by calling it from inside the cluster:
```
curl -i httpbin.default.svc.cluster.local/headers
```
On success, you will see a 200 status, and the service returns a list of headers. For example:
```
HTTP/1.1 200 OK
server: envoy
date: Tue, 12 May 2020 17:09:01 GMT
content-type: application/json
content-length: 328
access-control-allow-origin: *
access-control-allow-credentials: true
x-envoy-upstream-service-time: 7
{
"headers": {
"Accept": "*/*",
"Content-Length": "0",
"Host": "httpbin.default.svc.cluster.local",
"User-Agent": "curl/7.70.0-DEV",
"X-B3-Parentspanid": "69f88bc3e322e157",
"X-B3-Sampled": "0",
"X-B3-Spanid": "8dd725f30e393d8b",
"X-B3-Traceid": "38093cd817ad30a569f88bc3e322e157"
}
}
```
> [!TIP]
> **TIP:** Leave the `curl` client running and the shell open. You will use it in a later step.
## Run the Remote Service for Envoy
In this step, you start the Remote Service for Envoy client in the service mesh
where Apigee hybrid is installed. This service provides the endpoints to the Istio sidecars that
are installed on target services. You will also install a sidecar
with the `httpbin` service.
1. Apply the Apigee Remote Service to the service mesh:
```
kubectl apply -f $CLI_HOME/samples/apigee-envoy-adapter.yaml
```
2. Apply the `EnvoyFilter` to the Istio sidecars in the default namespace. The `EnvoyFilter` enables the `httpbin` sidecar to communicate with the Apigee Remote Service.
```
kubectl apply -f $CLI_HOME/samples/envoyfilter-sidecar.yaml
```
## Test the installation
1. Now, go back to the curl shell you opened in the step [Deploy a test service to the cluster](https://docs.cloud.google.com/apigee/docs/api-platform/envoy-adapter/v1.2.x/example-hybrid.md.txt#deploy-a-test-service-to-the-cluster) and call the `httpbin` service:
```
curl -i httpbin.default.svc.cluster.local/headers
```
The service is now being managed by Apigee, and because you did not supply an API key,
returns the following error.
```
curl -i httpbin.default.svc.cluster.local/headers
HTTP/1.1 403 Forbidden
date: Tue, 12 May 2020 17:51:36 GMT
server: envoy
content-length: 0
x-envoy-upstream-service-time: 11
```
2. Configure an API product and get an API key as explained in [How to obtain an API key](https://docs.cloud.google.com/apigee/docs/api-platform/envoy-adapter/v1.2.x/operation.md.txt#how-to-obtain-an-api-key).
3. Make an API call using the key:
export APIKEY=YOUR_API_KEY
curl -i httpbin.default.svc.cluster.local/headers -H "x-api-key: $APIKEY"
The call should succeed with a 200 status and returning a list of headers in the response.
For example:
```
curl -i httpbin.default.svc.cluster.local/headers -H "x-api-key: kyOTalNNLMPfOSy6rnVeclmVSL6pA2zS"
HTTP/1.1 200 OK
server: envoy
date: Tue, 12 May 2020 17:55:34 GMT
content-type: application/json
content-length: 828
access-control-allow-origin: *
access-control-allow-credentials: true
x-envoy-upstream-service-time: 301
{
"headers": {
"Accept": "*/*",
"Content-Length": "0",
"Host": "httpbin.default.svc.cluster.local",
"User-Agent": "curl/7.70.0-DEV",
"X-Api-Key": "kyOTalNNLMPfOSy6rnVeclmVSL6pA2zS",
"X-Apigee-Accesstoken": "",
"X-Apigee-Api": "httpbin.default.svc.cluster.local",
"X-Apigee-Apiproducts": "httpbin",
"X-Apigee-Application": "httpbin",
"X-Apigee-Authorized": "true",
"X-Apigee-Clientid": "kyOTalNNLMPfOSy6rnVeclmVSL6pA2zS",
"X-Apigee-Developeremail": "jdoe@example.com",
"X-Apigee-Environment": "envoy",
"X-Apigee-Organization": "acme-org",
"X-Apigee-Scope": "",
"X-B3-Parentspanid": "1476f9a2329bbdfa",
"X-B3-Sampled": "0",
"X-B3-Spanid": "1ad5c19bfb4bc96f",
"X-B3-Traceid": "6f329a34e8ca07811476f9a2329bbdfa"
}
}
```
## Next steps
API traffic to the `httpbin` service is now managed by Apigee. Here are
some features you can explore and try:
- If you configured your API product as explained in [How to obtain an API key](https://docs.cloud.google.com/apigee/docs/api-platform/envoy-adapter/v1.2.x/operation.md.txt#how-to-obtain-an-api-key), the quota limit was set to 5 requests per minute. Try calling the `httpbin` service a few more times to trigger the quota. When the quota is depleted, an HTTP status 403 error is returned.
- Access Apigee Analytics in the Apigee UI. Go to **Analyze \> API Metrics \> API
Proxy Performance**.
- Generate and use [JWT tokens](https://docs.cloud.google.com/apigee/docs/api-platform/envoy-adapter/v1.2.x/operation.md.txt#using-jwt-based-authentication) to authenticate API calls.
- Use the CLI to manage, create tokens, and control bindings. For CLI details, see the [Reference](https://docs.cloud.google.com/apigee/docs/api-platform/envoy-adapter/v1.2.x/reference.md.txt).