# Creating multi-region deployments for API Gateway
> [!WARNING]
>
> **Preview**
>
>
> This product or feature is
>
> subject to the "Pre-GA Offerings Terms" in the General Service Terms section
> of the [Service Specific
> Terms](https://docs.cloud.google.com/terms/service-terms#1).
>
> Pre-GA products and features are available "as is" and might have limited support.
>
> For more information, see the
> [launch stage descriptions](https://cloud.google.com/products/#product-launch-stages).
This tutorial shows you how to configure an HTTP(S) load balancer to enable multi-region deployments for API Gateway.
**Important:** You can't configure multi-region deployments for gateways with an `effectiveStreamingMode` of `EFFECTIVE_STREAMING_MODE_ENABLED` using this method because they are incompatible with HTTP(S) Load Balancing for API Gateway and Serverless NEGs during Public Preview.
Creating an HTTP(S) load balancer to support multi-region deployments of API Gateway can improve availability and decrease latency for your service by serving from more than one region. You can further minimize latency and maximize uptime with cross-region routing, which serves requests from the available region closest to your user.
For the purposes of this tutorial, you will configure a single, non-regional URL scheme that works anywhere in the world, but serves user requests from the closest API Gateway deployment. With this configuration, requests are ideally routed to the region that provides minimal latency to the user. In the event that the closest region is unavailable or over capacity, the request is routed to a different region to ensure availability.
## Before you begin
Before configuring your multi-region deployment, follow the [API Gateway Quickstart](https://docs.cloud.google.com/api-gateway/docs/secure-traffic-gcloud) to deploy a Cloud Run service and create a gateway that points to that service.
For this tutorial, deploy your service to two different regions. For example, you can deploy two API Gateway instances:
- `my-gateway-eu` to a region in Europe
- `my-gateway-us` to a region in the US
## Configure permissions
In this tutorial, you will create a serverless [network endpoint group (NEG)](https://cloud.google.com/load-balancing/docs/negs/) and an external
HTTP(S) load balancer in a Cloud project. This requires either a project [owner or
editor](https://docs.cloud.google.com/iam/docs/roles-overview#basic) role, or the following
[Compute Engine IAM roles](https://docs.cloud.google.com/compute/docs/access/iam):
| Task | Required Role |
|---|---|
| Create load balancer and networking components | [Network Admin](https://docs.cloud.google.com/compute/docs/access/iam#compute.networkAdmin) |
| Create and modify NEGs | [Compute Instance Admin](https://docs.cloud.google.com/compute/docs/access/iam#compute.instanceAdmin) |
| Create and modify SSL certificates | [Security Admin](https://docs.cloud.google.com/compute/docs/access/iam#compute.securityAdmin) |
## Create an SSL certificate resource
To create an HTTPS load balancer, an SSL certificate
resource must be added to the load balancer's frontend. Create an SSL certificate resource
using either a [Google-managed SSL
certificate](https://docs.cloud.google.com/load-balancing/docs/ssl-certificates/google-managed-certs)
or a [self-managed SSL certificate](https://docs.cloud.google.com/load-balancing/docs/ssl-certificates/self-managed-certs).
- **Google-managed certificates.** Using Google-managed certificates is
recommended because Google Cloud obtains, manages, and renews these
certificates automatically. To create a Google-managed certificate,
you must have a domain and the DNS records for that domain in order for
the certificate to be provisioned.
If you don't already have a domain, you can get one from
[Google Domains](https://domains.google/). Additionally, you will need to
update the domain's DNS A record to point to the load balancer's IP address
created in a later step.
For detailed instructions, see [Using Google-managed
certificates](https://docs.cloud.google.com/load-balancing/docs/ssl-certificates/google-managed-certs).
- **Self-signed certificates.** If you do not want to set up a domain at this
time, you can use a self-signed SSL certificate for testing.
> [!WARNING]
> **Warning:** Don't use a self-signed certificate for production purposes.
This tutorial assumes that you have already created an SSL certificate resource.
If you want to test this process without creating an SSL certificate
resource (or a domain as required by Google-managed certificates), you
can still use the instructions on this page to set up an HTTP load
balancer instead.
## Create the HTTP or HTTPS load balancer
1. Create a serverless NEG for each API Gateway instance.
A [network endpoint group (NEG)](https://cloud.google.com/load-balancing/docs/negs/) specifies a group of backend endpoints for a load balancer. A *serverless NEG* is a backend that points to a service like API Gateway, as shown in the following figure:

To create a serverless NEG for each gateway instance, run the following command, where:
- SERVERLESS_NEG_NAME is the name of the serverless NEG to create.
- GATEWAY_ID specifies the name of the gateway.
- REGION_ID is the deployment region for the serverless NEG (this should match the gateway region).
```
gcloud beta compute network-endpoint-groups create SERVERLESS_NEG_NAME \
--region=REGION_ID \
--network-endpoint-type=serverless \
--serverless-deployment-platform=apigateway.googleapis.com \
--serverless-deployment-resource=GATEWAY_ID
```
For example:
```
gcloud beta compute network-endpoint-groups create api-gateway-serverless-neg-eu \
--region=europe-west1 \
--network-endpoint-type=serverless \
--serverless-deployment-platform=apigateway.googleapis.com \
--serverless-deployment-resource=my-gateway-eu
```
Repeat this command to create a serverless NEG for the next gateway instance, using the appropriate values for the second gateway instance, for example,`api-gateway-serverless-neg-us` for `my-gateway-us` in the `us-central1` region.
2. Create a [backend service](https://cloud.google.com/compute/docs/reference/rest/v1/backendServices) to define how Cloud Load Balancing distributes traffic.
The backend service configuration contains a set of values, such as the protocol used to connect to backends, various distribution and session settings, health checks, and timeouts, as shown in the following figure:
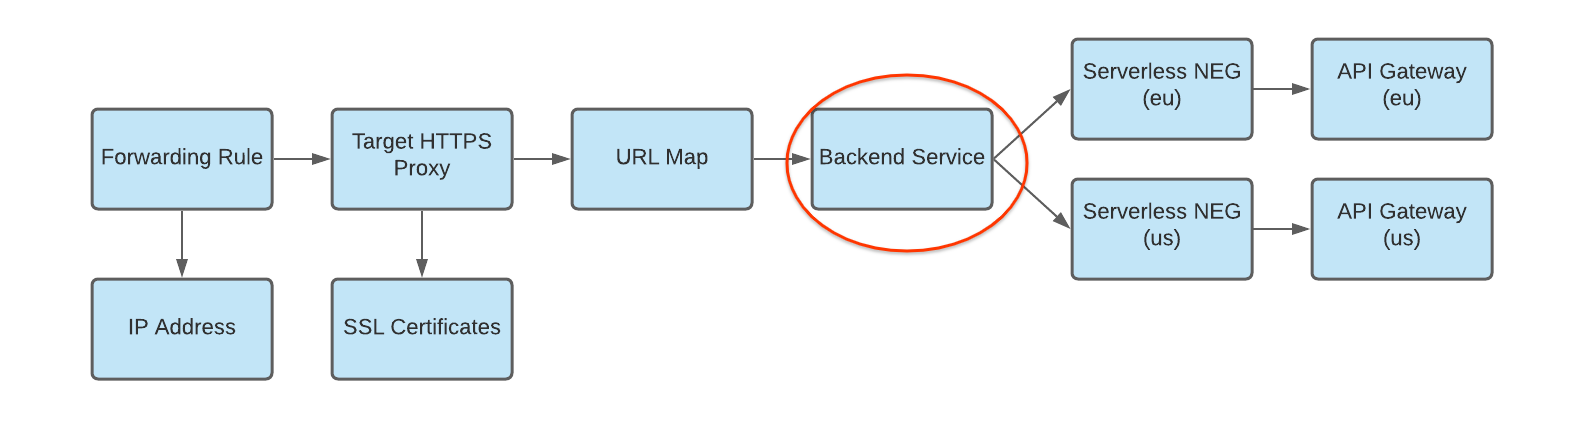
To create a backend service and add your serverless NEG as a backend to the backend service, run the following commands, where:
- BACKEND_SERVICE_NAME is the name of your backend service.
- SERVERLESS_NEG_NAME is the name of the serverless NEG created in the previous step.
- REGION_ID is the deployment region for the serverless NEG (this should match the gateway region).
```
gcloud compute backend-services create BACKEND_SERVICE_NAME \
--global \
```
```
gcloud compute backend-services add-backend BACKEND_SERVICE_NAME \
--global \
--network-endpoint-group=SERVERLESS_NEG_NAME \
--network-endpoint-group-region=REGION_ID
```
For example:
```
gcloud compute backend-services add-backend api-gateway-backend-service \
--global \
--network-endpoint-group=api-gateway-serverless-neg-eu \
--network-endpoint-group-region=europe-west1
```
Repeat this command to add the second serverless NEG to the backend service, using the appropriate values for the second serverless NEG, for example, `api-gateway-serverless-neg-us` for `my-gateway-us` in the `us-central1` region.
3. Create a URL map to route incoming requests to the backend service, as shown in the following figure:

To create the URL map, run the following command, where:
- URL_MAP_NAME is the name of the URL map to create.
- BACKEND_SERVICE_NAME is the name of your backend service.
```
gcloud compute url-maps create URL_MAP_NAME \
--default-service BACKEND_SERVICE_NAME
```
For example:
```
gcloud compute url-maps create api-gateway-url-map \
--default-service api-gateway-backend-service
```
This example URL map only targets one backend service representing a single gateway, so host rules or path matchers are not required. If you have more than one backend service, you can use host rules to direct requests to different services based on the hostname. Use path matchers to direct requests to different services based on the request path.
For example:
```
gcloud compute url-maps add-path-matcher api-gateway-url-map \
--path-matcher-name=my-pm2 \
--default-service=my-host-default-backend \
--path-rules="/video=video-service,/video/*=video-service" \
--new-hosts my-hosts.com
```
```
gcloud compute url-maps add-host-rule api-gateway-url-map \
--hosts=my-app-domain \
--path-matcher-name=my-app-path-matcher
```
To learn more about host rules and path matchers, see the [URL Map](https://cloud.google.com/compute/docs/load-balancing/http/url-map) documentation.
4. Create an SSL certificate for your target proxy, as shown in the following figure:

To create an HTTPS load balancer, an
[SSL certificate
resource](https://docs.cloud.google.com/load-balancing/docs/ssl-certificates) is required for the HTTPS target proxy. You can create an SSL
certificate resource using either a Google-managed SSL certificate or a self-managed SSL certificate. Using Google-managed certificates is recommended.
To create a Google-managed certificate,
[you must have a domain](https://docs.cloud.google.com/load-balancing/docs/ssl-certificates/google-managed-certs#before_you_begin). If you don't have a domain, you can use
a self-signed SSL certificate for testing.
To create a Google-managed SSL certificate resource:
```
gcloud compute ssl-certificates create SSL_CERTIFICATE_NAME
--domains DOMAIN
```
To create a self-managed SSL certificate resource:
```
gcloud compute ssl-certificates create SSL_CERTIFICATE_NAME \
--certificate CRT_FILE_PATH \
--private-key KEY_FILE_PATH
```
5. Create a target HTTP(S) proxy to route requests to your URL map, as
shown in the following figure:
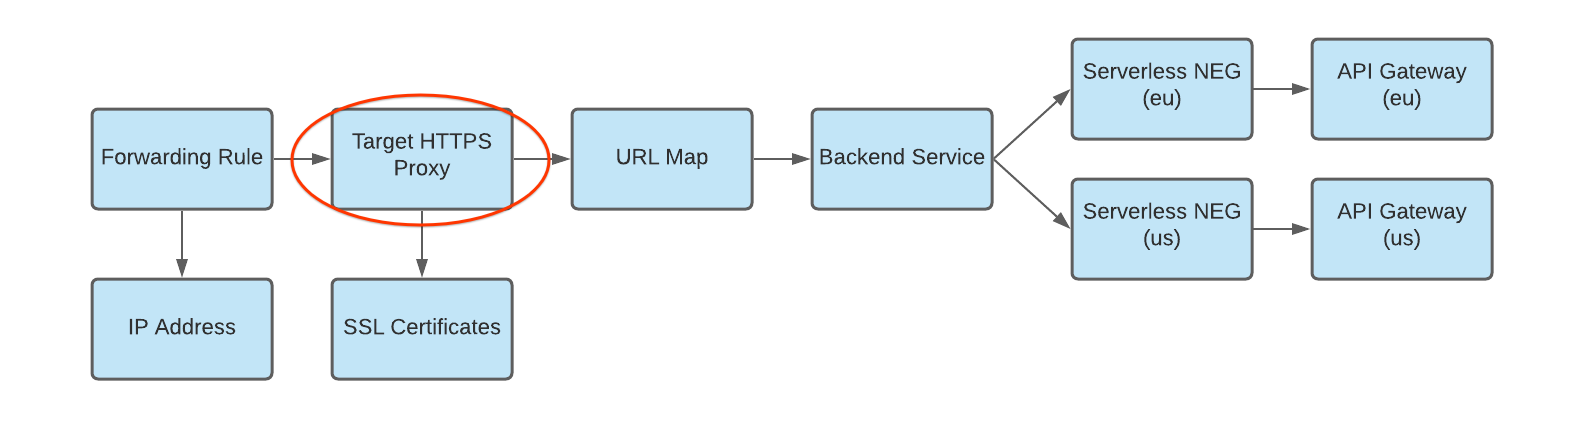
To create the target proxy, use the following command, where:
- TARGET_HTTP_PROXY_NAME is the name of the target proxy to create.
- URL_MAP_NAME is the name of the URL map created in a previous step.
- Optional: SSL_CERT_NAME is the name of the SSL cert created.
```
gcloud compute target-http-proxies create TARGET_HTTP_PROXY_NAME \
--ssl-certificates=SSL_CERT_NAME
--url-map=URL_MAP_NAME
```
For example:
```
gcloud compute target-http-proxies create api-gateway-https-proxy \
--ssl-certificates=hello-cert
--url-map=api-gateway-url-map
```
6. Create a forwarding rule to route incoming requests to the proxy, as shown in the following figure:
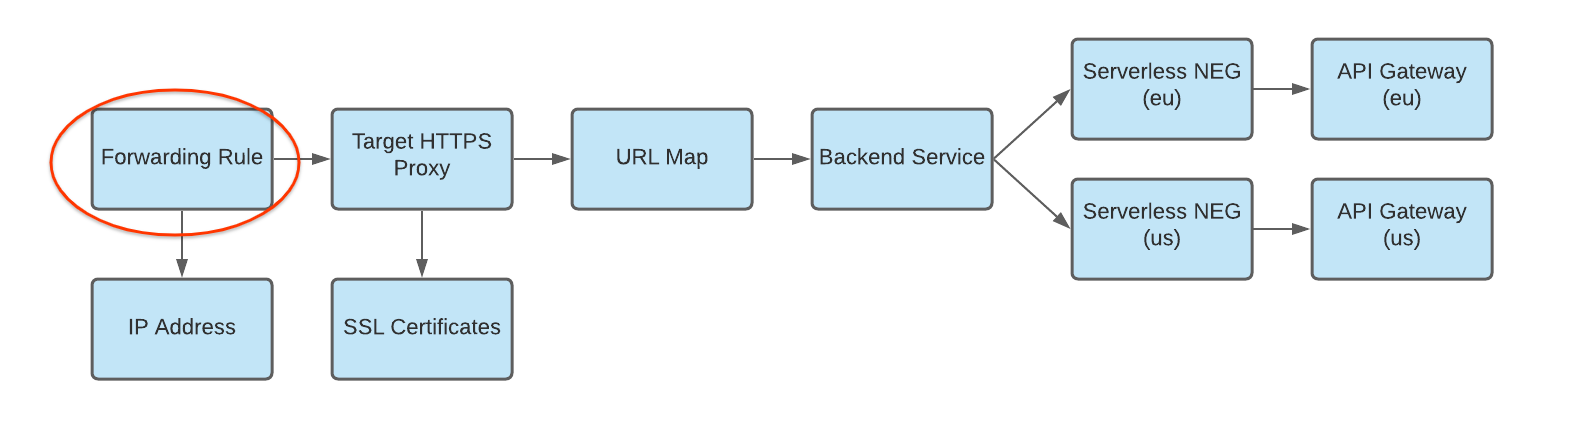
Use the following command to create the forwarding rule, where:
- HTTPS_FORWARDING_RULE_NAME is the name of the rule to create.
- TARGET_HTTP_PROXY_NAME is the name of the target proxy to create.
```
gcloud compute forwarding-rules create HTTPS_FORWARDING_RULE_NAME \
--target-https-proxy=TARGET_HTTPS_PROXY_NAME \
--global \
--ports=443
```
For example:
```
gcloud compute forwarding-rules create my-fw \
--target-https-proxy=api-gateway-https-proxy \
--global \
--ports=443
```
## Update DNS records with load balancer IP address
If you have a custom domain, this step is required to set up the DNS settings for your domain to point to the new IP address of your service. It is also required if you created an HTTP(S) load balancer with a Google-managed certificate (which requires a domain). Allocating and using [a static IP address](https://cloud.google.com/sdk/gcloud/reference/compute/addresses/create) is recommended when used with DNS. The specific instructions for this step depend on your DNS provider.
1. To send traffic to the load balancer, the DNS record of your domain (in this tutorial, my-app-domain) must point to the IP address(es) of the load balancer.
To find the IP address of your global forwarding rule, use this command:
```
gcloud compute forwarding-rules list
```
2. Update your domain's DNS A or AAAA record to point
to the load balancer's IP address so that traffic sent to the existing custom domain URL is routed through the load balancer instead. It may take as little as several seconds or as long as several hours for DNS to propagate this change to the DNS server.
3. Test to confirm that your gateway is receiving traffic using `curl` or by visiting the URL in your browser. For example:
`none
https://my-app-domain`
You should see the response generated by the Cloud Run service. For example, this may be a "Hello World" HTML page or another expected response generated by the backend service directly. This means your request is going through the load balancer, and the backend service is instructing the load balancer to send it to your gateway.
## Considerations
Before implementing a multi-region deployment of API Gateway, consider the following:
1. API Gateway does not support health checks. With the cross-region routing configuration outlined previously, if your gateway or its backend service returns errors in one region but the overall API Gateway infrastructure in the region is available and has capacity, your HTTP(S) load balancer won't direct traffic away to other regions.
2. Combining different regions in a single forwarding rule requires Premium Tier pricing. For more information on calculating pricing and usage, see [Network Service Tiers pricing](https://cloud.google.com/network-tiers/pricing).
## Best practices
When using multi-region serving, we recommend using a globally replicated managed data storage solution such as [Cloud Spanner](https://cloud.google.com/spanner/docs) to make sure that all data is managed globally.