- [Latest version](https://docs.cloud.google.com/anthos/clusters/docs/on-prem/latest/how-to/egress-nat-gateway)
- [Version 1.16](https://docs.cloud.google.com/anthos/clusters/docs/on-prem/1.16/how-to/egress-nat-gateway.md.txt)
- [Earlier versions (unsupported)](https://docs.cloud.google.com/anthos/clusters/docs/on-prem/latest/version-history#expandable-1)
With Google Distributed Cloud, you can configure source network address
translation (SNAT) so that certain egress traffic from your user cluster is
given a predictable source IP address.
This document shows how to configure an egress NAT gateway for a user cluster.
> [!CAUTION]
> **Caution:** You can't upgrade any version 1.8.x or 1.9.x cluster that has Anthos Network Gateway enabled to any later version. For example, you cannot upgrade a version 1.9.0 cluster that has Anthos Network Gateway enabled to version 1.9.x, nor can you upgrade it to version 1.10. You can only upgrade clusters that have Anthos Network Gateway enabled if they were created in version 1.10 or later. You can delete a version 1.8.x or version 1.9.x cluster, and then recreate it following the instructions in this document.
## Introduction
Sometimes you have Pods running in a user cluster that need to send packets
to components running in your organization, but outside of the cluster. You
might want to design those external components so that they filter incoming
network traffic according to a set of well-known source IP addresses.
Here are some scenarios:
- You have a firewall in front of a database that allows access
only by IP address. And the team that manages the database firewall
is different from the team that manages the user cluster.
- Workloads in your user cluster have to access a third-party API over the
internet. For security reasons, the API provider authenticates and authorizes
traffic by using IP address as the identity.
With an egress NAT gateway, you can have fine-grained control over the source IP
addresses used for network traffic that leaves a cluster.
### Pricing
There is no charge for using this feature during the preview.
## How an egress NAT gateway works
Ordinarily, when a Pod sends a packet out of the cluster, the packet is SNAT
translated with the IP address of the node where the Pod is running.
When an egress NAT gateway is in place, you can specify that certain outbound
packets should be sent first to a dedicated gateway node. The network interface
on the gateway node is configured with two IP addresses: the primary IP address
and an egress source IP address.
When a packet has been selected to use the egress NAT gateway, the packet
leaves the cluster from the gateway node and is SNAT translated with the egress
source IP address that is configured on the network interface.
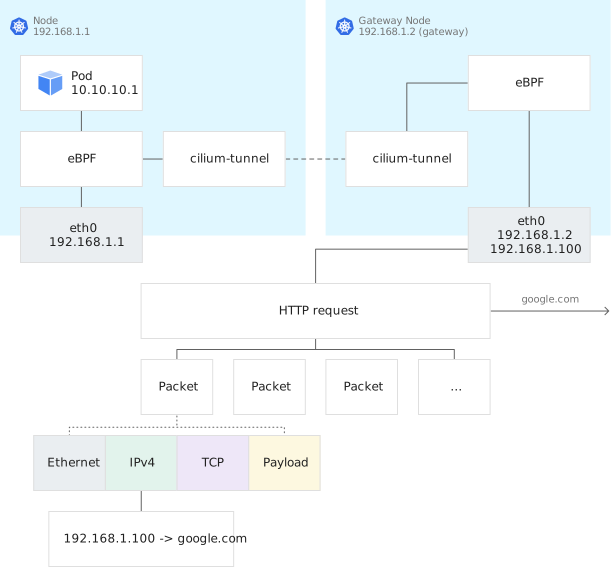
The following diagram illustrates the packet flow:
[](https://docs.cloud.google.com/static/anthos/clusters/docs/on-prem/1.12/images/egress-nat-gateway.svg)
The preceding diagram, you can see the flow of a packet that is sent from the
Pod.
1. On a node with IP address 192.168.1.1, a Pod with IP address 10.10.10.1
generates an outbound packet.
2. The packet matches an egress rule, so the packet is forwarded to the gateway
node.
3. The gateway node changes the source IP address to 192.168.1.100 and sends
the packet out of the cluster.
4. Return traffic comes back to the gateway node with destination
192.168.1.100.
5. The gateway node uses conntrack to modify the destination IP address to
10.10.10.1.
6. The packet is treated as in-cluster traffic and forwarded to the original
node and delivered back to the original Pod.
## Personas
This topic refers to two personas:
- **Cluster administrator.** This person creates a user cluster and specifies
floating IP addresses to be used by Anthos Network Gateway.
- **Developer.** This person runs workloads on the user cluster and creates
egress policies.
## Enable egress NAT gateway
This section is for cluster administrators.
To configure an egress NAT gateway, use the `enableDataplaneV2` and `advancedNetworking` fields in the user cluster configuration file, and create one or more NetworkGatewayGroup objects.
In your cluster configuration file, set these fields to `true`:
```
enableDataplaneV2: true
...
advancedNetworking: true
```
[Create the user cluster](https://docs.cloud.google.com/anthos/clusters/docs/on-prem/1.12/how-to/create-user-cluster.md.txt).
## Specify floating IP addresses
This section is for cluster administrators.
Choose a set of IP addresses that you would like to use as egress source
addresses. These are called *floating IP addresses*, because Network
Gateway Group assigns them, as needed, to the network interfaces of nodes that it
chooses to be egress gateways.
Your floating IP addresses must be in the same subnet as your node IP addresses.
Your set of floating IP addresses must not overlap with the set of IP addresses
you have specified for your nodes.
For example, suppose a subnet has the address range 192.168.1.0/24. And suppose
you have chosen to use 192.168.1.1 through 192.168.1.99 for nodes. Then you
could use 192.168.1.100 through 192.168.1.104 as floating IP addresses.
## Create a NetworkGatewayGroup object
This section is for cluster administrators.
Here's an example of a manifest for a NetworkGatewayGroup object:
```
kind: NetworkGatewayGroup
apiVersion: networking.gke.io/v1
metadata:
namespace: kube-system
name: default
spec
floatingIPs:
- 192.168.1.100
- 192.168.1.101
- 192.168.1.102
- 192.168.1.103
- 192.168.1.104
```
Replace the `floatingIPs` array with your floating IP addresses, and save the
manifest in a file named `my-ngg.yaml`.
Create the NetworkGatewayGroup object:
```
kubectl --kubeconfig USER_CLUSTER_KUBECONFIG apply -f my-ngg.yaml
```
## Example of an egress NAT policy
This section is for developers.
Here's an example of an EgressNatPolicy custom resource:
```
kind: EgressNATPolicy
apiVersion: networking.gke.io/v1
metadata:
name: alice-paul
spec:
sources:
- namespaceSelector:
matchLabels:
user: alice
podSelector:
matchLabels:
role: frontend
- namespaceSelector:
matchLabels:
user: paul
podSelector:
matchLabels:
role: frontend
action: SNAT
destinations:
- cidr: 8.8.8.0/24
gatewayRef:
name: default
namespace: kube-system
```
In the preceding manifest, we see:
- A Pod is a candidate for egress NAT if it satisfies one the following:
- The Pod has the label `role: frontend`, and the Pod is in a namespace that has
the label `user: alice`.
- The Pod has the label `role: frontend`, and the Pod is in a namespace that has
the label `user: paul`.
- Traffic from a candidate Pod to an address in the 8.8.8.0/24 range is sent to
the egress NAT gateway.
- The `gatewayRef` section determines the egress source IP address. The EgressNATPolicy custom resource uses the `gatewayRef.name` and `gatewayRef.namespace` values to find a NetworkGatewayGroup object. The policy uses one of the NetworkGatewayGroup's floating IP addresses as the source IP address for egress traffic. If there are multiple floating IP addresses in the matching NetworkGatewayGroup, the policy uses the first IP address in the `floatingIPs` list, and ignores any other IP addresses. If there are invalid fields in the `gatewayRef` section, this will result in an a failure to apply the EgressNATPolicy object.
## Create an EgressNATPolicy object
Create your own EgressNATPolicy manifest. Set `metadata.name` to `"my-policy"`.
Save your manifest in a file named `my-policy.yaml`.
Create the EgressNatPolicy object:
```
kubectl apply --kubeconfig USER_CLUSTER_KUBECONFIG -f my-policy.yaml
```
## View information about your egress NAT policy
```
kubectl --kubeconfig USER_CLUSTER_KUBECONFIG get egressnatpolicy my-policy --output yaml
kubectl --kubeconfig USER_CLUSTER_KUBECONFIG get networkgatewaygroup --namespace kube-system --output yaml
kubectl --kubeconfig USER_CLUSTER_KUBECONFIG describe egressnatpolicy my-policy
```
## Order of operations
Egress NAT policy is compatible with network policy APIs. Network policy is
evaluated before egress NAT policy. If a network policy says to drop a packet,
the packet is dropped regardless of the egress NAT policy.
## Multiple egress policies
As described previously, each EgressNATPolicy uses the first IP address in the `floatingIPs` list from the NetworkGatewayGroup that matches `gatewayRef.name` and `gatewayRef.namespace`. If you create multiple policies and intend to use different IP addresses, you need to create multiple NetworkGatewayGroup objects, and refer to them respectively. If you create multiple policies, the `gatewayRef` object must be unique for each policy.
A limitation in Google Distributed Cloud for this release is that only the NetworkGatewayGroup that has the `default` name in the `kube-system` namespace is reconciled for floating IP allocations. Additionally, only the default NetworkGatewayGroup reports the allocation status for all the floating IP addresses.
Therefore, when creating multiple NetworkGatewayGroup objects, you need to make sure that the IP addresses in the non-default objects are also specified in the default NetworkGatewayGroup manifest. Otherwise, they will not be allocated as floating IPs, and therefore can't be used by the EgressNATPolicies object.
To set up multiple egress policies and multiple NetworkGatewayGroup objects:
1. Verify the default NetworkGatewayGroup object (`name: default`) with `kubectl` to get
the allocation status of the floating IP addresses:
```
kubectl --kubeconfig USER_CLUSTER_KUBECONFIG get networkgatewaygroup --name default --output yaml
```
The response for a cluster with two nodes, `worker1` and `worker2` might
look like this:
```
kind: NetworkGatewayGroup
apiVersion: networking.gke.io/v1
metadata:
namespace: kube-system
name: default
spec:
floatingIPs:
— 192.168.1.100
— 192.168.1.101
— 192.168.1.102
status:
...
floatingIPs:
192.168.1.100: worker1
192.168.1.101: worker2
192.168.1.102: worker1
```
2. After verifying the status of the default NetworkGatewayGroup, create additional NetworkGatewayGroup
objects in the `kube-system` namespace to "track" each floating IP.
Note that these new objects don't report allocation status, which is
in the `default` NetworkGatewayGroup.
```
kind: NetworkGatewayGroup
apiVersion: networking.gke.io/v1
metadata:
namespace: kube-system
name: gateway1
spec:
floatingIPs:
— 192.168.1.100
---
kind: NetworkGatewayGroup
apiVersion: networking.gke.io/v1
metadata:
namespace: kube-system
name: gateway2
spec:
floatingIPs:
— 192.168.1.101
---
kind: NetworkGatewayGroup
apiVersion: networking.gke.io/v1
metadata:
namespace: kube-system
name: gateway3
spec:
floatingIPs:
— 192.168.1.102
```
3. Create multiple policies that refer to the "secondary" NetworkGatewayGroup objects, such
as `gateway1` created in the preceding step:
```
kind: EgressNATPolicy
apiVersion: networking.gke.io/v1
metadata:
name: egresspolicy1
spec:
...
gatewayRef:
name: gateway1
namespace: kube-system
---
kind: EgressNATPolicy
apiVersion: networking.gke.io/v1
metadata:
name: egresspolicy2
spec:
...
gatewayRef:
name: gateway2
namespace: kube-system
---
kind: EgressNATPolicy
apiVersion: networking.gke.io/v1
metadata:
name: egresspolicy3
spec:
...
gatewayRef:
name: gateway3
namespace: kube-system
```