- [Latest version](https://docs.cloud.google.com/anthos/clusters/docs/on-prem/latest/how-to/minimal-infrastructure)
- [Version 1.16](https://docs.cloud.google.com/anthos/clusters/docs/on-prem/1.16/how-to/minimal-infrastructure.md.txt)
- [Earlier versions (unsupported)](https://docs.cloud.google.com/anthos/clusters/docs/on-prem/latest/version-history#expandable-1)
This document shows how to set up minimal vSphere and Google Cloud environments
for a small proof-of-concept installation of Google Distributed Cloud.
The installation includes an admin workstation, an admin cluster, and a user
cluster.
## Before you begin
- Read the
[Anthos clusters on VMware overview](https://docs.cloud.google.com/anthos/clusters/docs/on-prem/1.11/overview.md.txt).
- See
[vSphere supported versions](https://docs.cloud.google.com/anthos/clusters/docs/on-prem/1.11/how-to/vsphere-requirements.md.txt#supported_versions).
- See
[vSphere license requirements](https://docs.cloud.google.com/anthos/clusters/docs/on-prem/1.11/how-to/vsphere-requirements.md.txt#license_requirements).
For this minimal installation, a vSphere Standard license is sufficient.
- You need a running instance of
[vCenter Server](https://www.vmware.com/products/vcenter-server.html).
- You need a vCenter user account with
[sufficient privileges](https://docs.cloud.google.com/anthos/clusters/docs/on-prem/1.11/how-to/vsphere-requirements.md.txt#vcenter-user-account-privileges).
Make a note of the username and password for this account.
## CPU, RAM and storage requirements
For this minimal installation, you can use a single physical host running
[ESXi](https://www.vmware.com/products/esxi-and-esx.html).
These are the minimum resource requirements for your ESXi host:
- 8 physical CPUs @ 2.7GHz with hyperthreading enabled
- 80 gibibytes (GiB) RAM
The minimum storage requirement is 470 GiB.
## Example host and datastore
Here's an example of an
[ESXi host](https://www.vmware.com/products/esxi-and-esx.html)
and a
[vSphere
datastore](https://docs.vmware.com/en/VMware-vSphere/7.0/com.vmware.vsphere.storage.doc/GUID-3CC7078E-9C30-402C-B2E1-2542BEE67E8F.html)
that meet the requirements:
- ESXi host configuration:
- Manufacturer: Dell Inc.
- Physical CPUs: 8 CPUs @ 2.7 GHz
- Processor type: Intel(R) Xeon(R) Platinum 8168 CPU @ 2.70 GHz
- Processor sockets: 2
- ESXi version: 6.7U3
- vCenter Server version: 6.7U3
- Hyperthreading: enabled
- Datastore configuration:
- Type: VMFS 6.82
- Drive type: SSD
- Vendor: DELL
- Drive type: logical
- RAID level: RAID1
## vSphere objects
Set up the following objects in your vSphere environment:
- [vSphere data center](https://docs.vmware.com/en/VMware-vSphere/7.0/com.vmware.vsphere.vcenterhost.doc/GUID-7FDFBDBE-F8AC-4D00-AE5E-3F14D7472FAF.html)
- [vSphere cluster](https://docs.vmware.com/en/VMware-vSphere/7.0/com.vmware.vsphere.resmgmt.doc/GUID-487C09CE-8BE2-4B89-BA30-0E4F7E3C66F7.html)
- [vSphere datastore](https://docs.vmware.com/en/VMware-vSphere/7.0/com.vmware.vsphere.storage.doc/GUID-3CC7078E-9C30-402C-B2E1-2542BEE67E8F.html)
- [vSphere network](https://docs.vmware.com/en/VMware-vSphere/7.0/com.vmware.vsphere.networking.doc/GUID-35B40B0B-0C13-43B2-BC85-18C9C91BE2D4.html)
### Load balancing
The clusters in this minimal installation use the
[MetalLB](https://docs.cloud.google.com/anthos/clusters/docs/on-prem/1.11/how-to/bundled-load-balance-metallb.md.txt)
load balancer. This load balancer runs on the cluster nodes, so no additional
VMs are needed for load balancing
## Plan your IP addresses
Later when you
[create basic clusters](https://docs.cloud.google.com/anthos/clusters/docs/on-prem/1.11/how-to/minimal-create-clusters.md.txt), you will
specify
[static IP addresses](https://docs.cloud.google.com/anthos/clusters/docs/on-prem/1.11/how-to/manage-node-ip-addresses.md.txt)
for your cluster nodes.
For this small installation, we recommend that you put your admin workstation,
admin cluster nodes, and user cluster nodes on the same VLAN in your vSphere
network. For example, suppose all IP addresses in the 172.16.20.0/24 range are
routed to a particular VLAN. Also suppose your network administrator says you
can use 172.16.20.49 - 172.16.20.72 for VMs and virtual IP addresses (VIPs).
The following diagram illustrates a VLAN that has an admin workstation, an admin
cluster, and a user cluster. Notice that VIPs are not shown associated with any
particular node in a cluster. That is because the MetalLB load balancer can
choose which node announces the VIP for an individual Service. For example, in
the user cluster, one worker node could announce 172.16.20.63, and a different
worker node could announce 172.16.20.64.
[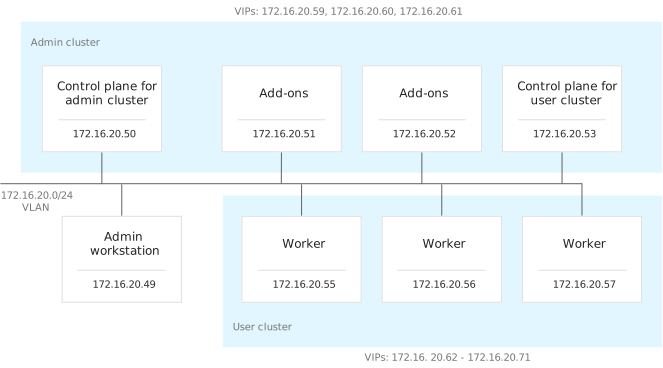](https://docs.cloud.google.com/static/anthos/clusters/docs/on-prem/1.11/images/ip-addresses-minimal.svg) IP addresses for an admin cluster and a user cluster (Click to enlarge)
### Example IP address: admin workstation
For the admin workstation, this example uses the first address in the range
given to you by your network administrator: 172.16.20.49.
### Example IP addresses: cluster nodes
The following table gives an example of how IP addresses could be used for
cluster nodes. The table shows two extra nodes: admin-vm-5 and user-vm-4. The
extra nodes are needed during cluster upgrade, update, and auto repair. For more
information, see
[Manage node IP addresses](https://docs.cloud.google.com/anthos/clusters/docs/on-prem/1.11/how-to/manage-node-ip-addresses.md.txt).
| VM hostname | Description | IP address |
|---|---|---|
| admin-vm-1 | Control-plane node for the admin cluster | 172.16.20.50 |
| admin-vm-2 | Admin cluster add-on node | 172.16.20.51 |
| admin-vm-3 | Admin cluster add-on node | 172.16.20.52 |
| admin-vm-4 | Control-plane node for the user cluster. This node is in the admin cluster. | 172.16.20.53 |
| admin-vm-5 | | 172.16.20.54 |
| user-vm-1 | User cluster worker node | 172.16.20.55 |
| user-vm-2 | User cluster worker node | 172.16.20.56 |
| user-vm-3 | User cluster worker node | 172.16.20.57 |
| user-vm-4 | | 172.16.20.58 |
### Example IP addresses: VIPs for the admin cluster
The following table gives an example of how you could specify VIPs for your
admin cluster:
| VIP | Description | IP address |
|---|---|---|
| VIP for the Kubernetes API server of the admin cluster | Configured on the load balancer for the admin cluster | 172.16.20.59 |
| Admin cluster add-ons VIP | Configured on the load balancer for the admin cluster | 172.16.20.60 |
### Example IP addresses: VIPs for the user cluster
The following table gives an example of how you could specify VIPs for your user
cluster.
Notice that the VIP for the Kubernetes API server of the user cluster is
configured on the load balancer of the admin cluster. That is because the
Kubernetes API server for a user cluster runs on a node in the admin cluster.
Note that in the cluster configuration files, the field where you specify, the
VIP for a Kubernetes API server is called `controlPlaneVIP`:
| VIP | Description | IP address |
|---|---|---|
| VIP for the Kubernetes API server of the user cluster | Configured on the load balancer for the admin cluster | 172.16.20.61 |
| Ingress VIP | Configured on the load balancer for the user cluster | 172.16.20.62 |
| Service VIPs | Ten addresses for Services of type `LoadBalancer`. Configured as needed on the load balancer for the user cluster. Notice that this range includes the ingress VIP. This is a requirement for the MetalLB load balancer. | 172.16.20.62 - 172.16.20.71 |
## IP addresses for Pods and Services
Before you create a cluster, you must specify a
[CIDR](https://datatracker.ietf.org/doc/html/rfc1519)
range to be used for Pod IP addresses and another CIDR range to be used for
the `ClusterIP` addresses of Kubernetes Services.
Decide what CIDR ranges you want to use for Pods and Services. Unless you
have a reason to do otherwise, you can use the following default ranges:
| Purpose | Default CIDR range |
|---|---|
| Admin cluster Pods | 192.168.0.0/16 |
| User cluster Pods | 192.168.0.0/16 |
| Admin cluster Services | 10.96.232.0/24 |
| User cluster Services | 10.96.0.0/20 |
The default values illustrate these points:
- The Pod CIDR range can be the same for multiple clusters.
- The Service CIDR range of a cluster must not overlap with the Service CIDR
range of any other cluster.
- Typically you need more Pods than Services, so for a given cluster, you
probably want a Pod CIDR range that is larger than the Service CIDR range.
For example, the default Pod range for a user cluster has 2\^(32-16) = 2\^16
addresses, but the default Service range for a user cluster has only
2\^(32-20) = 2\^12 addresses.
### Avoid overlap
You might need to use non-default CIDR ranges to avoid overlapping with IP
addresses that are reachable on your network. The Service and Pod ranges must
not overlap with any address outside the cluster that you want to reach from
inside the cluster.
For example, suppose your Service range is 10.96.232.0/24, and your Pod range is
192.168.0.0/16. Any traffic sent from a Pod to an address in either of those
ranges will be treated as in-cluster and will not reach any destination outside
the cluster.
In particular, the Service and Pod ranges must not overlap with:
- IP addresses of nodes in any cluster
- IP addresses used by load balancer machines
- VIPs used by control-plane nodes and load balancers
- IP address of vCenter servers, DNS servers, and NTP servers
We recommend that you use the private IP address ranges defined by
[RFC 1918](https://datatracker.ietf.org/doc/html/rfc1918)
for your Pod and Service ranges.
Here is one reason for the recommendation to use RFC 1918 addresses. Suppose
your Pod or Service range contains external IP addresses. Any traffic sent from
a Pod to one of those external addresses will be treated as in-cluster traffic
and will not reach the external destination.
## DNS server and default gateway
Before you create your admin and user clusters, you must know the IP addresses
of:
- A DNS server that can be used by your admin workstation and cluster nodes
- The IP address of the default gateway for the subnet that has
your admin workstation and cluster nodes. For example, suppose your admin
workstation, admin cluster nodes, and user cluster nodes are all in the
172.16.20.0/24 subnet. The address of the default gateway for the subnet might
be 172.16.20.1.
## Configure your firewall and proxy
Configure your firewall and proxy according to
[Proxy and firewall rules](https://docs.cloud.google.com/anthos/clusters/docs/on-prem/1.11/how-to/firewall-rules.md.txt).
## Set up Google Cloud resources
Choose an existing
[Google Cloud project](https://docs.cloud.google.com/resource-manager/docs/creating-managing-projects.md.txt)
or create a new one. Make a note of your
Google Cloud project ID.
In your Google Cloud project, create a service account for access to
Google Distributed Cloud components. This is called your *component access
service account*:
```
gcloud iam service-accounts create component-access-sa \
--display-name "Component Access Service Account" \
--project PROJECT_ID
```
Replace PROJECT_ID with the ID of your
Google Cloud project.
Create a JSON key for your component access service account:
```
gcloud iam service-accounts keys create component-access-key.json \
--iam-account SERVICE_ACCOUNT_EMAIL
```
Replace SERVICE_ACCOUNT_EMAIL with the
[email address](https://docs.cloud.google.com/iam/docs/service-accounts)
of your component access service account.
Grant
[IAM roles](https://docs.cloud.google.com/iam/docs/understanding-roles)
to your component access service account:
```
gcloud projects add-iam-policy-binding PROJECT_ID \
--member "serviceAccount:SERVICE_ACCOUNT_EMAIL" \
--role "roles/serviceusage.serviceUsageViewer"
```
```
gcloud projects add-iam-policy-binding PROJECT_ID \
--member "serviceAccount:SERVICE_ACCOUNT_EMAIL" \
--role "roles/iam.roleViewer"
```
```
gcloud projects add-iam-policy-binding PROJECT_ID \
--member "serviceAccount:SERVICE_ACCOUNT_EMAIL" \
--role "roles/iam.serviceAccountViewer"
```
For more information about the component access service account and granting
IAM roles, see
[Service accounts and keys](https://docs.cloud.google.com/anthos/clusters/docs/on-prem/1.11/how-to/service-accounts.md.txt).
## Enable Google APIs
Enable the following Google APIs in your Google Cloud project.
```
gcloud services enable --project PROJECT_ID \
anthos.googleapis.com \
anthosgke.googleapis.com \
anthosaudit.googleapis.com \
cloudresourcemanager.googleapis.com \
container.googleapis.com \
gkeconnect.googleapis.com \
gkehub.googleapis.com \
serviceusage.googleapis.com \
stackdriver.googleapis.com \
opsconfigmonitoring.googleapis.com \
monitoring.googleapis.com \
logging.googleapis.com \
iam.googleapis.com \
storage.googleapis.com
```
## What's next
[Create basic clusters](https://docs.cloud.google.com/anthos/clusters/docs/on-prem/1.11/how-to/minimal-create-clusters.md.txt)