- [Latest](https://docs.cloud.google.com/anthos/clusters/docs/bare-metal/latest/installing/install-edge-profile)
- [Version 1.16](https://docs.cloud.google.com/anthos/clusters/docs/bare-metal/1.16/installing/install-edge-profile.md.txt)
- [Earlier versions (unsupported)](https://docs.cloud.google.com/anthos/clusters/docs/bare-metal/1.13/getting-support.md.txt#version-support)
This tutorial introduces a ready-to-use solution that uses Google Distributed Cloud
and [Config Management](https://docs.cloud.google.com/anthos-config-management/docs/overview)
to deploy Kubernetes clusters on the edge at scale. This tutorial is for
platform operators and developers. You should have familiarity with the
following technologies and concepts:
- [Ansible playbooks](https://docs.ansible.com/ansible/latest/user_guide/playbooks_intro.html).
- Edge deployments and their challenges.
- How to work with a Google Cloud project.
- [Deploying a containerized web application](https://docs.cloud.google.com/kubernetes-engine/docs/tutorials/hello-app).
- `gcloud` and `kubectl` command-line interfaces.
In this tutorial you use Compute Engine virtual machines (VMs) to emulate
nodes deployed on the edge, and a sample point-of-sale application as the edge
workload. Google Distributed Cloud and Config Management provide
centralized management and control for your edge cluster.
Config Management dynamically pulls new configs from GitHub and applies
these policies and configs to your clusters.
## Edge deployment architecture
A retail edge deployment is a good way to illustrate the architecture that's
used in a typical Google Distributed Cloud deployment.
A physical retail store is the closest point of interaction between an
enterprise business unit and the consumer. Software systems inside stores must
run their workloads, receive timely updates, and report critical metrics in
isolation from the enterprise's central management system. Furthermore, these
software systems need to be designed so that they can be expanded to more store
locations in the future. While Google Distributed Cloud satisfies all these requirements
for store software systems, the
[edge profile](https://docs.cloud.google.com/anthos/clusters/docs/bare-metal/1.13/installing/node-machine-prerequisites.md.txt#resource_requirements_for_standalone_clusters_using_the_edge_profile)
enables an important use case: *deployments in environments with limited hardware resources*
like a retail store front.
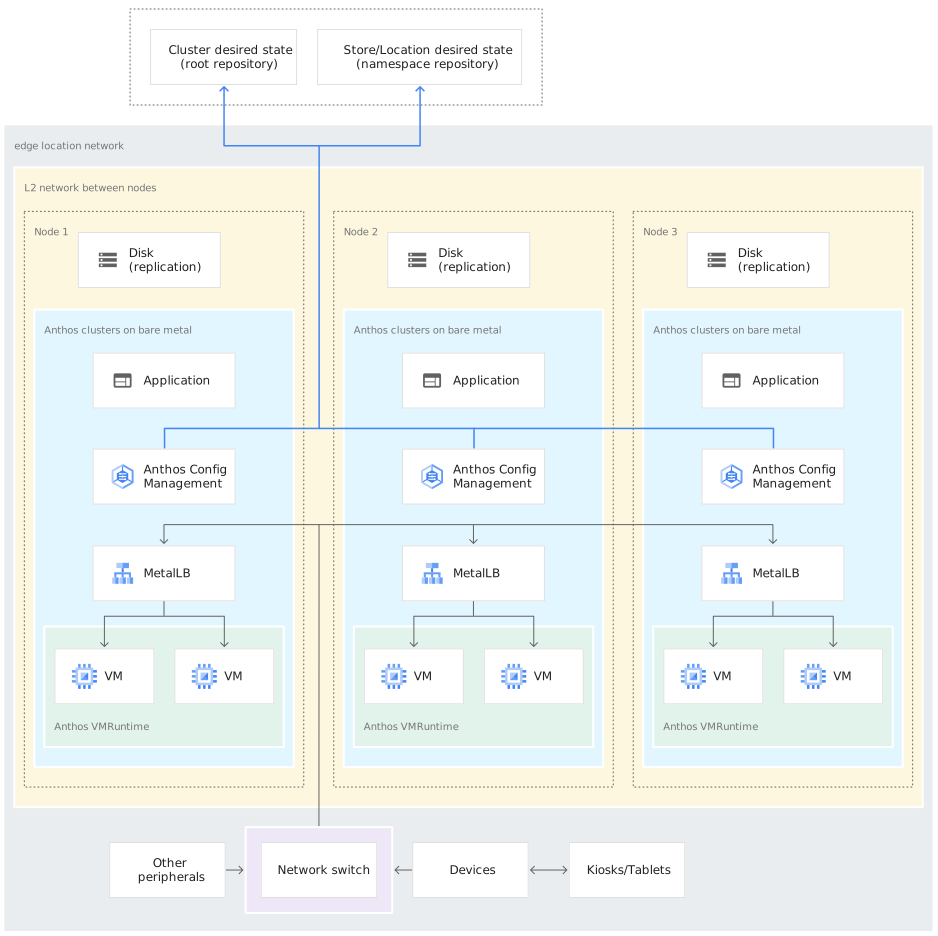
The following diagram shows an Google Distributed Cloud deployment that uses the edge
profile in a retail store:
[](https://docs.cloud.google.com/static/anthos/clusters/docs/bare-metal/1.13/installing/images/edge_location_2x.png) An Google Distributed Cloud deployment in a retail store
The preceding diagram shows a typical physical retail store. The store has smart
devices like card readers, point-of-sale machines, cameras, and printers.
The store also has three physical computing hardware devices (labeled `Node 1`, `Node 2` and `Node 3`).
All these devices are connected to a central network switch. Thus, the three
computing devices are connected to each other through a Layer 2 network. The
computing devices networked together make up the bare metal infrastructure.
Google Distributed Cloud is running inside each of the three computing devices. These
devices also have their own disk storage and are configured for data replication
between them for high availability.
The diagram also shows the following key components that are part of a
Google Distributed Cloud deployment:
- The component marked as [MetalLB](https://metallb.universe.tf/) is the [bundled load balancer](https://docs.cloud.google.com/anthos/clusters/docs/bare-metal/1.13/installing/load-balance.md.txt#bundled_load_balancer_mode) that's deployed with Google Distributed Cloud.
- The Config Management component enables synchronizing the state of the cluster against source repositories. It is a highly recommended optional add-on that requires separate installation and configuration. For more information on how to set up Config Management and the different nomenclature, see the [Config Management documentation](https://docs.cloud.google.com/anthos-config-management/docs/config-sync-overview).
- The **root repository** and **namespace repository** shown at the top of the
diagram outside the store location represent two source repositories.
Changes to the cluster are pushed to these central source repositories.
Google Distributed Cloud deployments in various edge locations pull updates from the
source repositories. This behavior is represented by the arrows connecting
the two repositories in the diagram to the Config Management
components inside the Google Distributed Cloud cluster running in the
devices.
- Another key component that's depicted as part of the cluster is the
VM Runtime on Google Distributed Cloud. VM Runtime on Google Distributed Cloud enables running existing
VM-based workloads inside the cluster without the need for containerization. The
[VM Runtime on Google Distributed Cloud documentation](https://docs.cloud.google.com/anthos/clusters/docs/bare-metal/1.13/vm-runtime/enable-disable.md.txt)
explains how to enable it and deploy your VM workloads into the cluster.
- The component marked as **Application** denotes software deployed into the
cluster by the retail store. The point of sale application seen in the kiosks of
a retail store could be one example of such an application.
The boxes at the bottom of the diagram represent the many devices (like kiosks,
tablets, or cameras) inside a retail store, all of which are connected to a
central network switch. The local networking inside the store enables the
applications running inside the Google Distributed Cloud deployment to reach these
devices.
In the next section, you see the emulation of this retail store deployment in
Google Cloud using Compute Engine VMs. This emulation is what you use
in the tutorial that follows to experiment with Google Distributed Cloud.
## Emulated edge deployment in Google Cloud
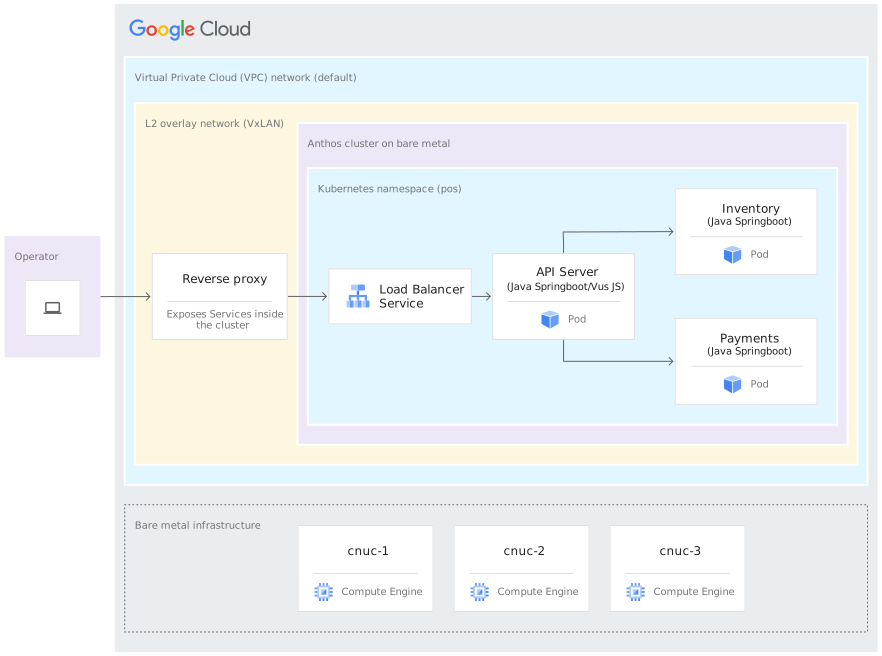
The following diagram is a depiction of everything that you set up in
Google Cloud in this tutorial. This diagram correlates to the retail store
diagram from the preceding section. This deployment represents an emulated edge
location in which the point of sale application is deployed. The architecture
also shows a simple point of sale sample application workload that you use in
this tutorial. You access the point of sale application inside the cluster by
using a web browser as a kiosk.
[](https://docs.cloud.google.com/static/anthos/clusters/docs/bare-metal/1.13/installing/images/edge_in_gcp_2x.png) A sample application deployed inside an Google Distributed Cloud cluster
The three Compute Engine virtual machines (VMs) in the preceding diagram
represent the physical hardware (or nodes) in a typical edge location. This
hardware would be connected together with network switches to make up the bare
metal infrastructure. In our emulated environment in Google Cloud,
these VMs are connected to each other through the default
[Virtual Private Cloud (VPC)](https://docs.cloud.google.com/vpc)
network in the Google Cloud project.
In a typical Google Distributed Cloud installation you can
[configure your own load balancers](https://docs.cloud.google.com/anthos/clusters/docs/bare-metal/1.13/installing/load-balance.md.txt).
However, for this tutorial you don't set up an external load
balancer. Instead you use the bundled MetalLB load balancer that's installed
with Google Distributed Cloud. The bundled MetalLB load balancer requires Layer 2
network connectivity between the nodes. Thus, Layer 2 connectivity between the
Compute Engine VMs is enabled by creating a
[VxLAN](https://en.wikipedia.org/wiki/Virtual_Extensible_LAN#:%7E:text=Virtual%20Extensible%20LAN%20(VXLAN)%20is,with%20large%20cloud%20computing%20deployments.)
overlay network on top of the default Virtual Private Cloud (VPC) network.
Within the rectangle labeled *"L2 overlay network (VxLAN)"* the software
components running inside the three Compute Engine VMs are shown. This
rectangle includes the *Google Distributed Cloud cluster* and a
*Reverse proxy* . The cluster is represented by the *"Google Distributed Cloud"*
rectangle. THis rectangle representing the cluster includes another rectangle
marked as *"Kubernetes namespace (pos)"* . This represents a Kubernetes namespace
inside the cluster. All the components inside this Kubernetes namespace make up
the point of sale application that is deployed into the Anthos cluster. The point
of sale application has three microservices: API Server, Inventory and Payments.
All these components together represent one *"application"* shown in the earlier
Edge rollout architecture diagram.
The Anthos cluster's [bundled MetalLB load balancer](https://docs.cloud.google.com/anthos/clusters/docs/bare-metal/1.13/installing/load-balance.md.txt#bundled_load_balancer_mode)
can't be directly reached from outside the VMs. The diagram shows an
[NGINX reverse proxy](https://docs.nginx.com/nginx/admin-guide/web-server/reverse-proxy/)
being configured to run inside the VMs to route traffic coming into the
Compute Engine VMs to the load balancer. This is only a workaround for the
purposes of this tutorial where the edge nodes are emulated using Google Cloud
Compute Engine VMs. In a real edge location this can be done with proper
network configuration.
## Objectives
1. Use Compute Engine VMs to emulate a bare metal infrastructure that runs in an edge location.
2. Create an Google Distributed Cloud cluster in the emulated edge infrastructure.
3. Connect and register the cluster with Google Cloud.
4. Deploy a sample point-of-sale application workload on the Anthos cluster.
5. Use the Google Cloud console to verify and monitor the point-of-sale application that operates on the edge location.
6. Use [Config Management](https://docs.cloud.google.com/anthos-config-management/docs/overview) to update the point-of-sale application that runs on the Anthos cluster.
## Before you begin
1. In the Google Cloud console, on the project selector page, select or
[create a Google Cloud project](https://docs.cloud.google.com/resource-manager/docs/creating-managing-projects.md.txt).
> [!NOTE]
> **Note:** If you don't plan to keep the resources that you create in this procedure, create a project instead of selecting an existing project. After you finish these steps, you can delete the project, removing all resources associated with the project.
[Go to project select](https://console.cloud.google.com/projectselector2/home/dashboard)
2. Make sure that billing is enabled for your Cloud project. Learn how to
[check if billing is enabled on a project](https://docs.cloud.google.com/billing/docs/how-to/verify-billing-enabled.md.txt).
3. [Install](https://docs.cloud.google.com/sdk/docs/install)
and [initialize](https://docs.cloud.google.com/sdk/docs/initialize.md.txt)
the Google Cloud CLI.
## Fork and clone the anthos-samples repository
All the scripts used in this tutorial are stored in the [anthos-samples](https://github.com/GoogleCloudPlatform/anthos-samples/tree/main/anthos-bm-edge-deployment)
repository. The folder structure under
[`/anthos-bm-edge-deployment/acm-config-sink`](https://github.com/GoogleCloudPlatform/anthos-samples/tree/main/anthos-bm-edge-deployment/acm-config-sink)
is organized according to what is expected by Config Management.
Clone this repository to your own GitHub account before you continue with the
following steps.
1. If you don't have one already, create an account on [GitHub](https://github.com/).
2. [Create a personal access token](https://docs.github.com/en/github/authenticating-to-github/creating-a-personal-access-token)
to use in the Config Management configuration. This is required for the
Config Management components in the cluster to authenticate with your
GitHub account when trying to synchronize new changes.
1. Select the `public_repo` scope only.
2. Save the access token you created in a safe place to use later.
3. Fork the `anthos-samples` repository to your own GitHub account:
1. Go to the [anthos-samples repository](https://github.com/GoogleCloudPlatform/anthos-samples/tree/main/anthos-bm-edge-deployment).
2. Click on the **Fork** icon on the top-right corner of the page.
3. Click on the GitHub user account you want to fork the repository to. You are automatically redirected to the page with your forked version of the anthos-samples repository.
4. Open a terminal in your local environment.
5. Clone the forked repository by running the following command, where
GITHUB_USERNAME is the username for your GitHub
account:
```bash
git clone https://github.com/GITHUB_USERNAME/anthos-samples
cd anthos-samples/anthos-bm-edge-deployment
```
> [!NOTE]
> **Note:** Both the source repository for this solution and your fork of that repository are public repositories. This document shows the use of an access token to mimic an actual use case with a private repository.
## Set up the workstation environment
To complete the edge deployment described in this document, you need one
workstation with access to the Internet and the following tools installed:
- [Docker](https://www.docker.com/get-started/)
- [envsubst command-line interface tool](https://www.gnu.org/software/gettext/manual/html_node/envsubst-Invocation.html) (usually pre-installed on Linux and other Unix-like OSes)
Run all of the commands in the tutorial on the workstation you configure in this section.
1. On your workstation, initialize the environment variables in a new shell instance:
```bash
export PROJECT_ID="PROJECT_ID"
export REGION="us-central1"
export ZONE="us-central1-a"
# port on the admin Compute Engine instance you use to set up an nginx proxy
# this allows to reach the workloads inside the cluster via the VM IP
export PROXY_PORT="8082"
# should be a multiple of 3 since N/3 clusters are created with each having 3 nodes
export GCE_COUNT="3"
# url to the fork of: https://github.com/GoogleCloudPlatform/anthos-samples
export ROOT_REPO_URL="https://github.com/GITHUB_USERNAME/anthos-samples"
# this is the username used to authenticate to your fork of this repository
export SCM_TOKEN_USER="GITHUB_USERNAME"
# access token created in the earlier step
export SCM_TOKEN_TOKEN="ACCESS_TOKEN"
```
Replace the following values:
- PROJECT_ID: your Google Cloud project ID.
- GITHUB_USERNAME: your GitHub username.
- ACCESS_TOKEN: the personal access token you created for your GitHub repository.
Keep the default values for the other environment variables. They are
explained in the sections that follow.
2. On your workstation, initialize Google Cloud CLI:
```bash
gcloud config set project "${PROJECT_ID}"
gcloud services enable compute.googleapis.com
gcloud config set compute/region "${REGION}"
gcloud config set compute/zone "${ZONE}"
```
> [!NOTE]
> **Note:** This step can take up to 90 seconds to complete.
3. On your workstation, create the Google Cloud service account for the
Compute Engine instances. This script creates the JSON key file for the
new service account at `/anthos-bm-edge-deployment/build-artifacts/consumer-edge-gsa.json`.
It also sets up the [Cloud Key Management Service](https://docs.cloud.google.com/kms/docs/create-encryption-keys.md.txt)
keyring and key for SSH private key encryption.
```bash
./scripts/create-primary-gsa.sh
```
A portion of the script is visible below. Click on the `View on GitHub` link
to see the entire script.
```bash
# ...
EXISTS=$(gcloud iam service-accounts list \
--filter="email=${GSA_EMAIL}" \
--format="value(name, disabled)" \
--project="${PROJECT_ID}")
if [[ -z "${EXISTS}" ]]; then
echo "GSA [${GSA_EMAIL}]does not exist, creating it"
# GSA does NOT exist, create
gcloud iam service-accounts create ${GSA_NAME} \
--description="GSA used on each Target machine to make gcloud commands" \
--display-name="target-machine-gsa" \
--project "${PROJECT_ID}"
else
if [[ "${EXISTS}" =~ .*"disabled".* ]]; then
# Found GSA is disabled, enable
gcloud iam service-accounts enable "${GSA_EMAIL}" --project "${PROJECT_ID}"
fi
# otherwise, no need to do anything
fi
# ...
```
## Provision the Compute Engine instances
In this section, you create the Compute Engine VMs where Google Distributed Cloud
will be installed. You also verify connectivity to these VMs before proceeding
to the install section.
1. On your workstation, create SSH keys that are used for communication between
the Compute Engine instances.
```bash
ssh-keygen -f ./build-artifacts/consumer-edge-machine
```
2. Encrypt the SSH private key using Cloud Key Management Service.
```bash
gcloud kms encrypt \
--key gdc-ssh-key \
--keyring gdc-ce-keyring \
--location global \
--plaintext-file build-artifacts/consumer-edge-machine \
--ciphertext-file build-artifacts/consumer-edge-machine.encrypted
```
3. Generate the environment configuration file `.envrc` and source it. After
created inspect the `.envrc` file to ensure that the environment variables have
been replaced with the correct values.
```bash
envsubst < templates/envrc-template.sh > .envrc
source .envrc
```
The following is an example of an `.envrc` file generated by replacing the
environment variables in the `templates/envrc-template.sh` file. Notice that
the lines that were updated are highlighted:
# GSA Key used for provisioning (result of running ./scripts/create-primary-gsa.sh)
LOCAL_GSA_FILE=$(pwd)/build-artifacts/consumer-edge-gsa.json
export LOCAL_GSA_FILE
# GCP Project ID
export PROJECT_ID="abm-edge-project"
# Bucket to store cluster snapshot information
export SNAPSHOT_GCS="abm-edge-project-cluster-snapshots"
# GCP Project Region (Adjust as desired)
export REGION="us-central1"
# GCP Project Zone (Adjust as desired)
export ZONE="us-central1-a"
# Gitlab Personal Access Token credentials (generated in Quick Start step 2)
export SCM_TOKEN_USER="LarryPage"
export SCM_TOKEN_TOKEN="oo901Sp-FHuzmz__dgl0393atkf69c8L"
# Default Root Repo setup for multiple locations
export ROOT_REPO_URL="https://github.com/LarryPage/anthos-samples"
export ROOT_REPO_BRANCH="main"
export ROOT_REPO_DIR="/anthos-bm-edge-deployment/acm-config-sink"
# OIDC Configuration (off by default)
export OIDC_CLIENT_ID="" # Optional, requires GCP API setup work
export OIDC_CLIENT_SECRET="" # Optional
export OIDC_USER="" # Optional
export OIDC_ENABLED="false" # Flip to true IF implementing OIDC on cluster
4. Create Compute Engine instances where Google Distributed Cloud is installed.
```bash
./scripts/cloud/create-cloud-gce-baseline.sh -c "$GCE_COUNT" | \
tee ./build-artifacts/gce-info
```
## Install Google Distributed Cloud with Ansible
The script used in this guide creates Google Distributed Cloud clusters in
groups of three Compute Engine instances. The number of clusters created is
controlled by the `GCE_COUNT` environment variable. For example, you set the
environment variable `GCE_COUNT` to `6` to create two
Google Distributed Cloud clusters with `3` VM instances each. By default
the `GCE_COUNT` environment variable is set to `3`. Thus, in this guide one
cluster with `3` Compute Engine instances will be created. The VM
instances are named with a prefix `cnuc-` followed by a number. The first VM
instance of each cluster acts as the admin workstation from which the
installation is triggered. The cluster is also given the same name as the admin
workstation VM (for example, `cnuc-1`, `cnuc-4`, `cnuc-7`).
The Ansible playbook does the following:
- Configures the Compute Engine instances with the necessary tools, such as `docker`, `bmctl`, `gcloud`, and `nomos`.
- Installs Google Distributed Cloud in the configured Compute Engine instances.
- Creates an Google Distributed Cloud standalone cluster called `cnuc-1`.
- Registers the `cnuc-1` cluster with Google Cloud.
- Installs Config Management into the `cnuc-1` cluster.
- Configures Config Management to sync with the cluster configurations located at `anthos-bm-edge-deployment/acm-config-sink` in your forked repository.
- Generates the `Login token` for the cluster.
Complete the following steps to set up and start the installation process:
1. On your workstation, create the Docker image used for the installation. This
image has all the tools required for the installation process, such as
Ansible, Python, and Google Cloud CLI.
```bash
gcloud builds submit --config docker-build/cloudbuild.yaml docker-build/
```
When the build runs successfully, it produces an output like the following:
```bash
...
latest: digest: sha256:99ded20d221a0b2bcd8edf3372c8b1f85d6c1737988b240dd28ea1291f8b151a size: 4498
DONE
---
ID CREATE_TIME DURATION SOURCE IMAGES STATUS
2238baa2-1f41-440e-a157-c65900b7666b 2022-08-17T19:28:57+00:00 6M53S gs://my_project_cloudbuild/source/1660764535.808019-69238d8c870044f0b4b2bde77a16111d.tgz gcr.io/my_project/consumer-edge-install (+1 more) SUCCESS
```
2. Generate the Ansible inventory file from template.
```bash
envsubst < templates/inventory-cloud-example.yaml > inventory/gcp.yaml
```
3. Run the installation script that starts a Docker container from the image
built previously. The script internally uses Docker to spawn the container
with a volume mount to the current working directory. Upon successful
completion of this script you must be inside the Docker container that was
created. You trigger the Ansible installation from inside this container.
```bash
./install.sh
```
When the script runs successfully, it produces an output like the following:
```bash
...
Check the values above and if correct, do you want to proceed? (y/N): y
Starting the installation
Pulling docker install image...
==============================
Starting the docker container. You will need to run the following 2 commands (cut-copy-paste)
==============================
1: ./scripts/health-check.sh
2: ansible-playbook all-full-install.yaml -i inventory
3: Type 'exit' to exit the Docker shell after installation
==============================
Thank you for using the quick helper script!
(you are now inside the Docker shell)
```
4. From inside the Docker container, verify access to the Compute Engine
instances.
```bash
./scripts/health-check.sh
```
When the script runs successfully, it produces an output like the following:
```bash
...
cnuc-2 | SUCCESS => {"ansible_facts": {"discovered_interpreter_python": "/usr/bin/python3"},"changed": false,"ping": "pong"}
cnuc-3 | SUCCESS => {"ansible_facts": {"discovered_interpreter_python": "/usr/bin/python3"},"changed": false,"ping": "pong"}
cnuc-1 | SUCCESS => {"ansible_facts": {"discovered_interpreter_python": "/usr/bin/python3"},"changed": false,"ping": "pong"}
```
5. From inside the Docker container, run the Ansible playbook for installing
Google Distributed Cloud on Compute Engine instances. Upon completion you will
see the `Login Token` for the cluster printed on screen.
```bash
ansible-playbook all-full-install.yaml -i inventory | tee ./build-artifacts/ansible-run.log
```
When the install runs successfully, it produces an output like the following:
```bash
...
TASK [abm-login-token : Display login token] **************************************************************************
ok: [cnuc-1] => {
"msg": "eyJhbGciOiJSUzI1NiIsImtpZCI6Imk2X3duZ3BzckQyWmszb09sZHFMN0FoWU9mV1kzOWNGZzMyb0x2WlMyalkifQ.eymljZS1hY2NvdW
iZXJuZXRlcy5pby9zZXJ2aWNlYWNjb3VudC9zZWNyZXQubmFtZSI6ImVkZ2Etc2EtdG9rZW4tc2R4MmQiLCJrdWJlcm5ldGVzLmlvL3NlcnZpY2VhY2Nvd
4CwanGlof6s-fbu8"
}
skipping: [cnuc-2]
skipping: [cnuc-3]
PLAY RECAP ***********************************************************************************************************
cnuc-1 : ok=205 changed=156 unreachable=0 failed=0 skipped=48 rescued=0 ignored=12
cnuc-2 : ok=128 changed=99 unreachable=0 failed=0 skipped=108 rescued=0 ignored=2
cnuc-3 : ok=128 changed=99 unreachable=0 failed=0 skipped=108 rescued=0 ignored=2
```
> [!NOTE]
> **Note:** This step can take up to 35 minutes to complete for a setup with `$GCE_COUNT=3`.
## Log in to the Google Distributed Cloud cluster in the Google Cloud console
After the Ansible playbook runs to completion, a standalone
Google Distributed Cloud cluster is installed inside the Compute Engine
VMs. This cluster is also registered to Google Cloud via the
Connect Agent. However, to see details about this cluster you have to log
into the cluster from the Google Cloud console. To login to the
GKE cluster complete the following steps.
1. Copy the token from the output of the Ansible playbook in the previous
section.
> [!NOTE]
> **Note:** If you don't have access to the console output anymore, check the log file at `./build-artifacts/ansible-run.log` to get your token. You may also run the following ansible playbook to fetch the token again: `ansible-playbook all-get-login-tokens.yaml -i inventory`
2. In the Google Cloud console, go to the **Kubernetes clusters** page and
use the copied token to log in to the `cnuc-1` cluster.
[Go to the Kubernetes clusters page](https://console.cloud.google.com/kubernetes/list/overview)
1. In the list of clusters, click **Actions** next to the `cnuc-1` cluster, and then click **Log in**.
2. Select **Token** and paste in the copied token.
3. Click **Login**.
3.
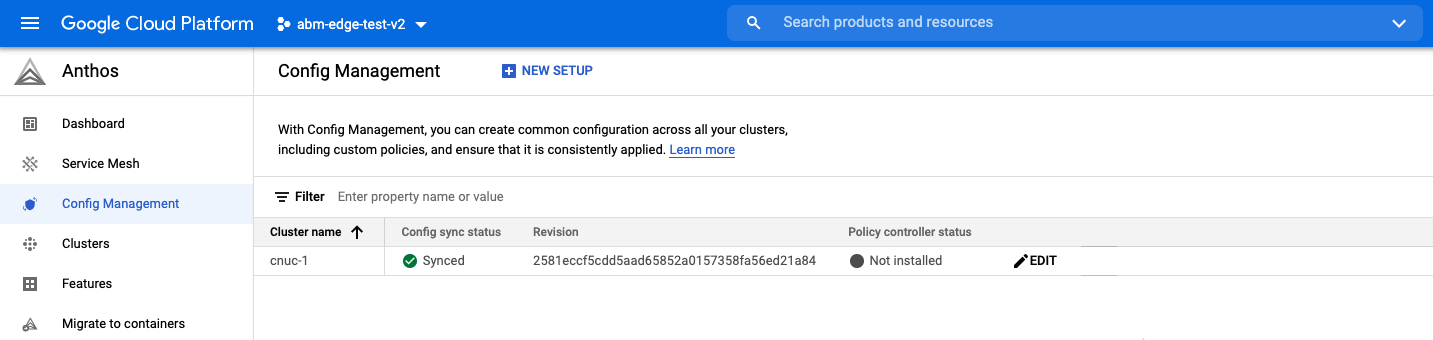
In the Google Cloud console, go to the **Config Management** page to check
the **Config spec status** . Verify that the status is **Synced** .
A status of **Synched** indicates that
[Config Management](https://cloud.google.com/anthos/config-management)
has successfully synchronized your GitHub configs with your deployed
cluster, `cnuc-1`.
[Go to the Config Management page](https://console.cloud.google.com/anthos/config_management)
[](https://docs.cloud.google.com/static/anthos/clusters/docs/bare-metal/1.13/installing/images/acm-sync.png)
## Configure a proxy for external traffic
The Google Distributed Cloud cluster installed in the previous steps uses a
bundled load balancer called [MetalLB](https://metallb.universe.tf/).
This load balancer service is accessible only through a
Virtual Private Cloud (VPC) IP address. To route traffic coming in through its
external IP to the bundled load balancer, set up a reverse proxy service in the
admin host (`cnuc-1`). This reverse proxy service allows you to reach the API
Server of the point of sale application through the external IP of the admin
host (`cnuc-1`).
The installation scripts in the earlier steps installed [NGINX](https://www.nginx.com/)
in the admin hosts along with a sample configuration file. Update this file to
use the IP address of the load balancer service and restart NGINX.
1. On your workstation, use SSH to log into the admin workstation:
```bash
ssh -F ./build-artifacts/ssh-config abm-admin@cnuc-1
```
2. From inside the admin workstation, set up NGINX reverse proxy to route
traffic to the API Server Load balancer service. Get the IP address of the Load
balancer type Kubernetes service:
```bash
ABM_INTERNAL_IP=$(kubectl get services api-server-lb -n pos | awk '{print $4}' | tail -n 1)
```
3. Update the template configuration file with the fetched IP address:
```bash
sudo sh -c "sed 's//${ABM_INTERNAL_IP}/g' \
/etc/nginx/nginx.conf.template > /etc/nginx/nginx.conf"
```
4. Restart NGINX to make sure that the new configuration is applied:
```bash
sudo systemctl restart nginx
```
5. Check and verify the status of the NGINX server to reports "active (running)":
```bash
sudo systemctl status nginx
```
When NGINX is running successfully, it produces an output like the following example:
```bash
● nginx.service - A high performance web server and a reverse proxy server
Loaded: loaded (/lib/systemd/system/nginx.service; enabled; vendor preset: enabled)
Active: active (running) since Fri 2021-09-17 02:41:01 UTC; 2s ago
Docs: man:nginx(8)
Process: 92571 ExecStartPre=/usr/sbin/nginx -t -q -g daemon on; master_process on; (code=exited, status=0/SUCCESS)
Process: 92572 ExecStart=/usr/sbin/nginx -g daemon on; master_process on; (code=exited, status=0/SUCCESS)
Main PID: 92573 (nginx)
Tasks: 17 (limit: 72331)
Memory: 13.2M
CGroup: /system.slice/nginx.service
├─92573 nginx: master process /usr/sbin/nginx -g daemon on; master_process on;
├─92574 nginx: worker process
├─92575 nginx: worker process
├─92577 nginx: ....
...
...
```
6. Exit from the SSH session into the admin workstation:
```bash
exit
```
7. Exit from the shell session into the Docker container. Upon exiting the admin
instance, you are still inside the Docker container used for the installation:
```bash
exit
```
## Access the point of sale application
With the external proxy setup you are able to access the application running
inside the GKE cluster. To access the sample point of sale application,
complete the following steps.
1. On your workstation, get the external IP address of the admin
Compute Engine instance and access the UI of the point of sale application:
```bash
EXTERNAL_IP=$(gcloud compute instances list \
--project ${PROJECT_ID} \
--filter="name:cnuc-1" \
--format="get(networkInterfaces[0].accessConfigs[0].natIP)")
echo "Point the browser to: ${EXTERNAL_IP}:${PROXY_PORT}"
```
When the scripts run successfully, they produce output like the following:
```bash
Point the browser to: 34.134.194.84:8082
```
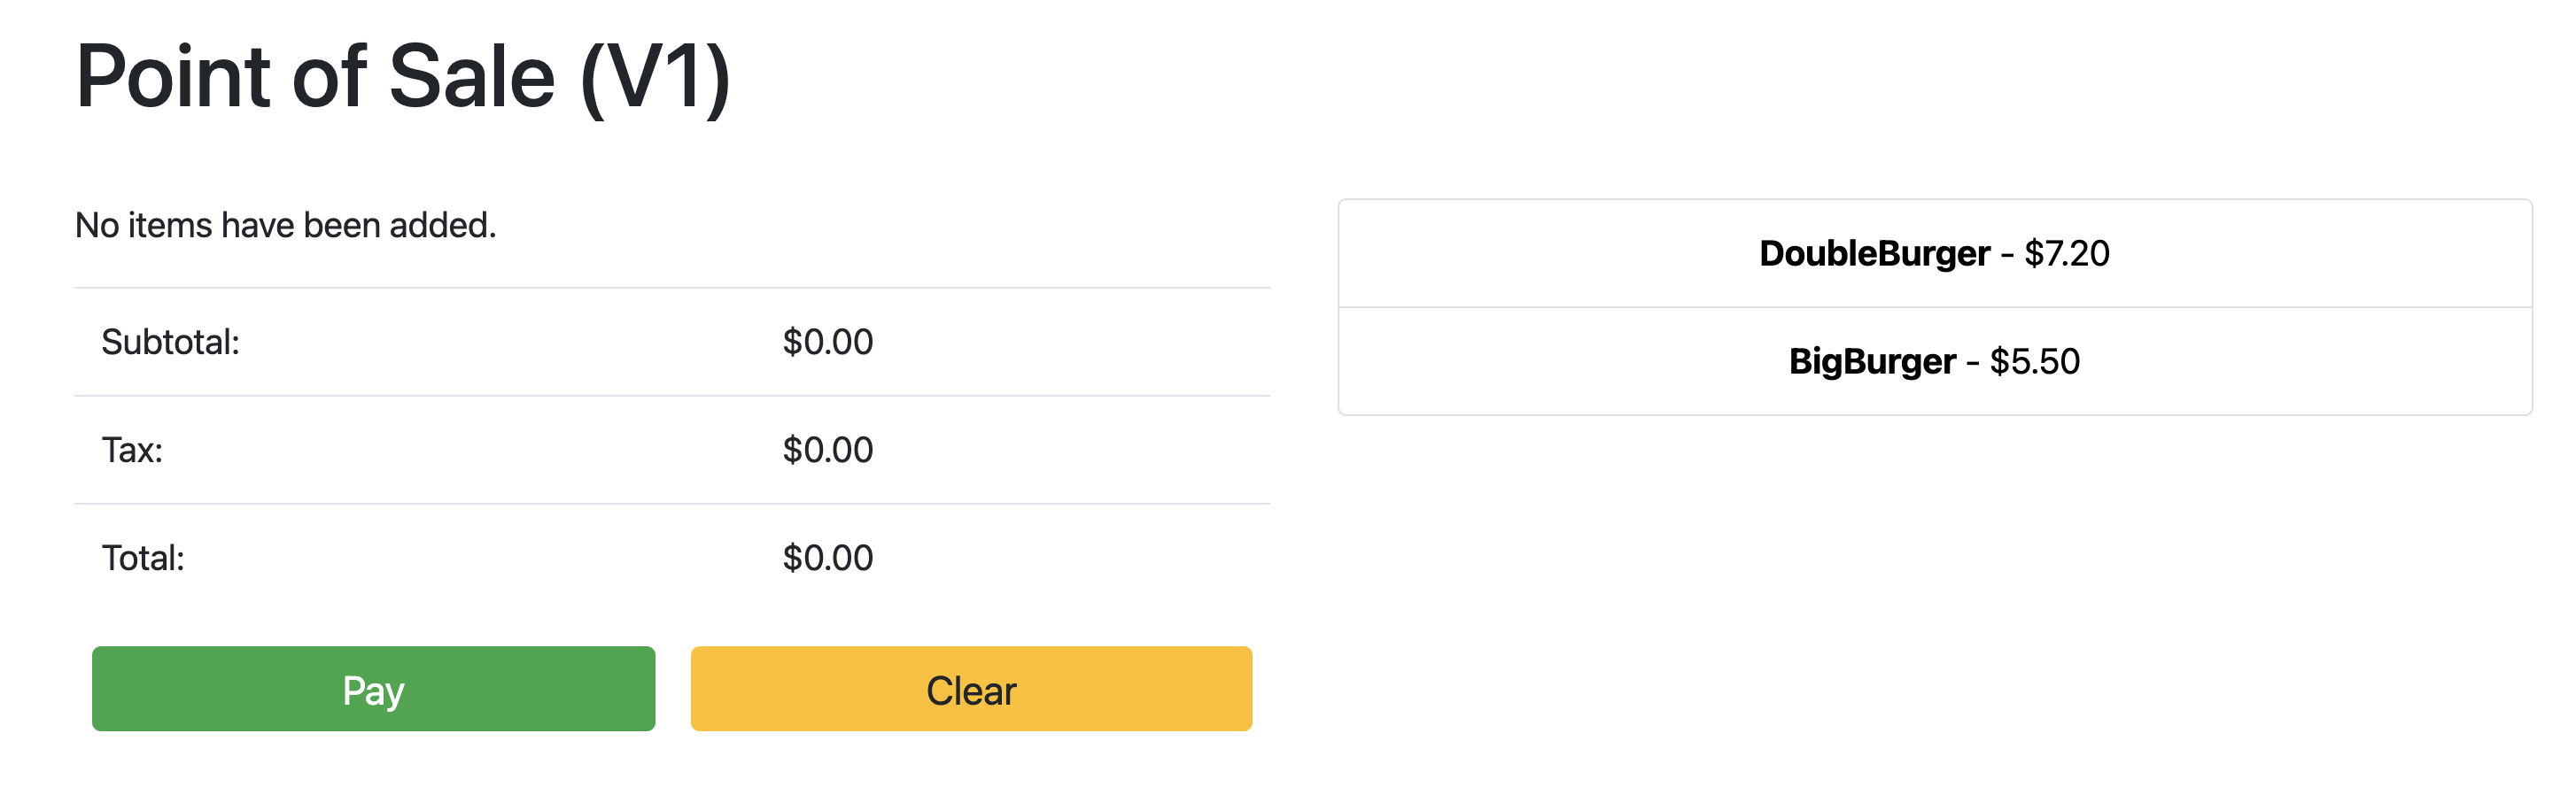
2. Open your web browser and navigate to the IP address shown in the output of
the previous command. You can access and test the sample point of sale
application, as shown in the following example screenshot:
[](https://docs.cloud.google.com/static/anthos/clusters/docs/bare-metal/1.13/installing/images/pos-v1.png)
## Use Config Management to update the API Server
The sample application can be upgraded to a newer version by updating the
configuration files in the root repository. Config Management detects
the updates and automatically makes the changes to your cluster. In this example
the root repository is the `anthos-samples` repository that you cloned at the
beginning of this guide. To see how the sample point of sale application can go
through an upgrade deployment to a newer version, complete the following steps.
1. On your workstation, update the `image` field to change the API Server
version from `v1` to `v2`. The YAML configuration for the deployment is in the
file at `anthos-bm-edge-deployment/acm-config-sink/namespaces/pos/api-server.yaml`.
```yaml
containers:
- name: api-server
image: us-docker.pkg.dev/anthos-dpe-abm-edge-pos/abm-edge-pos-images/api-server:v1
```
2. Add, commit, and push the changes to your forked repository:
```bash
git add acm-config-sink/namespaces/pos/api-server.yaml
git commit -m "chore: updated api-server version to v2"
git push
```
3. In the Google Cloud console, go to the **Config Management** page to check
the **Config spec status** . Verify that the status is **Synced**.
[Go to the Config Management page](https://console.cloud.google.com/anthos/config_management)
4. In the Google Cloud console, go to the **Kubernetes Engine Workloads**
page to verify that the **Deployment** is updated.
[Go to the Kubernetes Engine Workloads page](https://console.cloud.google.com/kubernetes/workload/overview)
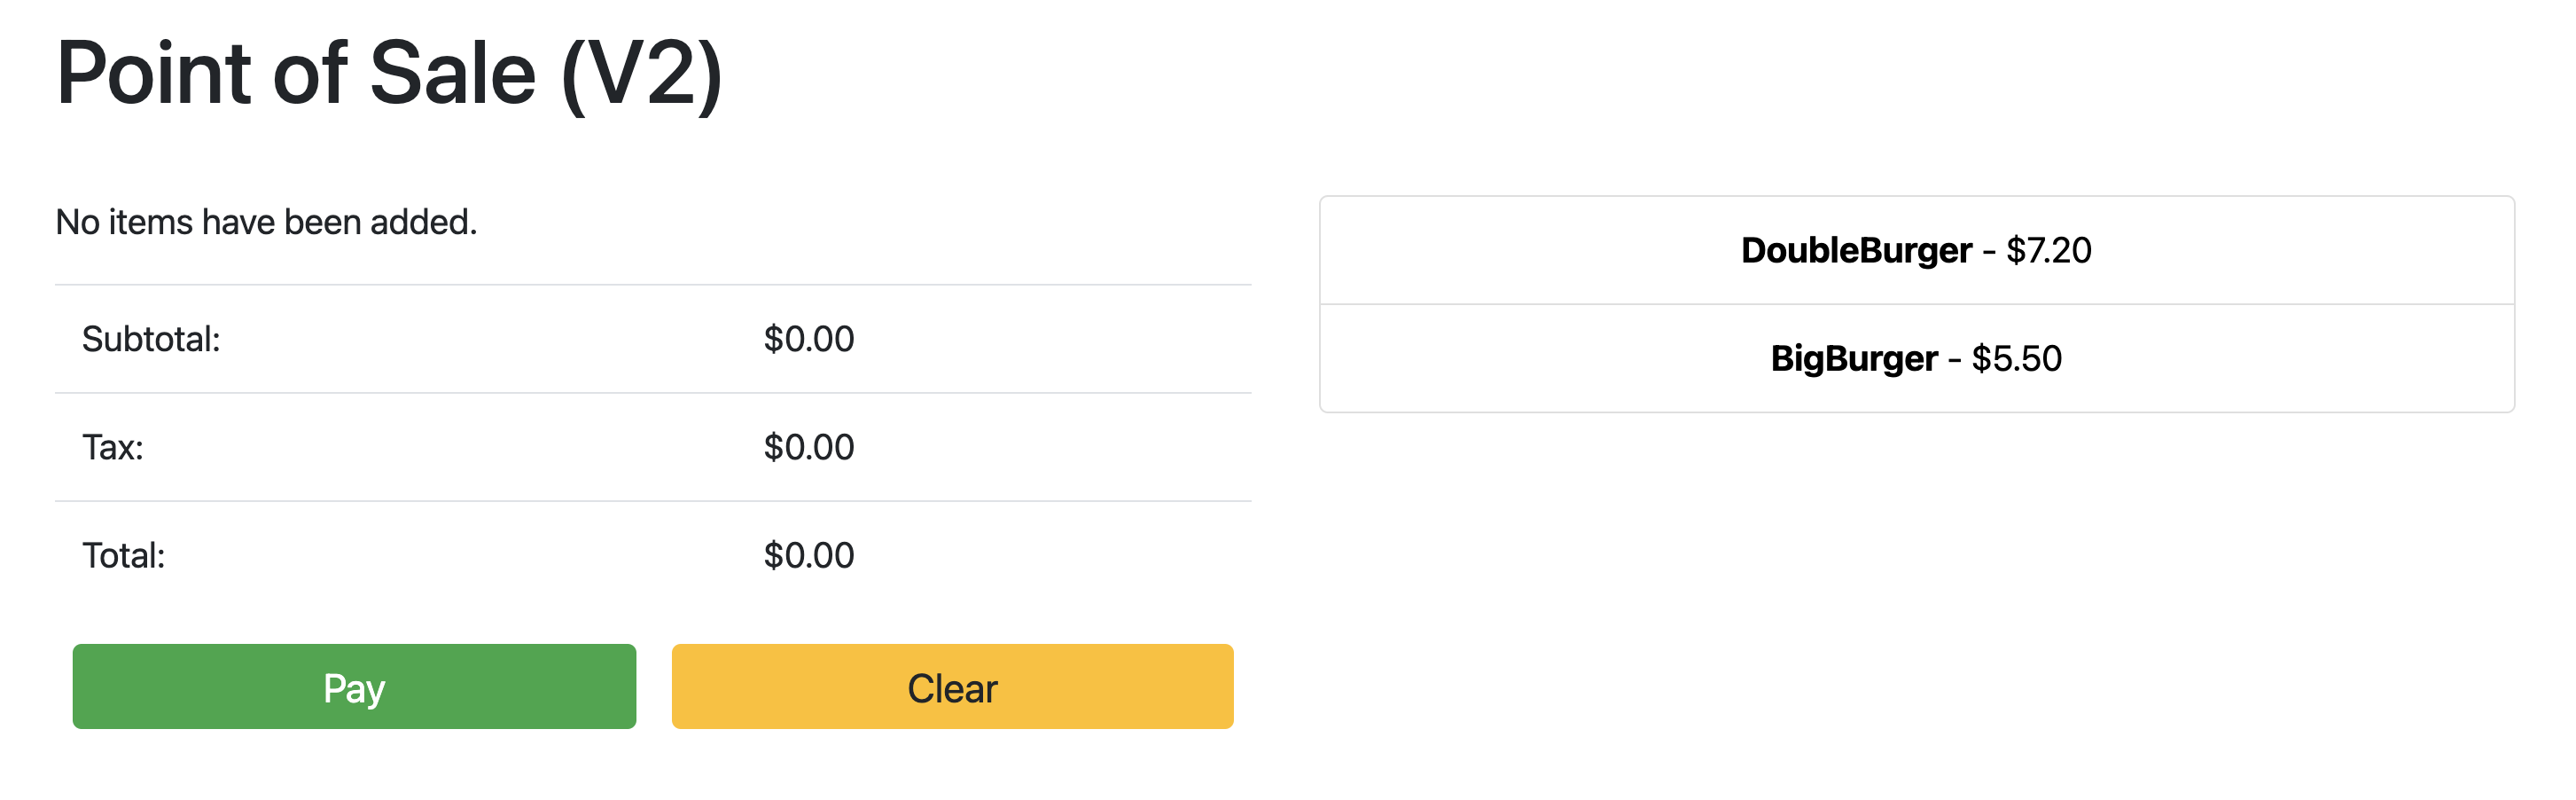
5. When the status of the **Deployment** is **OK**, point your browser to the
IP address from the previous section to view the point of sale application.
Note that the version in the title shows "V2", indicating that your
application change was deployed, as shown in the following example
screenshot:
[](https://docs.cloud.google.com/static/anthos/clusters/docs/bare-metal/1.13/installing/images/pos-v2.png)
You might have to do a hard refresh of the browser tab to see the changes.
## Clean up
To avoid unnecessary Google Cloud charges, delete the resources used for
this guide when you are done with it. You can either delete these
resources manually, or delete your Google Cloud project, which also gets rid
of all resources. In addition, you might also want to clean up the changes made
in your local workstation:
### Local workstation
The following files have to be updated to clear changes made by the
installation scripts.
- Remove the Compute Engine VM IP addresses added to the `/etc/hosts` file.
- Remove the SSH configuration for `cnuc-*` in the `~/.ssh/config` file.
- Remove the Compute Engine VM fingerprints from the `~/.ssh/known_hosts` file.
### Delete Project
If you created a dedicated project for this procedure, delete the Google Cloud project
from the Google Cloud console.
> [!CAUTION]
> **Caution** : Deleting a project has the following effects:
>
> - **Everything in the project is deleted.** If you used an existing project for the tasks in this document, when you delete it, you also delete any other work you've done in the project.
> - **Custom project IDs are lost.** When you created this project, you might have created a custom project ID that you want to use in the future. To preserve the URLs that use the project ID, such as an `appspot.com` URL, delete selected resources inside the project instead of deleting the whole project.
>
>
> If you plan to explore multiple architectures, tutorials, or quickstarts, reusing projects
> can help you avoid exceeding project quota limits.
- In the Google Cloud console, go to the **Manage resources** page.
[Go to Manage resources](https://console.cloud.google.com/iam-admin/projects)
- In the project list, select the project that you want to delete, and then click **Delete**.
- In the dialog, type the project ID, and then click **Shut down** to delete the project.
### Manual
If you used an existing project for this procedure, do the following:
- Unregister all Kubernetes clusters with a name prefixed by `cnuc-`.
- Delete all Compute Engine VMs with a name prefixed by `cnuc-`.
- Delete the Cloud Storage bucket with a name prefixed by `abm-edge-boot`.
- Delete the Firewall Rules `allow-pod-ingress` and `allow-pod-egress`.
- Delete the Secret Manager secret `install-pub-key`.
## What's next?
You can expand on this guide by adding another edge location. Setting the
`GCE_COUNT` environment variable to `6` and re-running the same steps from
the preceding sections creates three new Compute Engine instances
(`cnuc-4`, `cnuc-5`, `cnuc-6`) and a new Google Distributed Cloud
standalone cluster called `cnuc-4`.
You can also try updating the [cluster configurations](https://github.com/GoogleCloudPlatform/anthos-samples/tree/main/anthos-bm-edge-deployment/acm-config-sink)
in your forked repository to selectively apply different versions of the
point of sale application to the two clusters, `cnuc-1` and `cnuc-4`, using
[ClusterSelectors](https://docs.cloud.google.com/anthos-config-management/docs/how-to/cluster-scoped-objects#select_a_list_of_clusters).
For details about the individual steps in this guide, the scripts involved, see
the [anthos-samples](https://github.com/GoogleCloudPlatform/anthos-samples/tree/main/anthos-bm-edge-deployment)
repository.