- [Latest](https://docs.cloud.google.com/anthos/clusters/docs/bare-metal/latest/try/gce-vms-tf)
- [Version 1.16](https://docs.cloud.google.com/anthos/clusters/docs/bare-metal/1.16/try/gce-vms-tf.md.txt)
- [Earlier versions (unsupported)](https://docs.cloud.google.com/anthos/clusters/docs/bare-metal/1.10/getting-support.md.txt#version-support)
This document shows you how to set up VMs on Compute Engine with Terraform
so that you can install and try Google Distributed Cloud in High Availability
(HA) mode. For information about how to use the Google Cloud CLI for
this, see [Try Google Distributed Cloud on Compute Engine VMs](https://docs.cloud.google.com/anthos/clusters/docs/bare-metal/1.10/try/gce-vms.md.txt).
> [!IMPORTANT]
> **Important:** This deployment is for evaluation purposes only. Don't run Google Distributed Cloud on Compute Engine VMs in production. To deploy Google Distributed Cloud in production, follow the steps in our [quickstart](https://docs.cloud.google.com/anthos/clusters/docs/bare-metal/1.10/quickstart.md.txt).
You can try out Google Distributed Cloud quickly and without having to prepare
any hardware. The provided Terraform scripts create a network of VMs on
Compute Engine that can be used to run Google Distributed Cloud. In this
tutorial we use the [hybrid cluster deployment](https://docs.cloud.google.com/anthos/clusters/docs/bare-metal/1.10/installing/install-prep.md.txt#hybrid_cluster_deployment)
model.
Complete the following steps to get a sample cluster running:
1. [Execute the Terraform script to set up a network of VMs on Compute Engine](https://docs.cloud.google.com/anthos/clusters/docs/bare-metal/1.10/try/gce-vms-tf.md.txt#terraform_apply)
2. [Deploy a hybrid cluster](https://docs.cloud.google.com/anthos/clusters/docs/bare-metal/1.10/try/gce-vms-tf.md.txt#cluster)
3. [Verify your cluster](https://docs.cloud.google.com/anthos/clusters/docs/bare-metal/1.10/try/gce-vms-tf.md.txt#verify)
## Before you begin
The deployment requires the following resources:
- One workstation with access to the internet and the following tools installed: [Git](https://www.atlassian.com/git/tutorials/install-git), [Google Cloud CLI](https://cloud.google.com/sdk/docs/install) and [Terraform](https://releases.hashicorp.com/terraform/0.14.10/) (\< v1.2).
- A Google Cloud project.
[Go to project select](https://console.cloud.google.com/projectselector2/home/dashboard)
- A service account in the project that satisfies one of the following
requirements and its [key file downloaded](https://docs.cloud.google.com/iam/docs/creating-managing-service-account-keys) to the
workstation:
1. The service account has Owner permissions
2. The service account has both Editor and Project IAM Admin permissions
[Go to Service Accounts](https://console.cloud.google.com/iam-admin/serviceaccounts)
> [!NOTE]
> **Note:** All the commands are run on the workstation that has Git, Google Cloud CLI, and Terraform (\~v0.14.10) installed and the service account key downloaded.
## Set up the VM network on Compute Engine
In this section you use the Terraform scripts from the [anthos-samples](https://github.com/GoogleCloudPlatform/anthos-samples) repository.
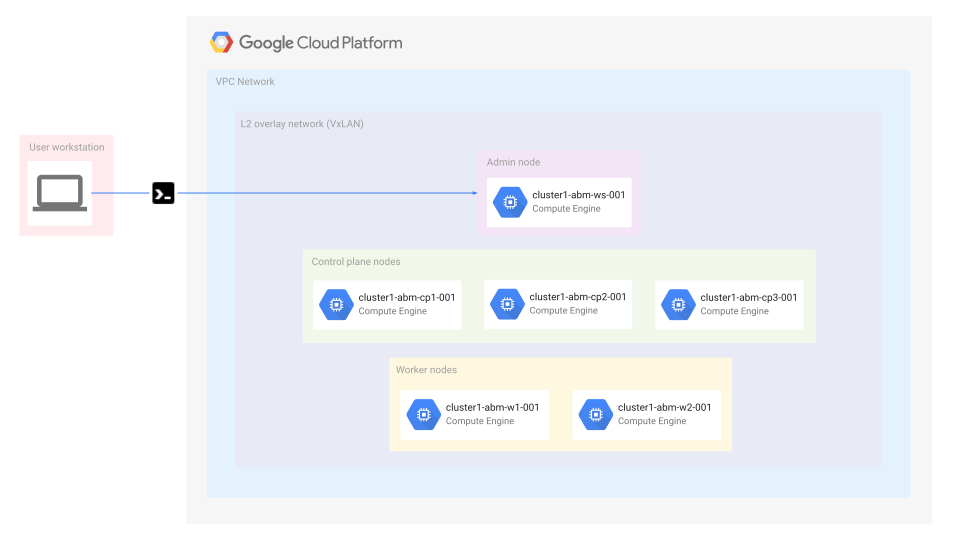
The scripts configure Compute Engine with the following resources:
- Six VMs to deploy the hybrid cluster:
- One admin VM used to deploy the hybrid cluster to the other machines.
- Three VMs for the three control plane nodes needed to run the hybrid cluster control plane.
- Two VMs for the two worker nodes needed to run workloads on the hybrid cluster.
- A `VxLAN` overlay network between all the nodes to emulate L2 connectivity.
- SSH access to the ***control-plane*** and ***worker*** nodes from the ***admin VM***.
> [!NOTE]
> **Note:** Since we use SSH keys for Compute Engine VM login, [`oslogin` has been
> disabled](https://github.com/GoogleCloudPlatform/anthos-samples/blob/v0.6.0/anthos-bm-gcp-terraform/main.tf#L117) for these machines.
You can change the number of nodes in the cluster by adding new node names to
the `instance_count` Terraform variable:
```terraform
###################################################################################
# The recommended instance count for High Availability (HA) is 3 for Control plane
# and 2 for Worker nodes.
###################################################################################
variable "instance_count" {
description = "Number of instances to provision per layer (Control plane and Worker nodes) of the cluster"
type = map(any)
default = {
"controlplane" : 3
"worker" : 2
}
}
```
1. Download the Terraform scripts for `anthos-bm-gcp-terraform` sample:
```bash
git clone https://github.com/GoogleCloudPlatform/anthos-samples
cd anthos-samples/anthos-bm-gcp-terraform
```
2. Update the `terraform.tfvars.sample` file to include variables specific to
your environment:
```bash
project_id = "PROJECT_ID"
region = "GOOGLE_CLOUD_REGION"
zone = "GOOGLE_CLOUD_ZONE"
credentials_file = "PATH_TO_GOOGLE_CLOUD_SERVICE_ACCOUNT_KEY_FILE"
```
3. Rename the `terraform.tfvars.sample` file to the default name used by
terraform for the variables file:
```bash
mv terraform.tfvars.sample terraform.tfvars
```
> [!NOTE]
> **Note:** Note: You can skip renaming the variables file if you use the `-var-file` flag to explicitly reference the file when you run `terraform apply` later in this procedure.
4. Initialize the sample directory as a Terraform working directory.
This sets up the required Terraform state management configurations,
similar to `git init`:
```bash
terraform init
```
5. Create a Terraform execution plan. This step compares the state of the
resources, verifies the scripts and creates an execution plan:
```bash
terraform plan
```
6. Apply the changes described in the Terraform script. This step executes the
plan on the given provider *(in this case Google Cloud)* to reach the desired
state of resources:
```bash
terraform apply # when prompted to confirm the Terraform plan, type 'Yes' and enter
```
> [!NOTE]
> **Note:** The `apply` command sets up the Compute Engine VMs based infrastructure. This can take a few minutes (approximately 3-5 mins) for the entire bare-metal cluster to be set up.
## Deploy the hybrid cluster
After the Terraform execution completes you are ready to deploy the hybrid
cluster.
1. Use SSH to connect to the admin host:
```bash
gcloud compute ssh tfadmin@cluster1-abm-ws0-001 --project=PROJECT_ID --zone=GOOGLE_CLOUD_ZONE
```
2. Run the following code block to create the `cluster1` hybrid
cluster on the configured Compute Engine VMs:
```bash
sudo ./run_initialization_checks.sh && \
sudo bmctl create config -c cluster1 && \
sudo cp ~/cluster1.yaml bmctl-workspace/cluster1 && \
sudo bmctl create cluster -c cluster1
```
Running the `bmctl` command starts setting up a new hybrid cluster. This
includes doing preflight checks on the nodes, creating the admin and user
clusters and also registering the cluster with Google Cloud using [Connect](https://docs.cloud.google.com/anthos/multicluster-management/connect/overview).
The whole setup can take up to 15 minutes. You see the following output as the
cluster is being created:
> [!NOTE]
> **Note:** The logs for checks on node initialization have been left out. They appear before the following logs from the hybrid cluster setup:
```bash
Created config: bmctl-workspace/cluster1/cluster1.yaml
Creating bootstrap cluster... OK
Installing dependency components... OK
Waiting for preflight check job to finish... OK
- Validation Category: machines and network
- [PASSED] 10.200.0.3
- [PASSED] 10.200.0.4
- [PASSED] 10.200.0.5
- [PASSED] 10.200.0.6
- [PASSED] 10.200.0.7
- [PASSED] gcp
- [PASSED] node-network
Flushing logs... OK
Applying resources for new cluster
Waiting for cluster to become ready OK
Writing kubeconfig file
kubeconfig of created cluster is at bmctl-workspace/cluster1/cluster1-kubeconfig, please run
kubectl --kubeconfig bmctl-workspace/cluster1/cluster1-kubeconfig get nodes
to get cluster node status.
Please restrict access to this file as it contains authentication credentials of your cluster.
Waiting for node pools to become ready OK
Moving admin cluster resources to the created admin cluster
Flushing logs... OK
Deleting bootstrap cluster... OK
```
## Verify and interact with the cluster
You can find your cluster's `kubeconfig` file on the admin machine in the
`bmctl-workspace` directory. To verify your deployment, complete the following
steps.
1. If you disconnected from the admin host, use SSH to connect to the host:
```bash
# You can copy the command from the output of the Terraform execution above
gcloud compute ssh tfadmin@cluster1-abm-ws0-001 --project=PROJECT_ID --zone=GOOGLE_CLOUD_ZONE
```
2. Set the `KUBECONFIG` environment variable with the path to the cluster's
configuration file to run `kubectl` commands on the cluster:
```bash
export CLUSTER_ID=cluster1
export KUBECONFIG=$HOME/bmctl-workspace/$CLUSTER_ID/$CLUSTER_ID-kubeconfig
kubectl get nodes
```
You should see the nodes of the cluster printed, similar to the
following output:
```bash
NAME STATUS ROLES AGE VERSION
cluster1-abm-cp1-001 Ready master 17m v1.18.6-gke.6600
cluster1-abm-cp2-001 Ready master 16m v1.18.6-gke.6600
cluster1-abm-cp3-001 Ready master 16m v1.18.6-gke.6600
cluster1-abm-w1-001 Ready 14m v1.18.6-gke.6600
cluster1-abm-w2-001 Ready 14m v1.18.6-gke.6600
```
## Log in to your cluster from Google Cloud console
To observe your workloads in the Google Cloud console, you must log in to the
cluster.
For instructions and more information about logging into your cluster, see [Logging in to a cluster from Google Cloud console](https://docs.cloud.google.com/anthos/multicluster-management/console/logging-in).
## Clean up
You can clean up the cluster setup in two ways.
### Console
- If you created a dedicated project for this procedure, delete the Google Cloud project
from the Google Cloud console.
[Delete Project](https://console.cloud.google.com/cloud-resource-manager)
### Terraform
- Unregister the cluster before deleting all the resources created by Terraform.
```bash
# Use SSH to connect to the admin host
gcloud compute ssh tfadmin@cluster1-abm-ws0-001 --project=PROJECT_ID --zone=GOOGLE_CLOUD_ZONE
# Reset the cluster
export CLUSTER_ID=cluster1
export KUBECONFIG=$HOME/bmctl-workspace/$CLUSTER_ID/$CLUSTER_ID-kubeconfig
sudo bmctl reset --cluster $CLUSTER_ID
# log out of the admin host
exit
```
- Use Terraform to delete all resources.
```bash
terraform destroy --auto-approve
```