Select a documentation version:
- [16.3.0](https://docs.cloud.google.com/alloydb/omni/kubernetes/16.3.0/docs/high-availability/setup.md.txt)
- [15.7.1](https://docs.cloud.google.com/alloydb/omni/kubernetes/15.7.1/docs/high-availability/setup.md.txt)
- [15.7.0](https://docs.cloud.google.com/alloydb/omni/kubernetes/15.7.0/docs/high-availability/setup.md.txt)
> [!NOTE]
> **Note:** Your use of AlloyDB Omni is subject to the agreement between you and Google that governs Google Cloud offerings. If you do not have a Google Cloud account, or have not otherwise entered into an agreement with Google that governs Google Cloud offerings, please do not proceed or download this software until you have done so. To create a Google Cloud account, see [the Google Cloud homepage](https://docs.cloud.google.com/docs/get-started).
This page describes how to set up a high availability configuration for
AlloyDB Omni. This page only covers creating a new
AlloyDB Omni instance in a high availability configuration. It
doesn't cover converting existing instances to high availability.
## Before you begin
1. Read the
[High availability and data resilience](https://docs.cloud.google.com/alloydb/omni/kubernetes/15.7.0/docs/high-availability/overview.md.txt).
2. If you don't already have one, create a Google Cloud project.
3. Ensure that billing is enabled for your project.
4. Open Cloud Shell in the Google Cloud console.
5. In the Google Cloud console, clone the following source repository.
git clone https://github.com/GoogleCloudPlatform/cloud-solutions.git
## Installation
In this guide, we deploy a three node
[Patroni](https://patroni.readthedocs.io/en/latest/) cluster with
AlloyDB Omni and a three node cluster [etcd](https://etcd.io/) as
the configuration store. In the front of the cluster, we use
[HAProxy](https://www.haproxy.org/) in a managed instance group for the
floating IP address so that the failover is transparent to clients.
The initial configuration for this setup is shown in the following diagram:
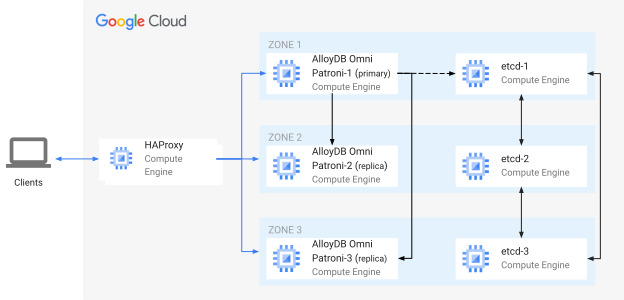
**Figure 1.** Configuration where HAProxy manages the connection between clients
and the primary node.
If an outage occurs, the configuration changes to the following diagram:
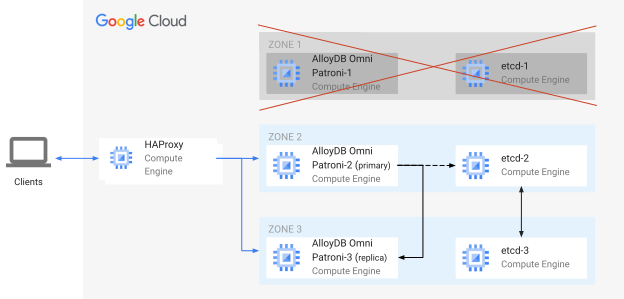
**Figure 2.** Updated configuration where the failed primary node is replaced by
the standby node.
If the number of clients that connect to the database becomes an issue and you
have performance issues due to the high number of simultaneous database
connections, we recommend that you add application-side connection pooling. If
you can't do that, then you can add database-side connection pooling using a
tool like PgBouncer.
## Deployment
1. In Cloud Shell and after cloning the Cloud Solutions repository, navigate
to the terraform directory.
```
cd cloud-solutions/projects/alloydbomni-ha-patroni-etcd/terraform
```
2. Create and edit a `terraform.tfvars` file. In the file, set values for the
following variables:
project_id = "PROJECT_ID"
region = "REGION"
zones = [ZONES]
node_count = 3
cluster_name = "CLUSTER_NAME"
replication_user_password = "REPLICATION_USER_PASSWORD"
postgres_super_user_password = "PG_SUPER_USER_PASSWORD"
Replace the following:
- `PROJECT_ID`: the ID of your Google Cloud project.
- `REGION`: the Google Cloud region where you want to deploy the resources---for example, `us-central1`.
- `ZONES`: a comma-separated list of quoted zones in the specified region---for example, `"us-central1-a", "us-central1-b", "us-central1-c"` or `"us-central1-a", "us-central1-c"`.
- `CLUSTER_NAME`: the name for your Patroni and AlloyDB Omni cluster.
- `REPLICATION_USER_PASSWORD`: the password for the replication user.
- `PG_SUPER_USER_PASSWORD`: the password for the PostgreSQL superuser (`postgres`).
For more information about each variable, see the
[variables configuration file](https://github.com/GoogleCloudPlatform/cloud-solutions/blob/79ceca9b9ff498d2af6101f264b1c731c8911aee/projects/alloydbomni-ha-patroni-etcd/terraform/variables.tf)
on GitHub.
3. Run the Terraform script to create all the resources.
```
terraform init && terraform apply
```
This script creates and configures the following:
- Three nodes for your etcd cluster
- Three nodes for your Patroni cluster
- One node for HAProxy
### Configuring Patroni to be synchronous
To make Patroni use only synchronous replication in your three nodes cluster,
add configuration items like `synchronous_mode`, `synchronous_node_count`,
`synchronous_commit`, and `synchronous_standby_names` in the bootstrap section
in your Patroni configuration files. The Patroni configuration is defined in the
[startup script template](https://github.com/GoogleCloudPlatform/cloud-solutions/blob/79ceca9b9ff498d2af6101f264b1c731c8911aee/projects/alloydbomni-ha-patroni-etcd/terraform/scripts/patroni_startup.tftpl)
and in the `/alloydb/config/patroni.yml` file on the Patroni nodes. To use
synchronous replication, your Patroni bootstrap configuration should look as
follows:
```yaml
bootstrap:
dcs:
ttl: 30
loop_wait: 10
retry_timeout: 10
maximum_lag_on_failover: 1048576
synchronous_mode: true
synchronous_node_count: 2
postgresql:
use_pg_rewind: true
use_slots: true
parameters:
hot_standby: "on"
wal_keep_segments: 20
max_wal_senders: 8
max_replication_slots: 8
synchronous_commit: remote_apply
synchronous_standby_names: '*'
```
When `synchronous_mode` is turned on, Patroni uses synchronous replication
between its primary and the other replicas. The parameter
`synchronous_node_count` is used by Patroni to manage the number of synchronous
standby replicas. Patroni manages precise number of synchronous standby
replicas based on parameter `synchronous_node_count` and adjusts the state in
the configuration store and in the `synchronous_standby_names` as members join
and leave. For more information about synchronous replication, see the
[Replication modes](https://patroni.readthedocs.io/en/latest/replication_modes.html)
section in Patroni's documentation.
## What's next
- [Test your high availability setup](https://docs.cloud.google.com/alloydb/omni/kubernetes/15.7.0/docs/high-availability/test.md.txt)