Select a documentation version:
- [Current (18.4.0)](https://docs.cloud.google.com/alloydb/omni/containers/current/docs/high-availability/test.md.txt)
- [18.4.0](https://docs.cloud.google.com/alloydb/omni/containers/18.4.0/docs/high-availability/test.md.txt)
- [18.3.0](https://docs.cloud.google.com/alloydb/omni/containers/18.3.0/docs/high-availability/test.md.txt)
- [18.1.0](https://docs.cloud.google.com/alloydb/omni/containers/18.1.0/docs/high-availability/test.md.txt)
- [17.10.0](https://docs.cloud.google.com/alloydb/omni/containers/17.10.0/docs/high-availability/test.md.txt)
- [17.9.0](https://docs.cloud.google.com/alloydb/omni/containers/17.9.0/docs/high-availability/test.md.txt)
- [17.7.0](https://docs.cloud.google.com/alloydb/omni/containers/17.7.0/docs/high-availability/test.md.txt)
- [17.5.0](https://docs.cloud.google.com/alloydb/omni/containers/17.5.0/docs/high-availability/test.md.txt)
- [16.14.0](https://docs.cloud.google.com/alloydb/omni/containers/16.14.0/docs/high-availability/test.md.txt)
- [16.13.0](https://docs.cloud.google.com/alloydb/omni/containers/16.13.0/docs/high-availability/test.md.txt)
- [16.11.0](https://docs.cloud.google.com/alloydb/omni/containers/16.11.0/docs/high-availability/test.md.txt)
- [16.9.0](https://docs.cloud.google.com/alloydb/omni/containers/16.9.0/docs/high-availability/test.md.txt)
- [16.8.0](https://docs.cloud.google.com/alloydb/omni/containers/16.8.0/docs/high-availability/test.md.txt)
- [16.3.0](https://docs.cloud.google.com/alloydb/omni/containers/16.3.0/docs/high-availability/test.md.txt)
- [15.18.0](https://docs.cloud.google.com/alloydb/omni/containers/15.18.0/docs/high-availability/test.md.txt)
- [15.17.0](https://docs.cloud.google.com/alloydb/omni/containers/15.17.0/docs/high-availability/test.md.txt)
- [15.15.0](https://docs.cloud.google.com/alloydb/omni/containers/15.15.0/docs/high-availability/test.md.txt)
- [15.13.0](https://docs.cloud.google.com/alloydb/omni/containers/15.13.0/docs/high-availability/test.md.txt)
- [15.12.0](https://docs.cloud.google.com/alloydb/omni/containers/15.12.0/docs/high-availability/test.md.txt)
- [15.7.1](https://docs.cloud.google.com/alloydb/omni/containers/15.7.1/docs/high-availability/test.md.txt)
- [15.7.0](https://docs.cloud.google.com/alloydb/omni/containers/15.7.0/docs/high-availability/test.md.txt)
> [!NOTE]
> **Note:** Your use of AlloyDB Omni is subject to the agreement between you and Google that governs Google Cloud offerings. If you do not have a Google Cloud account, or have not otherwise entered into an agreement with Google that governs Google Cloud offerings, please do not proceed or download this software until you have done so. To create a Google Cloud account, see [the Google Cloud homepage](https://docs.cloud.google.com/docs/get-started).
Ensuring the reliability and quality of your high availability Patroni setup is
crucial for maintaining continuous database operations and minimizing downtime.
This page provides a comprehensive guide to testing your Patroni cluster,
covering various failure scenarios, replication consistency, and failover
mechanisms.
## Test your Patroni setup
1. Connect to any of your patroni instances (`alloydb-patroni1`,
`alloydb-patroni2`, or `alloydb-patroni3`) and navigate to the
AlloyDB Omni patroni folder.
```
cd /alloydb/
```
2. Inspect the Patroni logs.
```
docker compose logs alloydbomni-patroni
```
The last entries should reflect information about the Patroni node. You
should see something similar to the following.
alloydbomni-patroni | 2024-06-12 15:10:29,020 INFO: no action. I am (patroni1), the leader with the lock
alloydbomni-patroni | 2024-06-12 15:10:39,010 INFO: no action. I am (patroni1), the leader with the lock
alloydbomni-patroni | 2024-06-12 15:10:49,007 INFO: no action. I am (patroni1), the leader with the lock
3. Connect to any instance running Linux that has network connectivity to your
primary Patroni instance, `alloydb-patroni1`, and get information about the
instance. You might need to install the `jq` tool by running
`sudo apt-get install jq -y`.
```
curl -s http://alloydb-patroni1:8008/patroni | jq .
```
You should see something similar to the following displayed.
```json
{
"state": "running",
"postmaster_start_time": "2024-05-16 14:12:30.031673+00:00",
"role": "master",
"server_version": 150005,
"xlog": {
"location": 83886408
},
"timeline": 1,
"replication": [
{
"usename": "alloydbreplica",
"application_name": "patroni2",
"client_addr": "10.172.0.40",
"state": "streaming",
"sync_state": "async",
"sync_priority": 0
},
{
"usename": "alloydbreplica",
"application_name": "patroni3",
"client_addr": "10.172.0.41",
"state": "streaming",
"sync_state": "async",
"sync_priority": 0
}
],
"dcs_last_seen": 1715870011,
"database_system_identifier": "7369600155531440151",
"patroni": {
"version": "3.3.0",
"scope": "my-patroni-cluster",
"name": "patroni1"
}
}
```
Calling the Patroni HTTP API endpoint on a Patroni node exposes various details
about the state and configuration of that particular PostgreSQL instance managed
by Patroni, including cluster state information, timeline, WAL information, and
health checks indicating whether the nodes and cluster are up and running
correctly.
## Test your HAProxy setup
1. On a machine with a browser and network connectivity to your HAProxy node,
go to the following address: `http://haproxy:7000`. Alternatively, you can
use the external IP address of the HAProxy instance instead of its hostname.
You should see something similar to the following screenshot.
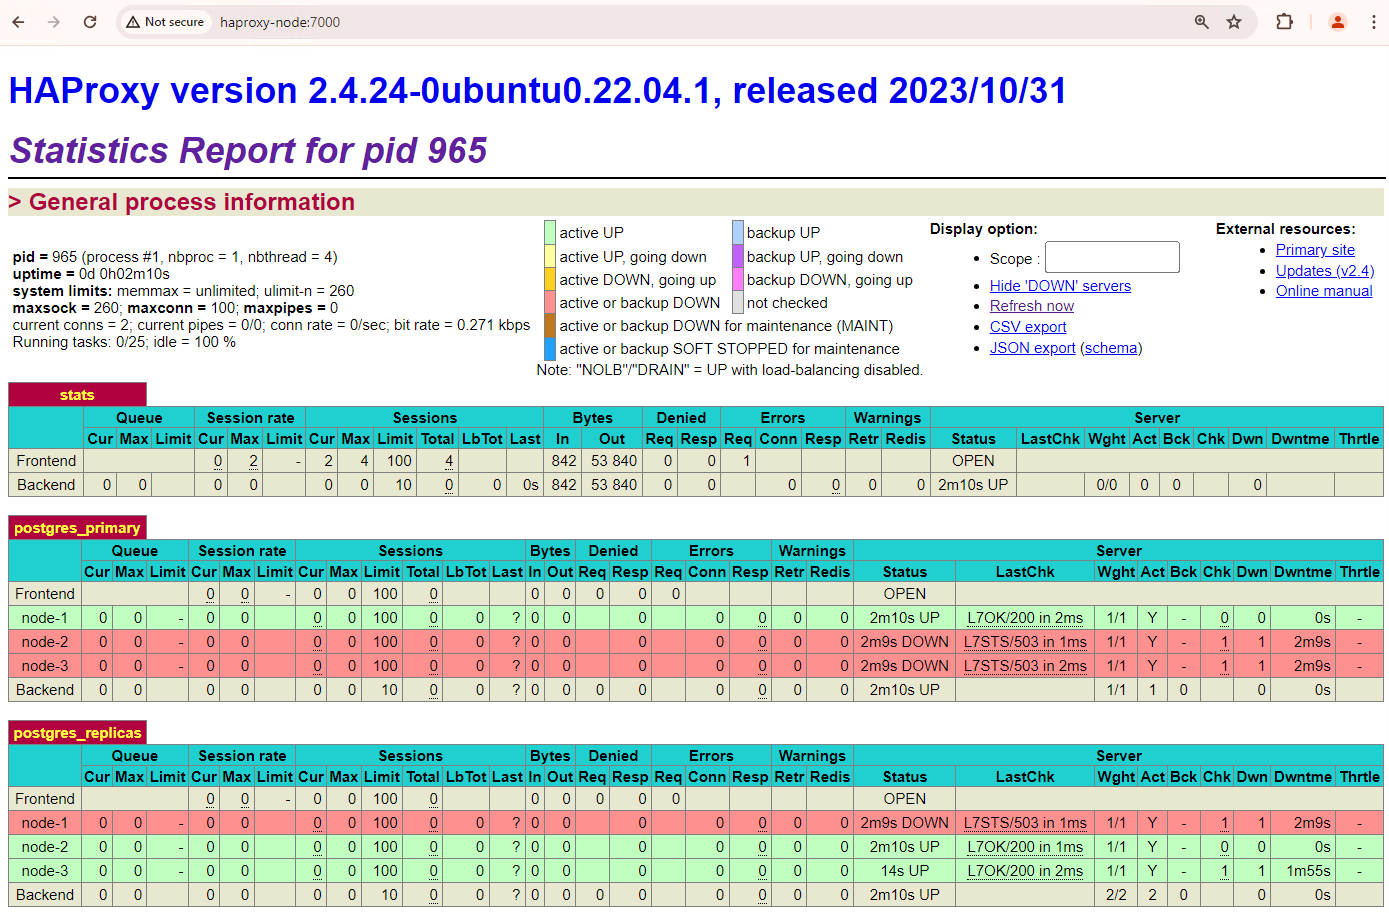
**Figure 1.** HAProxy status page showing health status and latency of
Patroni nodes.
In the HAProxy dashboard you can see the health status and latency of your
primary Patroni node, `patroni1`, and of the two replicas, `patroni2` and
`patroni3`.
2. You can perform queries to check the replication stats in your cluster. From
a client such as pgAdmin, connect to your primary database server through
HAProxy and run the following query.
```sql
SELECT
pid, usename, application_name, client_addr, state, sync_state
FROM
pg_stat_replication;
```
You should see something similar to the following diagram, showing that
`patroni2` and `patroni3` are streaming from `patroni1`.
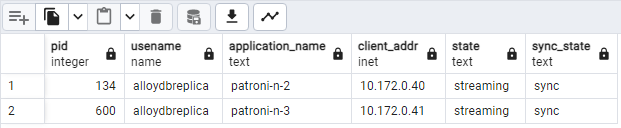
**Figure 2.** pg_stat_replication output showing the replication state of
the Patroni nodes.
## Test automatic failover
In this section, in your three node cluster, we simulate an outage on the
primary node by stopping the attached running Patroni container. You can either
stop the Patroni service on the primary to simulate an outage or enforce
some firewall rules to stop communication to that node.
1. On the primary Patroni instance, navigate to the AlloyDB Omni
Patroni folder.
```
cd /alloydb/
```
2. Stop the container.
```
docker compose down
```
You should see something similar to the following output. This should
validate that the container and network were stopped.
[+] Running 2/2
✔ Container alloydb-patroni Removed
✔ Network alloydbomni-patroni_default Removed
3. Refresh the HAProxy dashboard and see how failover takes place.
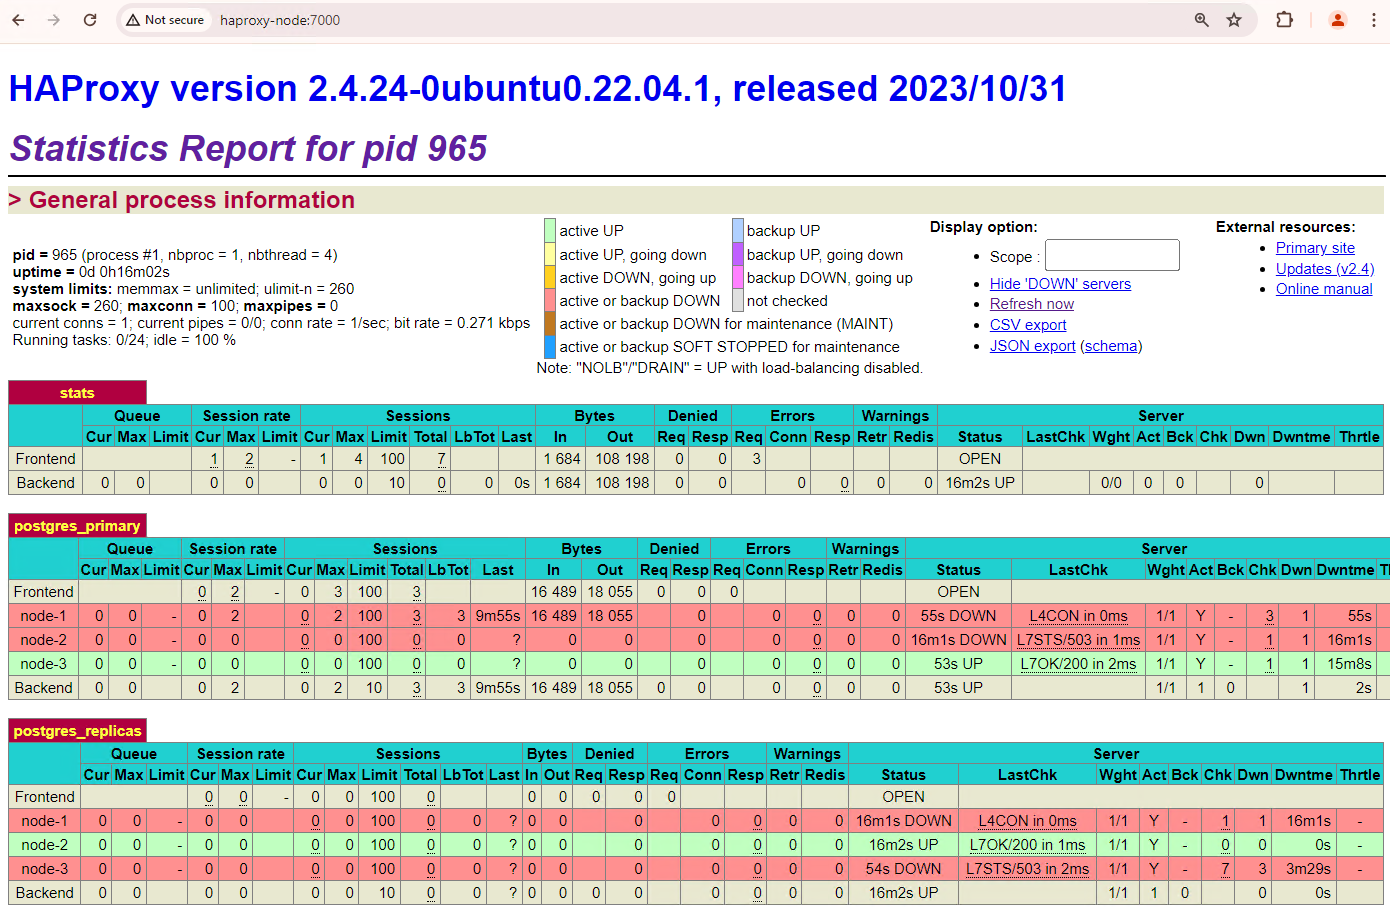
**Figure 3.** HAProxy dashboard showing the failover from the primary node
to the standby node.
The `patroni3` instance became the new primary, and `patroni2` is the only
remaining replica. The previous primary, `patroni1`, is down and health
checks fail for it.
Patroni performs and manages the failover through a combination of
monitoring, consensus, and automated orchestration. As soon as the primary
node fails to renew its lease within a specified timeout, or if it reports a
failure, the other nodes in the cluster recognize this condition through the
consensus system. The remaining nodes coordinate to select the most suitable
replica to promote as the new primary. Once a candidate replica is selected,
Patroni promotes this node to primary by applying the necessary changes,
such as updating the PostgreSQL configuration and replaying any outstanding
WAL records. Then, the new primary node updates the consensus system with
its status and the other replicas reconfigure themselves to follow the new
primary, including switching their replication source and potentially
catching up with any new transactions. HAProxy detects the new primary and
redirects client connections accordingly, ensuring minimal disruption.
4. From a client such as pgAdmin, connect to your database server through
HAProxy and check the replication stats in your cluster after failover.
```sql
SELECT
pid, usename, application_name, client_addr, state, sync_state
FROM
pg_stat_replication;
```
You should see something similar to the following diagram, showing that only
`patroni2` is streaming now.

**Figure 4.** pg_stat_replication output showing the replication state of
the Patroni nodes after failover.
5. Your three node cluster can survive one more outage. If you stop the current
primary node, `patroni3`, another failover takes place.
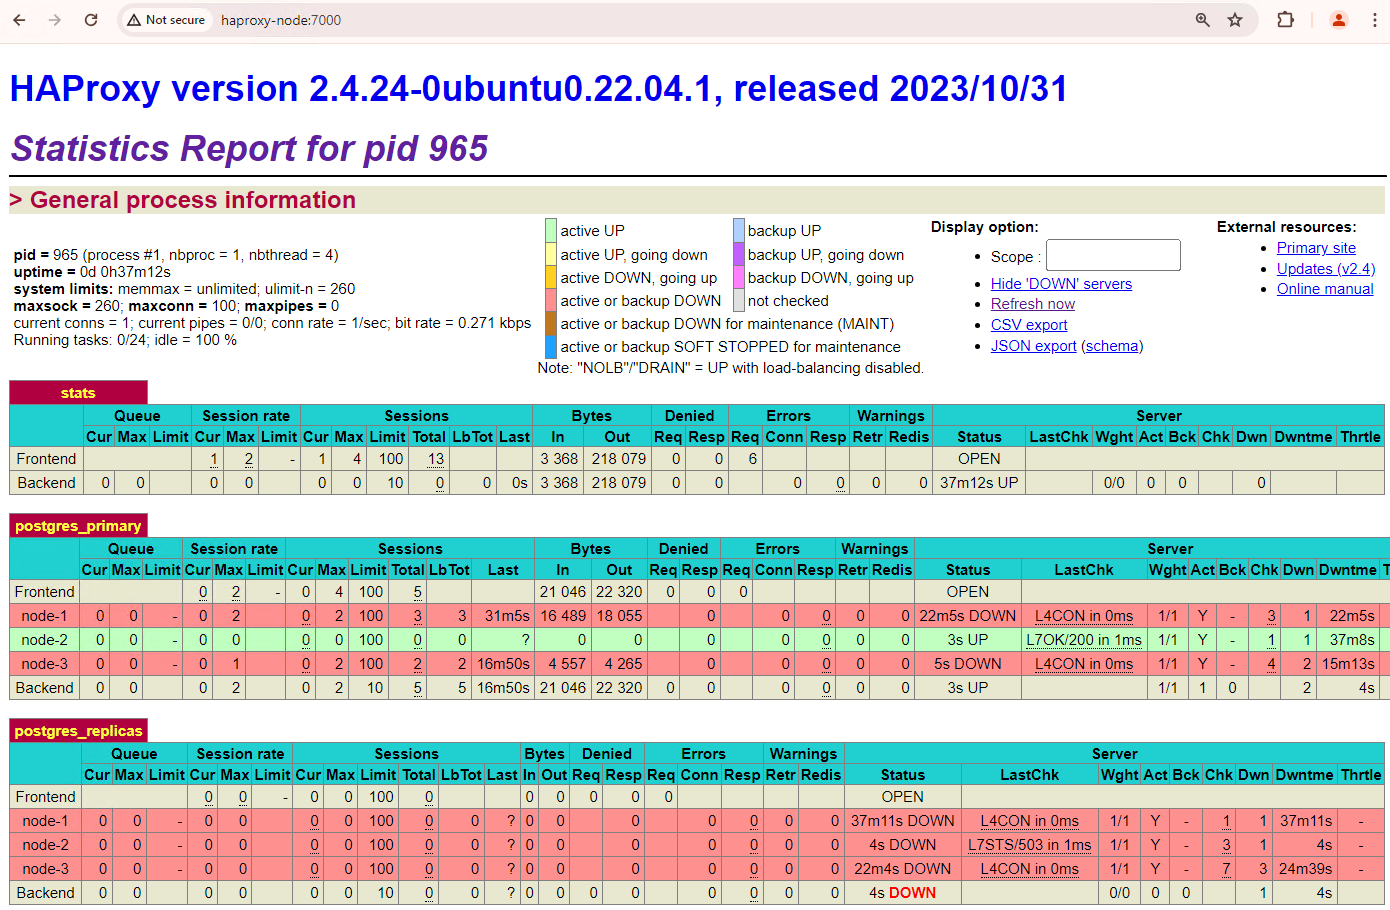
**Figure 5.** HAProxy dashboard showing the failover from the primary node,
`patroni3`, to the standby node, `patroni2`.
## Fallback considerations
Fallback is the process to reinstate the former source node after a failover
has occurred. Automatic fallback is generally not recommended in a high
availability database cluster because of several critical concerns, such as
incomplete recovery, risk of split-brain scenarios, and replication lag.
In your Patroni cluster, if you bring up the two nodes that you simulated an
outage with, they will rejoin the cluster as standby replicas.
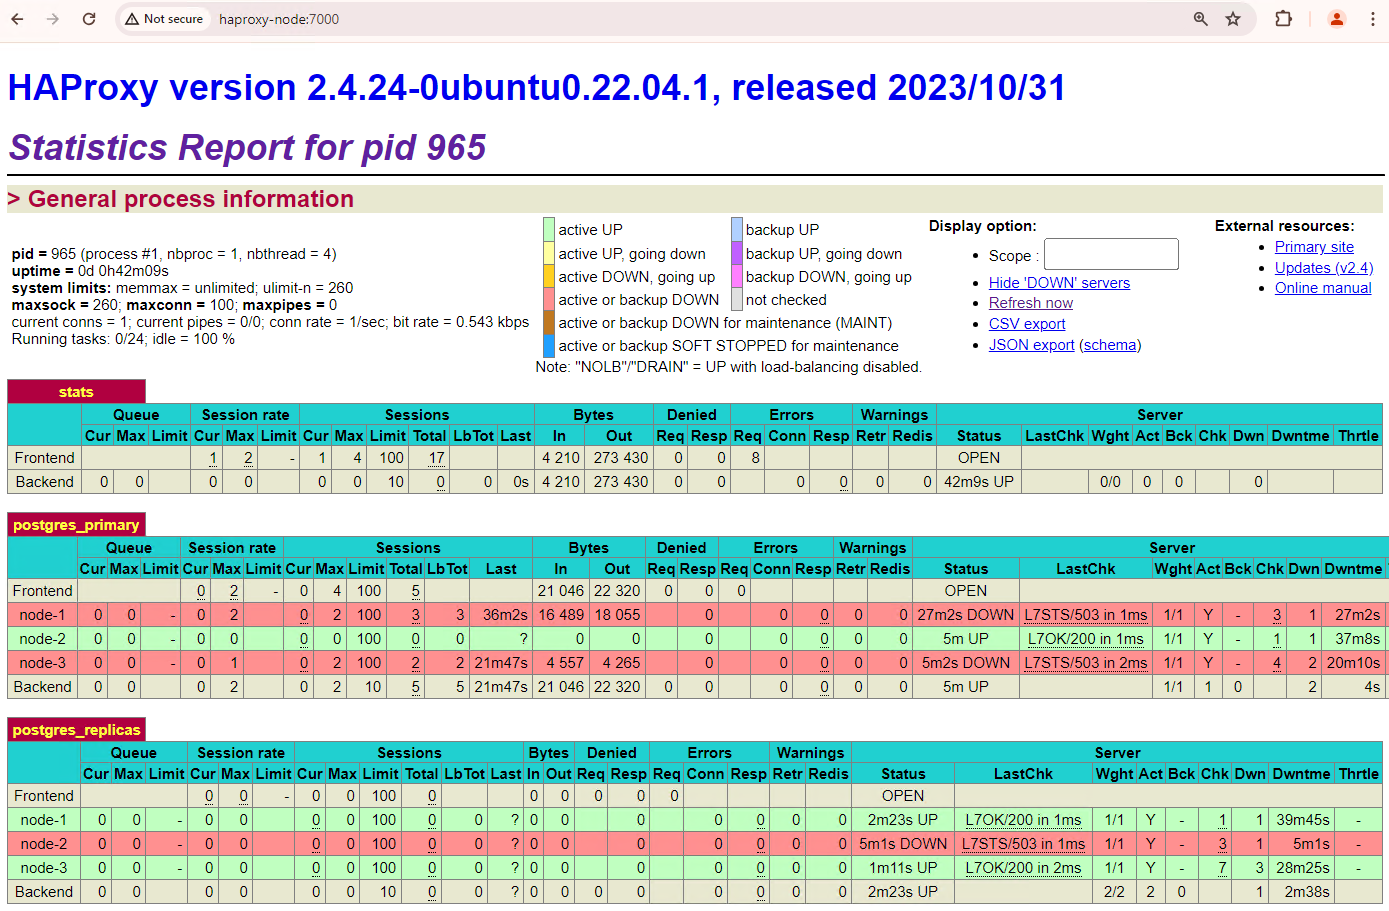
**Figure 6.** HAProxy dashboard showing the restoration of `patroni1` and
`patroni3` as standby nodes.
Now `patroni1` and `patroni3` are replicating from the current primary
`patroni2`.

**Figure 7.** pg_stat_replication output showing the replication state of the
Patroni nodes after fallback.
If you want to manually fall back to your initial primary, you can do that by
using the [patronictl](https://patroni.readthedocs.io/en/latest/patronictl.html)
command-line interface. By opting for manual fallback, you can ensure a more
reliable, consistent, and thoroughly verified recovery process, maintaining the
integrity and availability of your database systems.