To maintain availability across regions and scale read workloads globally, you
can create and manage AlloyDB for PostgreSQL secondary clusters, add read pool
instances, and perform switchover or promotion operations.
For a conceptual overview of cross-region replication, see
[Cross-region replication overview](https://docs.cloud.google.com/alloydb/docs/cross-region-replication/about-cross-region-replication.md.txt).
## Before you begin
- The Google Cloud project you are using must have been [enabled to access AlloyDB](https://docs.cloud.google.com/alloydb/docs/quickstart/create-and-connect.md.txt#before-you-begin).
- You must have one of these IAM roles in the Google Cloud project you are using:
- `roles/alloydb.admin` (the AlloyDB Admin predefined IAM role)
- `roles/owner` (the Owner basic IAM role)
- `roles/editor` (the Editor basic IAM role)
If you don't have any of these roles, contact your Organization Administrator to request
access.
## Create a secondary cluster
When you create a secondary cluster, AlloyDB copies and applies
some of the primary cluster configuration, including point-in-time recovery
(PITR) and backup configuration, onto the secondary cluster.
AlloyDB does not add any read pool instances to the secondary
cluster after creating it, no matter how many read pool instances exist on the
primary cluster.
If you update the primary cluster configuration after you create the secondary
cluster, the changes are not available on the secondary cluster. However, you can
manually update the secondary cluster to have the latest configuration that's
available in the primary cluster.
You can create up to five secondary clusters for a primary cluster. All of the
secondary clusters replicate from a single primary instance. If you promote a
secondary cluster, that secondary cluster becomes an independent primary
cluster.
> [!NOTE]
> **Note:** When you create multiple secondary clusters, Google recommends that you wait for each secondary cluster creation to complete before you create the additional secondaries.
The following diagram illustrates how to promote the secondary cluster called
`cluster-2` in `us-east4`:
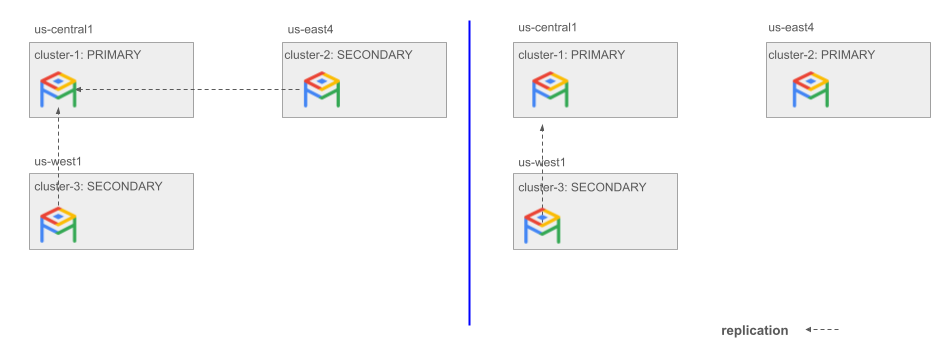
**Figure 1.** Example of promoting a secondary cluster.
To create an AlloyDB secondary cluster and secondary instance,
follow these steps:
> [!NOTE]
> **Note:** You cannot enable advanced query insights features on secondary clusters.
> [!NOTE]
> **Note:** To ensure replication stability and disaster recovery readiness, Google recommends that your secondary instance's machine configuration, including vCPU and RAM, matches the primary instance's configuration. While replication typically requires fewer resources than active query processing, a severely undersized secondary instance might lack the resources to keep up with high write volumes on the primary, leading to replication delays. Furthermore, matching the configuration ensures that the secondary cluster has sufficient capacity to handle the production workload if it's promoted. Attempting to scale up a secondary instance during a regional outage carries a risk of resource unavailability, or stockouts, in that region.
By default, AlloyDB creates secondary instances with the same machine config as the primary instance at the time of creation. However, if you scale up the primary instance after creating the secondary, AlloyDB does not automatically scale up the secondary instance; you must scale it up manually.
### Console
1. In the Google Cloud console, go to the **Clusters** page.
[Go to Clusters](https://console.cloud.google.com/alloydb/clusters)
2. In the **Resource name** column, click a cluster.
3. On the **Overview** page, click **Create secondary cluster**.
4. Configure your secondary cluster:
1. In the **Cluster ID** field, enter a resource ID for your secondary cluster.
2. In the **Region** menu, select a region for your secondary cluster that is different from the primary cluster region.
3. Configure encryption for your secondary cluster:
- **If the primary cluster uses Google-managed encryption** : By default, AlloyDB encrypts the secondary cluster by using Google-managed encryption. To encrypt the secondary cluster with a customer-managed encryption key ([CMEK](https://docs.cloud.google.com/alloydb/docs/cmek.md.txt)) instead, click **Advanced
configuration options** , click **Advanced encryption options** , and then select **Cloud KMS key**.
- **If the primary cluster uses CMEK** : You must also encrypt the secondary cluster with CMEK. In the **Encryption** section, **Cloud KMS key** is selected automatically.
4. If you use **Cloud KMS key**, select a key in the same region as the
secondary cluster:
1. Optional: In the **Key management type** menu, select a key management type (the default is **Cloud KMS**).
2. Click **Select a Cloud KMS key** and select a key from the menu.
The Google Cloud console limits this menu to keys within the
current Google Cloud project and selected region. To use a key
that isn't in this list, choose one of the options at the bottom
of the **Select a Cloud KMS key** menu:
- To browse keys from another project, click **Switch project** and select the project.
- To specify a key by its resource name, click **Enter key
manually** . In the **Enter key resource name** dialog, in the **Key resource name** field, enter the key resource name, and then click **Save**.
Using CMEK with AlloyDB requires additional setup.
For more information, see
[Secure data with encryption keys](https://docs.cloud.google.com/alloydb/docs/use-cmek.md.txt).
5. Click **Continue**.
5. Configure your secondary instance. In the **Instance ID** field, enter a
resource ID for your secondary instance. The resource ID must be unique
in a cluster.
> [!NOTE]
> **Note:** If creating a secondary instance fails, delete the secondary cluster and then recreate the secondary cluster and the secondary instance, in that order.
6. Click **Create cluster**.
### gcloud
To use the gcloud CLI, you can
[install and initialize](https://docs.cloud.google.com/sdk/docs/install-sdk.md.txt) the Google Cloud CLI, or you
can use [Cloud Shell](https://docs.cloud.google.com/shell/docs/using-cloud-shell.md.txt).
Use the [`gcloud alloydb clusters create-secondary`](https://docs.cloud.google.com/sdk/gcloud/reference/alloydb/clusters/create-secondary.md.txt)
command.
> [!NOTE]
> **Note:** If creating a secondary instance fails, delete the secondary cluster and then recreate the secondary cluster and the secondary instance, in that order.
```bash
gcloud alloydb clusters create-secondary SECONDARY_CLUSTER_ID \
--region=REGION_ID \
--primary-cluster=projects/PROJECT_ID/locations/LOCATION_ID/clusters/PRIMARY_CLUSTER_ID
gcloud alloydb instances create-secondary SECONDARY_INSTANCE_ID \
--cluster=SECONDARY_CLUSTER_ID \
--region=REGION_ID
```
Replace the following:
- `SECONDARY_CLUSTER_ID`: The ID of the secondary cluster that you want to create and associate the secondary instance with.
- `SECONDARY_INSTANCE_ID`: The ID of the secondary instance that you want to create.
- `REGION_ID`: The ID of the secondary cluster's region---for example, `us-central1`.
- `PROJECT_ID`: The ID of the primary cluster's project.
- `LOCATION_ID`: The location where your primary cluster is located---for example, `us-central1`.
- `PRIMARY_CLUSTER_ID`: The ID of the primary cluster that the secondary cluster is associated with.
To disable creation of automated backups on the secondary cluster, pass the
`--no-enable-automated-backup` flag to the `gcloud alloydb clusters create-secondary`
command.
To create a Private Service Connect-enabled secondary instance,
add the `--allowed-psc-projects` flag to set a comma-separated list of project
IDs or [project numbers](https://docs.cloud.google.com/resource-manager/docs/view-update-projects.md.txt#identifying_projects)
that you want to allow access to the instance---for example,
`my-project-1`, `12345`, and `my-project-n`.
```bash
gcloud alloydb clusters create-secondary SECONDARY_CLUSTER_ID \
--region=REGION_ID \
--primary-cluster=projects/PROJECT_ID/locations/LOCATION_ID/clusters/PRIMARY_CLUSTER_ID
gcloud alloydb instances create-secondary SECONDARY_INSTANCE_ID \
--cluster=SECONDARY_CLUSTER_ID \
--region=REGION_ID \
--allowed-psc-projects=ALLOWED_PSC_PROJECTS
```
Replace the following:
- `ALLOWED_PSC_PROJECTS` (Optional): the comma-separated list of project IDs or project numbers that you want to allow access to the instance---for example, `my-project-1`, `12345`, and `my-project-n`. If your cluster uses Private Service Connect as the method of connecting to the instance, you must set a list of allowed projects or numbers.
To create a secondary instance for a public IP-enabled cluster, add the
`--assign-inbound-public-ip=ASSIGN_IPV4` flag:
```bash
gcloud alloydb instances create-secondary SECONDARY_INSTANCE_ID \
--cluster=SECONDARY_CLUSTER_ID \
--region=REGION_ID \
--assign-inbound-public-ip=ASSIGN_IPV4
```
Optionally, pass a comma-separated list of CIDR blocks, such as
`64.233.160.0/16`, to the `--authorized-external-networks` flag to set
authorized external networks on your instance.
## View a secondary cluster
To view detailed information about an AlloyDB secondary cluster,
follow these steps:
1. In the Google Cloud console, go to the **Clusters** page.
[Go to Clusters](https://console.cloud.google.com/alloydb/clusters)
2. In the **Resource name** column, click a secondary cluster.
3. On the **Overview** page, view details about your secondary cluster.
## Update a secondary instance
You can update a secondary instance to add, modify, or delete database flags. You
can also scale your secondary instance's machine type.
### Configure database flags on a secondary instance
To add, modify, or delete database flags, complete the following steps:
### Console
1. In the Google Cloud console, go to the **Clusters** page.
[Go to Clusters](https://console.cloud.google.com/alloydb/clusters)
2. In the **Resource name** column, click the secondary cluster that you
want to modify.
3. On the **Overview** page, go to the **Instances in your cluster**
section, find the secondary instance, and click **Edit Secondary**.
4. Click **Show advanced options** and then expand **Flags**.
5. Add, modify, or delete a database flag on your instance:
**Add a flag**
1. Click **Add a database flag**.
2. In the **Choose a flag** menu, select a flag.
3. For **Value**, enter or select a value for the flag.
4. Click **Done**.
**Modify a flag**
1. Expand the database flag that you want to modify.
2. In the **Edit database flag** section, update the flag's value.
3. Click **Done**.
**Delete a flag**
- For the database flag that you want to remove, click **Delete**.
6. Click **Update instance**.
### gcloud
Use the [`gcloud alloydb instances update`](https://docs.cloud.google.com/sdk/gcloud/reference/alloydb/instances/update.md.txt)
command to change the database flags for a secondary instance.
> [!CAUTION]
> **Caution:** Running the following command overwrites all database flags that were previously set. Any database flags that aren't explicitly included in the `--database-flags` list are reset to their default values. To retain your instance's database flags while adding new flags, you must include both current and new flags in the `--database-flags` list.
```bash
gcloud alloydb instances update SECONDARY_INSTANCE_ID \
--database-flags FLAGS_LIST \
--region=REGION_ID \
--cluster=CLUSTER_ID \
--project=PROJECT_ID
```
Replace the following:
- `SECONDARY_INSTANCE_ID`: The ID of the secondary instance.
- `FLAGS_LIST`: A comma-separated list of one or more database flag specifications. Each specification consists of the name of the flag, an equals sign (`=`), and the value to assign to the flags. For database flags that don't take values, provide the name of the flag followed by an equals sign (`=`).
- `REGION_ID`: The region where the secondary instance is placed---for example, `us-central1`.
- `CLUSTER_ID`: The ID of the cluster where the secondary instance is placed.
- `PROJECT_ID`: The ID of the project where the secondary cluster is placed.
### Scale your secondary instance's machine type
To scale your secondary instance's machine type, complete the following steps:
### Console
1. In the Google Cloud console, go to the **Clusters** page.
[Go to Clusters](https://console.cloud.google.com/alloydb/clusters)
2. In the **Resource name** column, click the secondary cluster that you
want to modify.
3. On the **Overview** page, go to the **Instances in your cluster** section
and click **Edit Secondary**.
This action isn't available if the cluster **Status** is
**Maintenance** . Wait until **Status** changes to **Ready**.
4. In the **Machine** section, optionally select a series in the **Machine
Series** menu, and then select a configuration in the **Machine Type**
menu.
5. Click **Update instance**.
### gcloud
Use the
[`gcloud alloydb instances update`](https://docs.cloud.google.com/sdk/gcloud/reference/alloydb/instances/update.md.txt)
command to change the machine type of the secondary instance:
```bash
gcloud alloydb instances update SECONDARY_INSTANCE_ID \
--cpu-count=CPU_COUNT \
--region=REGION_ID \
--cluster=CLUSTER_ID \
--project=PROJECT_ID
```
Replace the following:
- `SECONDARY_INSTANCE_ID`: the ID of the secondary instance that you're updating.
- `CPU_COUNT`: the number of vCPUs that you want for the instance. Valid values include the following:
- `2` (2 vCPUs, 16 GB RAM)
- `4` (4 vCPUs, 32 GB RAM)
- `8` (8 vCPUs, 64 GB RAM)
- `16` (16 vCPUs, 128 GB RAM)
- `32` (32 vCPUs, 256 GB RAM)
- `64` (64 vCPUs, 512 GB RAM)
- `96` (96 vCPUs, 768 GB RAM)
- `128` (128 vCPUs, 864 GB RAM)
- `REGION_ID`: the region where the instance is placed.
- `CLUSTER_ID`: the ID of the cluster where the instance is placed.
- `PROJECT_ID`: the ID of the project where the cluster is placed.
If the command returns an error message that includes the phrase
`invalid cluster state MAINTENANCE`, then the cluster is undergoing routine
maintenance. Maintenance temporarily prevents instance reconfiguration. Run
the command again after the cluster returns to a `READY` state.
To check the cluster's status, see
[View cluster details](https://docs.cloud.google.com/alloydb/docs/cluster-view.md.txt).
## Add read pool instances to a secondary cluster
To add a read pool instance to a secondary cluster, follow these steps:
1. In the Google Cloud console, go to the **Clusters** page.
[Go to Clusters](https://console.cloud.google.com/alloydb/clusters)
2. In the **Resource name** column, click the secondary cluster to which you
want to add a read pool instance.
3. On the **Overview** page, go to the **Instances in your cluster** section
and click **Add read pool**.
4. Configure your read pool instance:
1. In the **Read pool instance ID** field, enter an ID for the read pool instance.
2. In the **Scaling mode** section, keep **Manual** selected and enter a
node count in the **Node count** field (or select **Autoscaling** to
configure **Minimum** and **Maximum** node counts).
The number of nodes in a read pool instance determines the instance's
overall computing capacity. You can have a maximum of 20 nodes across
all the read pool instances in a cluster.
3. In the **Machine** section, optionally select a series in the **Machine
Series** menu, and then select a configuration in the **Machine Type**
menu.
4. Optional: To set custom flags on your instance, click **Show advanced
options** , expand **Flags**, and do the following for each flag:
1. Click **Add a database flag**.
2. In the **Choose a flag** menu, select a flag.
3. For **Value**, enter or select a value for the flag.
4. Click **Done**.
5. Click **Create read pool**.
## Advanced disaster recovery
For advanced disaster recovery scenarios, AlloyDB supports switchover and cross-region failover:
### Perform a switchover
Switchover lets you reverse the roles of your primary and secondary clusters with zero data loss. Use this operation for planned migrations, routine maintenance, or disaster recovery drills. When you complete the switchover, the direction of replication is reversed.
> [!CAUTION]
> **Caution:** Do not perform a switchover while active write workloads are running on the primary cluster. Stop all write traffic to the primary cluster and [verify that replication lag is minimal](https://docs.cloud.google.com/alloydb/docs/cross-region-replication/work-with-cross-region-replication.md.txt#verify-replication-status) before initiating a switchover. Performing a switchover under heavy write load can cause the operation to time out or fail while waiting for in-flight transactions to replicate.
If you perform a switchover when you have multiple secondary clusters,
the following changes occur:
- The secondary cluster that receives the switchover command becomes a primary cluster.
- The previous primary cluster becomes a secondary cluster, replicating from the new primary cluster.
- All other secondary clusters switch to replicating from the new primary cluster.
The following diagram illustrates a switchover from `cluster-1` in `us-central1`
to `cluster-2` in `us-east4`:

**Figure 2.** Example of performing a switchover to one of two secondary clusters.
Before you perform a switchover, verify that all regions that the primary and
the secondary instances belong to are online and that the instances are in a
healthy state. For more information, see [Monitor an instance using the AlloyDB
System insights dashboard](https://docs.cloud.google.com/alloydb/docs/monitor-instance#monitoring).
> [!NOTE]
> **Note:** Verifying replication status before switchover, which helps the operation complete quickly, is an optional step. For more information, see [Verify replication status](https://docs.cloud.google.com/alloydb/docs/cross-region-replication/work-with-cross-region-replication.md.txt#verify-replication-status).
To perform a switchover, follow these steps:
### Console
1. In the Google Cloud console, go to the **Clusters** page.
[Go to Clusters](https://console.cloud.google.com/alloydb/clusters)
2. In the **Resource name** column, click the secondary cluster that you
want to switch over.
3. On the **Overview** page, click **Switchover**.
4. In the **Switchover cluster?** dialog, in the **Cluster ID** field, enter
your associated primary cluster ID to confirm that you want to switch
over the cluster.
5. Click **Switchover**.
After the switchover completes, the **Cluster type** field on the
**Overview** page updates to **Primary cluster** for the switched-over
cluster and **Secondary cluster** for the former primary cluster.
### gcloud
Use the
[`gcloud alloydb clusters switchover`](https://docs.cloud.google.com/sdk/gcloud/reference/alloydb/clusters/switchover.md.txt)
command:
```bash
gcloud alloydb clusters switchover SECONDARY_CLUSTER_ID \
--region=REGION_ID \
--project=PROJECT_ID
```
Replace the following:
- `SECONDARY_CLUSTER_ID`: the ID of the secondary cluster that you want to switch over.
- `REGION_ID`: the ID of the secondary cluster's region---for example, `us-central1`.
- `PROJECT_ID`: the ID of the secondary cluster's project.
> [!NOTE]
> **Note:** To continue using advanced query insights after you perform a switchover, you must re-enable advanced query insights on the new primary cluster.
#### Optional: Verify replication status
To help the switchover complete with minimal delay and zero data loss, confirm
that the secondary cluster has applied all transactions received from the
primary cluster:
1. Stop all writes to the primary cluster.
2. Check the replication status of the secondary cluster:
1. In the Google Cloud console, go to the **Clusters** page.
[Go to Clusters](https://console.cloud.google.com/alloydb/clusters)
2. In the **Resource name** column, click the secondary cluster that you
want to switch over.
3. In the AlloyDB navigation menu, click **System insights**.
4. In the **Instance** menu, select
**Secondary: SECONDARY_INSTANCE_ID** , where
`SECONDARY_INSTANCE_ID` is the ID of your secondary
instance.
5. Locate the **Replication lag from primary instance** chart and confirm
that the chart shows minimal lag.
A lag value of `0` is optimal. If the lag is greater than `0`, the
switchover operation might take longer to complete while it applies
remaining transactions.
6. Locate the **Replication status** chart and confirm that all nodes
represented in the chart are in the `streaming` state.
### Promote a secondary cluster
Promoting a secondary cluster makes it a standalone primary cluster with full
read and write capabilities. Use this operation primarily for disaster recovery
when the region hosting your primary cluster becomes unavailable.
By default, promotion makes the secondary cluster a standalone primary. However,
you can optionally enable cross-region failover
([Preview](https://docs.cloud.google.com/products#product-launch-stages)) to automate the recreation of the
original primary. Cross-region failover is supported only for topologies with a
single primary cluster and a single secondary cluster.
> [!NOTE]
> **Note:** If you're performing a planned migration or a disaster recovery scenario and you want to reverse the roles of your clusters with zero data loss, use [switchover](https://docs.cloud.google.com/alloydb/docs/cross-region-replication/work-with-cross-region-replication.md.txt#switchover-secondary) instead.
To promote a secondary cluster to a primary cluster or to optionally add
failover orchestration, follow these steps:
### Console
1. In the Google Cloud console, go to the **Clusters** page.
[Go to Clusters](https://console.cloud.google.com/alloydb/clusters)
2. In the **Resource name** column, click the secondary cluster that you
want to promote.
3. On the **Overview** page, choose whether to perform a standalone
promotion or a promotion with failover orchestration:
- **Promote to a standalone primary cluster** :
1. Click **Promote**.
2. In the dialog that appears, in the **Cluster ID** field, enter your secondary cluster ID, and then click **Promote**.
- **Promote with failover orchestration** ([Preview](https://docs.cloud.google.com/products#product-launch-stages)):
1. Click **Failover**.
2. In the dialog that appears, in the **Cluster ID** field, enter your secondary cluster ID, and then click **Trigger Failover**.
After the promotion completes, the **Cluster type** field on the
**Overview** page updates from **Secondary cluster** to **Primary
cluster** . If you selected **Failover** , AlloyDB
recreates the original primary cluster in the background when its region
becomes available; during this process, its **Status** displays
**Recreating** , and its **Cluster type** updates to **Secondary
cluster** when recreation finishes.
### gcloud
To promote a secondary cluster to a standalone primary cluster, use the
[`gcloud alloydb clusters promote`](https://docs.cloud.google.com/sdk/gcloud/reference/alloydb/clusters/promote.md.txt)
command:
```bash
gcloud alloydb clusters promote SECONDARY_CLUSTER_ID \
--region=REGION_ID \
--project=PROJECT_ID
```
To perform a promotion with failover orchestration
([Preview](https://docs.cloud.google.com/products#product-launch-stages)), add the optional `--failover`
flag. This flag automatically recreates the original primary as a secondary
and updates associated endpoints to route traffic to the new primary
cluster.
> [!NOTE]
> **Note:** The command completes when the secondary cluster is promoted to primary. The recreation of the original primary cluster occurs in the background when the primary region becomes available. During this background process, the state of the original primary cluster appears as `RECREATING`.
```bash
gcloud beta alloydb clusters promote SECONDARY_CLUSTER_ID \
--region=REGION_ID \
--project=PROJECT_ID \
--failover
```
Replace the following:
- `SECONDARY_CLUSTER_ID`: the ID of the secondary cluster that you want to promote.
- `REGION_ID`: the ID of the secondary cluster's region---for example, `us-central1`.
- `PROJECT_ID`: the ID of the secondary cluster's project.
#### Use write endpoints to avoid split-brain
> [!NOTE]
> **Note:** When you initiate a cross-region failover, there might be a short period during which both the original primary and the new primary clusters are available and accept writes. This is known as a split-brain scenario. If clients remain connected to the original primary, they might continue to perform writes that will eventually be lost when the original primary is recreated as a secondary.
To further simplify your disaster recovery workflow during a cross-region
failover, Google recommends that you [manage database connections with write
endpoints](https://docs.cloud.google.com/alloydb/docs/manage-write-endpoints) to connect to your cluster.
When you perform a cross-region failover, AlloyDB automatically
updates the DNS record of your write endpoint to point to the new primary
cluster. This makes sure that new write traffic is directed away from the original
primary and toward the new one.
Before using write endpoints during a cross-region failover, consider the following:
- Immediate DNS update: the DNS record for the write endpoint is updated immediately upon promotion.
- Delayed metadata update: the write endpoint's metadata might still show the address of the original primary until the original primary cluster region recovers.
#### Data recovery during cross-region failover
When you perform a cross-region failover, AlloyDB automatically
takes a backup of the original primary cluster before re-creating it as a
secondary cluster. A split-brain scenario occurs when both the original primary
and the new primary clusters accept writes simultaneously. To prevent
such scenarios, writes to the original primary are stopped before this
backup is taken. Use this backup to recover transactions that didn't replicate
to the secondary cluster due to lag during failover.
This backup is created automatically as part of the failover orchestration and
is distinct from your regularly scheduled automated backups and on-demand
backups. You can use it to create a new, temporary cluster and manually
reconcile any missing data.
This backup captures writes that the original primary accepted before it stopped, but it doesn't automatically merge the writes into the new primary cluster.
## What's next
- [View cluster details](https://docs.cloud.google.com/alloydb/docs/cluster-view.md.txt).
- [View the list of clusters](https://docs.cloud.google.com/alloydb/docs/cluster-list.md.txt).