To evaluate AlloyDB for PostgreSQL features, performance, and generative AI
integrations for up to 30 days without a financial commitment, you can create
and connect to an AlloyDB free trial cluster.
For more information about AlloyDB
free trial clusters, see [AlloyDB
free trial clusters overview](https://docs.cloud.google.com/alloydb/docs/free-trial-cluster).
## Before you begin
You are not charged for free trial clusters and instance resources,
but you are charged for data transfer costs for connections outside the region,
through the public internet, and for taking and storing your final backup. For
more information, see [Trial inclusions and
conditions](https://docs.cloud.google.com/alloydb/docs/free-trial-cluster#trial-inclusion-conditions).
## Create a free trial cluster
### Console
When you create a free trial cluster, a primary instance is automatically created.
1. In the Google Cloud console, go to the **Get started** page, or go to the
**Clusters** page if your Google Cloud project doesn't have any
existing clusters.
[Go to Clusters](https://console.cloud.google.com/alloydb/clusters)
2. Click **Start a free trial**.
3. In the **Cluster ID** field of the **Basic info** section, enter a name
for the cluster---for example, `my-trial-cluster`.
4. In the **Password** field, enter a password you'd like. This password is
used to connect to the default database.
5. In the **Region** field of the **Location** section, select a
region---for example, `us-central1 (Iowa)`.
6. In the **Database version** field, keep the default value.
7. Under **Networking** , select `default`.
If you have not set up private services access yet, a dialog labeled
**Private service access connection required** appears.
In the **Private service access connection required** dialog, to create
private services access connection, complete the following:
1. Click **Set up connection**.
A new pane labeled **Enable Service Networking API** appears.
2. In the pane, select **Use an automatically allocated IP range**.
3. Click **Continue**.
4. Click **Create connection**, and wait for the connection
configuration to finish.
The **Enable Service Networking API** pane is removed.
8. Click **Start a free trial**.
After you create the free trial cluster, you are redirected to
the **Overview** page. You can view your primary instance in the **Instances
in your cluster** section, and other information about your cluster, such as
days left on trial.
> [!NOTE]
> **Note:** If a primary instance doesn't get created when you create a free trial cluster, then don't delete the cluster, and try [creating a primary instance](https://docs.cloud.google.com/alloydb/docs/instance-primary-create.md.txt#procedure) manually.
### gcloud
To use the gcloud CLI, you can
[install and initialize](https://docs.cloud.google.com/sdk/docs/install-sdk.md.txt) the Google Cloud CLI, or you
can use [Cloud Shell](https://docs.cloud.google.com/shell/docs/using-cloud-shell.md.txt).
To create an AlloyDB cluster using private services access,
you must [enable private services access](https://docs.cloud.google.com/alloydb/docs/configure-connectivity.md.txt).
Use the [`gcloud alloydb clusters
create`](https://docs.cloud.google.com/sdk/gcloud/reference/alloydb/clusters/create) and [`gcloud alloydb
instances create`](https://docs.cloud.google.com/sdk/gcloud/reference/alloydb/instances/create) command
to create a cluster and primary instance respectively.
```bash
gcloud alloydb clusters create CLUSTER_ID \
--password=PASSWORD \
--region=REGION_ID \
--subscription-type=TRIAL
gcloud alloydb instances create INSTANCE_ID \
--instance-type=PRIMARY \
--cpu-count=8 \
--region=REGION_ID \
--cluster=CLUSTER_ID \
```
Replace the following:
- `CLUSTER_ID`: the ID of the cluster
that you are creating. It must begin with a lowercase letter and
can contain lowercase letters, numbers, and hyphens.
- `PASSWORD`: the password to use for
the default `postgres` user.
- `REGION_ID`: the region where you want
the cluster placed.
- `CLUSTER_ID`: The ID of the
free trial cluster where you want the instance placed.
## Add a read pool instance
You can add a single read pool instance of 8 vCPU compute capacity in a free trial cluster.
1. In the Google Cloud console, go to the **Clusters** page.
[Go to Clusters](https://console.cloud.google.com/alloydb/clusters)
2. Click the free trial cluster in the **Resource Name** column.
3. Go to the **Instances in your cluster** section, and click **Add read pool**.
4. Configure your read pool instance:
1. In the **Read pool instance ID** field, enter an ID for the read
pool instance.
2. In the **Node count** field, the node count value is auto-set to `1` for
a pool instance in a free trial cluster. This value cannot
be changed.
3. Click **Create read pool**.
## Optional: Import your SQL file
> [!WARNING]
>
> **Preview**
>
>
> This feature is
>
> subject to the "Pre-GA Offerings Terms" in the General Service Terms section of the
> [Service Specific
> Terms](https://docs.cloud.google.com/terms/service-terms#1).
>
> Pre-GA features are available "as is" and might have limited support.
>
> For more information, see the
> [launch stage descriptions](https://cloud.google.com/products/#product-launch-stages).
You can import your SQL file that contains a logical backup of a PostgreSQL
database to the free trial cluster.
Before you begin, do the following:
- Upload your SQL file to a Cloud Storage bucket. For more
information, see [Import a SQL file](https://docs.cloud.google.com/alloydb/docs/import-sql-file.md.txt).
- Grant the [AlloyDB service account permissions to the Cloud Storage
bucket](https://docs.cloud.google.com/storage/docs/access-control/using-iam-permissions#bucket-add) for
the import operation.
The format of the service account is as follows:
service-PROJECT_NUMBER@gcp-sa-alloydb.iam.gserviceaccount.com
Replace `PROJECT_NUMBER` with your project number---for example, `212340152241`.
- Ensure that the service account is granted the Storage Object Viewer (`roles/storage.objectViewer`) role.
- Ensure that you are granted the AlloyDB Admin (`roles/alloydb.admin`) role. For custom roles, add the
`alloydb.clusters.import` permission to the role.
- (Optional). If you don't want
to use the default database, [connect to your instance and create a
database](https://docs.cloud.google.com/alloydb/docs/database-create).
To import your SQL file into an AlloyDB database, complete the
following steps:
1. Go to the **Clusters** page.
[Go to Clusters](https://console.cloud.google.com/alloydb/clusters)
2. Click the free trial cluster in the **Resource Name** column.
3. In the **Overview** page, expand the **Get the most out of your free
cluster** menu.
4. Click the **Import data into AlloyDB** step, and then
click **Import Data**.
5. In the **Choose the file you'd like to import data from** section, enter the
path to the bucket and SQL file to use for the import, or browse to an
existing file.
The SQL file is a file with a sequence of SQL commands, like the
output of the `pg_dump` utility.
6. In the **Destination** section, select the database you want the data to be imported into.
7. Select a database user in the **User** list.
8. In the **Password** field, enter the password set for your database.
> [!NOTE]
> **Note:** If you want to use the default database, then select the `postgres` user and enter the password you set when the free trial cluster was created.
9. Click **Import** to start the import.
## Upgrade a free trial cluster
You can upgrade your free trial cluster anytime during your 30-day
free trial period.
1. In the Google Cloud console, go to the **Clusters** page.
[Go to Clusters](https://console.cloud.google.com/alloydb/clusters)
1. Click the free trial cluster you created earlier in the
**Resource Name** column.
2. In the **Overview** page, click **Upgrade now** in the **Days left on
trial** field.
3. In the **Machine type** field of the **Machine** section, select the
machine type you want to upgrade to.
4. To start the upgrade, click **Upgrade now**.
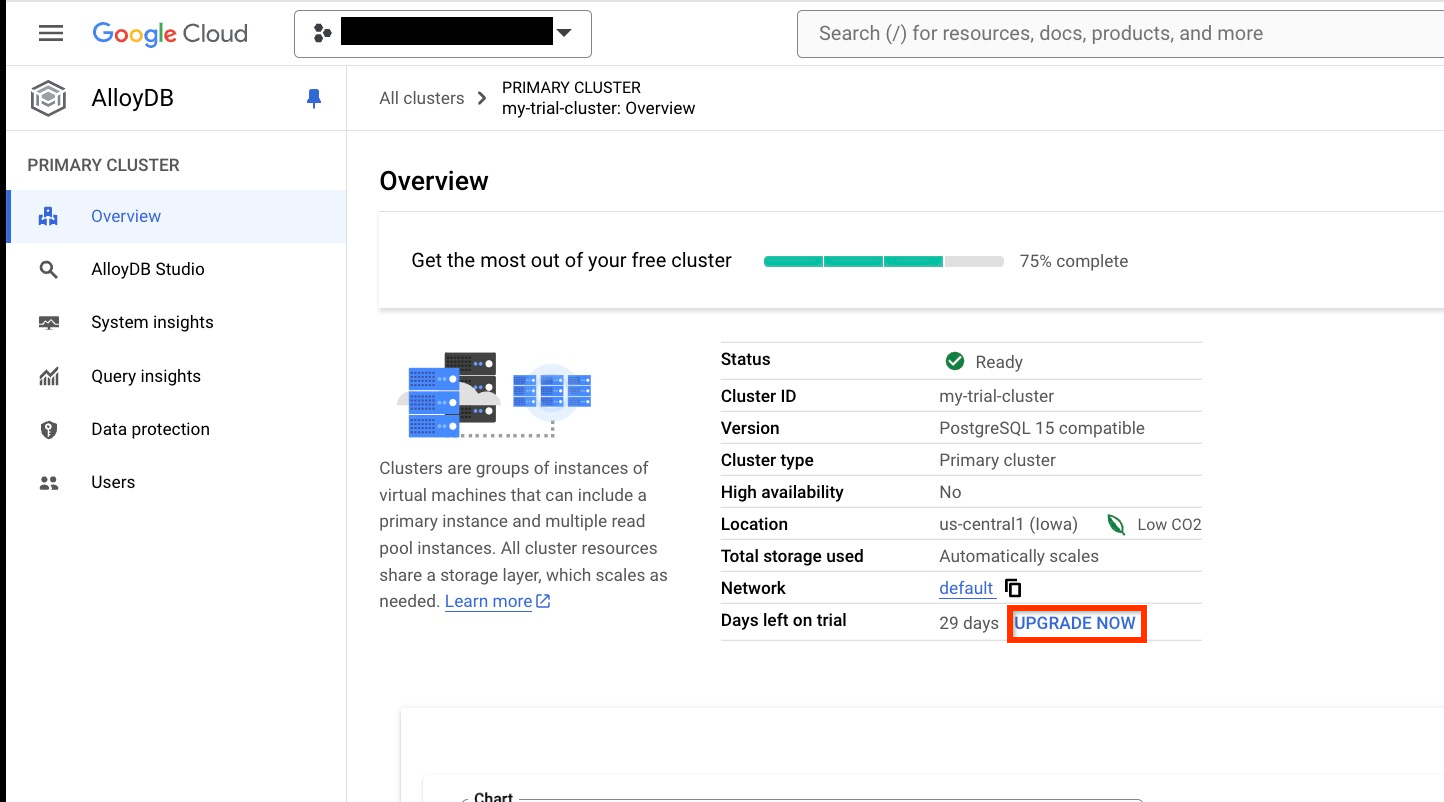
After the upgrade completes, the **Overview** page no longer shows the days left
on trial information, and any
[limitations](https://docs.cloud.google.com/alloydb/docs/free-trial-cluster.md.txt#trial-inclusion) that apply to
the free trial cluster are removed.
## What's next
- Learn about [creating and connecting to a database](https://docs.cloud.google.com/alloydb/docs/quickstart/create-and-connect.md.txt).
- Use [columnar engine to accelerate your analytical queries](https://docs.cloud.google.com/alloydb/docs/columnar-engine/about.md.txt).
- [Import your DMP file into an AlloyDB database](https://docs.cloud.google.com/alloydb/docs/import-dmp-file.md.txt).